Setup & Configuration Guide
Zenople AR Agent
Step-by-step instructions for configuring the AI-powered AR collections agent — from email profile setup through company, office, and customer-level policies.
Configuration Hierarchy
Settings inherit downward. Lower levels override higher levels. Leave a field empty to inherit from the parent.
Customer
Override per individual customer
Office
Override per branch / location
Company
Default policy for all offices & customers
Prerequisites
Required Before You Begin:
|
Note: The email account and phone number are configured at the company level. If you are setting up for multiple companies, each company can have its own outbound email and phone number.
Email Profile Setup
Connect your Gmail or Microsoft email account for AR Agent inbound & outbound communication.
Before configuring AR Agent policies, you need to set up an email profile that the agent will use to send collection emails and receive customer replies.
Step 1: Open the Email Module
Click the Shortcut icon in the top toolbar, then select Email from the shortcut menu.
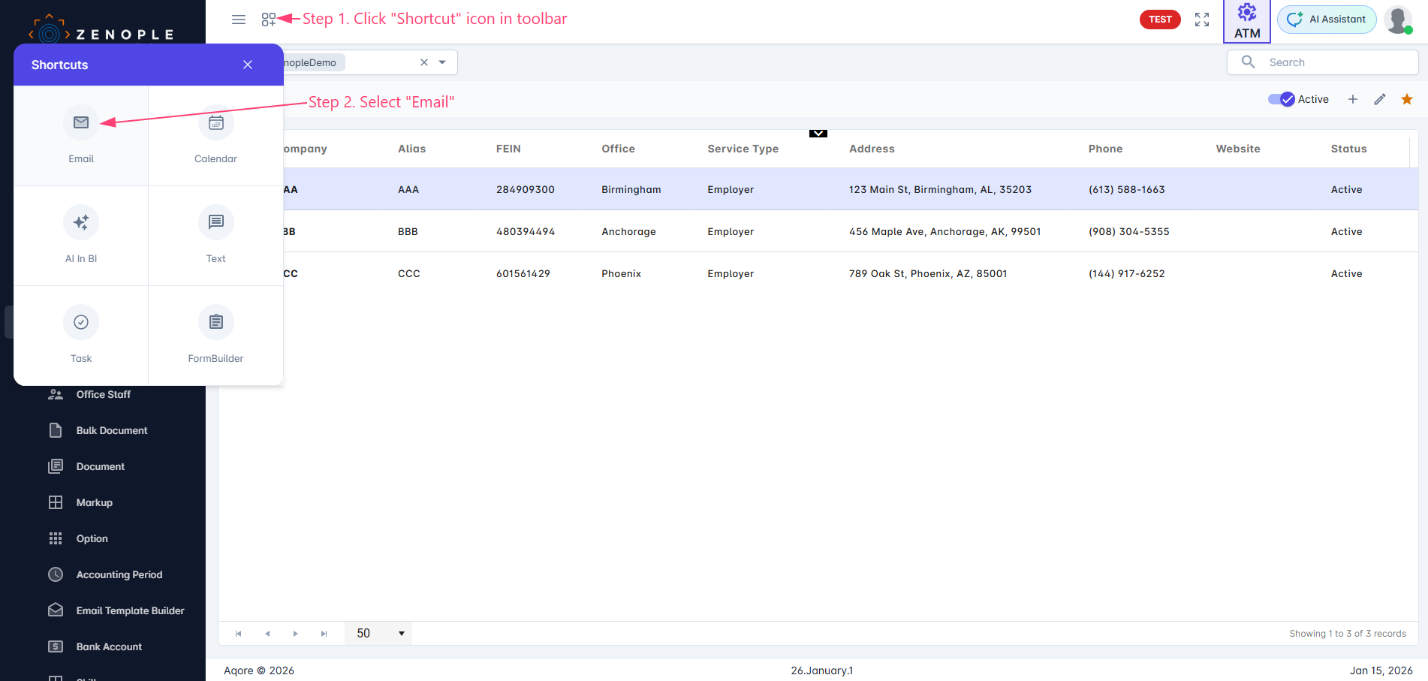
Click the Shortcut icon in the toolbar, then select "Email" to open the Email module.
Step 2: Create a New Email Profile
In the Email board, click the menu icon (⋮) at the top, then select New Email Profile.
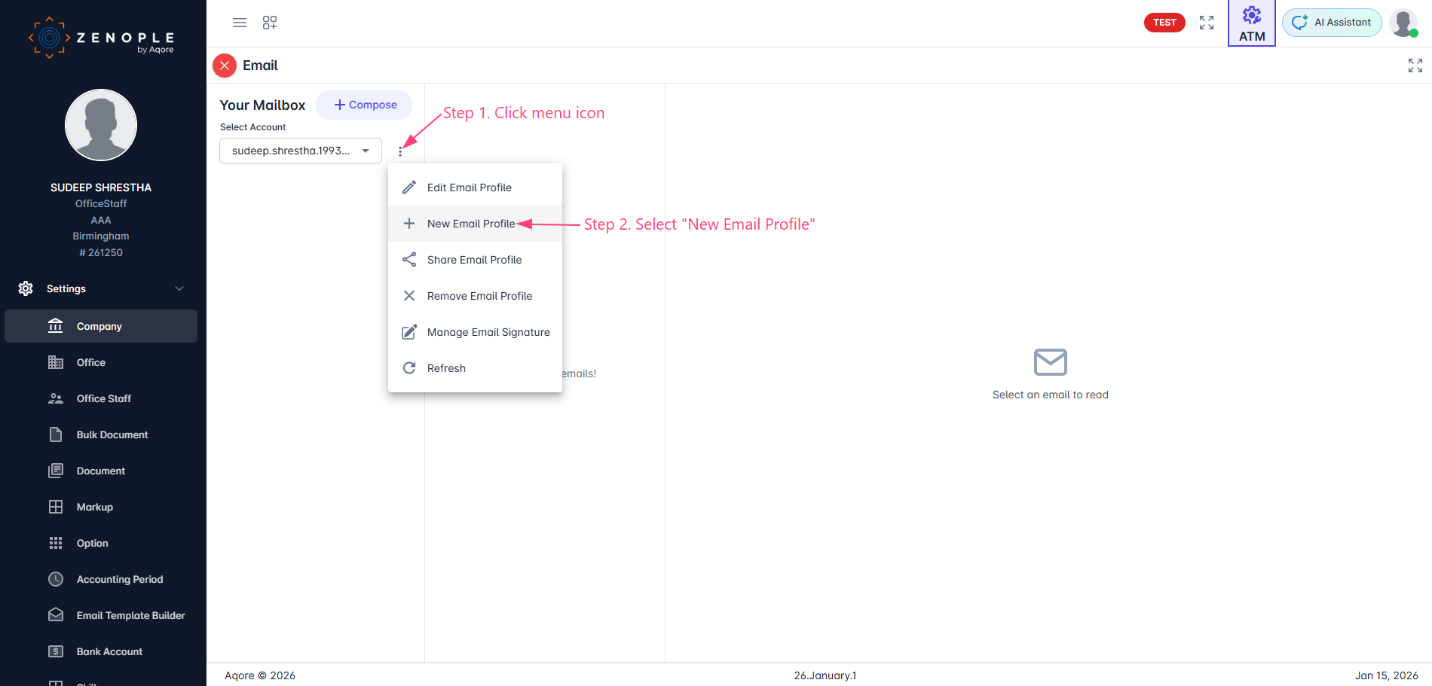
Click the menu icon (⋮) and select "New Email Profile" to begin setup.
Step 3: Authenticate Your Email Account
The Add Email Profile dialog offers two authentication paths:
Gmail: Click "Use OAuth verification" to authenticate via Google's standard OAuth flow.
Microsoft (Outlook / Office 365): Scroll to the "AR Agent Microsoft Graph Setup" section and click "Connect with Microsoft".
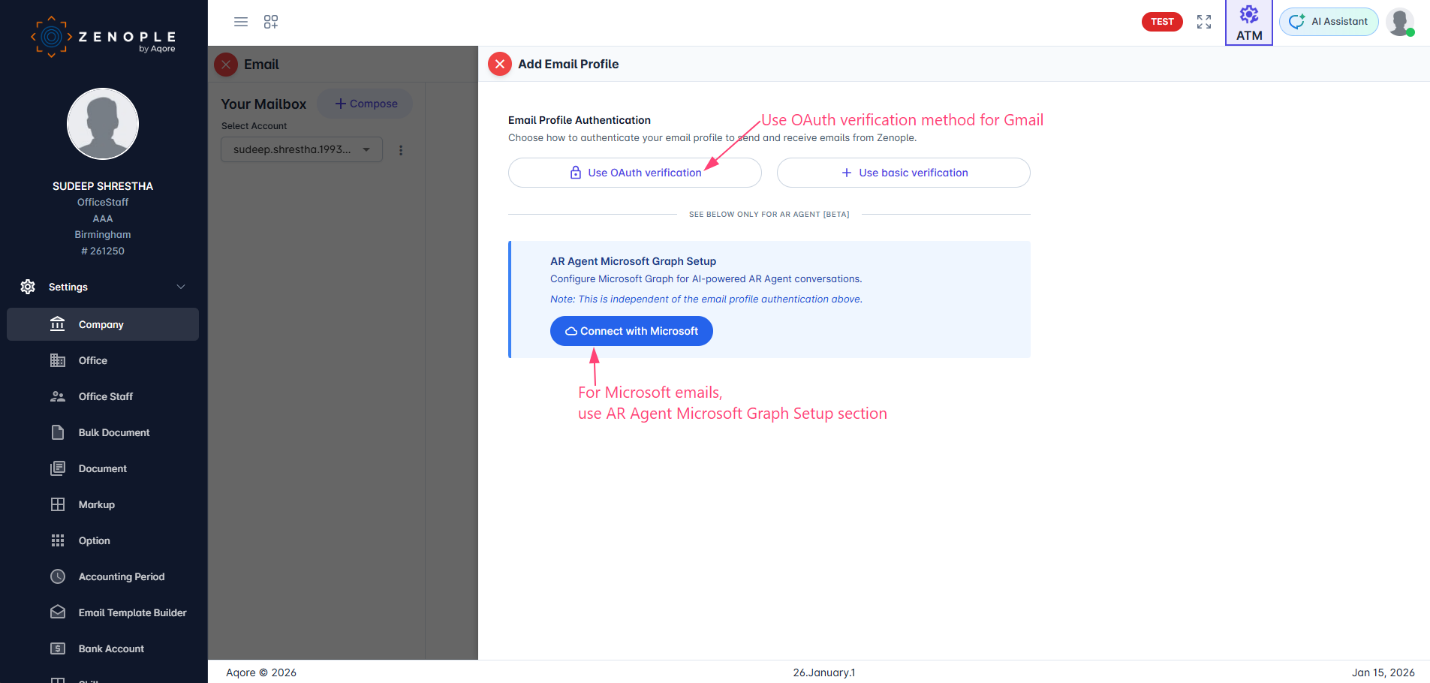
Gmail uses OAuth verification (top). Microsoft uses the "AR Agent Microsoft Graph Setup" section with the "Connect with Microsoft" button.
Important: The Microsoft Graph setup at the bottom of the dialog is independent of the email profile authentication above it. |
Step 4: Complete Microsoft Authentication
After clicking "Connect with Microsoft," the standard Microsoft "Pick an account" dialog appears. Select the email account you want the AR Agent to use for outbound collection emails.
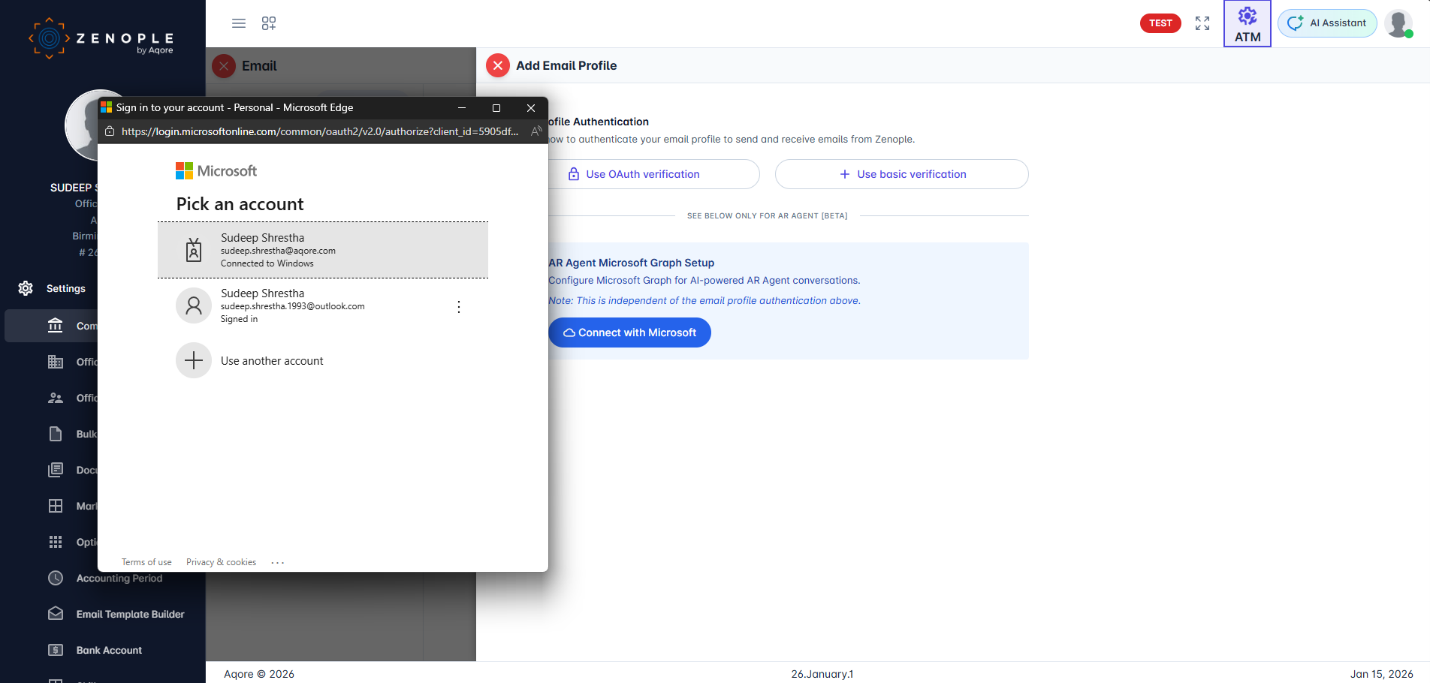
Microsoft's standard "Pick an account" dialog. Select the account for AR Agent email communications.
Tip: If you are already logged into multiple Microsoft accounts, use an Incognito/Private browser window to ensure you authenticate with the correct account. |
Company-Level AR Agent Policy
Set the default collection policy that applies to all offices and customers under this company.
Company-level settings serve as the baseline. Office and customer levels can override specific values, but any field left empty at a lower level will inherit from here.
Step 1: Navigate to the Company
Switch to ATM mode. In the left navigation, click Company, then open the detail view for the desired company.
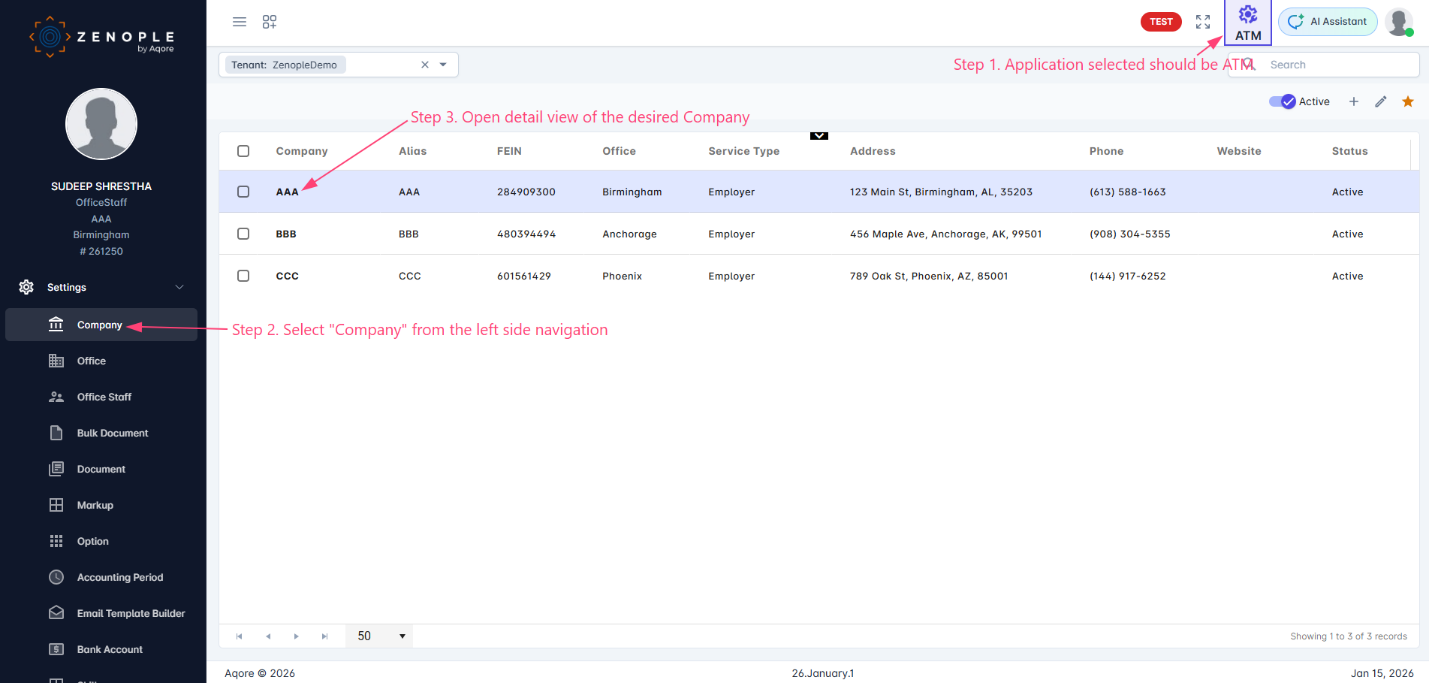
ATM mode → Company navigation → Select the company to configure (e.g., AAA).
Step 2: Open AR Agent Policy
In the company detail view, hover over the navigation toggle at the bottom of the page. Hover over AI Agents, then click AR Agent Policy.
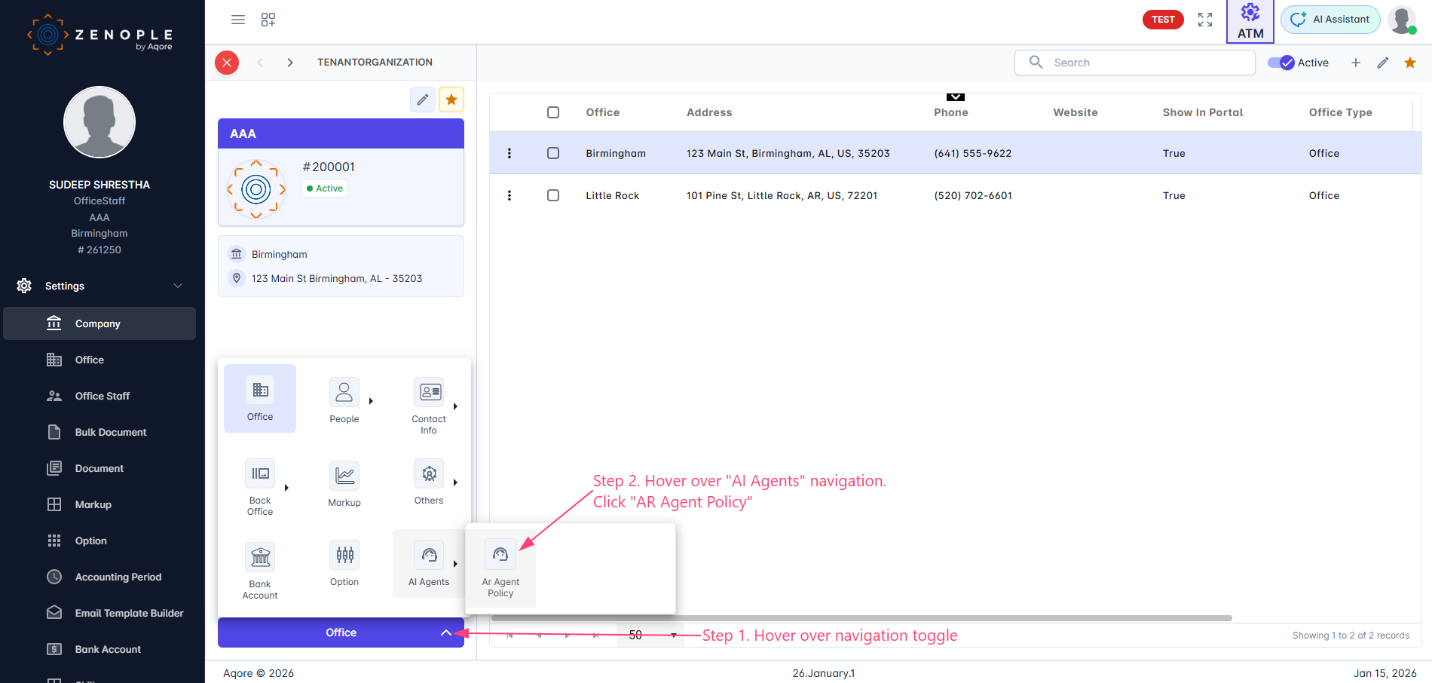
Hover over the navigation toggle → AI Agents → AR Agent Policy.
Step 3: Review Current Settings (Read-Only View)
The AR Agent Configuration page opens in read-only mode, showing all current settings. Click the Edit icon (pencil) to modify.
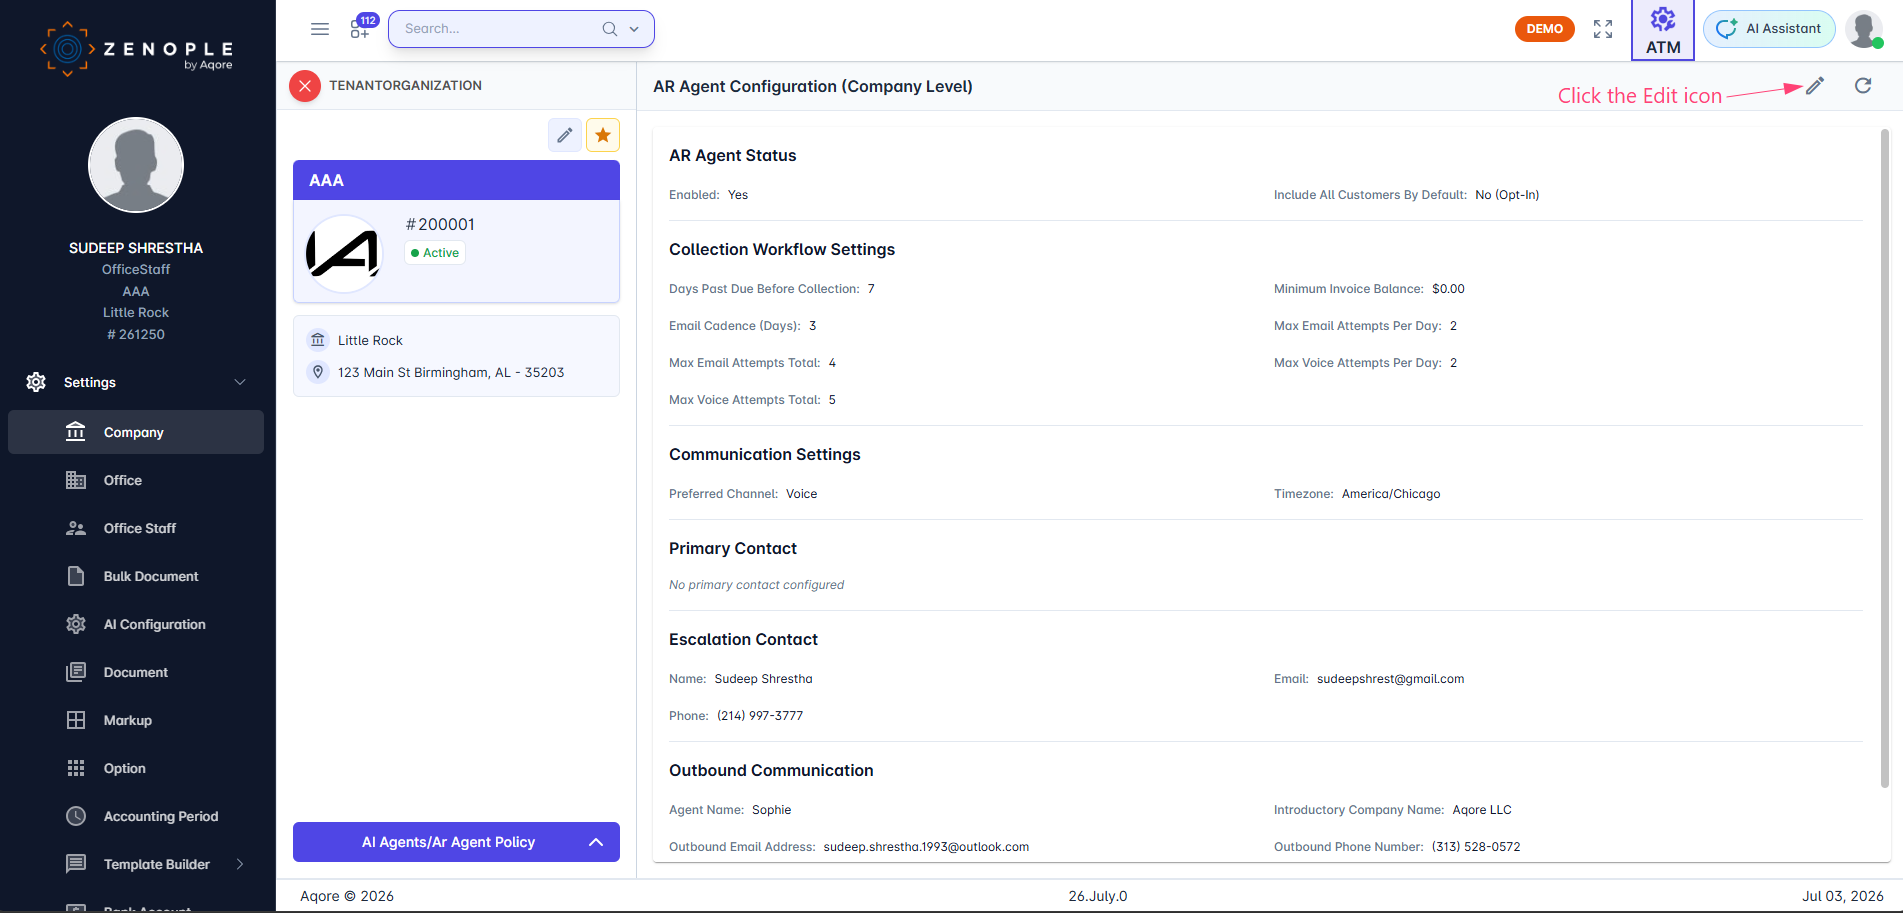
Company-level AR Agent Configuration in read-only mode. Click the Edit icon (pencil) to enter edit mode.
Step 4: Configure Settings (Edit Mode)
In edit mode, configure the following sections:
AR Agent Status
Enable AR Agent | Master switch. When enabled, the AI agent will automatically contact customers about overdue invoices. |
Include All Customers By Default (Opt-Out) | If enabled, all customers are included unless explicitly opted out. If disabled (Opt-In), customers must be individually enabled at the customer level. |
Collection Workflow Settings
Wait period (in days) after invoice due date before the agent initiates first contact. | |
Minimum Invoice Balance ($) * | Skip invoices below this dollar amount. Prevents the agent from contacting customers for trivial balances. |
[DEPRECATED] Max Attempts Per Day * | Maximum number of contact attempts the agent can make to a single customer per day. |
[DEPRECATED] Max Attempts Total * | Total lifetime contact attempts before the agent stops and places the customer on hold (Max Attempts Reached). |
Max Emails Per Day * | Maximum email attempts to a single customer in one day |
Max Emails Total * | Total email attempts before MaxAttemptsReached hold |
Max Voice Calls Per Day * | Maximum voice call attempts in one day |
Max Voice Calls Total * | Total voice attempts before MaxAttemptsReached hold |
Communication Settings
Primary method for contacting customers — Email Only, Voice Only, Email Then Voice, etc. | |
Timezone * | Used to calculate quiet hours and determine when the agent can contact customers. |
Quiet Hours
Weekday Quiet Hours Start | No-contact window for Monday–Friday (e.g., 6:00 PM – 8:00 AM) |
Weekday Quiet Hours End | No-contact window for Monday–Friday (e.g., 6:00 PM – 8:00 AM) |
Weekend Quiet Hours Start | No-contact window for Saturday–Sunday (e.g., 12:00 AM – 11:59 PM to block all weekend contact) |
Weekend Quite Hours End | No-contact window for Saturday–Sunday (e.g., 12:00 AM – 11:59 PM to block all weekend contact) |
Leave the weekend fields empty to apply the same window as weekdays. All times are evaluated in the Timezone configured in the same section.
The Agent Availability section has corresponding weekday and weekend time inputs for your Internal AR Staff's working hours.
Outbound Communication
Agent Name | The name of the AR Agent |
Introductory Company Name | Company nickname (e.g., “Happy’s” rather than Happy’s Staffing Agency |
Outbound Email Address | The email address used to send collection emails and receive customer replies. Must be set up as an email profile in Zenople (see Section 2). |
Outbound Phone Number | The Plivo phone number used for outbound voice calls. Provisioned by Zenople during onboarding. |
Incoming Call Forward To | The phone number to forward incoming calls to if a person calls back the Agent phone number |
The Outbound Email Address and Outbound Phone Number are set at the company level as the default for all offices and customers. Individual offices can override these values if they use a different email account or Plivo number for outbound communications.
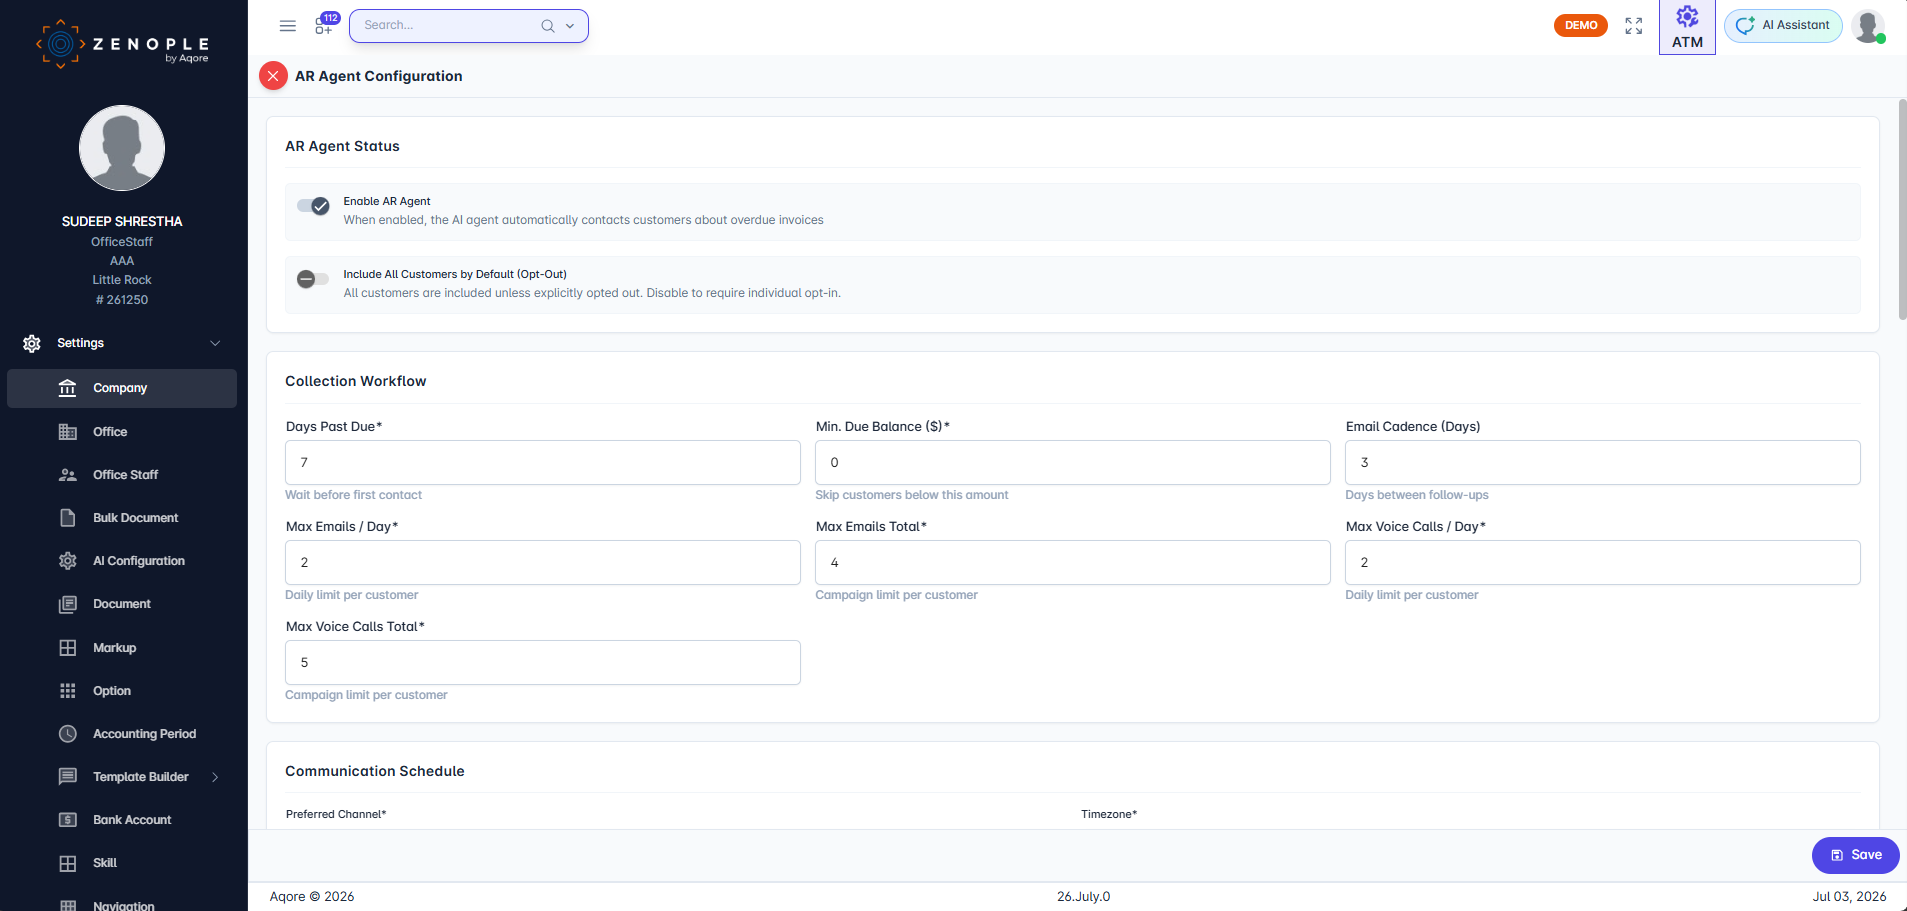
Edit mode (top): AR Agent Status, Collection Workflow, Communication Settings, Quiet Hours, and Outbound Communication.
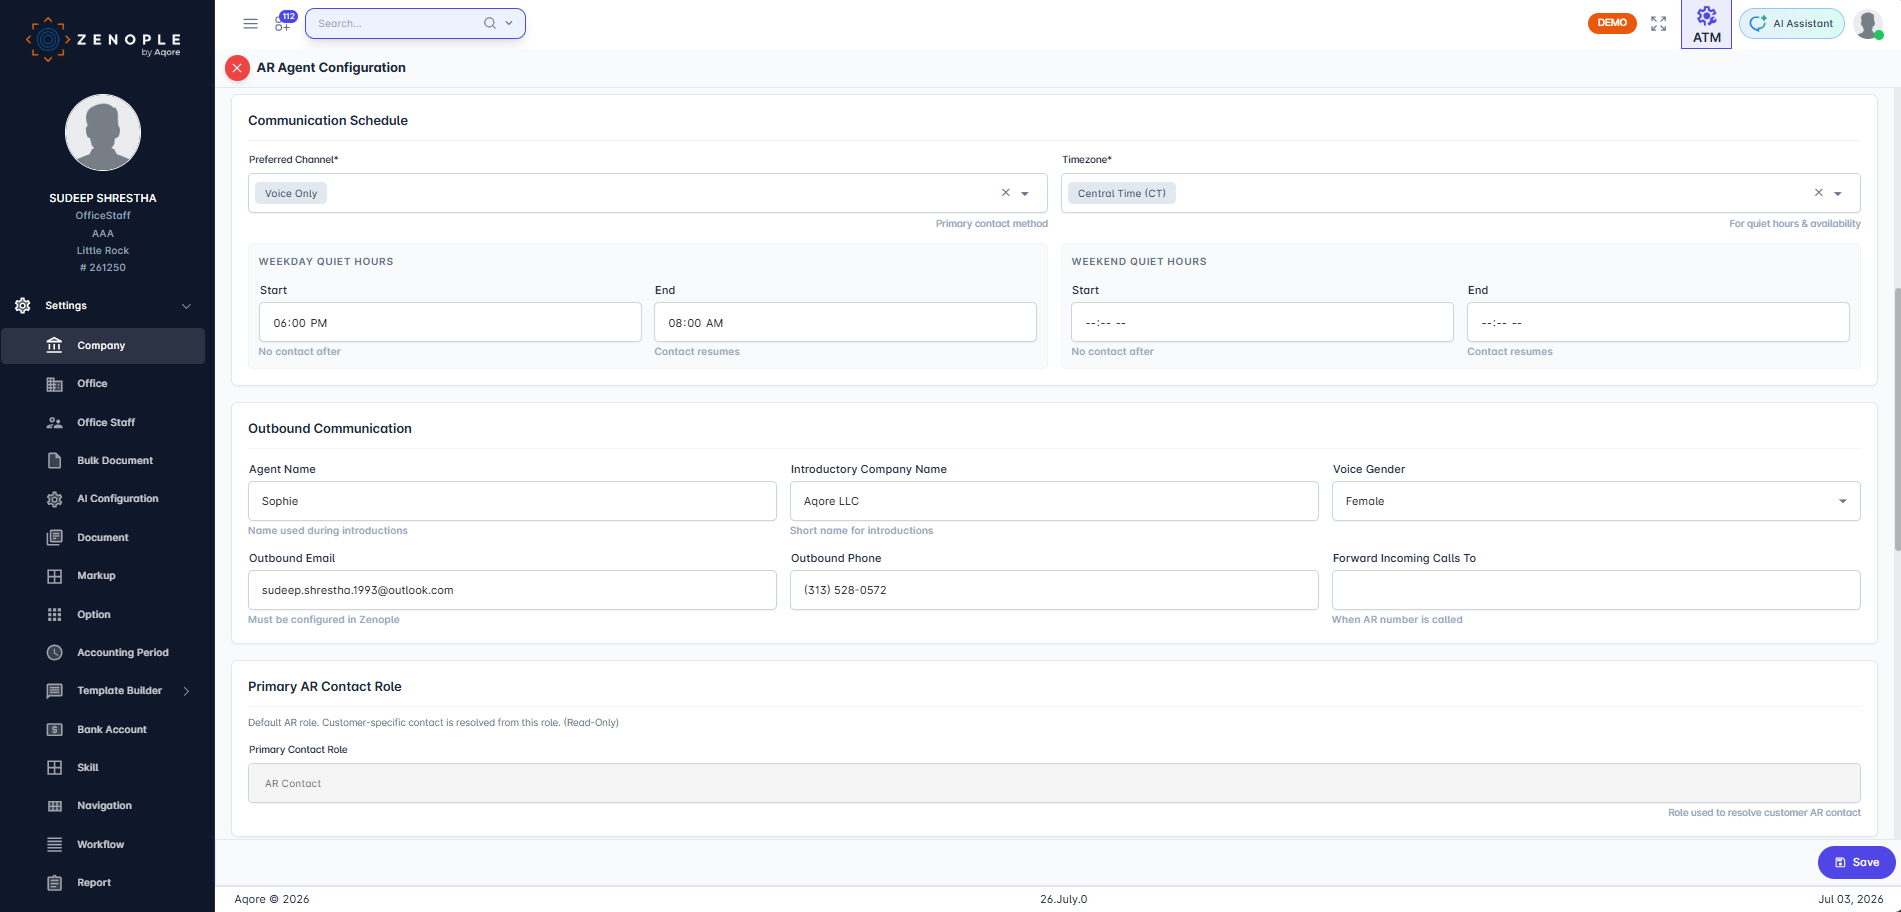
Edit mode (Mid): Communication Settings, Quiet Hours, and Outbound Communication and Primary AR contact role.
Primary AR Contact Role is disabled by default. It is Read Only.
Internal AR Staff
Your staff member who handles escalated cases. The AI agent will notify them when human intervention is needed (e.g., disputes, do-not-call requests). | |
Email address for escalation notifications. | |
Phone | Phone number for urgent escalations. |
Agent Availability
Agent Availability Start | When your AR staff is available for escalations (e.g., 8:00 AM). |
Agent Availability End | When your AR staff ends availability (e.g., 6:00 PM). |
Weekend Availability Start | Saturday & Sunday — when staff is available starts ( |
Weekend Availability End | Saturday & Sunday — when staff is available ends |
Email Cadence (Days) | Days between follow-up emails to a customer |
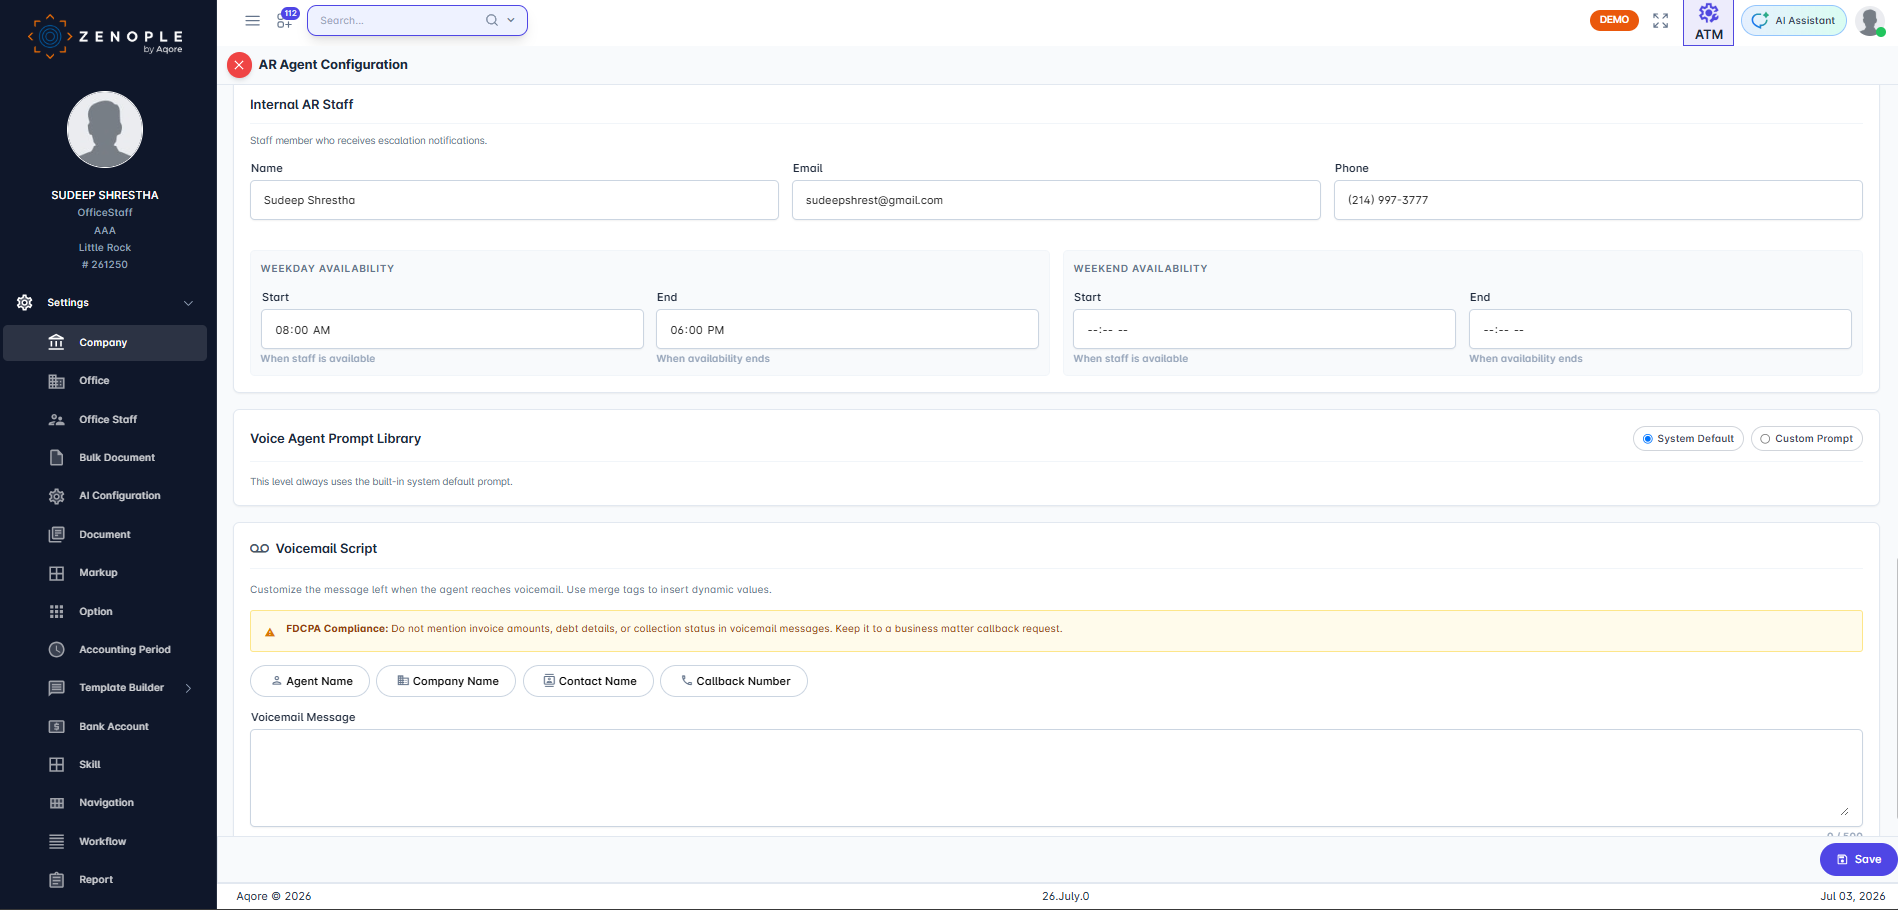
Edit mode (bottom): Internal AR Staff contact and Agent Availability hours.
Voice Agent Prompt Library. Voicemail Script.
Click Save when done.
Voice Agent Prompt Library
The Voice Agent Prompt Library section (bottom of the AR Agent Policy form) controls how the AI constructs its voice conversation.
Step 1 — Choose a Prompt Mode:
Mode | When to Use |
System Default | Use Zenople's standard AR collection prompt. Recommended for initial setup and most tenants. |
Custom Prompt | Activate the sectioned prompt editor to customize tone, introductory phrasing, and company-specific guidance. |
Inherit (Office/Customer only) | Automatically use the parent level's prompt. No local configuration needed. |
Step 2 (Custom Prompt mode only) — Select a Prompt Version:
Choose an active prompt version from your prompt library using the prompt version selector.
The system shows configurable sections (editable ~30%) and immutable sections (guardrails, compliance, tool contracts — managed by Zenople, shown for reference via "View current system default" expanders).
Click Save to apply. To revert to System Default, switch the mode back and save.
What each section means:
Persona & Identity - who the Agent is and how she should sound.
Greeting - the exact opening style and first turn behavior.
Guiding Principles - the rules that shape the call flow and conversational style.
Advanced Section - the deeper configuration layer that controls context, safety, style, and examples.
Advanced Sections:
Industry Context - what this tenant's collection environment looks like.
Custom Guardrails - extra restrictions or special instructions.
Conversation Style - how direct, warm, brief, or formal the agent should be.
Confidentiality Rules - what the agent may or may not disclose.
Few-Shot Examples - example responses that show the model what good looks like.
If they want to change agent’s role or tone, use Persona & Identity.
If they want to change the opening language, use Greeting.
If they want to change how agent behaves during calls, use Guiding Principles.
If they want to add tenant-specific rules, examples, or safety language, use Advanced Sections.
Company level: Only System Default and Custom Prompt are available (Inherit is not available at company level). Office/Customer level: All three modes are available. Default is Inherit.
Prompt runtime resolution: Customer → Office → Company. The agent uses the first non-Inherit level's prompt.
Saving a Prompt Version ("Save as New Version")
When you edit prompt section content in Custom Prompt mode, you must save it as a versioned entry in the library before saving the overall policy form. The prompt sections are not persisted by the main policy Save button — they have their own save action.
Step-by-step:
Switch Prompt Mode to Custom Prompt.
Enter a Prompt Name in the name field (e.g., "Collections Follow-Up v2"). This name groups all versions of the same prompt together in the library.
Edit the desired prompt sections in the accordion (Persona & Identity, Greeting, Guiding Principles, Advanced Sections, etc.).
Click the "Save as New Version"button (blue, below the prompt sections accordion).
The button is disabled if the Prompt Name is empty or the prompt content is blank.
While saving, the button shows "Saving…"
On success, the new version appears in the Saved Version dropdown with a version number and timestamp.
The new version is now selected as the activePromptId for this level.
Click the main Save button (in the stepper footer) to persist the policy including the activePromptId binding.
Important: Each click of "Save as New Version" creates a new version entry. To update an existing prompt, load it from the Saved Version dropdown first, then edit sections and save again — a new version number is always assigned.
Saved Version dropdown: Groups prompt versions by name, showing version number and last-modified date (e.g., "Collections Follow-Up — v3 — 6/28/2026, 2:30 PM"). Earlier versions remain in the dropdown for rollback.
Office-Level Overrides
Override company defaults for a specific branch or office location.
Office-level settings let you customize collection policies per branch. Any field left empty at the office level automatically inherits from the parent company.
Step 1: Navigate to the Office
From the company detail view, click Office in the left navigation, then select the desired branch.
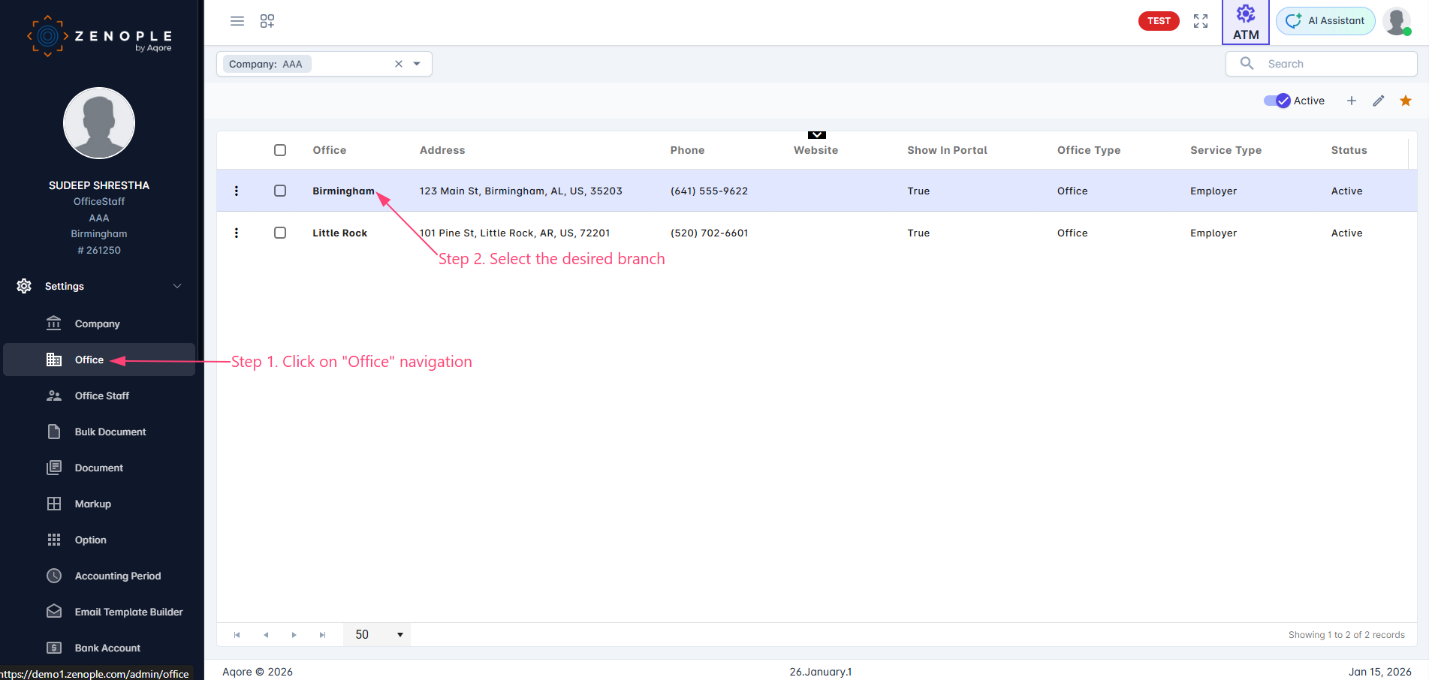
Click "Office" in the left navigation, then select the branch to configure (e.g., Birmingham).
Step 2: Open AR Agent Policy
In the office detail view, hover over the navigation toggle. Under AI Agents, click AR Agent Policy.
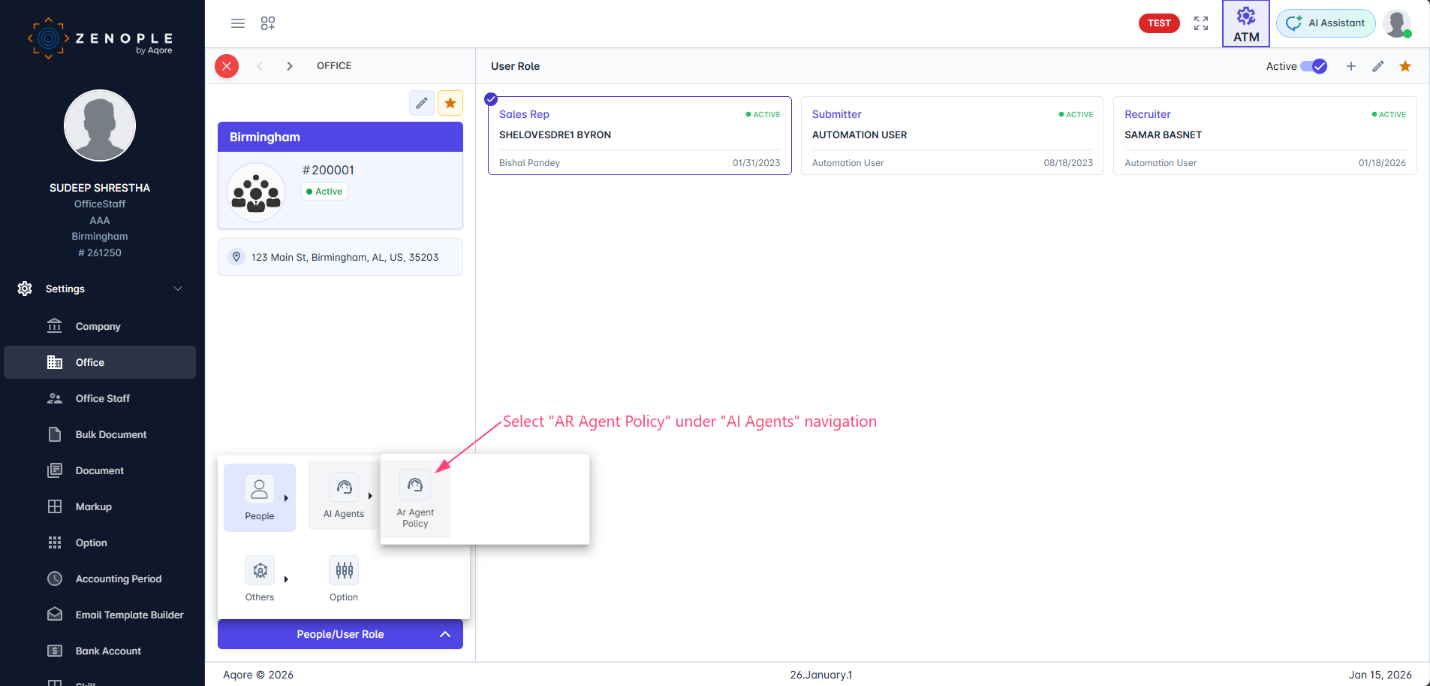
Hover the navigation toggle → AI Agents → AR Agent Policy.
Step 3: Review Inherited Settings (Read-Only View)
The read-only view displays all effective settings, including values inherited from the company level.
Note: This office inherits settings from company level. Values shown below include inherited settings. Only explicitly overridden values are stored at this level. |
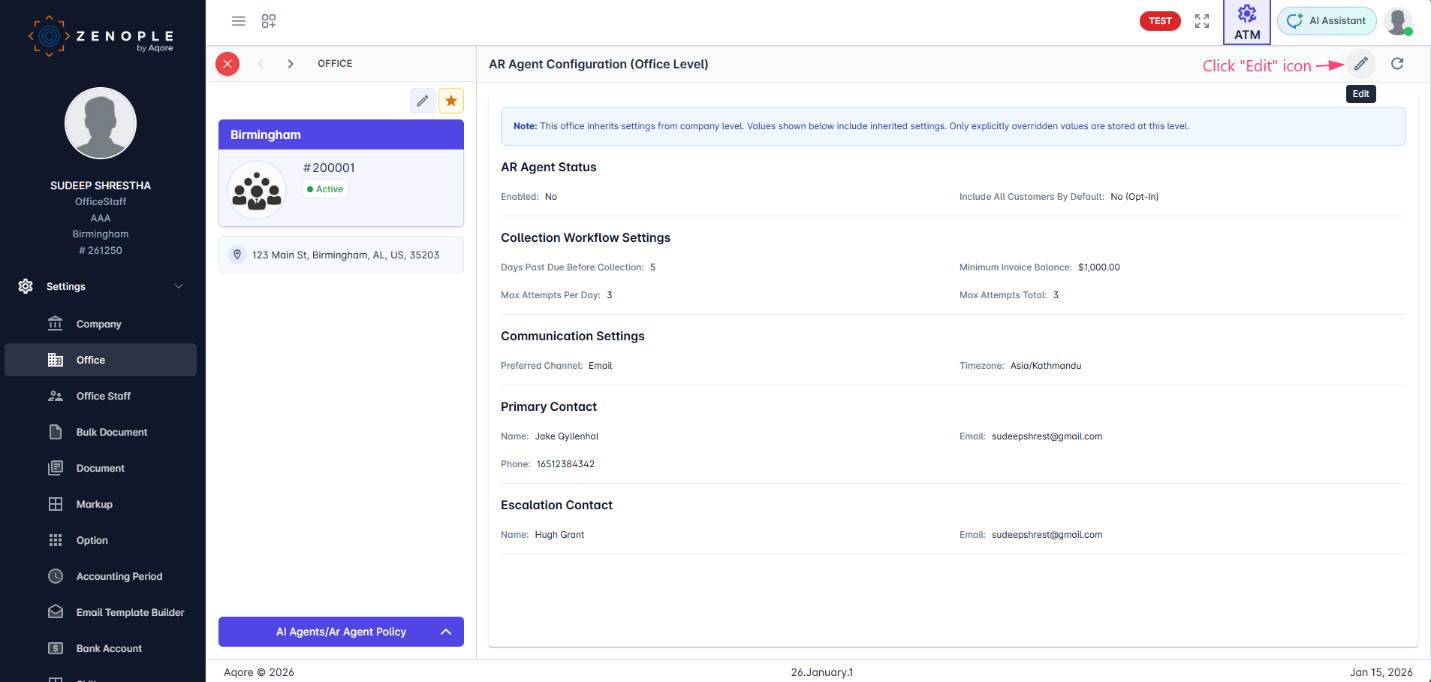
Office-level read-only view. The orange banner indicates settings are inherited from the company level.
Step 4: Override Settings (Edit Mode)
Click the Edit icon to enter edit mode. A yellow banner reminds you that changes here override company defaults.
Office Level: Settings configured here override company-level defaults. Leave fields empty to inherit from parent level. |
The edit form contains the same sections as the company level.
Outbound Communication (Office Override) — If this office uses a different outbound email or phone number than the company default, enter the overrides here. Leave these fields empty to inherit the company values. Note: Outbound communication fields are not available at the customer level.
Customer-Level Configuration
Fine-tune collection settings for individual customers.
Customer-level configuration lets you override any inherited setting for a specific customer. This is also where you manage the customer's AR contact information and respond to hold states.
Step 1: Navigate to the Customer
Switch to CMS mode. Click Customer in the left navigation, search for the customer, and open their detail view.
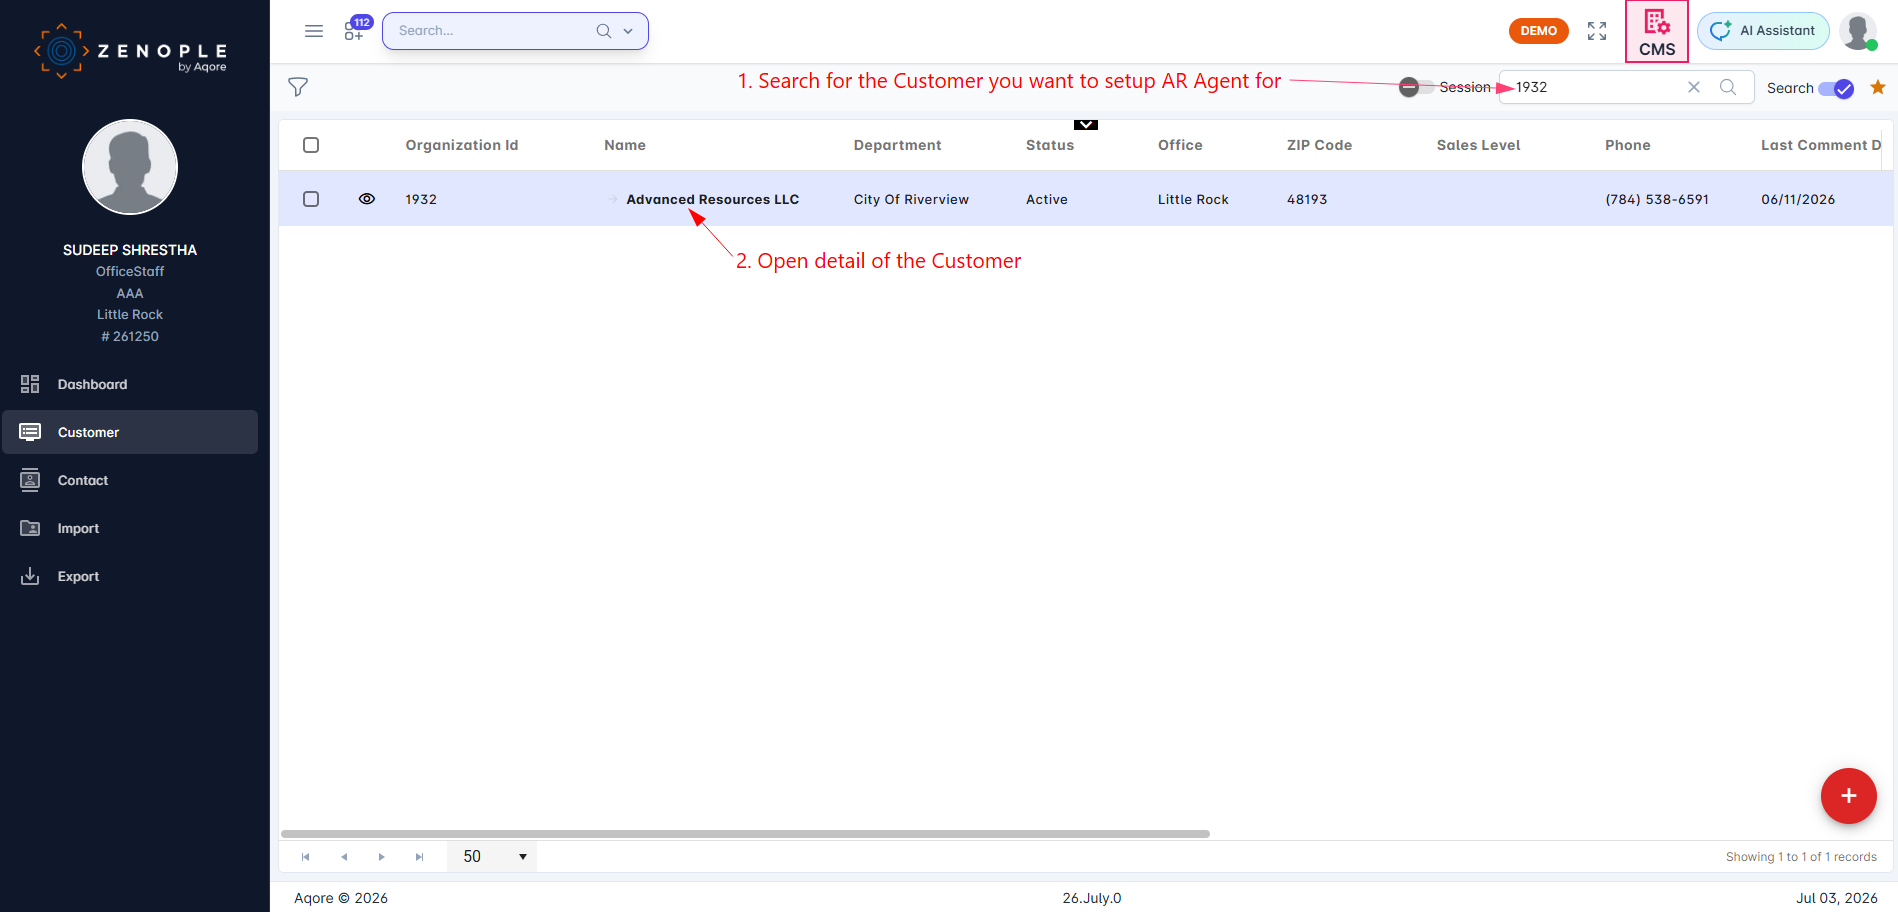
CMS mode → Customer → Search for the customer → Open detail view.
Step 2: Setting Up Client AR Contact role.
In the customer detail view, hover over the navigation toggle at the bottom. Under People, click Contact.
Then click the add icon to add a new contact, fill out the form as you would but select the Contact Role as AR Contact from the role dropdown. Then Save.
Step 3: Open AR Agent Policy
In the customer detail view, hover over the navigation toggle at the bottom. Under AI Agents, click AR Agent Policy.
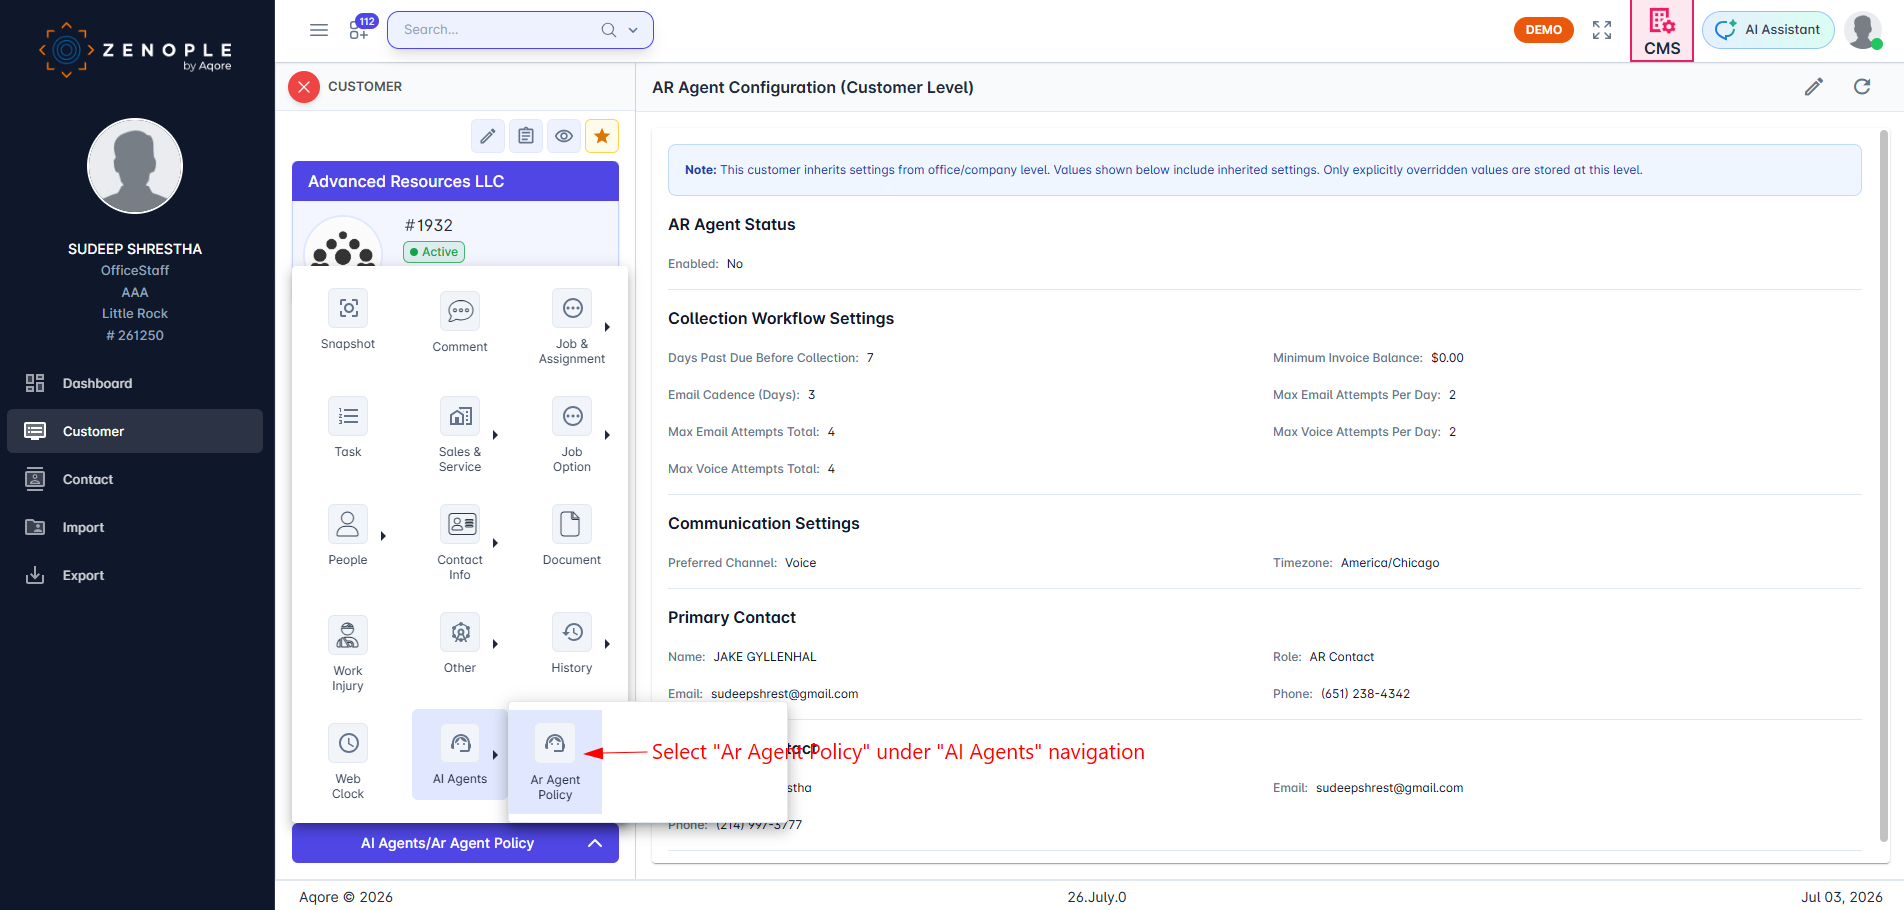
Customer detail → hover navigation toggle → AI Agents → AR Agent Policy.
Step 4: Configure Customer Settings (Edit Mode)
The customer-level form includes all the same workflow and communication sections, plus customer-specific contact fields.
Customer Level: Settings configured here override company-level defaults. Leave fields empty to inherit from parent level. |
Client AR Contact
The customer's point of contact for AR matters. The AI agent will try to reach this person.
Name | Full name of the customer's AR contact person. |
Email address for collection emails. | |
Phone | Phone number for voice call outreach. |
Ext. | Phone extension, if applicable. |
Internal AR Staff
Can be overridden per customer to assign a different escalation contact for this specific account.
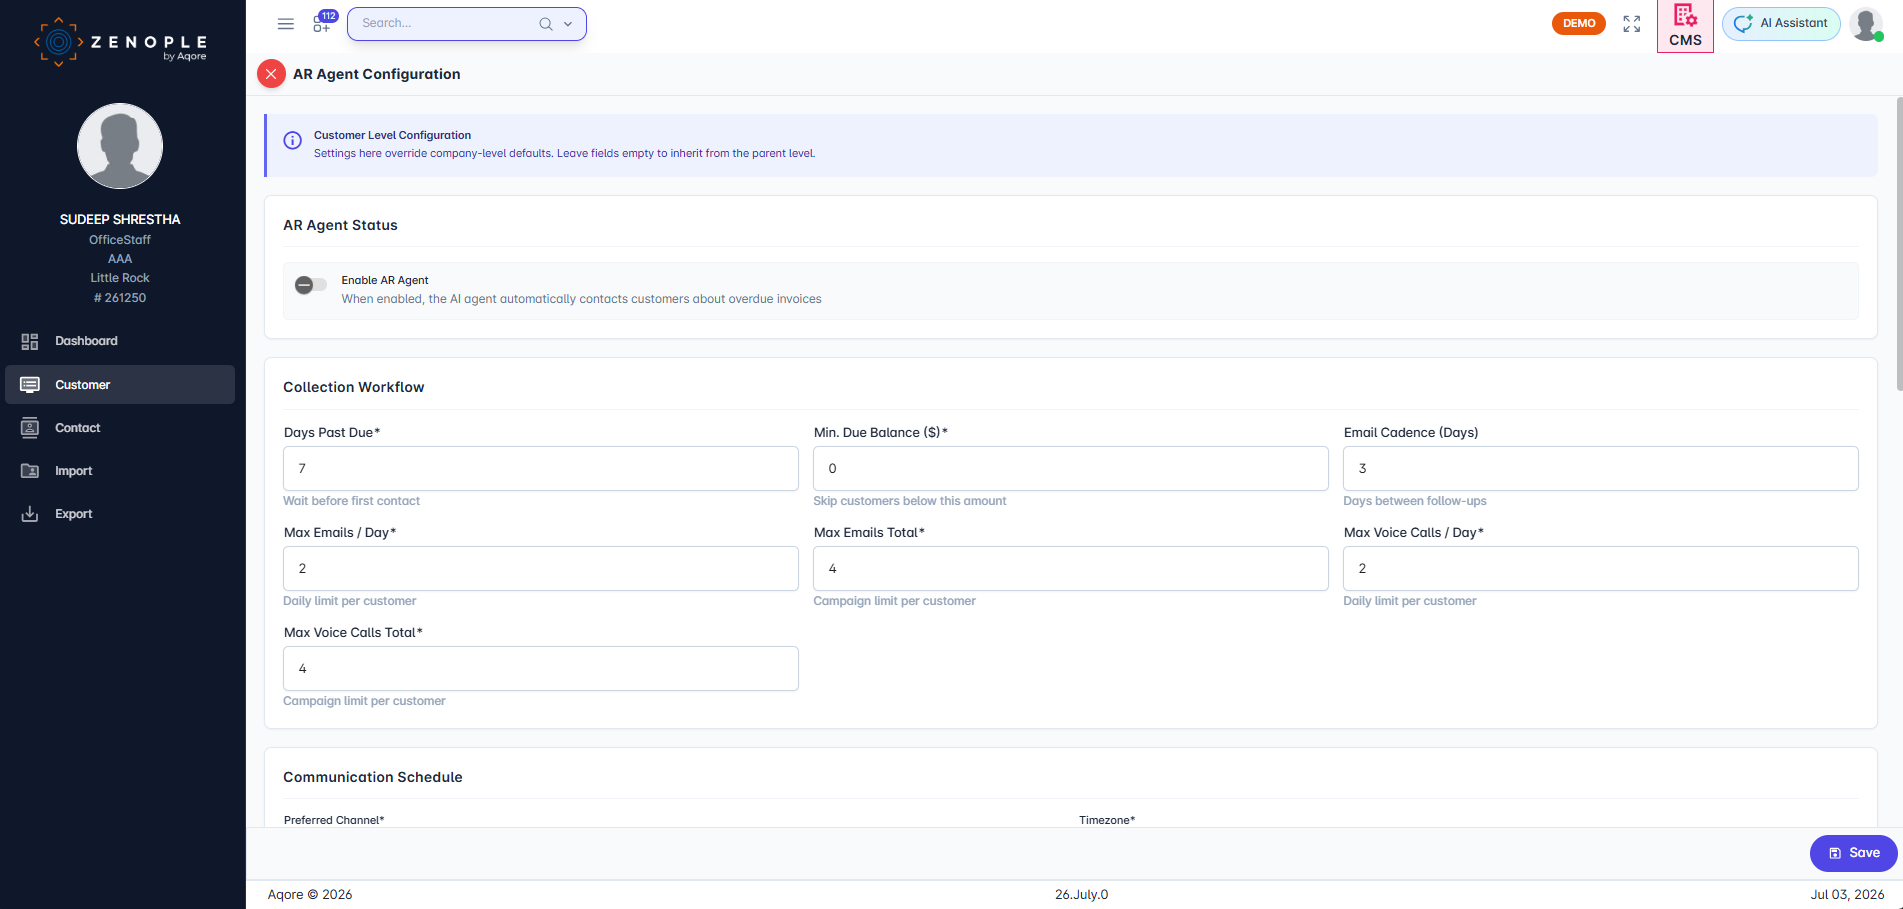
Customer edit mode (top): Enable AR Agent, Collection Workflow.
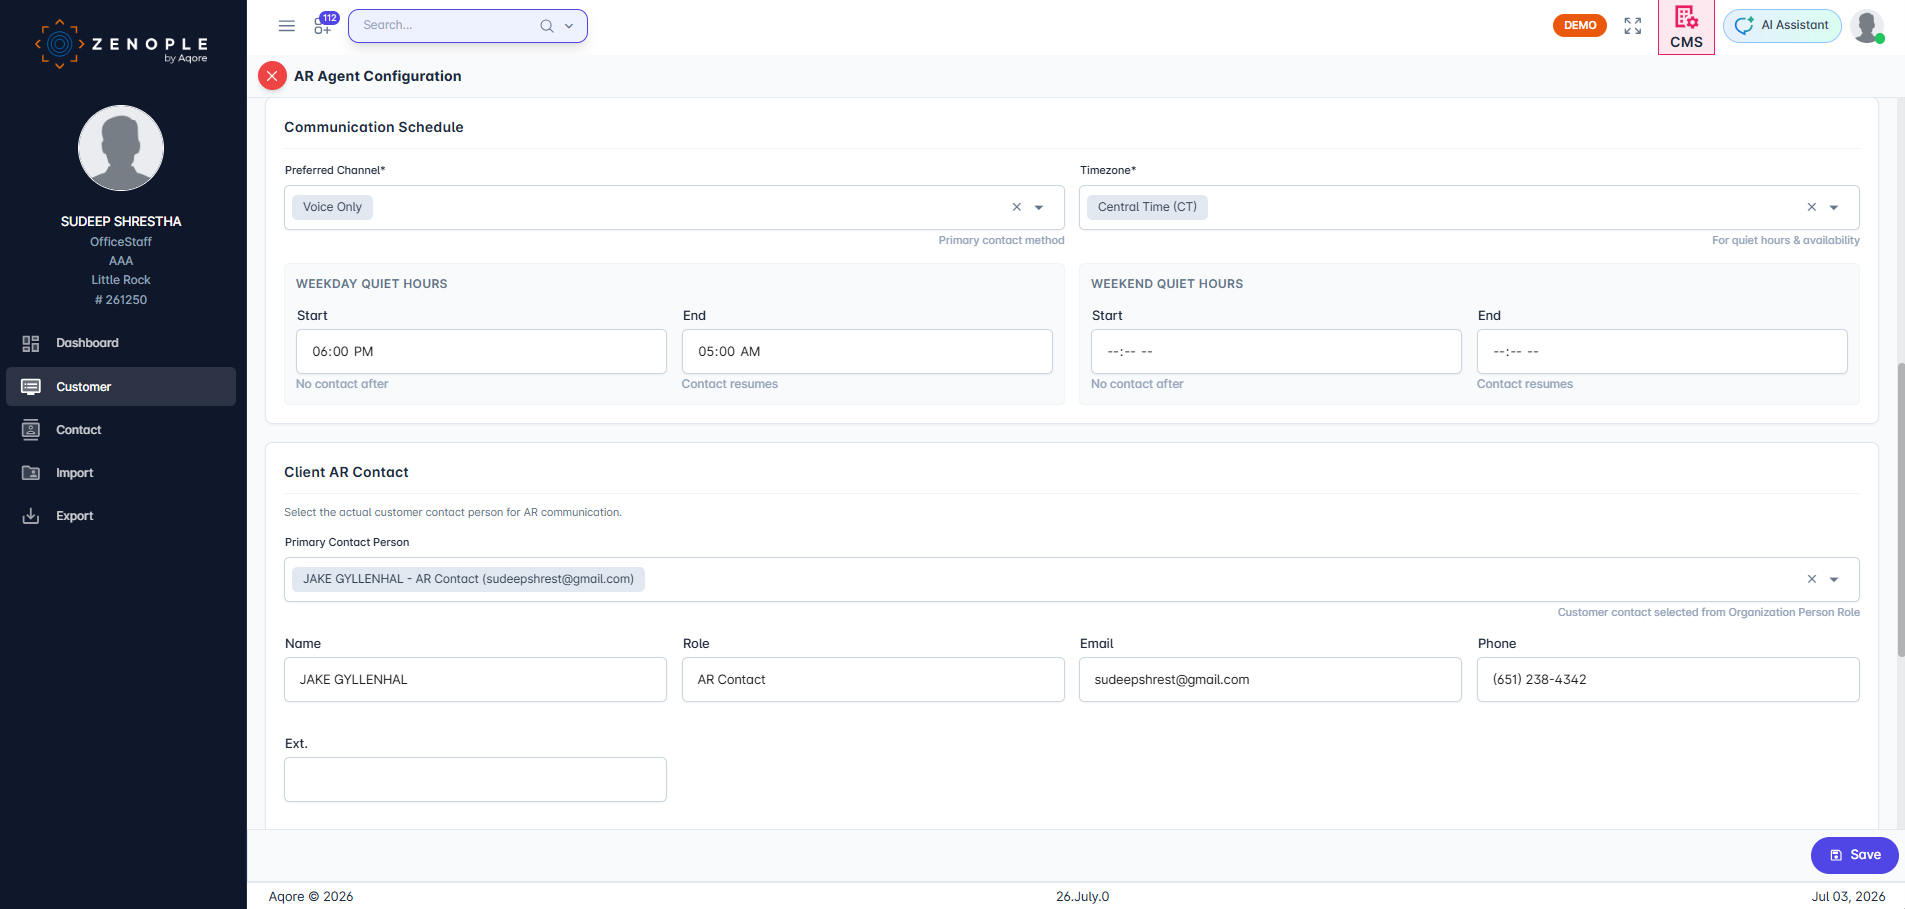
Customer edit mode (mid): Communication, Client AR Contact.
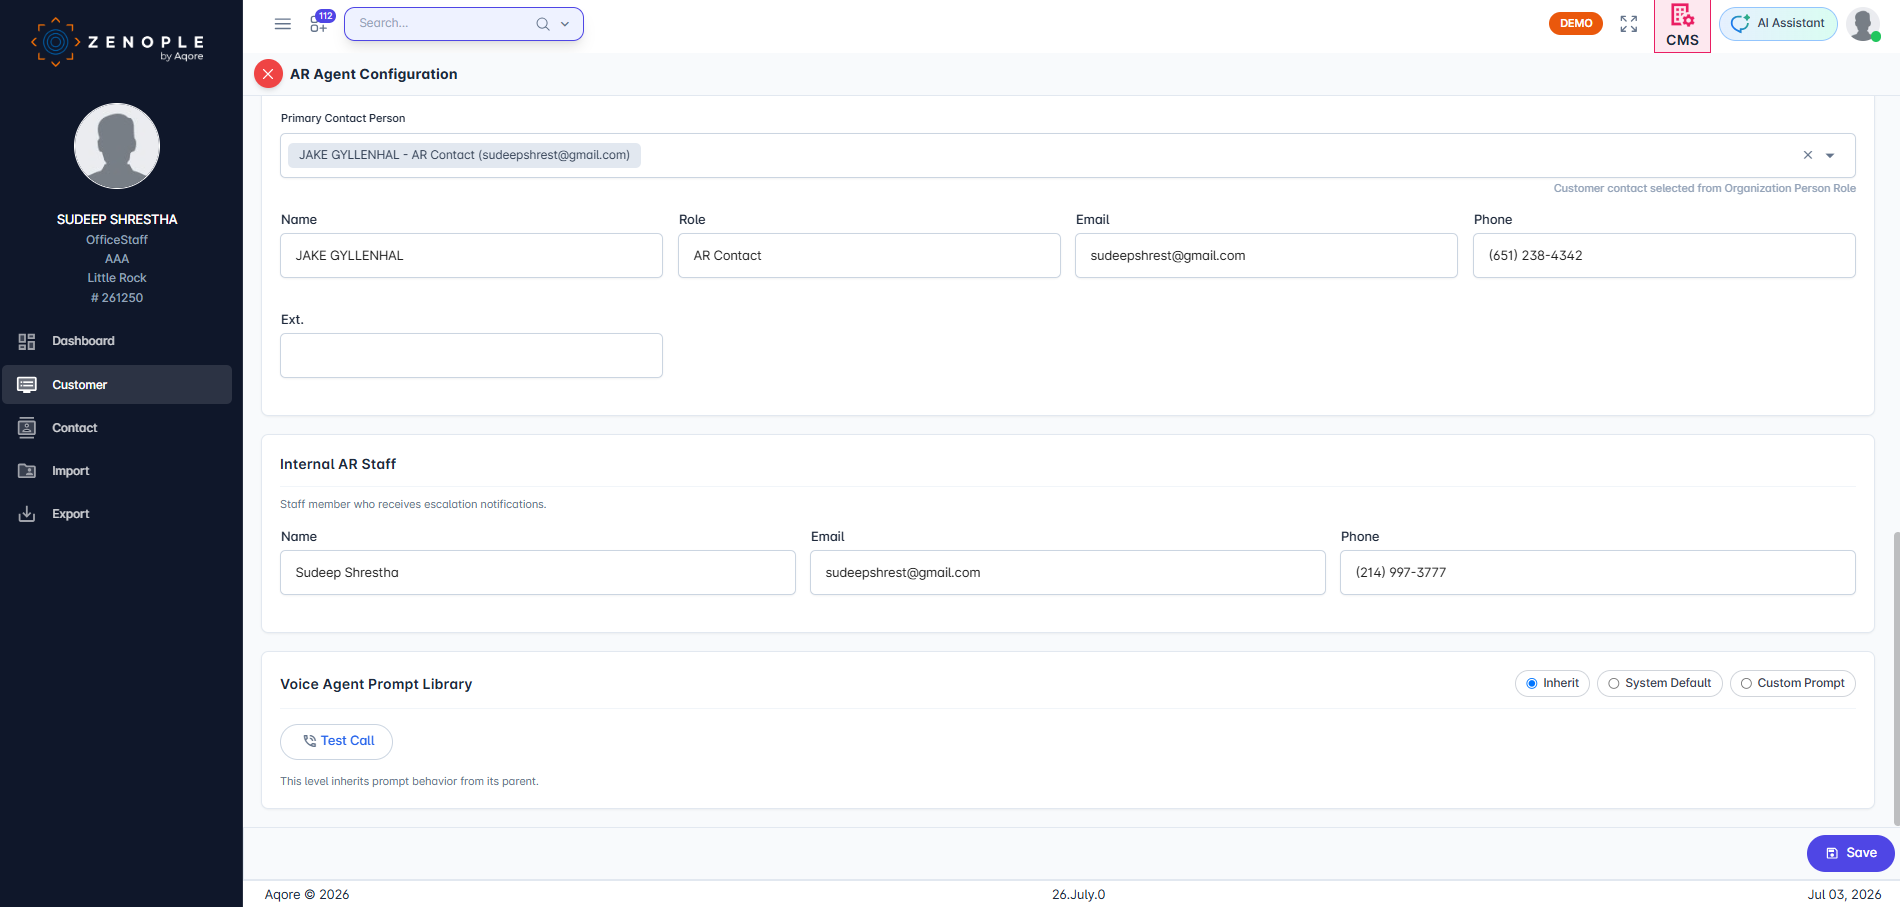
Customer edit mode (mid): Internal AR Staff, Voice Agent Prompt Library, Test Call. Click Save when done.
What "Inherit" means for prompt strategy: The Voice Agent Prompt Library at office and customer level defaults to Inherit, meaning it uses the parent level's prompt. Switching to System Default explicitly overrides to the standard prompt (even if the company uses a custom one). Switching to Custom Prompt requires selecting a prompt version for that specific level.
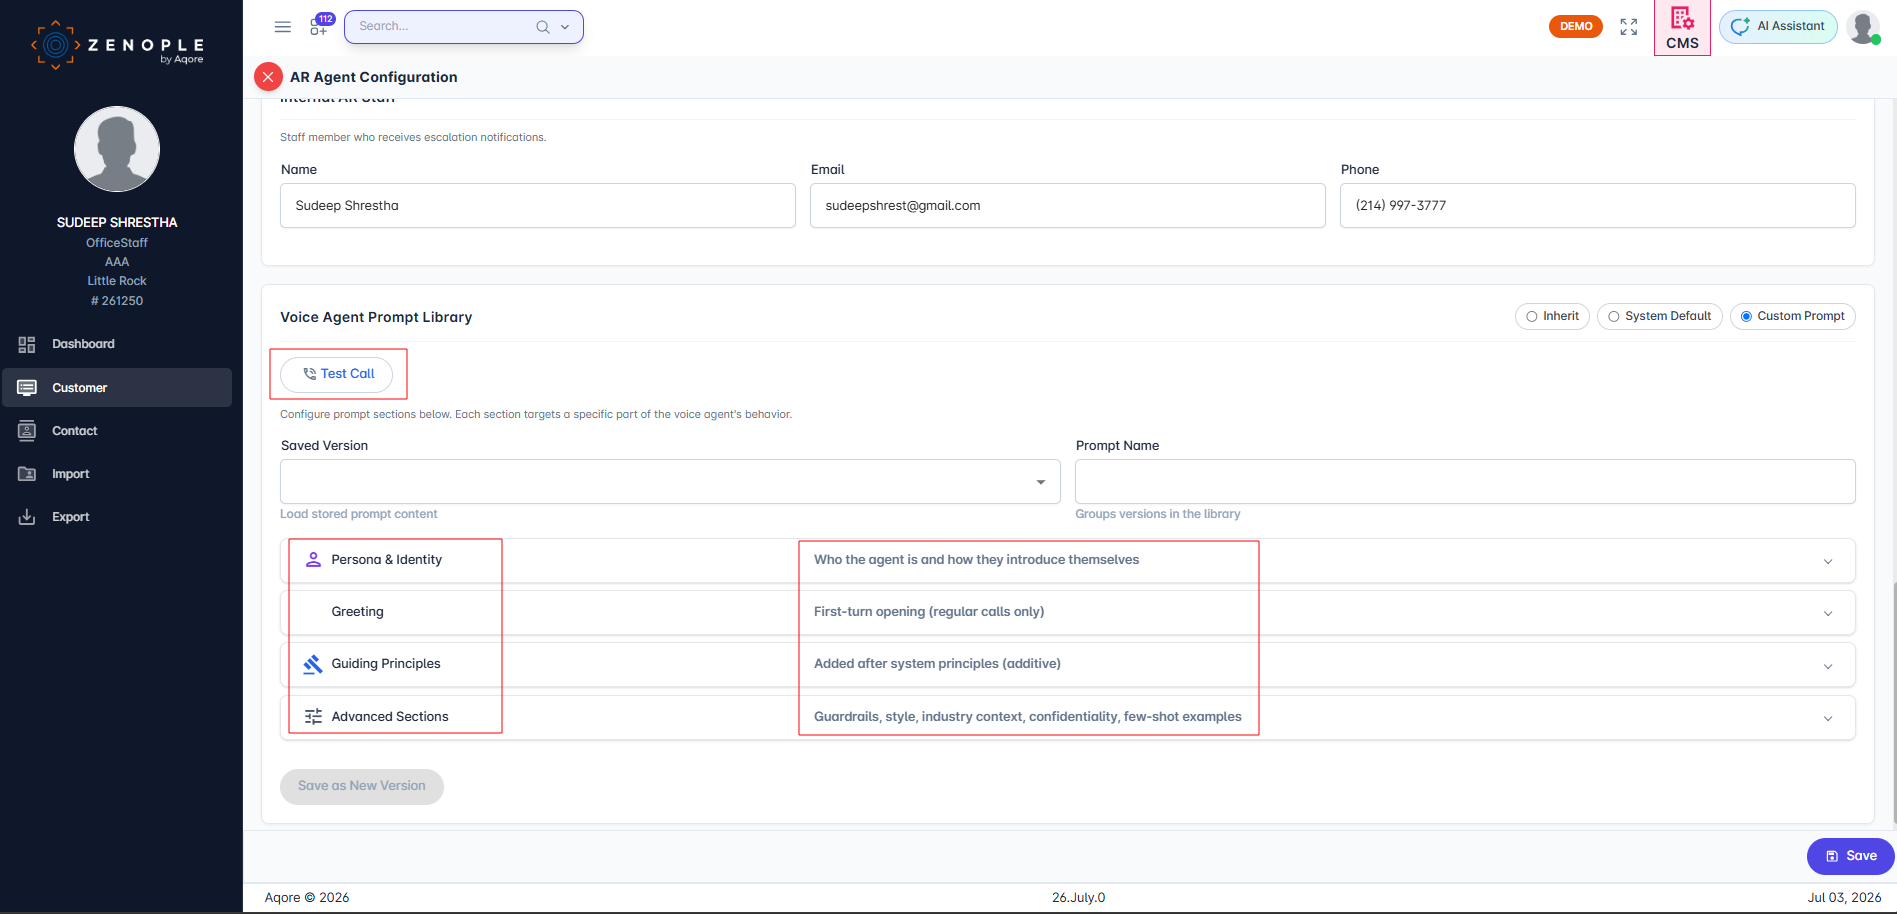
Testing Your Configuration with a Test Call
The Test Call feature lets you validate your AR Agent setup — including prompt changes — without waiting for the agent polling cycle and without creating production collection records.
Prerequisites
Before running a test call at the customer level, confirm:
The customer has a valid primary contact phone number configured in the Client AR Contact section.
The company (or office override) has a valid Outbound Phone Number configured.
How to launch a Test Call
Open the customer in CMS → AI Agents → AR Agent Policy.
Click the Edit icon (pencil) to enter edit mode.
Scroll to the Voice Agent Prompt Library section.
Click the Test Call button.
Confirm the dialog ("This will initiate a test call to [customer]. Proceed?").
The system validates both phone numbers. If valid, an outbound call is placed to the customer's primary contact phone.
What happens during a Test Call
A real phone call is placed to the customer's primary contact.
The call uses the current policy and prompt settings in the form, including any unsaved changes.
The AI conducts the call normally (voice conversation, intent detection, etc.).
What is blocked during a Test Call (side-effect guards)
Action | Blocked? |
|---|---|
Recording a contact attempt | ✅ Blocked — counters are not incremented |
Sending a post-call summary email | ✅ Blocked |
Writing a call note to Comment section | ✅ Blocked |
Flagging AR events | ✅ Blocked |
After the Test Call
Check call quality, prompt behavior, and voice tone during the call.
If the prompt needs adjustment, modify the prompt settings in the form and run another test call.
When satisfied, click Save to persist the configuration.
Hold States & Statuses
Understanding automatic hold states set by the AR Agent.
The AR Agent automatically places customers on hold when certain conditions are met during the collection process. Hold states are displayed as banners at the top of the customer's AR Agent Policy page.
Holds Requiring Action (Red Banner)
These holds pause all outreach to the customer. The agent will not contact the customer again until the hold is manually cleared by a Zenople user.
Hold State | What triggered it | Recommended action before clearing |
|---|---|---|
MaxAttemptsReached | All attempt limits exhausted | Consider adjusting limits or manually resolving the account first |
WrongPerson | Wrong contact was reached | Update the correct contact in Client AR Contact |
DoNotCall | Customer requested no further contact | Get explicit approval from management; legal/compliance review recommended |
DisputeOpen | Customer disputed invoices | Resolve the dispute with AR staff first |
Escalated | Case flagged for human review | Ensure the escalation has been handled |
PaymentIntentExpressed | Customer stated intent to pay | Verify payment before clearing |
PaymentClaimedNeedsVerification | Customer claims to have paid | Verify in your payment records first |
PromiseScheduled | Customer made a payment promise | Only clear if you are manually voiding the promise |
PromiseBroken | Promise deadline passed without payment | Review with AR staff before resuming outreach |
PromisePartiallyKept | Promise was partially fulfilled | Review remaining balance and payment terms |
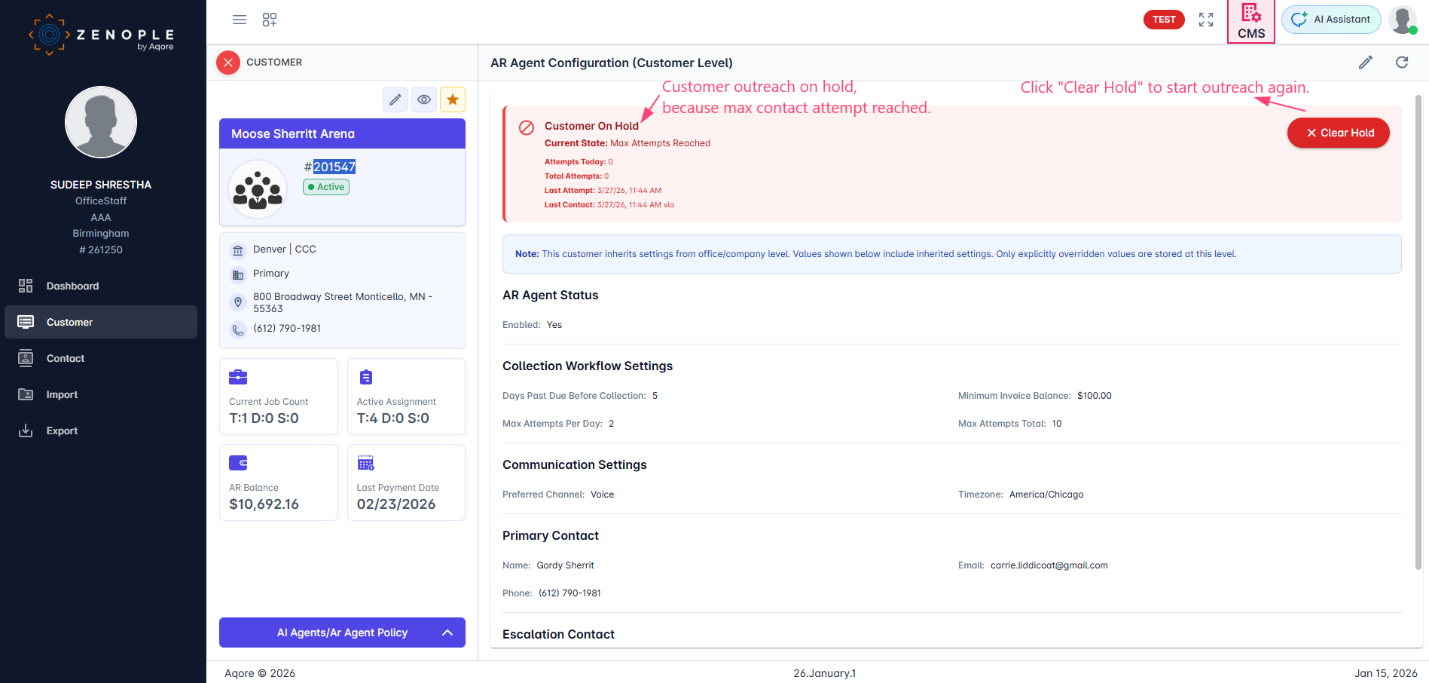
Red "Customer On Hold" banner showing the hold state (Max Attempts Reached), attempt counts, and the "Clear Hold" button.
How Resume Campaign works:
Clicking Resume Campaign sends a delete instruction to the system — the customer's state record is removed entirely. This returns the customer to implicit Active status and resets all attempt counters (email and voice, both daily and total).
Important: Do not use Resume Campaign as a routine action without first reviewing the hold reason.
Once cleared, the customer is marked as Active and becomes eligible for AR Agent contact again. The attempt counters reset.
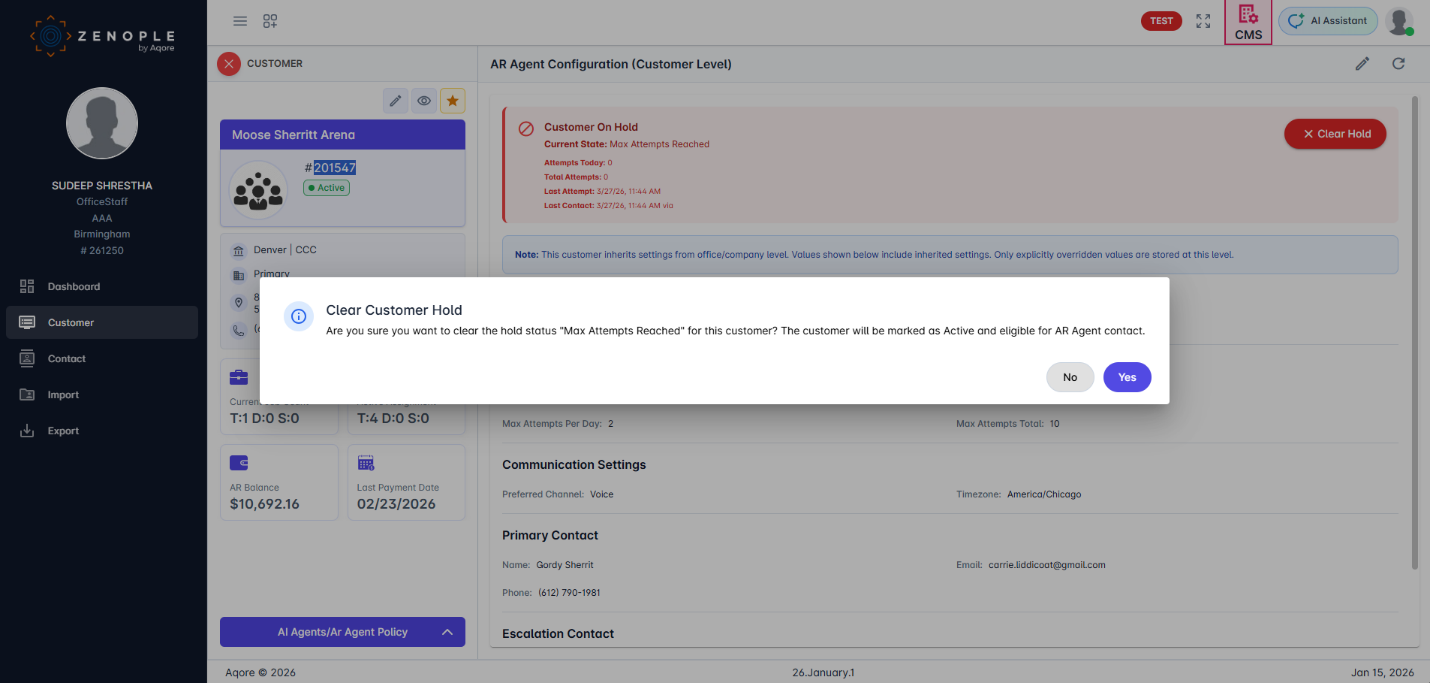
Clear Hold confirmation: "Are you sure you want to clear the hold status? The customer will be marked as Active and eligible for AR Agent contact."
Informational Status (Green Banner)
This status is informational only — no action is needed. The agent is managing the situation automatically.
Hold State | What It Means |
CallbackScheduled | A callback has been scheduled with the customer. The agent will automatically follow up at the agreed time. No manual intervention required. |
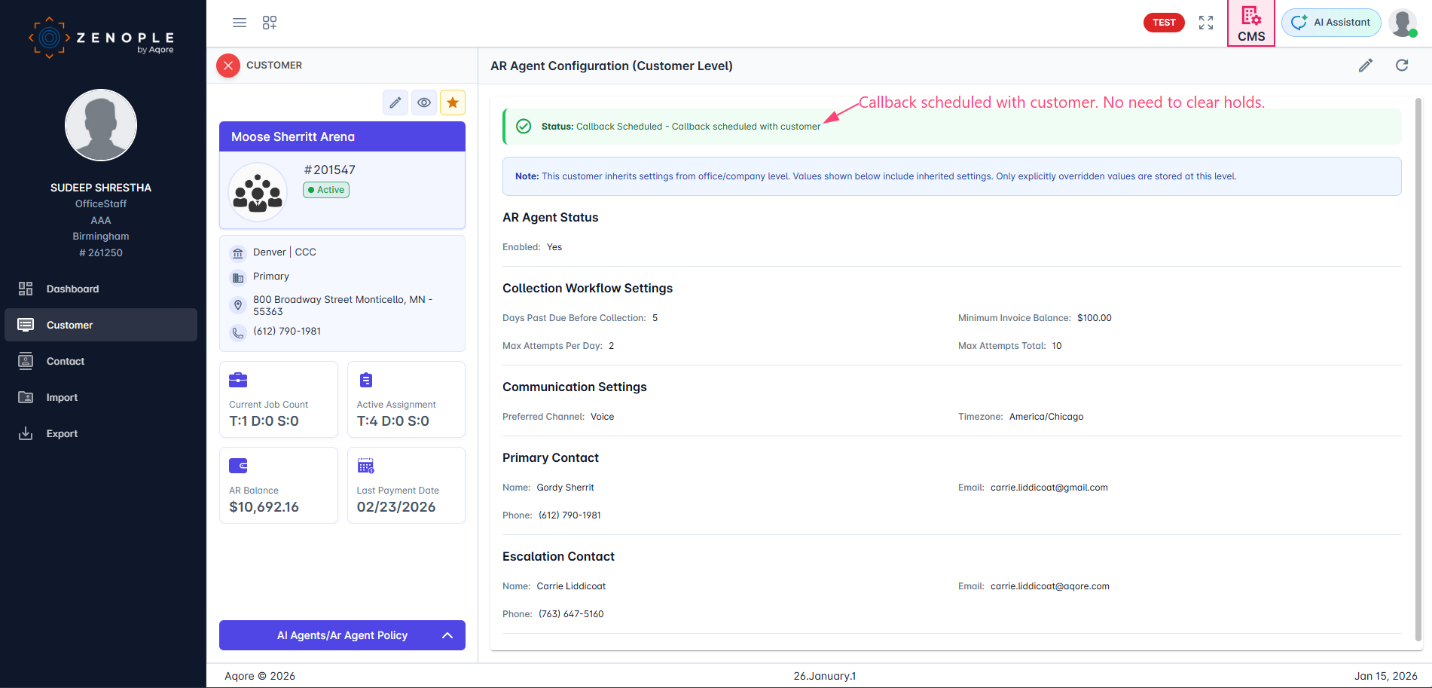
Green "Status: Callback Scheduled" banner. This is informational — no need to clear holds.
Opt-In / Opt-Out Mechanics
How the AR Agent determines which customers to contact.
The "Include All Customers By Default" toggle at the company level determines the inclusion model:
All customers are included by default.
|
Opt-In Model (Toggle OFF) No customers are contacted by default.
|
Remember: Regardless of the inclusion model, the AR Agent will only contact customers who have open invoices that meet the configured Days Past Due and Minimum Invoice Balance thresholds. |
Monitoring
Verify your configuration and monitor AR Agent activity.
After completing the setup, you can monitor the AR Agent's activity through the Comment section on each customer's detail page. This is where you'll find call transcripts, email threads, and AI-generated summaries.
Viewing Call Transcripts & Email Threads
Navigate to the customer in CMS, then click the Comment tab in the customer navigation. The Comment section displays:
Voice Call Transcripts — Full conversation transcripts with color-coded Agent and Customer dialogue, plus an AI-generated summary with key action items.
Email Threads — Outbound collection emails and customer replies.
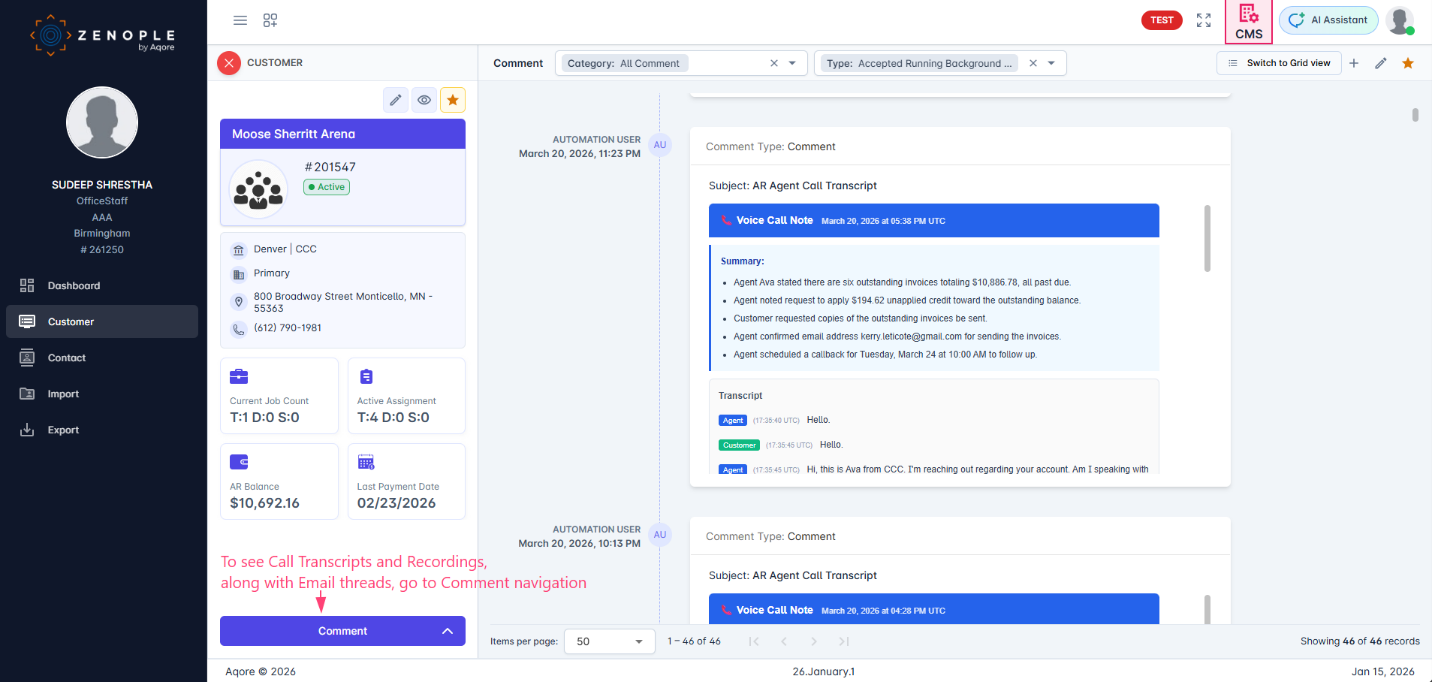
The Comment section shows Voice Call Transcripts with AI-generated summaries (bullet points) and color-coded Agent/Customer dialogue.