Zenople AI Receptionist Agent - Setup Process
To use the Receptionist Agent, complete the following setup process:
Initial Setup (Aqore Team):
- Contact Aqore Support to request setup of your Receptionist Agent environment and phone number.
- The Aqore team will:
- Provision an active phone number for inbound calls and SMS.
- Configure the required backend services.
- Set up the AI insights dashboard and required navigation.
- Once the setup is complete, the Aqore team will notify you that the environment is ready.
Client Configuration (Self):
After receiving confirmation from Aqore, complete the Receptionist Agent configuration in ATM > AI Agent by configuring the required settings, such as:
- Agent Identity configuration
- Office hours and routing
- Escalation settings
- Automation permissions
- Outbound delivery mode
Receptionist Default Configuration Settings
These default configuration values available on first agent setup.
Name | Purpose | Default Values |
Agent Name | Identity of the agent | Jennifer Adams |
Company Name | Doing business name of the client | Tenant name |
Language | Language that agent can recognize and speak back | English, Spanish |
Voice | Voice used by agent. Rate and pitch of voice can be adjusted | Luna |
Greeting Message | Initial welcome message | Hi, this is Jennifer Adams with #Company Name. How may I help you today? |
Office Availability hours | Office open hours | Monday to Friday 9 AM – 5 PM |
Identification Method | Could be same or different based on each person type | Unknown:
Employee:
Applicant:
New hire:
Contact:
|
Enable Contact Persona | Decides if caller type contact to be handled by agent or escalated directly | True |
Escalation Mode | How handoff occurs for different person type | Unknown: Text Applicant: Text New hire: Text Employee: Text Contact: Text |
Escalation number | Person type specific number (could be different for all or same) | Unknown: Custom Applicant: Office New hire: Office Employee: Office Contact: Office |
Escalation Human Availability hours | Live staff hours for each person type (can be same or different) | Mon-Fri 9AM-5PM |
Escalation Live call transfer handoff message | Handoff message to be spoken while transferring call | Let me connect you with a right person |
Outbound Delivery | Communication medium used to send information to caller during call | Text |
Write-Back Permission | Automation permission for zenople |
|
Note: Unknown Escalation Destination Number should setup as default value will have invalid number.
How to use Receptionist Agent Configuration UI:
Use this screen to configure how the AI Receptionist behaves for a selected Tenant, Company, or Office scope.
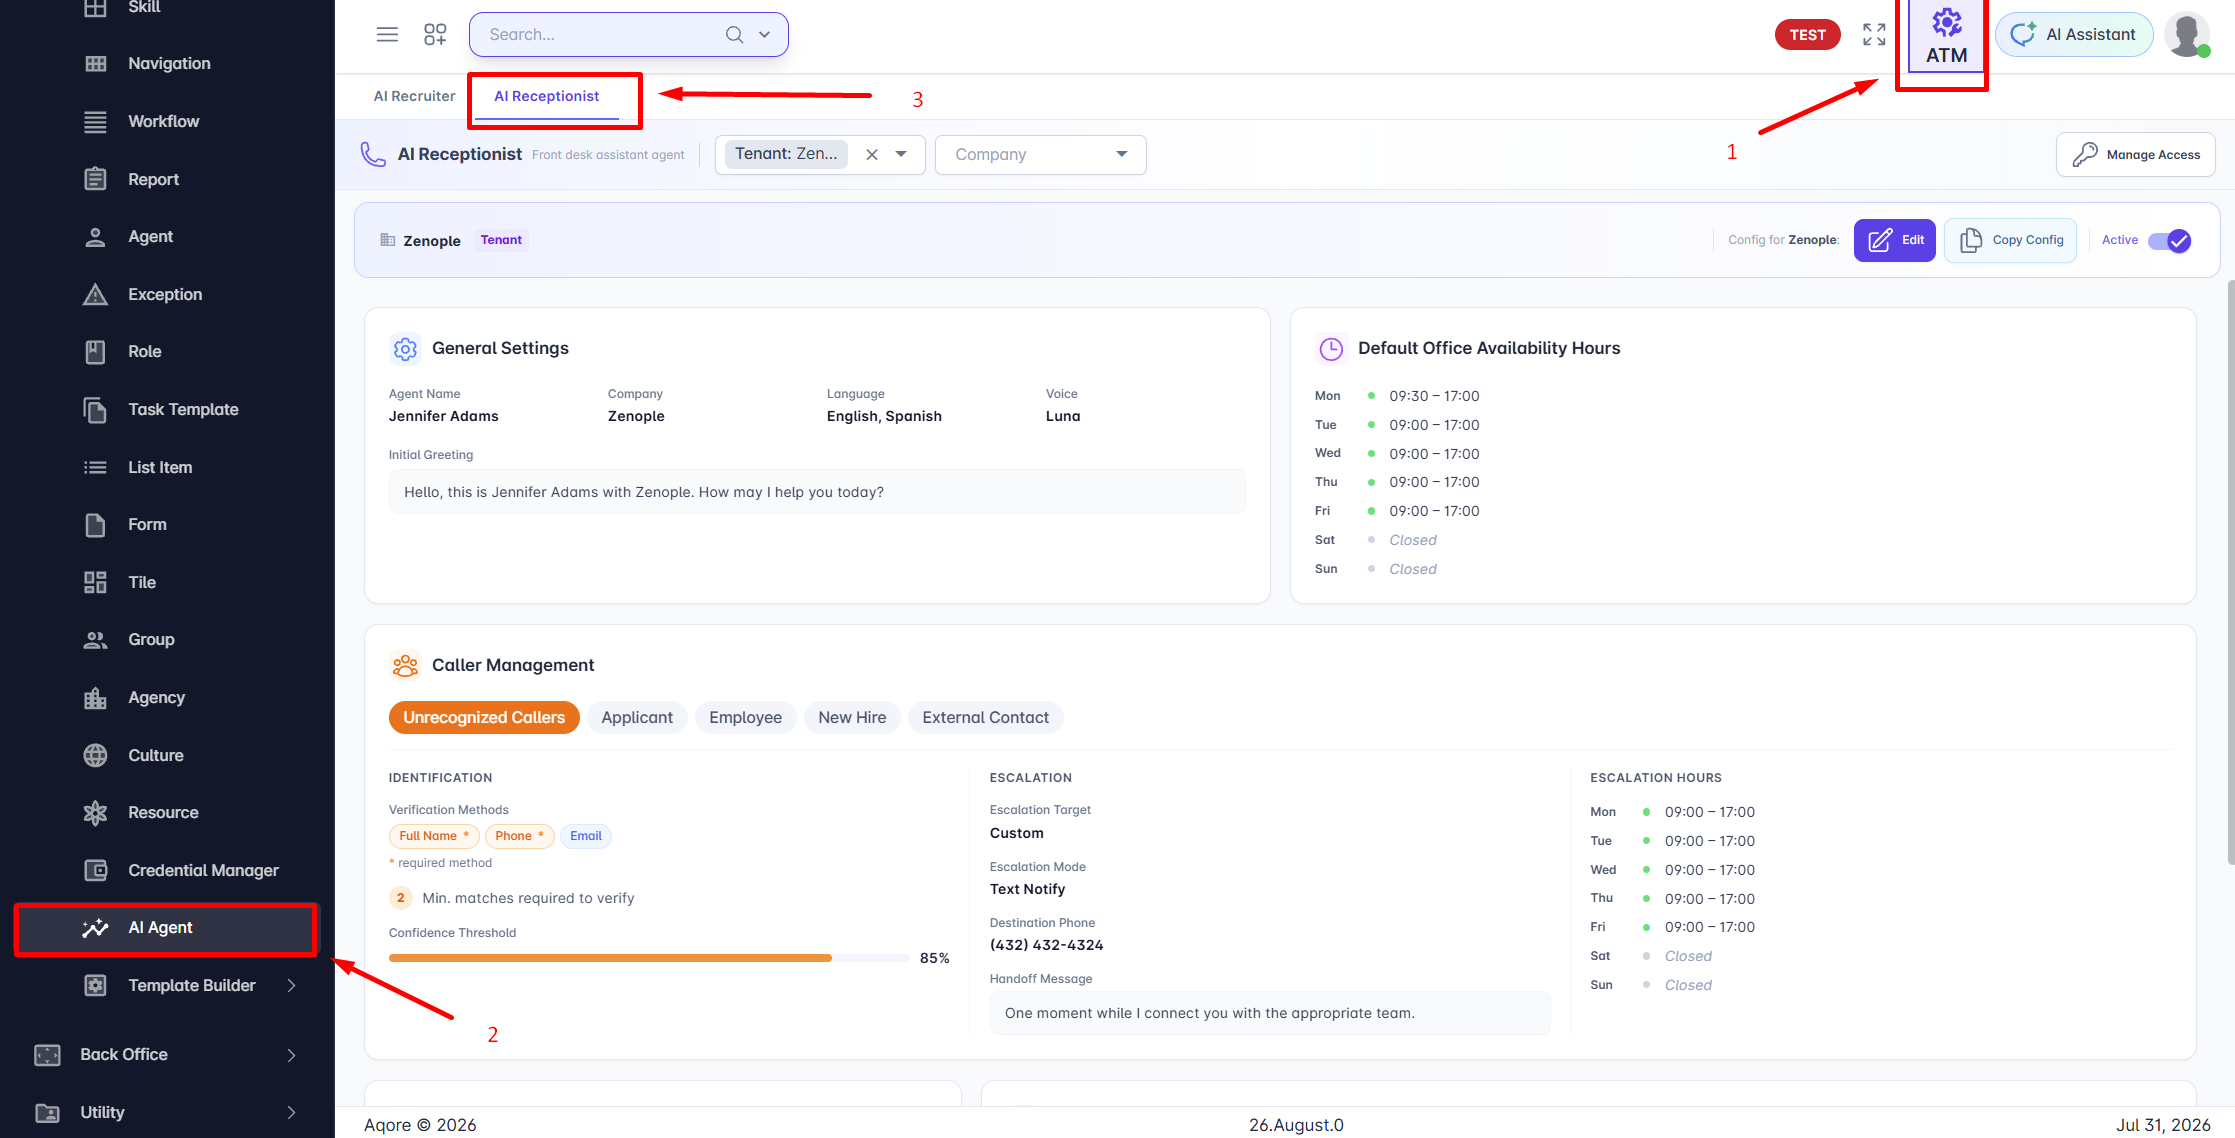
Where to Access
- Open ATM.
- Go to AI Agent Navigation under Settings category.
- Select the AI Receptionist tab.
Scope and Inheritance
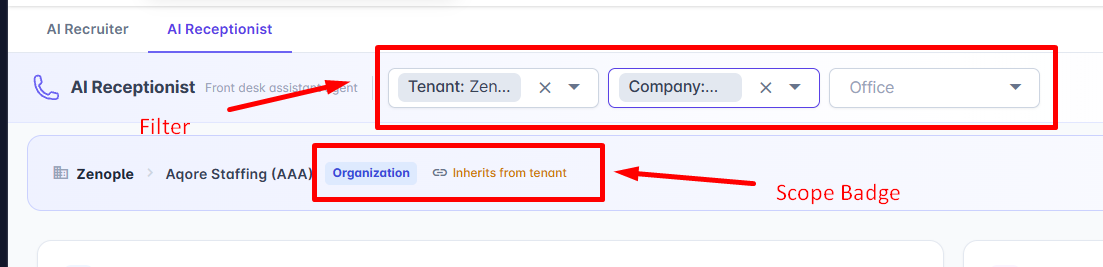
- Use the top filters to select Tenant, Company, and optionally Office.
- The active scope badge shows whether you are editing Tenant, Organization, or Office level config.
- If a scope inherits from a parent, the screen shows Inherits from ....
- When you save, config_level is set automatically based on selected scope:
- Tenant → Tenant
- Company → Organization
- Office → Office
Top Action Bar
Manage Access Button
- Opens the access management drawer for Receptionist Agent permissions.
- Used to enable or disable receptionist agent in multiple office or organization at once.
- Button is enabled after tenant level onboarding is completed and only available for tenant entity is selected in the filter.

Edit Button
- Opens the configuration form drawer for the currently selected scope entity.
- Use this to update the selected entity configuration directly.
- Disabled when AI Receptionist is inactive for the filtered scope entity.
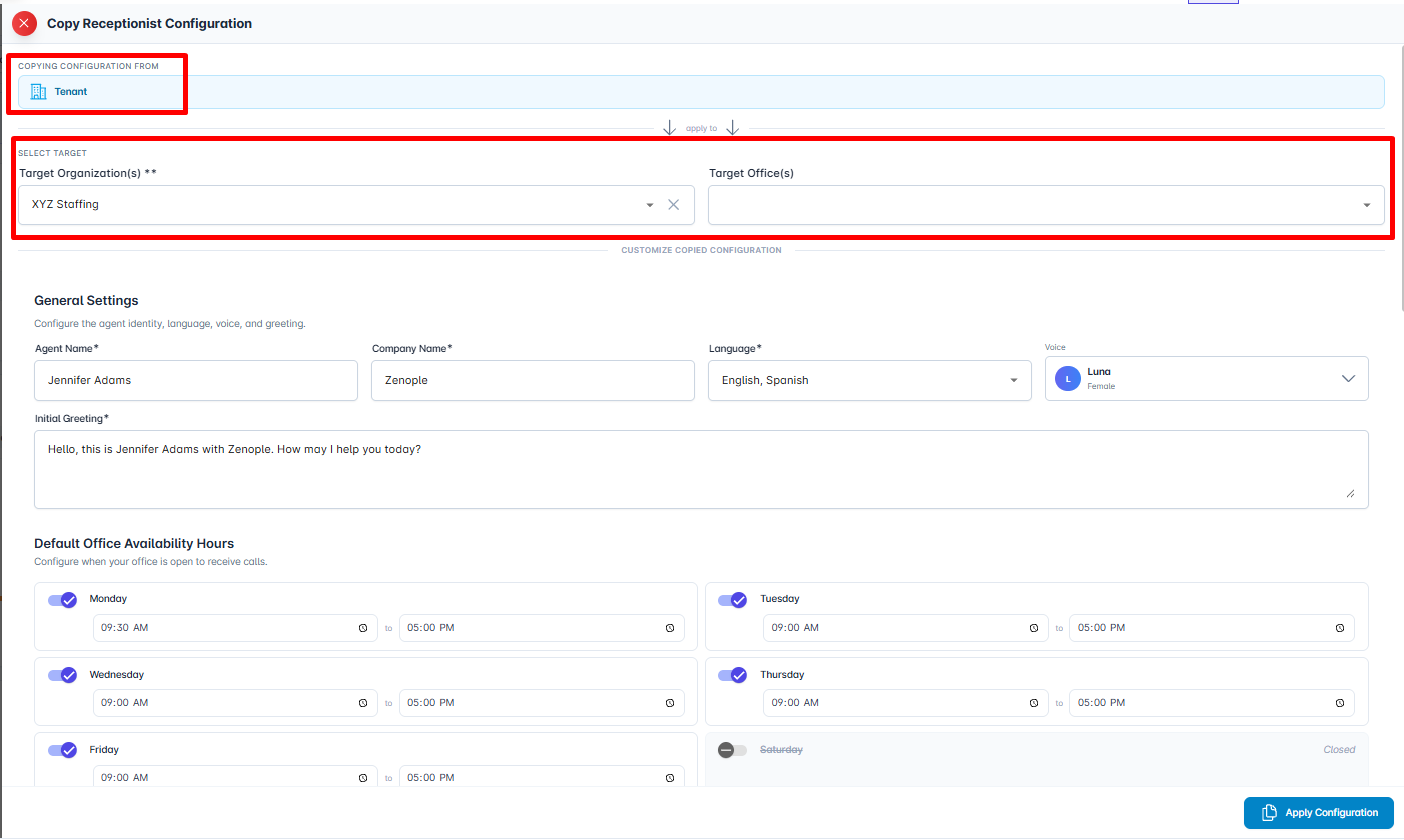
Copy Config Button
- Opens the copy configuration drawer.
- Let’s you copy current selected scope entity configuration to one or more organizations/offices.
- You can still modify or adjust configuration values in the embedded form before applying.
- Disabled when AI Receptionist is inactive for the selected entity.
Active Toggle
- Controls whether AI Receptionist is active for the selected scope.
- Turning Off disables the receptionist for that scope.
- Turning On behavior:
- If already onboarded (or non-tenant scope), it enables directly.
- If tenant scope is not onboarded, onboarding launches first with two steps:
- Access
- Configuration
- After successful onboarding, the toggle remains active and config is saved.
Configure the Form
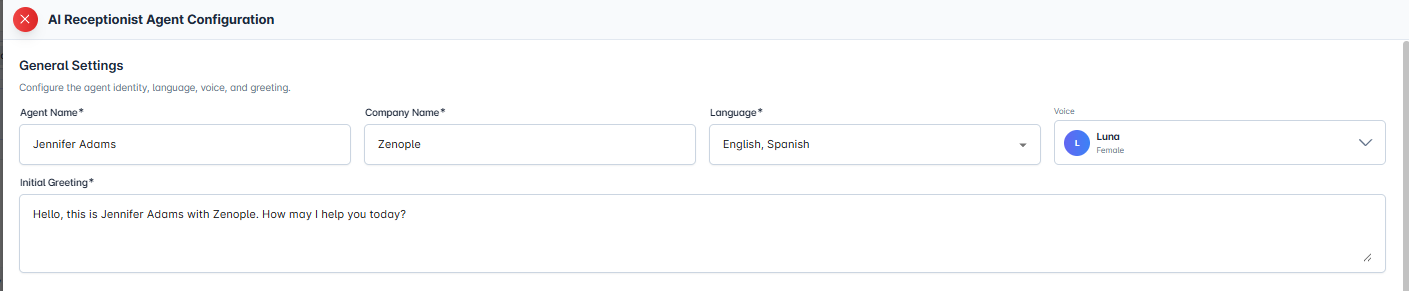
1. General Settings
- Agent Name: Display name used by the receptionist.
- Company Name: Editable business-facing company name for currently selected scope entity.
- Language: One or more supported conversation languages.
- Voice: Choose the voice from the voice picker dialog.
- Initial Greeting: First message spoken by the receptionist. Make sure to use same agent name or company name as above for initial greeting if needed.
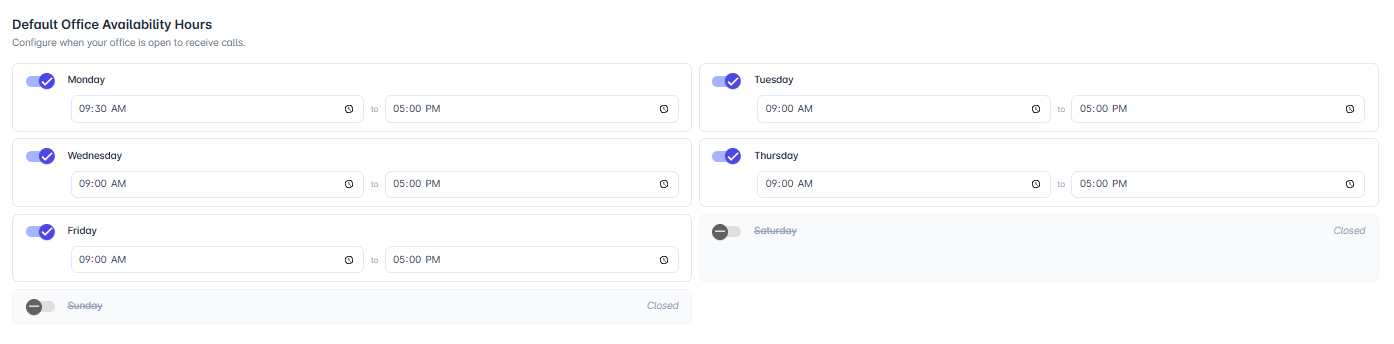
2. Default Office Availability Hours
- Set open/closed status for each day.
- For enabled days, provide From and To times.
- If a day is enabled, both times are required.
3. Caller Management (per caller type)
Caller types: Unknown, Applicant, Employee, New Hire, Contact.
Identification Method
- Verify identity via: Select information will be available for identification per caller type.
- Required: Mark information that are mandatory during profile identification.
- Min. Matches: Minimum matches needed to verify identity. Example: If required is name and but other 3 information are selected in verify identity via agent will ask name and any 1 of the other available information.
- Contact Persona toggle is available on the Contact tab. It specifies all contact type request are escalated directly or handled by the receptionist. If enable agent will try to handled request related to contact persona, but if disabled it will escalate every request of contact persona.

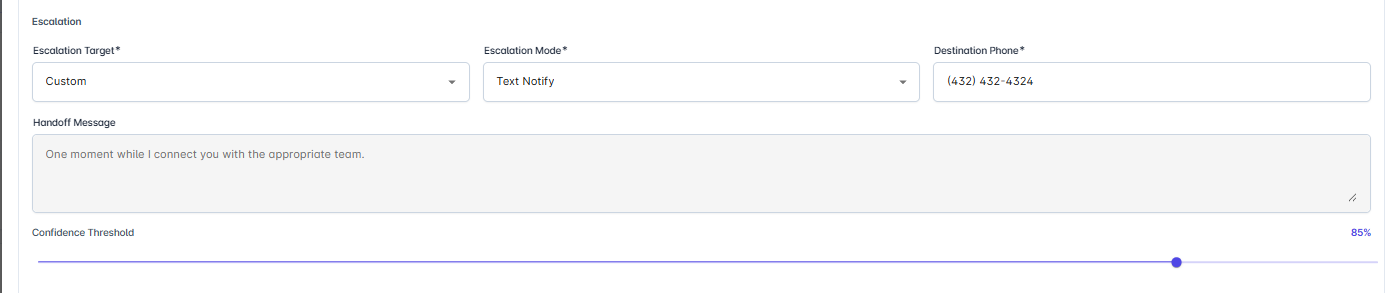
Escalation
- Escalation Target:
- Available values Office or Custom.
- If office is selected all escalation will take place in the office number of the respected identified person.
- If custom, destination phone needs to be provided where the escalation related call or SMS is received.
- Escalation Mode:
- Available values Call or Text.
- Call mode directly transfer escalated call if under escalation availability hour.
- Destination Phone: Required for Custom target.
- Handoff Message: Required when Escalation Mode is Call. Message that plays before call transfer.
- Confidence Threshold: Set escalation sensitivity (0–100%).
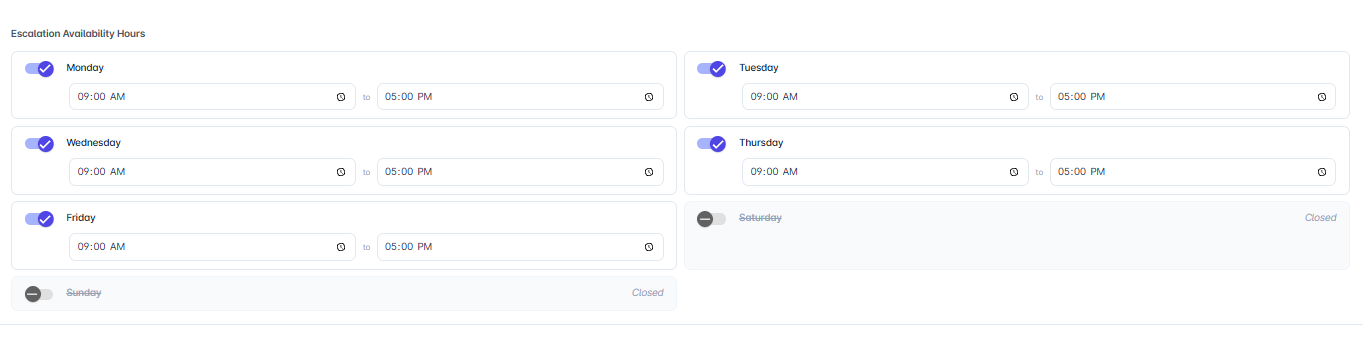
Escalation Availability Hours
- Configure escalation hours by day for configured escalated number.
- For enabled days, both From and To times are required.
4. Outbound Delivery
- Allowed Channels: Choose supported outbound channels to send information during call.
- Default Channel: Must be one of the allowed channels.

5. Write-Back Permissions
Control what actions AI can perform:
- Update Mailing Address
- Update Phone
- Update W-4
- Update Direct Deposit
- Log Availability Status
- Create Applicant
- Create Lead
- Schedule Appointment
- Log Absense
- Log No Show
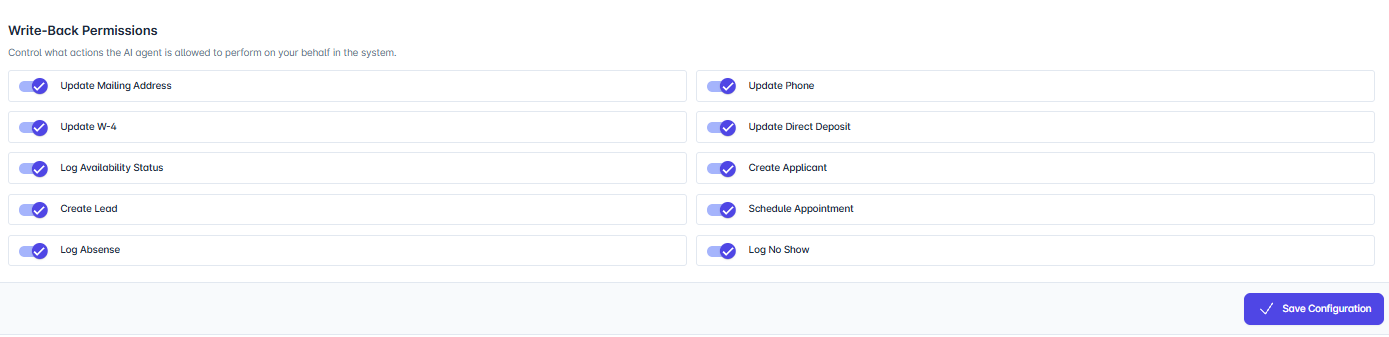
Save Configuration
- Click Save Configuration.
- Wait for completion.
- Summary cards refresh with the latest values.
If the AI toggle is inactive, enable it first to edit/copy configuration.
Copy Configuration to Other Targets
Use Copy Config to clone current scope settings to target company or office:
- Open Copy Config.
- Select one or more target organizations.
- (Optional) Select target offices.
- Optionally adjust settings in the embedded form.
- Click Apply Configuration.