Features Added on ATM
The features added to ATM are:
‘Edit Office’ Action Implemented in The Vertical Ellipsis
Users can easily edit offices without having to follow several steps to update office information.
.png)
Note: Users can update the office by clicking on Edit action as well, where they can update other information such as access, workflow, task template, form, and skill.
Improvement: Office Type Field
As of now, we have child office, office, and region fields in the office type dropdown. In replace to the child office, an internal office type has been added.
Users have the option to add ‘Internal Office’ and ‘Office’ from the office type dropdown.
.png)
Improvement: Task Achieve (Option property has been added)
New option property has been added at the person level in the ATM application as ‘Disallowtaskarchieve’. This property is set to allow/disallow users to archive tasks.
Options property has been added at the person level (Entity wise). The default value is set to NONE.
.png)
Users can view the list of tasks in the default value. They can select the task they want to disallow the archive option to and select office staff, and save.
Once the property is set, office staff will not see the archive action in a task.
.png)
Added Option Property for Default Office Selecting on Creating New Assignment
New option property ‘Defaultofficecopyfrom’ has been added on the company level that allows users to choose their default office while adding assignments.
By default, the job’s office is displayed.
.png)
As option property is selected to Job while adding assignment job’s office is displayed as:
.png)
Added Option Property for Hired Date Mid-Night Job Calculation
New option property ‘HireDateCalculation’ has been added on the company level that runs in a midnight job to calculate the hired date.
.png)
Based on the property set hired date calculation is done.
Email Header Logo Type Now Upload able at Office Level
Previously, the application only allowed Email Header Logo Type upload on the Company level. As per the update, the same feature is available at the Office level too.
- When users upload an Email Header logotype at the company level, the same logo gets pulled for its default office.
- When an email header has been set up for a specific office, it gets reflected on the office’s email template. But this particular feature is yet to get reflected in the application.
.png) From the above screenshot, we can see:
From the above screenshot, we can see:
Number 1: We are uploading an email header logo on the company level.
Number 2: This default office, will pull the email header logo from its company.
Number 3: The Add icon which allows uploading the icon.
Number 4: Email Header chosen as the Logo Type.
So, if the users then choose to upload an email header logo for the office under the company, the company email header icon will auto-populate.
New Options Property Created to Pull Address Details
While reviewing the I-9 form for new hires, the assigned staff’s details will be populated in the form based on the options property “i9address”. The Optionvalue set for the office will get auto-populated while reviewing the form.
.png)
Since the Asheville office has “OfficeAddress” set up for the i9address, the main address of the office will get populated in the Reviewi9 form.
.png)
.png)
.png)
Reject and Forward Access Handled Through Options Property
Now, the application will provide access or restrict the actions “forward” and “restrict” for each office staff as per the options property “Allowforward” and “AllowReject”. The setup can be done for each staff as well as each application.
.png) The staff with “false” set up as the default value won’t have the access to a certain action for the chosen application.
The staff with “false” set up as the default value won’t have the access to a certain action for the chosen application.
.png)
List Item Property to Auto-Replicate the User Role
A new list item property has been made for each user type in the application called “ReplicateEnteredBy”. By editing the property, users can set their desired user role for an office that gets replicated whenever users add an entity under that office.
.png)
Another property that is relevant while setting up the “ReplicateEnteredBy” property is the “Relates to” property. If users want to set up the “ReplicateEnteredBy” property for an entity, they have to make sure the entity is populated under the “Relatesto” property for that user role. This is to make sure the user role is relevant to the entity.
.png)
Also, the office should not have the role already set up from the office level of ATM. In such cases, the “ReplicateEnteredBy” property will not override the Office level set up for that user role.
.png) The list item replicates the user role and copies/replicates it under the User Role section of the organization as seen in the screenshot below.
The list item replicates the user role and copies/replicates it under the User Role section of the organization as seen in the screenshot below. 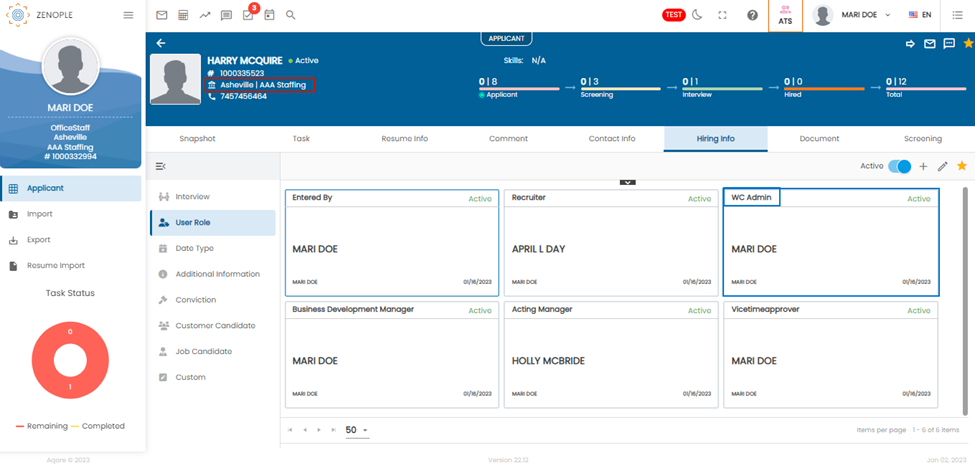
ATM: Option Property to Show Full SSN
A new option property “ViewfullSSN” has been added on the system level that decides the access control of office staff regarding SSN visibility.
As highlighted in the below screenshot, the “ViewfullSSN” has been set to “false” for the selected office staff.
.png)
So, the office staff will have restricted visibility of the SSN details as shown in the screenshot below.
.png)
Options Property Created to Reduce WCCost
A new option property “ReduceWCCostforholidayandPTO” has been created under the Tenant level in ATM. The main reason behind creating the options property is to reduce the Worker Compensation cost for jobs with low risks.
For jobs with transaction codes “PTO” and “Holiday Pay” set up, it is better to use 8810 which has lower rates compared to standard WC Codes set up. If a company has “ReduceWCCostForHOlidayAndPTO” values set to false, the transactions under the company will automatically use 8810 during payroll. Conversely, if the value is set to true, the original job WC Code gets used..png)
Default Status Options Property Added at Office Level
Option Property “Default Status” is now set up at the office level in the ATM. With this property, users can choose to set a default status while creating different entities in the application. Users can choose what status to show while adding applicant, employee, new hire, lead, sales, new customer, customer, or candidate.
As we can see from the screenshot below, the default status for the selected office is “Active” for new applicants..png) So, if users were to change the status and add an applicant, the selected status should be seen in the new applicant status.
So, if users were to change the status and add an applicant, the selected status should be seen in the new applicant status. .png)
.png)
FEIN Column Added to Company Directory
Users can now see the Federal Employer Identification Number Column in the Company Directory of ATM.
.png)
Re-Sizing Logo Feature Available While Uploading Logo
Users can now re-size the logo based on the system’s standard logo.
Users will also be able to preview the logo once uploaded.
.png)
Task Template Available Irrespective of the Workflow Stage
When users set up a particular task or set of tasks from the workflow navigation for a particular workflow stage, those task templates were only available for that particular workflow stage. For example, “Education” is a task template that used to be only available under the task template workflow of the Applicant stage.
.png) According to the update, the “Education” task template should be available under a different workflow stage too while assigning tasks.
According to the update, the “Education” task template should be available under a different workflow stage too while assigning tasks.
.png) As seen from the snapshot, the Education task template is now available under the Screening workflow stage for the Applicant stage.
As seen from the snapshot, the Education task template is now available under the Screening workflow stage for the Applicant stage.
Business Development Manager List Implemented
Users can now select the “Business Development Manager” list item under the setting main nav dropdown. The category should be “User Type”.
.png)
Improvement: General Ledger(GL) Code is Divided into Debit and Credit GL Code
In the add Office option of the ATM application, the GL Code field is now replaced with Debit GL Code and Credit GL Code. The default values for both fields are 000. The update is visible across other navigations of the ATM application too.(1).png)
Profession Type List Item Added
Profession Type List Item has been added under List Item under Settings main navigation of ATM. Users can add, edit or refresh list items from the Favorite Action as per their requirements.
.png)
Users can click on the add action and fill in all the required details and click on save to make changes.
.png)
The newly added list item will appear on the dropdown of ‘Profession Type.’
.png)
Office Type Field Added to Add/ Edit Office
Users will now see a new field ‘Office Type’ while adding or editing an office under Office of Setting's main navigation of ATM. This field will allow users to add the Office Type to which an office staff belongs. The dropdown of the Office Type includes ‘Child Office,’ ‘Internal Office,’ ‘Office’ and ‘Region.’ The column ‘Office Type’ will be displayed in the directory.
.png)
Four New Fields are Added While Selecting Haley Job Portal
The following fields have been added while selecting the Haley job portal and these fields will be posted on the job portal as well.
Minimum Pay: It allows users to add a minimum pay rate for a job.
Maximum Pay: It allows users to add a maximum pay rate for a job.
Email: It allows users to add the email id of the respective office staff.
Date: It allows users to add the insert date of the job.
.png)
Improvement: Document Category Added
Users can manage the document category from the List Item under Settings main navigation of the ATM application at the Document Type level.
.png)