Overview
Invoicing allows users to create a new batch for processing the invoice transaction. The batch is created based on the company and accounting period. The invoice will be displayed on the 'Invoice Directory' after the successful creation of a batch.
Add Batch
Users must select the organization and accounting period under which the invoice batch is to be created. Further, users need to click on the 'Add' icon to add the batch. Batches can only be added in an open accounting period.
.png)
The 'Grid' option has toggle buttons for 'Show Posted' and 'Show Others.' 'Show Posted' will display batches that have been already posted while 'Show Others' will display the batches created by other users when enabled.
.png)
After filling up the invoice batch details, an invoice batch is created.
.png)
Groupings
Grouping is done to select the transactions for each batch.
The grouping can be done based on various categories such as,
- Accounting Period
- Customer
- Employee
- Office
- Period Ending
The transactions will be displayed based on these selected grouping options.
.png)
The grid options in 'Groupings' are similar to that of 'Batch.' The grid option has the toggle button 'Show mine' which will display the transactions created by the user in TMS. Users need to select the transactions to include them in invoice processing, .png)
Transaction
This will display the selected transactions to be processed for invoicing in detail and will further calculate the total invoice amount. These transactions are tagged from the TMS application where the billing hours are entered for the customer under a specific accounting period.
Users should enable the toggle button 'Show Mine' from the 'Groupings' to view the transactions created by users themselves from the TMS application.
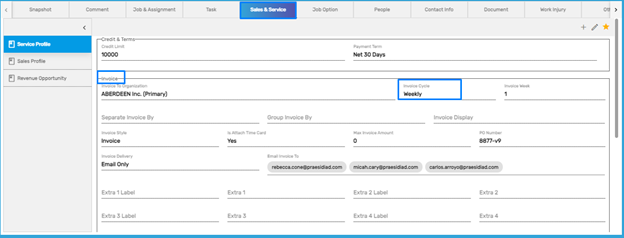
If the invoice cycle is set to other values except 'Weekly' or 'Daily' the transaction may not be reflected in the current accounting period. This is set up from the 'Service Profile,' side navigation in CMS.
If the bill amount is less than or equal to '0,' the transaction will not be displayed. If the transactions aren't reflected then one of its reasons could be the accessibility.
Select the required transactions and click on the 'Next button to move forward.
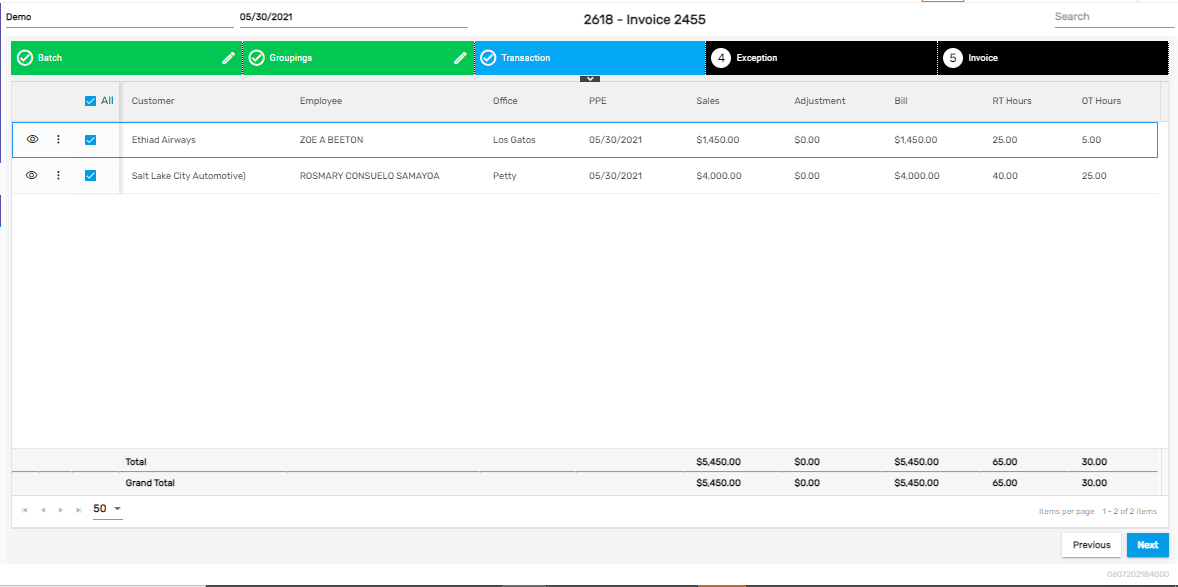
Note: Invoices are separated by customers. If there are two transactions of two different customers, separate invoices are created.
The vertical ellipsis button has also two actions under it. They are:
- Edit
- Timesheet Attachment
.png)
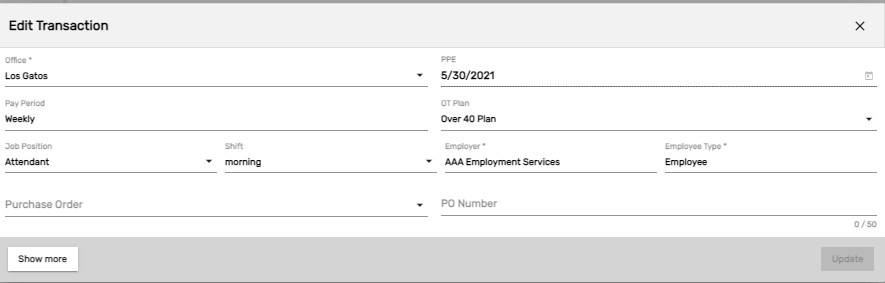
1. Edit
It allows users to edit the invoice transaction details such as OT plan, PPE period, shift, and job position details.
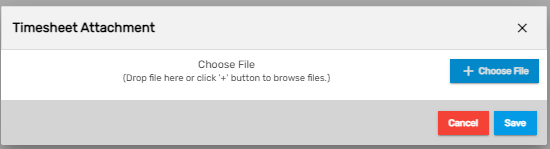
2. Timesheet Attachment
It allows users to attach timesheets of the employees for user convenience when processing the invoice. This timesheet is usually given by the company for the payroll of their employees and while creating an invoice, the same timesheet is attached for billing purposes.
 Users can redirect to the assignment, customer, employee, and temp job detail related to a specific transaction by hovering the cursor on the eye view icon and clicking on the required icon among icons of different transactions.

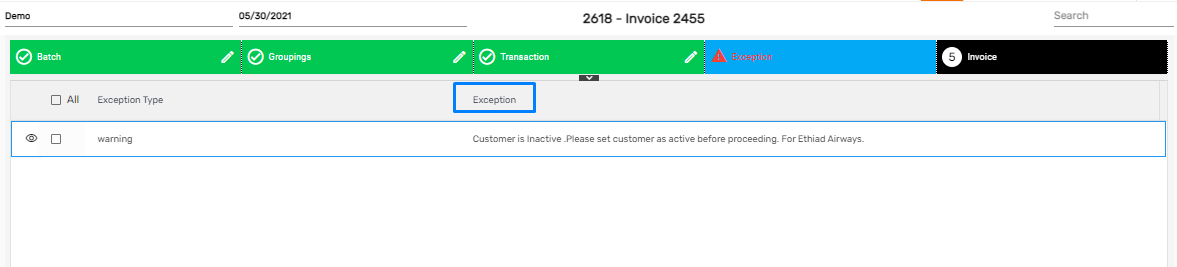
Exception
The exceptions are disclaimers called during a process. It may be a warning or a severe exception. Users cannot ignore a severe exception and users have to fix the records based on the disclaimer to move forward. Likewise, various exceptions get tested while completing this process.
- If no exception is seen, users can move forward.
- If a warning exception is seen, users may fix the records as per the exception or ignore the exception and move forward.
- If a severe exception is seen, users must fix the records based on the exception called to move forward.
Invoice
The last workflow to complete the invoice batch before posting is the 'Invoice'. Users can view the details of the invoice transactions with its 'Invoice Number,' 'Customer’s Name,' 'Department,' 'Office,' 'Sue Date,' 'Total Bill,' 'Sales Tax,' 'Discount,' 'Charge,' 'Total Invoice Amount' and so on. The eye view icon allows users to redirect to the invoice detail. Users must click on 'Print' and post the invoice for it to be seen in the Invoice directory and successfully create an invoice.
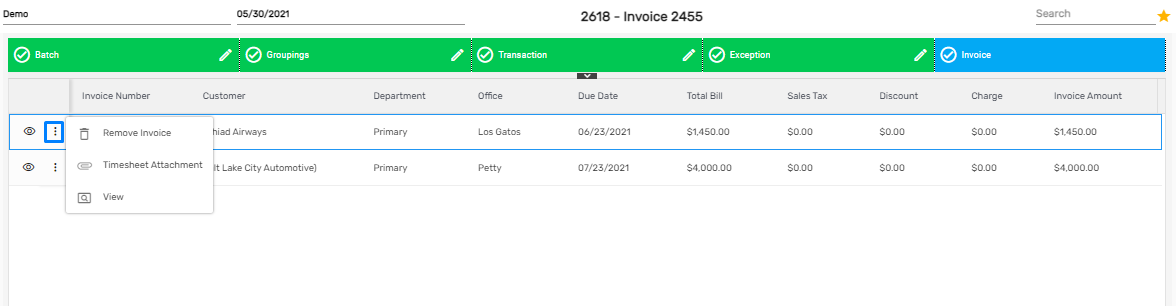
The vertical ellipsis button has three actions. They are:
- Remove Invoice
- Timesheet Attachment
- View
.png)
1. Remove Invoice
It allows users to remove specific invoices before posting.
2. Timesheet Attachment
It allows users to attach a timesheet of the employees for user convenience when processing the invoice.
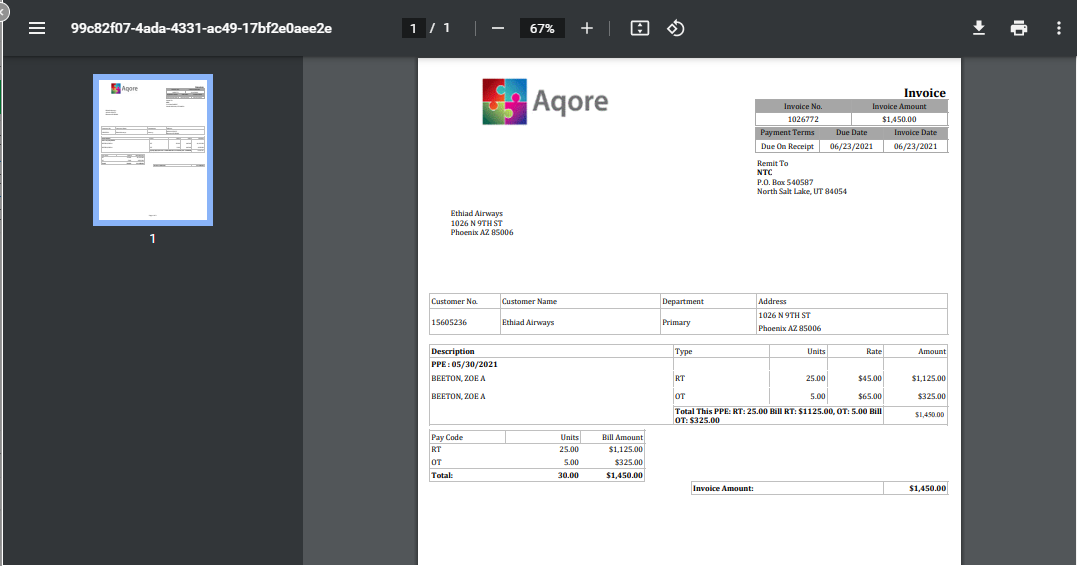
3. View
It allows users to view the invoice in document slider view. Users can also download and print the invoice as required.
Favorite Action
The favorite icon in invoicing has three actions. They are:
- Discard
- Reprocess Invoice
- Summary
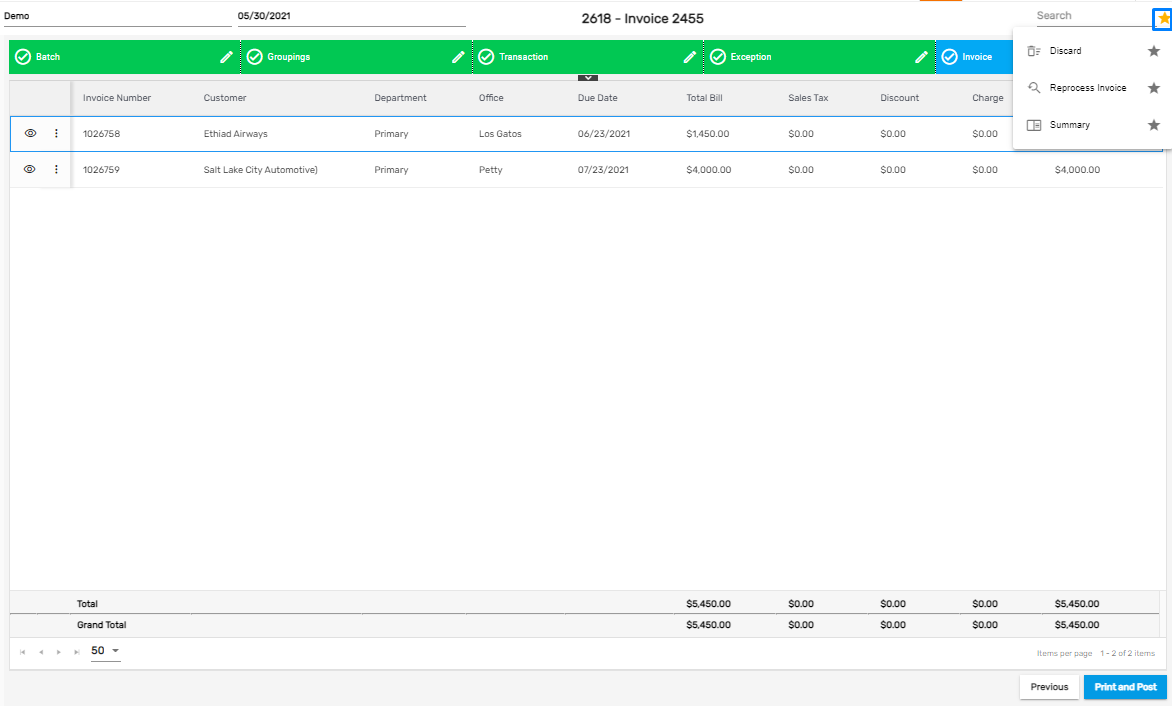
1. Discard
It allows users to discard the invoice before posting.
2. Reprocess Invoice
It allows users to reprocess the invoice batch. When changes are made in items related to the 'Invoice,' 'Transactions,' 'Employees,' and 'Customers,' reprocess should be done to update these changes and reflect them in the current batch.
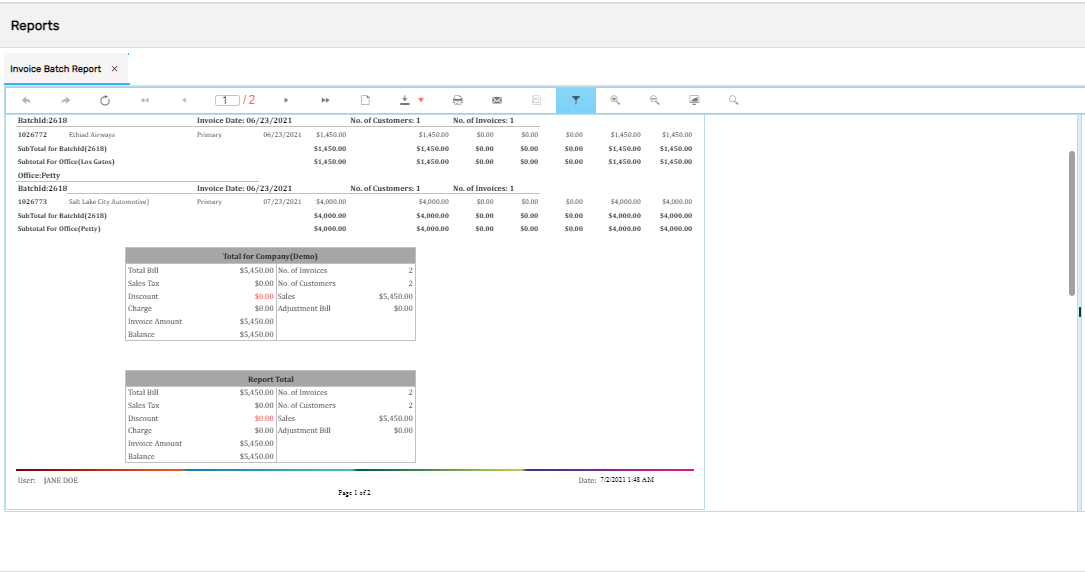
3. Summary
It allows users to view the summarized 'Invoice Batch Report' with all the invoice details. The user may print, email, or download the invoice batch report.
This report shows a summary of invoices created in the batch. This report is generated when an invoice batch is posted.
.png )
Also, users may enter the parameter details as required and view other 'Invoice Batch Report' from the right-side parameter section. 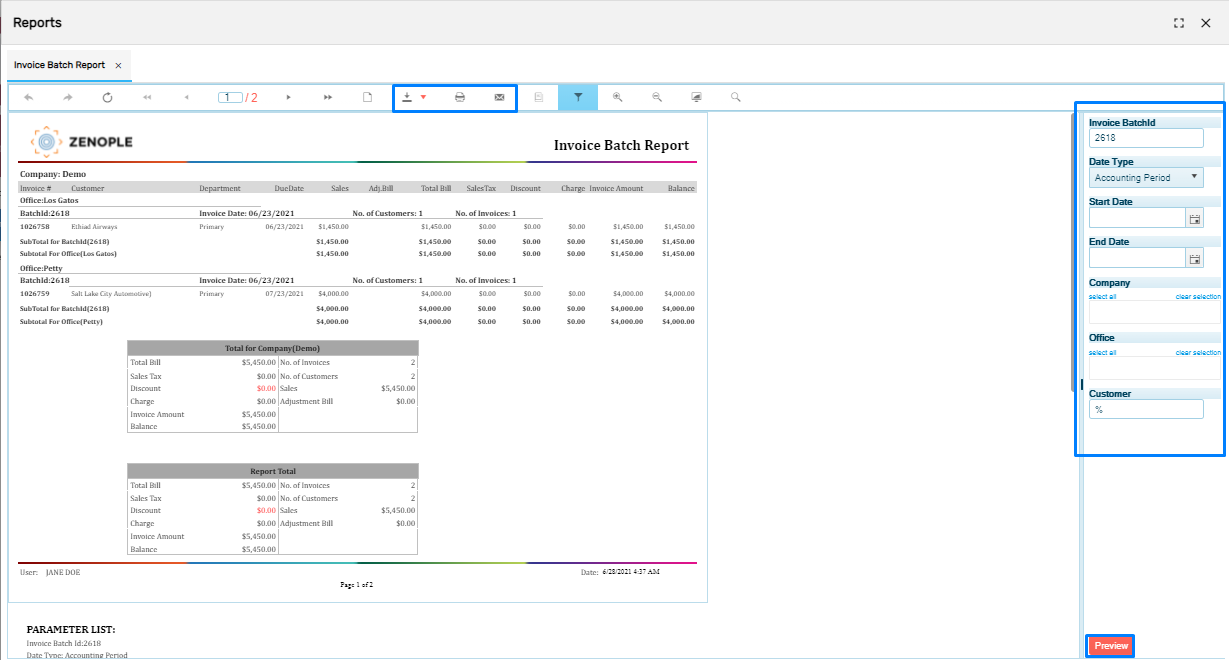
Once the invoice gets posted, it will be displayed as below,
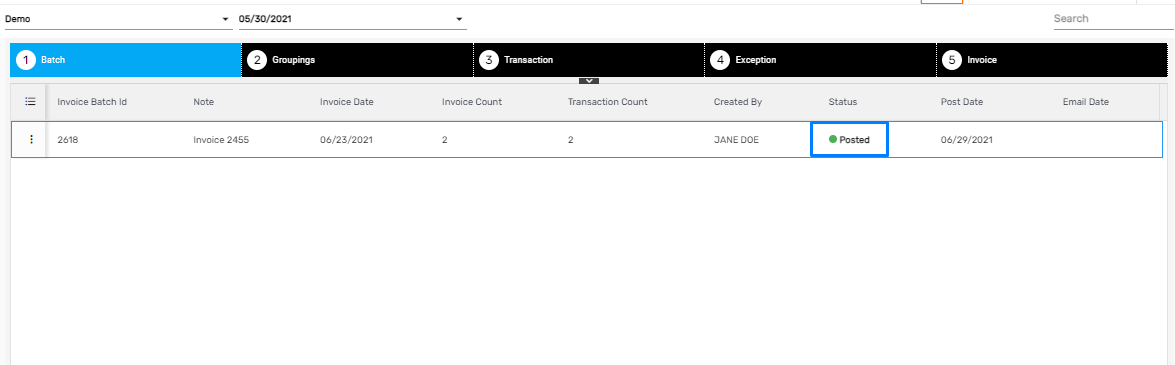
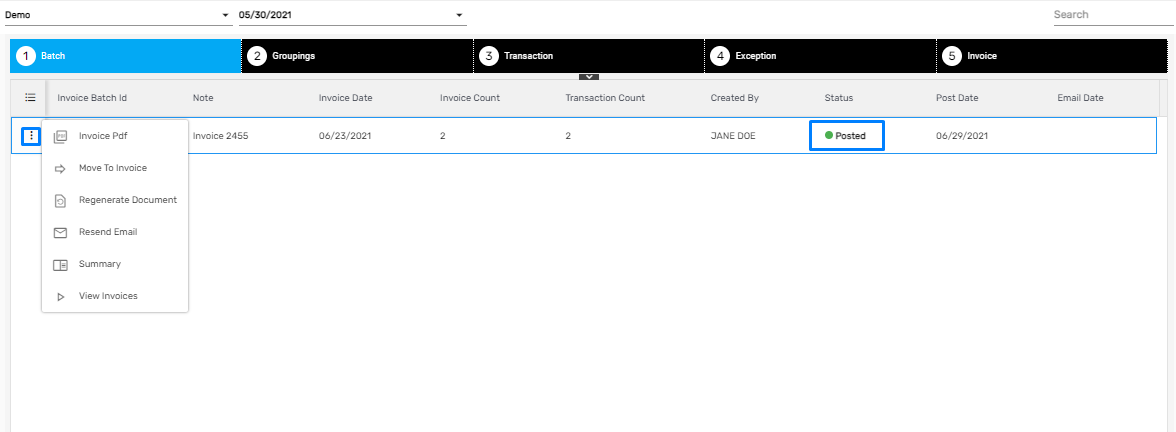
The posted batch consists of six actions under the vertical ellipsis button. They are:
- Invoice PDF
- Move to Invoice
- Regenerate Document
- Resend Email
- Summary
- View Invoices
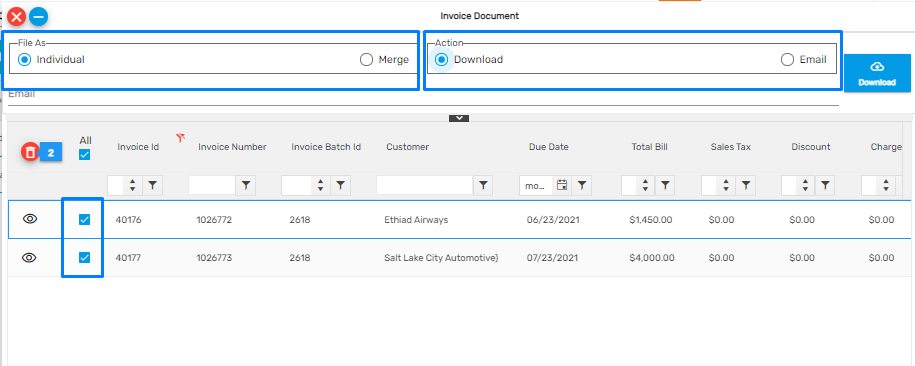
1. Invoice PDF
It allows users to download the multiple invoice documents separately as well as merge multiple invoice documents into one single invoice document as a PDF. Users can also download it and email the files accordingly.
2. Move to Invoice
This allows users to skip the process of grouping, transaction, exception and directly move the invoice batch to the invoice tab.
3. Regenerate Document
This allows users to regenerate the document for all the invoices in the batch in case of any changes regarding the customer, employee, invoice batch, and transaction.
4. Resend Email
This allows users to resend the invoice email to the customer.
5. Summary
This allows users to view invoice batch reports with all the invoice details.
6. View Invoices
It allows users to view the invoices in the document slider view.