Centralized AI Configuration
Overview
The Centralized AI Configuration serves as the primary control center for all AI capabilities within the platform. It allows administrators to centrally manage AI access, control feature availability, and define which AI features are accessible across the organization.
Using this configuration, administrators can:
- Enable or disable AI functionality for an entire tenant.
- Control which AI features are available.
- Manage AI feature access at different configuration levels.
AI Feature Access Hierarchy
AI feature access is evaluated in the following priority order:
- Tenant Level (Highest Priority)
- Person Level
- Role Level (Lowest Priority)
Tenant Level
The Tenant Level is the highest level of AI access control and acts as the global gatekeeper for all AI features within a tenant. Only features enabled at this level are available for use. If a feature is disabled at the tenant level, it cannot be accessed by any user, regardless of their role or individual permissions.
Person Level
The Person Level defines AI feature access for an individual user. When a person-level configuration exists, it overrides the permissions assigned through the user's role. This allows administrators to grant or restrict AI features for specific users based on business requirements.
Role Level
The Role Level defines the default AI feature access for users assigned to a specific role. These permissions are applied only when no person-level configuration is configured for the user. Role-level access provides a standardized set of AI features for users with similar responsibilities.
Access Evaluation
The system determines AI feature access using the following sequence:
- The feature must be enabled at the Tenant Level.
- If a Person-Level configuration exists, it is used to determine the user's access.
- If no Person-Level configuration exists, the Role-Level configuration is applied.
Navigation
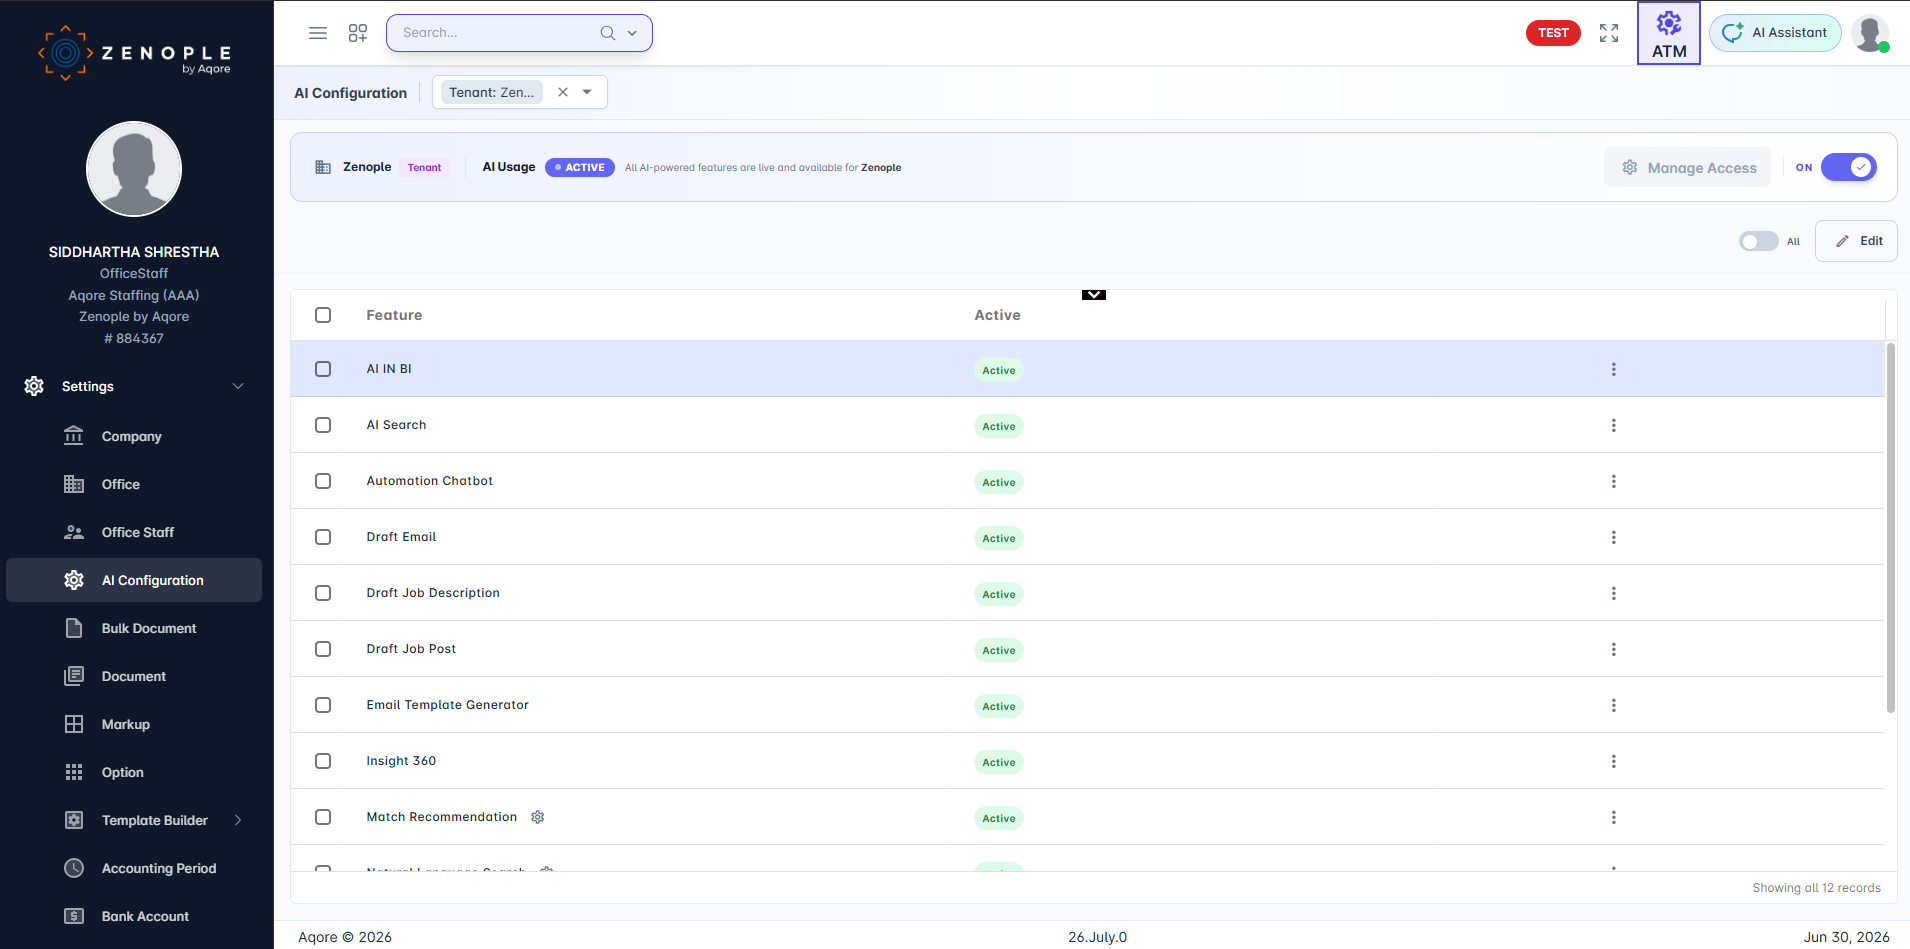
To access the Centralized AI Configuration, navigate to the ATM application and select Settings from the left-hand navigation menu. Under the Settings section, click AI Configuration to open the centralized AI configuration page.
Configuration Workflow
First-Time Activation (Onboarding)
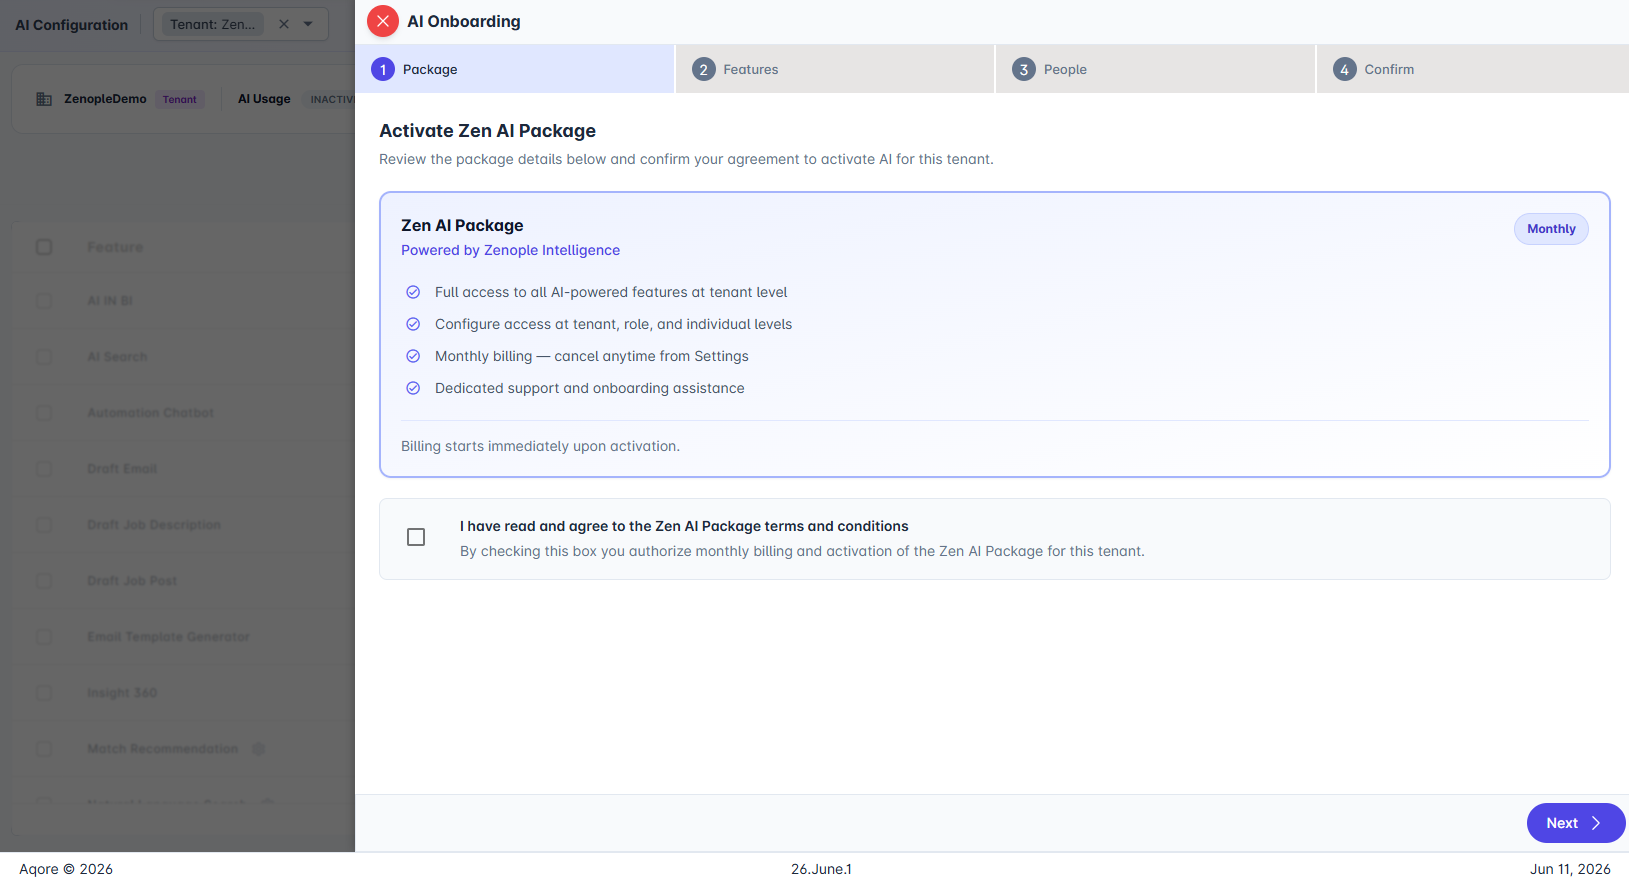
If AI has not been activated for the tenant, the onboarding process will start when an administrator turns on the master toggle button for the first time from the AI Configuration page. This guided setup ensures that the tenant is properly configured before AI features become available.
The onboarding process consists of the following steps:
1. Package
Review the selected Zen AI package, including its available features and subscription details. Before proceeding, read and accept the service agreement by selecting the confirmation checkbox.
2. Features
Select the AI features to enable for the tenant. These features define the AI capabilities that will be available after activation. At least one AI feature must be enabled to continue.
3. Person
Assign AI feature access to individual users. Select the users who should be granted access to the enabled AI features after activation.
4. Confirmation
Review the activation summary to verify the selected package, enabled AI features, and assigned users. Accept the activation agreement and click Confirm Activation to complete the onboarding process.
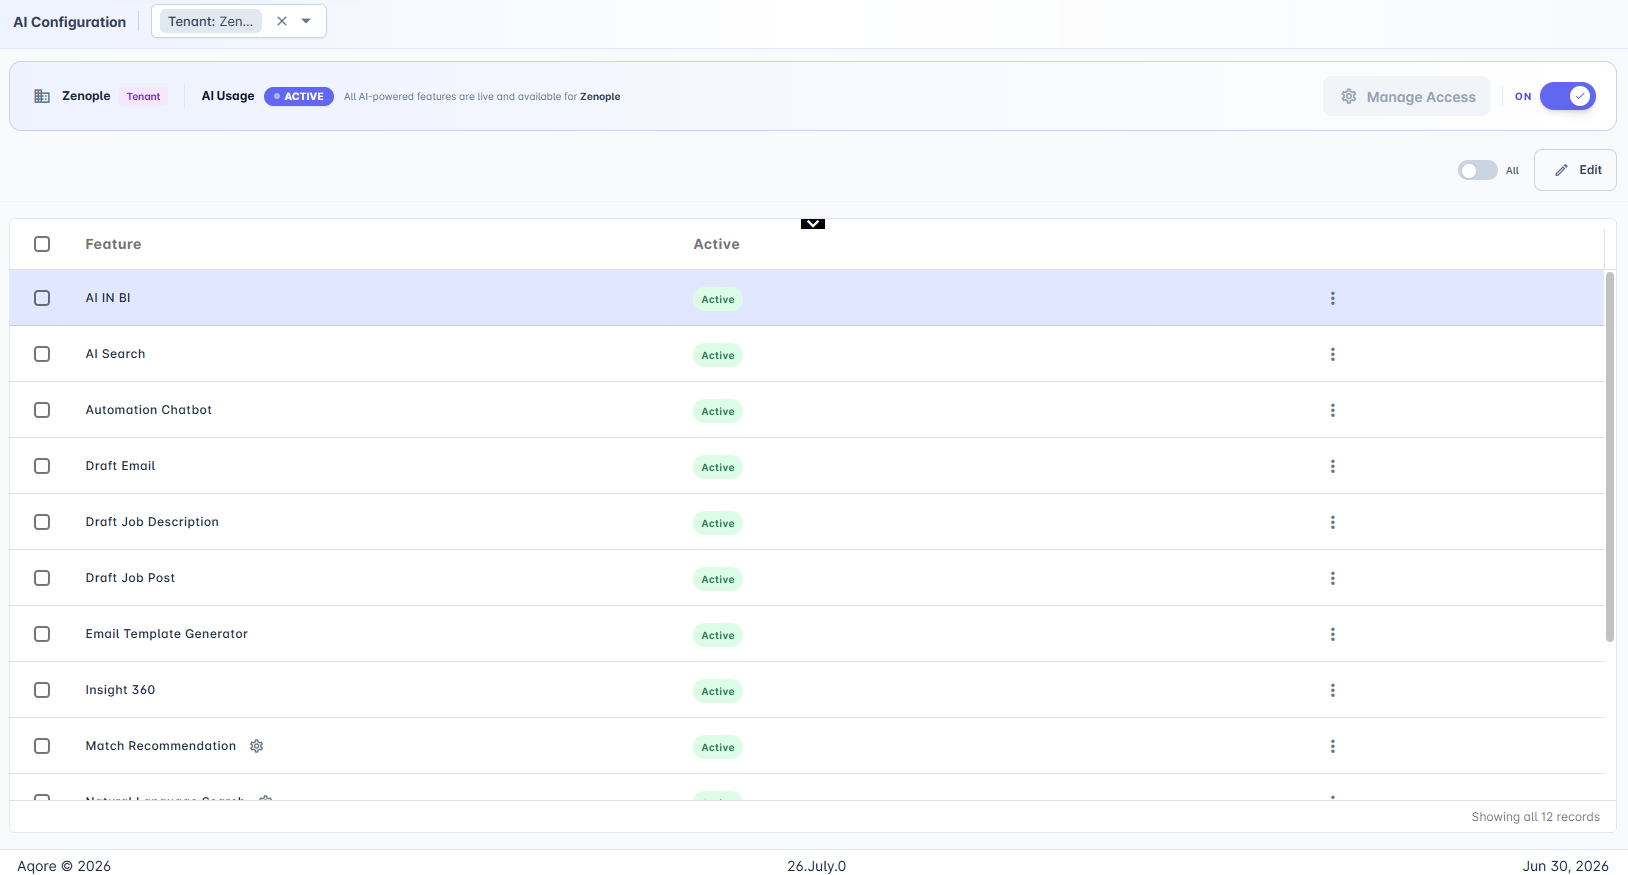
Once AI has been successfully activated, the AI Configuration page becomes the central location for managing AI capabilities for the tenant.
From this page, administrators can:
- Enable or disable AI for the tenant.
- Select the AI features that are available for use.
- Assign AI feature access to individual users.
- Configure settings for supported AI features.
Day-to-Day Operations
After AI has been activated, administrators can use the AI Configuration page to manage AI settings and user access.
1. Enable or Disable AI Usage
Use the AI Usage toggle in the header section to control AI availability for the tenant.

- Turning Off disables all AI-powered features for the tenant after confirmation.
- Turning On re-enables AI and restores access to the configured AI features.
2. Enable or Disable AI Features
Manage which AI features are available for the tenant.
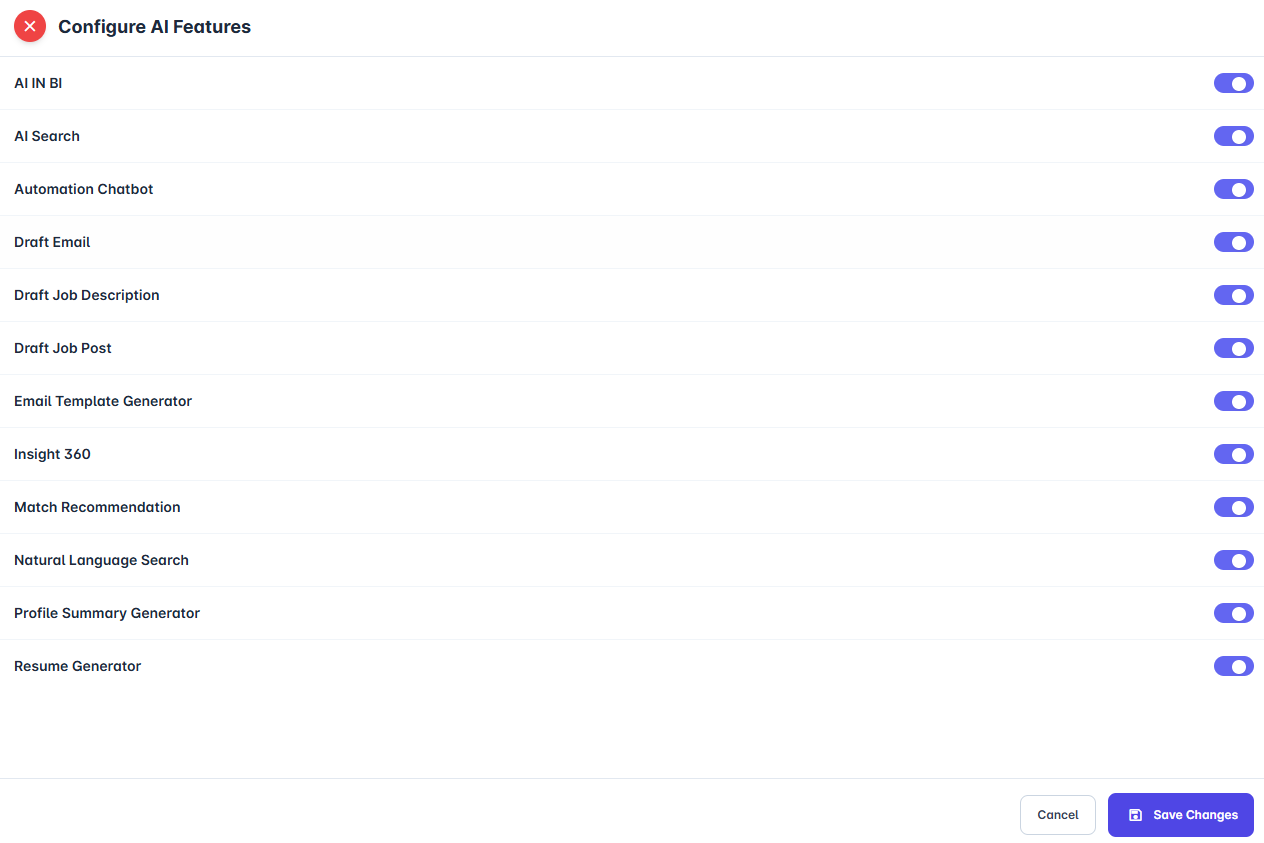
- Click Edit.
- Enable or disable the required AI features.
- Click Save Changes to apply the changes.
3. Manage Access
The Manage Access dialog allows administrators to grant or revoke access to one or more AI features. Access can be managed by Role or by Person, depending on how permissions need to be assigned.
By Role
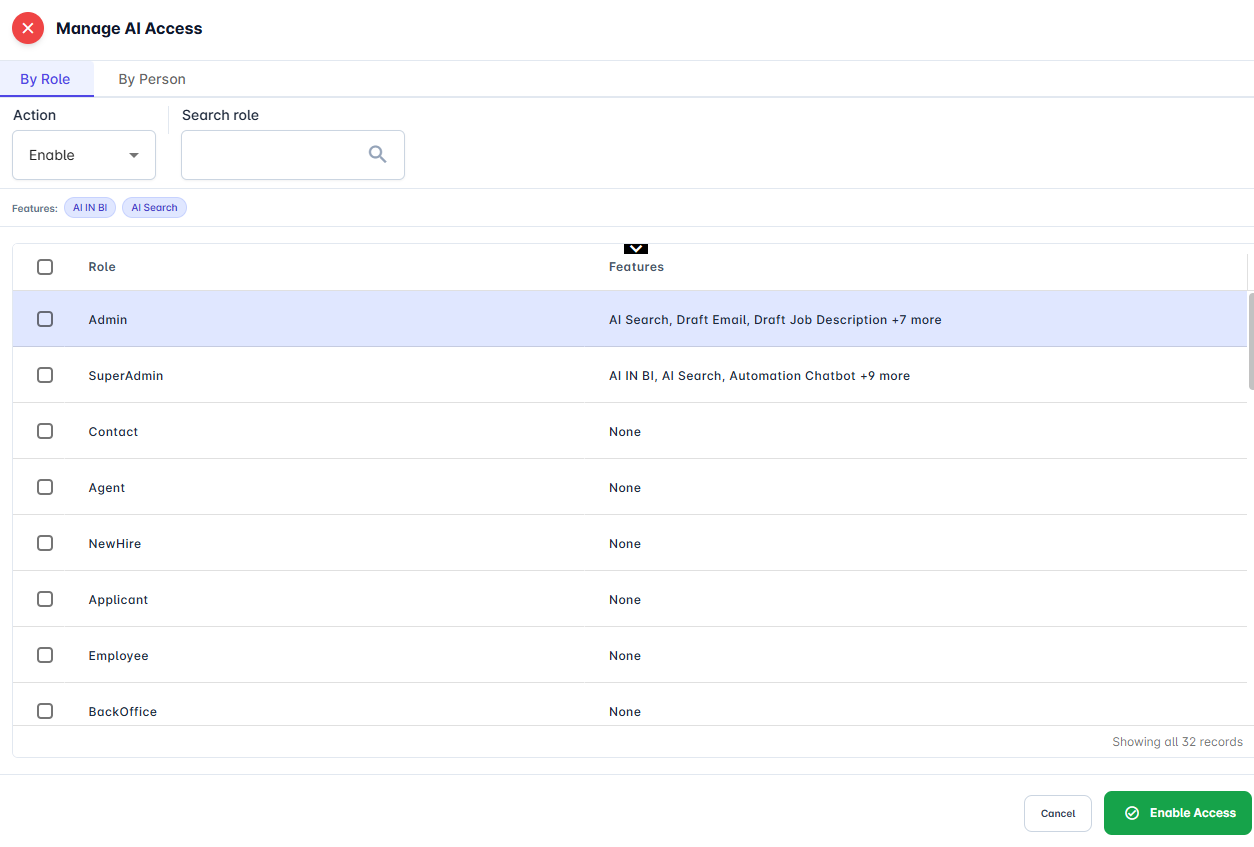
The By Role tab is used to manage AI feature access for one or more roles.
To assign access:
- Select the required Action (Enable or Disable).
- Use the Search Role field to locate the required role.
- Select one or more roles from the list.
- Click Enable Access or Disable Access to apply the changes.
Available options:
- Action – Select whether to Enable or Disable the selected AI features.
- Search Role – Search for a specific role by name.
By Person
The By Person tab is used to manage AI feature access for individual users.
To assign access:
- Select the required Action (Enable or Disable).
- Search for the required user.
- (Optional) Use the available filters to narrow the list of users.
- Select one or more users.
- Click Enable Access or Disable Access to apply the changes.
To reset to role-based access:
If a user has a custom Person-Level configuration, it can be removed to restore the user's default Role-Level permissions.
- Select one or more users with a custom Person-Level configuration.
- Click Reset to Role-Based Access.
- Confirm the action to remove the custom configuration.
After the reset, the user inherits AI feature access based on their assigned role.
Available options:
- Action – Select whether to Enable or Disable the selected AI features.
- Search Person – Search for a user by entering their name.
- Company – Filter users by company.
- Office – Filter users by office.
- Role – Filter users by their assigned role.
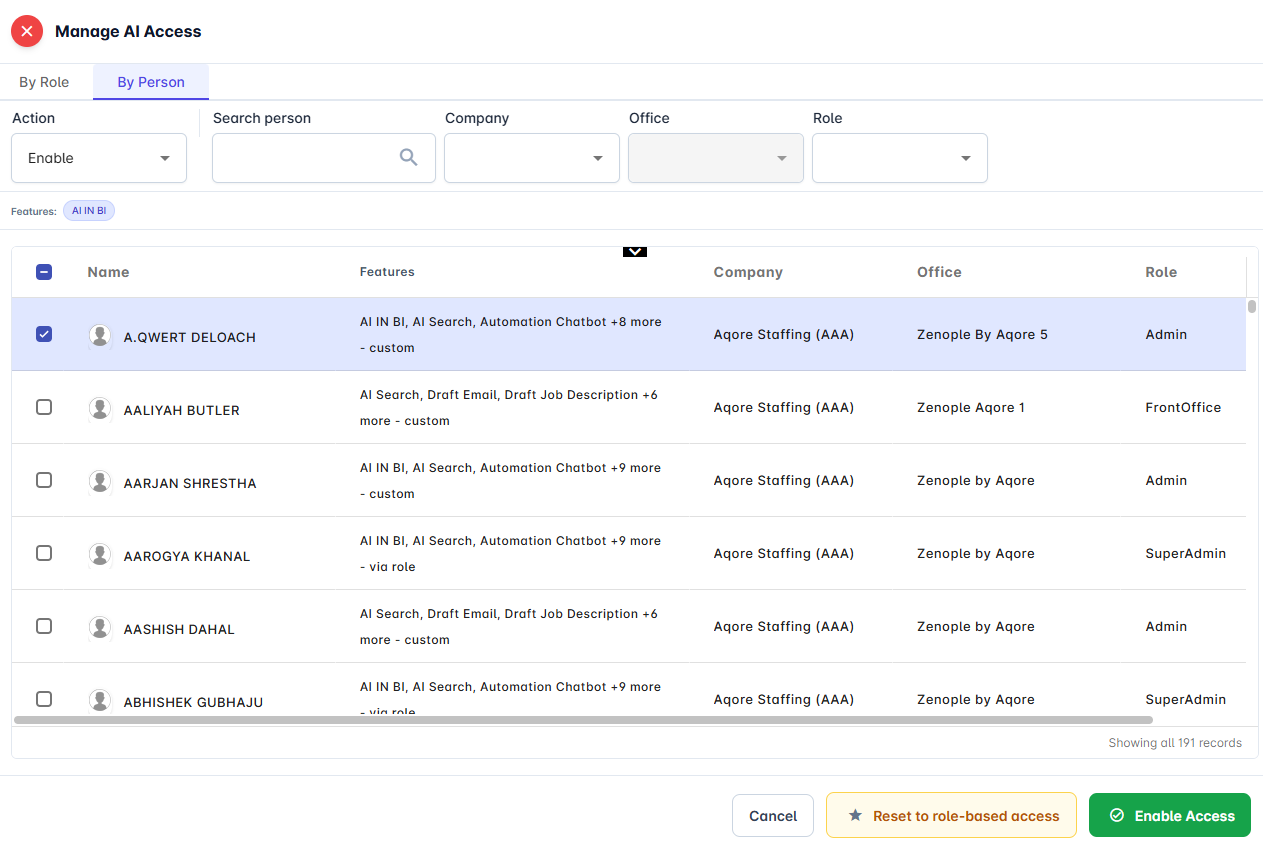
Note: Person-Level permissions override Role-Level permissions. However, users can only access AI features that are enabled at the Tenant Level. If a user's Person-Level configuration is reset, the system automatically applies to the permissions defined by the user's assigned role.
4. View User Access
View the users who have access to a specific AI feature.
- Select the More Actions (⋮) menu for an active AI feature.
- Click View Access.
- Review the assigned users or use the available filters to narrow the results.
The AI Feature dropdown allows administrators to switch between or select multiple AI features within the same dialog. The user list is updated based on the selected features, making it easy to review access across multiple AI features.
To revoke access:
- Select the required AI feature(s).
- Select one or more users from the list.
- Click Disable Access to remove access for the selected users.
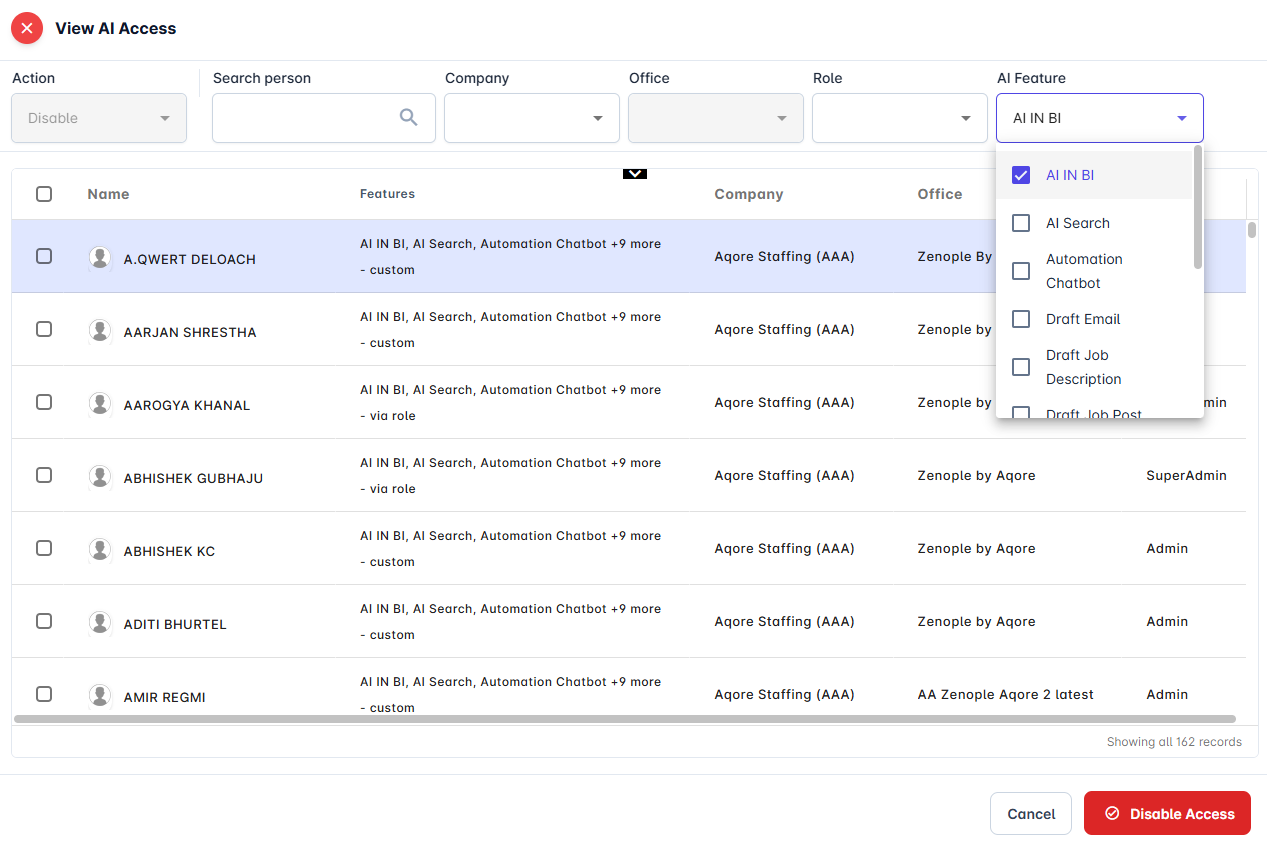
Note: The View AI Access dialog supports disabling access only. To grant access, use the Manage Access option.
5. Feature-Level Settings
Some AI features provide additional configuration options that allow administrators to customize how the feature behaves. Depending on the feature, settings can be configured at either the Office Level or the Person Level.
Office-Level Configuration
Features such as Match Recommendation support Office-Level configuration. This allows administrators to define feature settings for individual offices based on their business requirements.
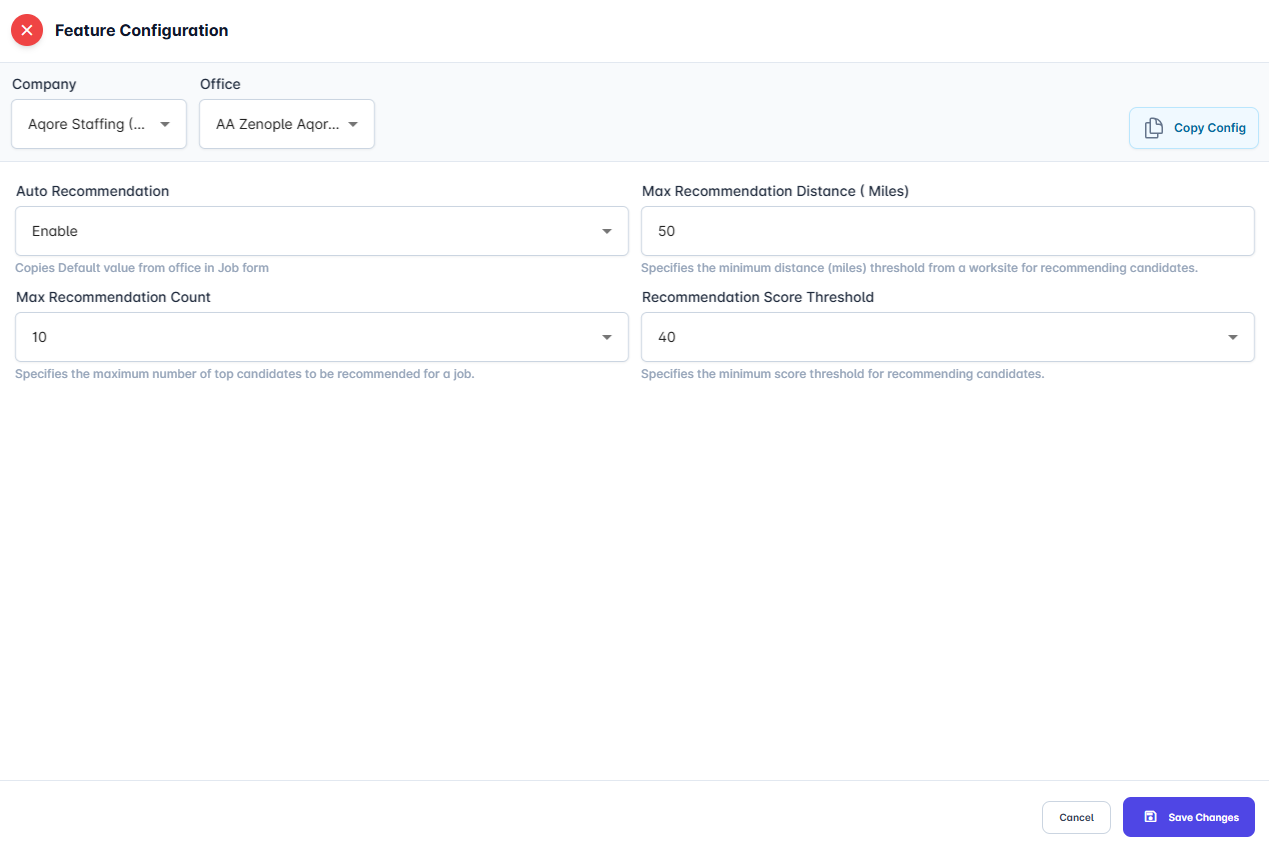
To configure office-level settings:
- Click the Settings icon next to the feature.
- Select the required Company and Office.
- Update the required configuration values.
- Click Save Changes to apply the configuration.
The Match Recommendation feature provides the following configuration options:
Setting | Description |
Auto Recommendation | Enables or disables automatic candidate recommendations. |
Max Recommendation Distance (Miles) | Specifies the maximum distance from the worksite within which candidates can be recommended. |
Max Recommendation Count | Specifies the maximum number of candidates returned as recommendations. |
Recommendation Score Threshold | Defines the minimum recommendation score required for a candidate to be included in the recommendation results. |
Copy Configuration
Office-level configurations can be copied to multiple offices, eliminating the need to configure each office individually.
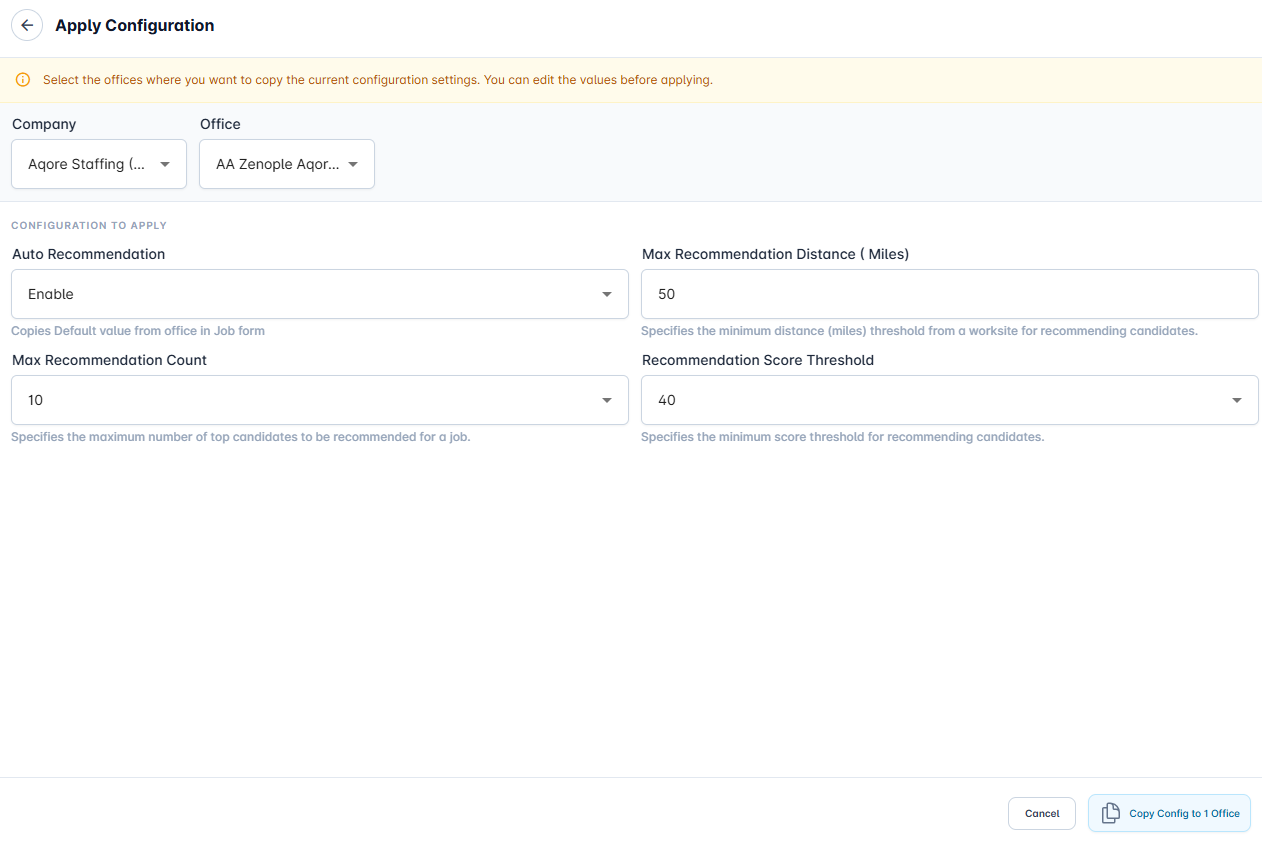
To copy a configuration:
- Open the feature configuration.
- Click Copy Configuration.
- Select the target companies or offices.
- Review the configuration values.
- Click Copy Configuration to apply the settings.
Person-Level Configuration
The Natural Language Search feature uses Person-Level configuration instead of Office-Level configuration.
Administrators can enable or disable Semantic Search for individual users, allowing access to Natural Language Search to be managed on a user-by-user basis.
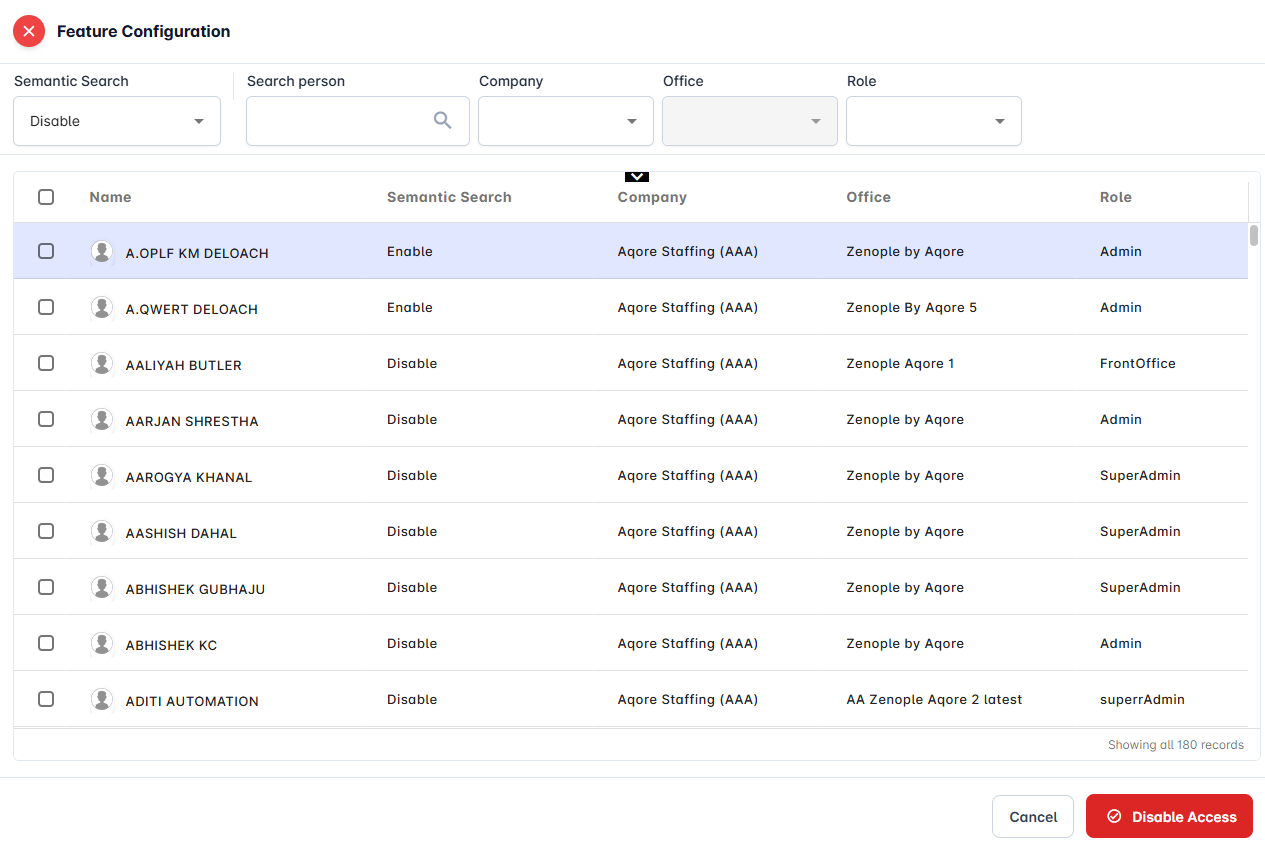
To configure person-level settings:
- Click the Settings icon for Natural Language Search.
- Search for and select the required users.
- Enable or disable Semantic Search for the selected users.
- Click Save Changes to apply the changes.
Note: The configuration level depends on the AI feature. Match Recommendation uses Office-Level configuration, while Natural Language Search uses Person-Level configuration for managing Semantic Search access.