Features Added on ATM
The features added on ATM are:
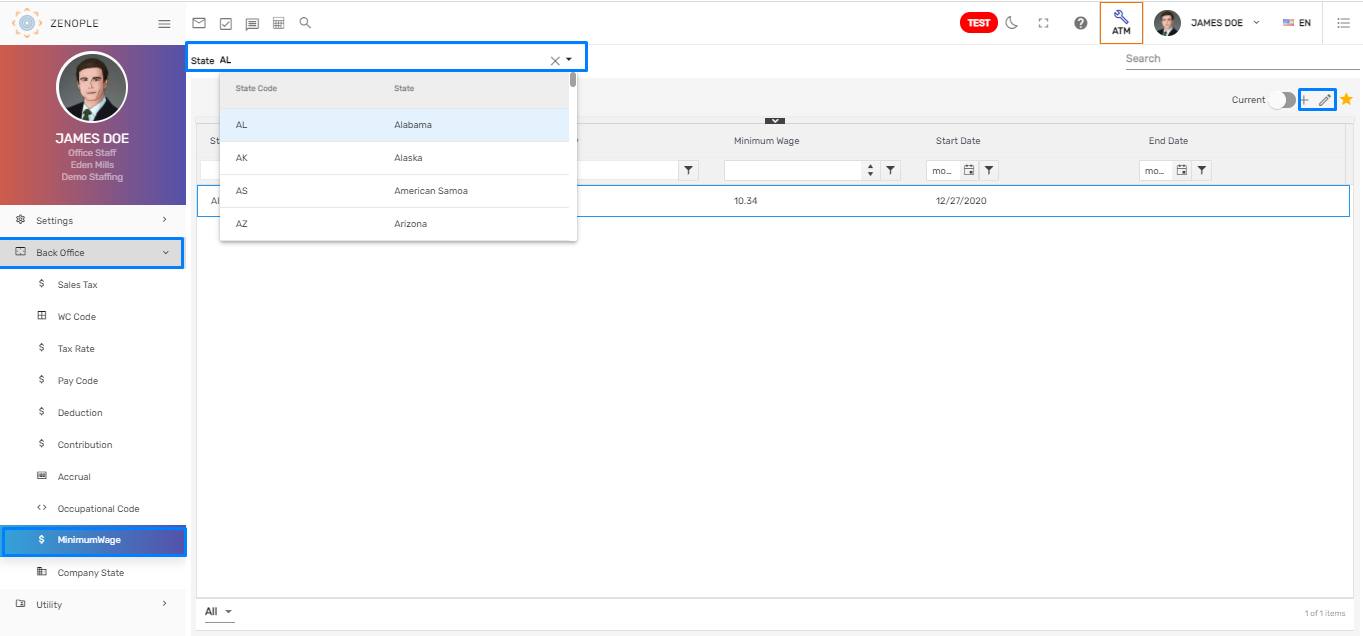
Minimum Wage Navigation Added
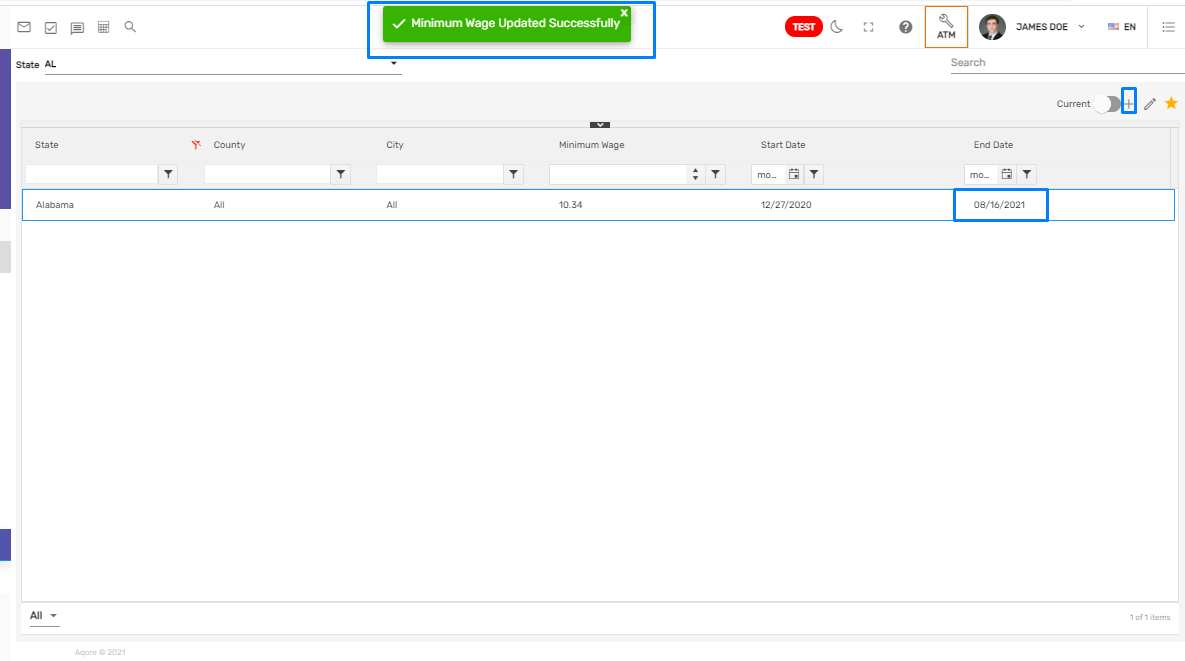
Minimum wage main navigation has been added under Back Office. It allows users to add and edit minimum wages under various states as required.
The 'Current'/ 'All' toggle button allows users to view the current effective minimum wage or all the minimum wage as required when enabled accordingly.
How to Use This Feature
- Go to Back Office and click on Minimum Wage main navigation
- Choose the State and then click on Add/ Edit as per the requirement
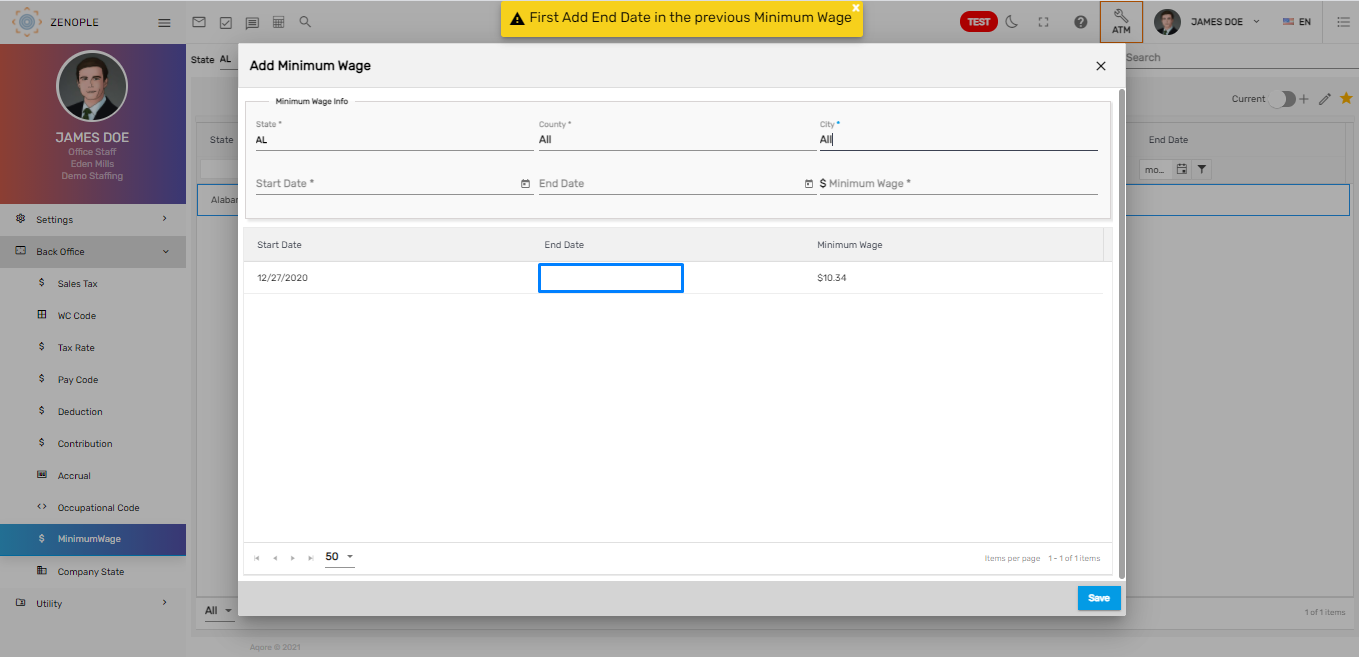
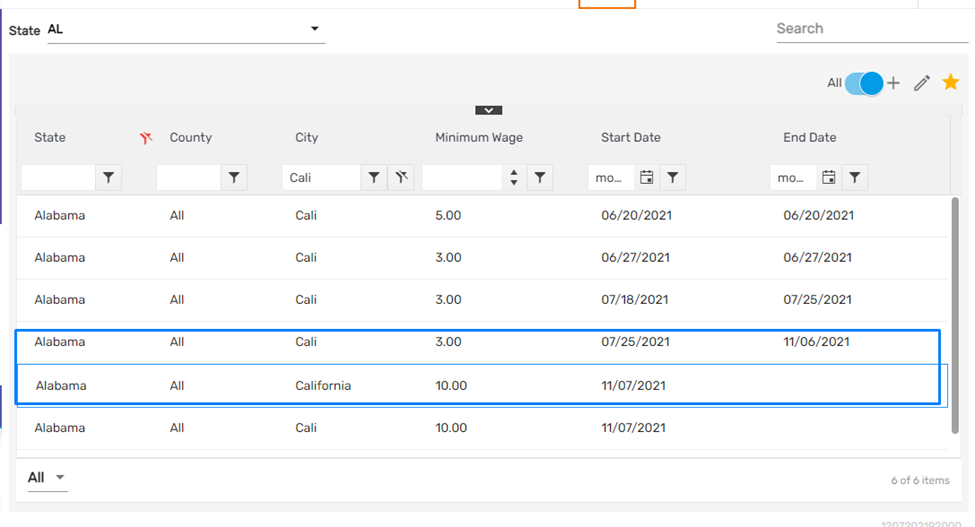
- The user will not be able to add multiple minimum wages on the same dates as the wages would overlap the dates.
- 'End Date' is not mandatory while adding a new Minimum Wage for a state. However, if the users want to add a new Minimum Wage to the existing one for a state then it is mandatory to close the existing interval with an 'End Date.' Further, the users need to start a new interval by adding a new 'Start Date' for a new Minimum Wage under a state. Else, a warning message will be displayed as,
- Click on the Edit action under the Favorite icon to enter the 'End Date' on the existing Minimum Wage for a state.
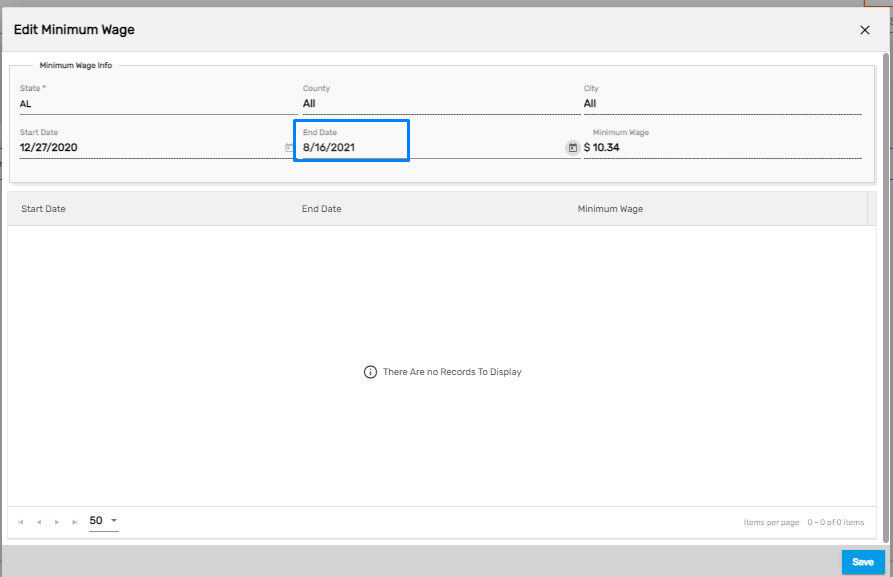
- The existing Minimum Wage will be updated with the End Date. Now, the user can add the new Minimum Wage rate for the new interval under the state.
- The records with the list of previous Minimum Wages with the Start Date and End Date will be displayed if any.
- Now enter the New Start Date, End Date, Minimum Wage Rate as required and Save it.
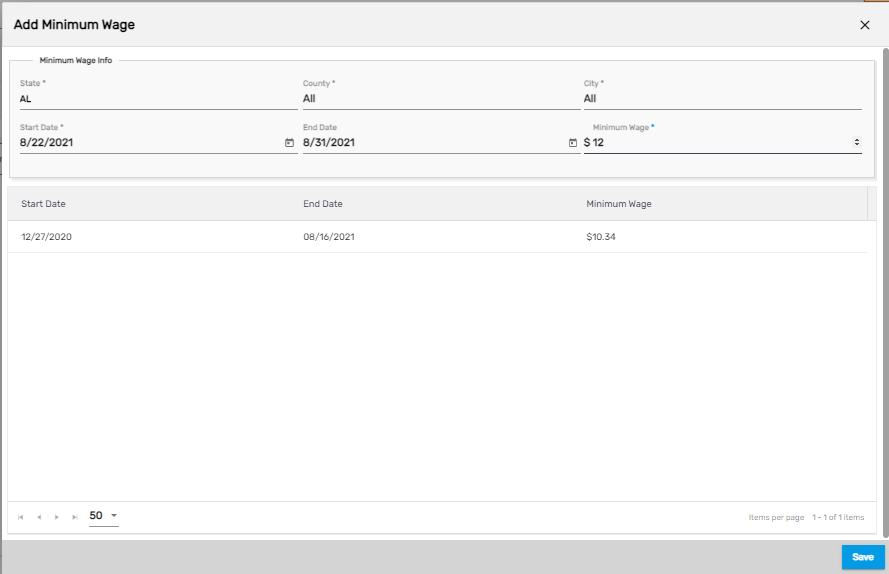
Note: The Start Date must always be a Sunday that is why the user will be allowed to choose only the Sunday’s date for a start date.
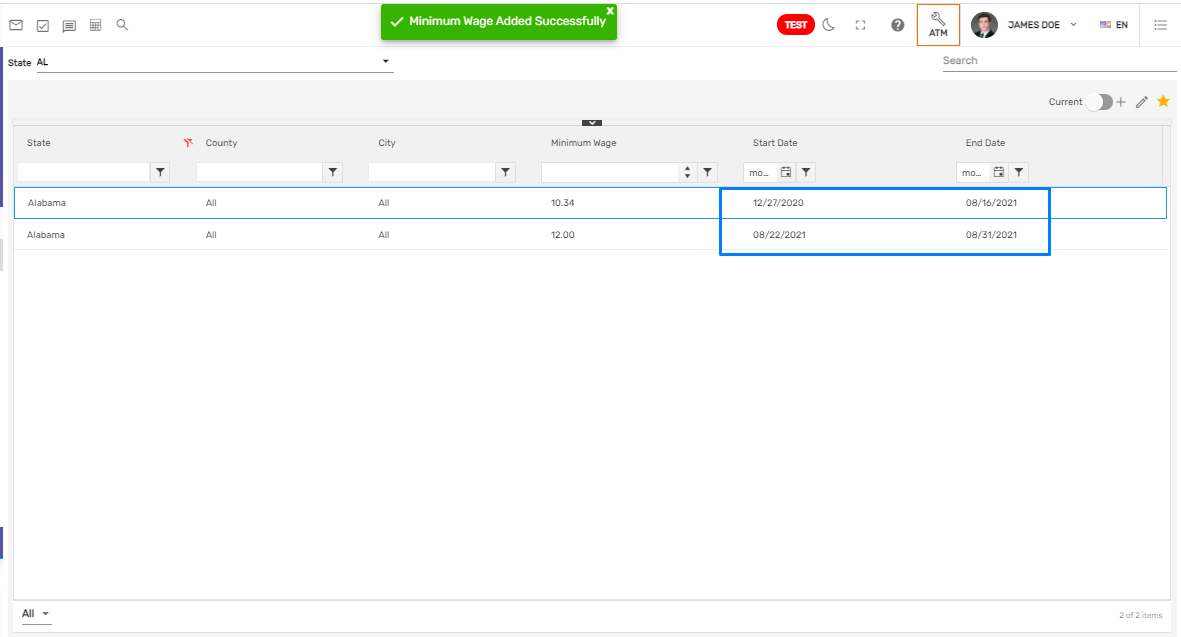
- The updated Minimum Wages will be displayed as below,
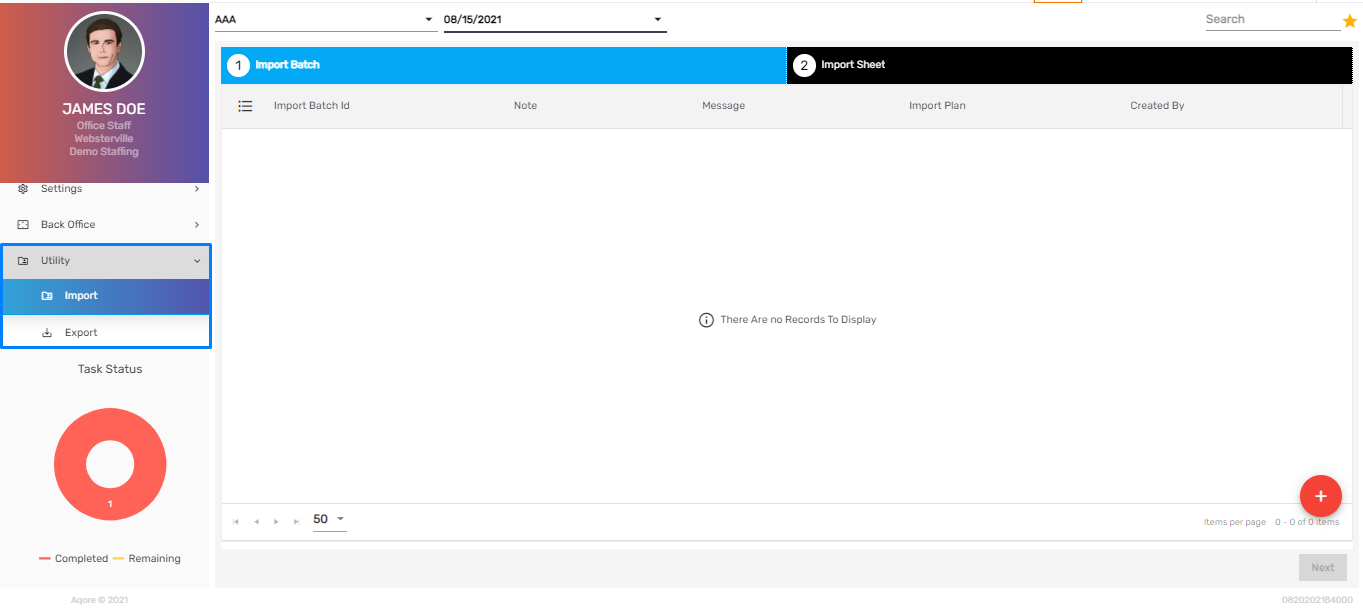
Import/ Export Navigation Added
Import and Export navigations have been added under the Utility main navigation. It allows the users to import or export various plans and the imported records will be reflected in the related navigations. For now, an Import Plan for Minimum Wage has been implemented. The other plans will be implemented in the upcoming releases.
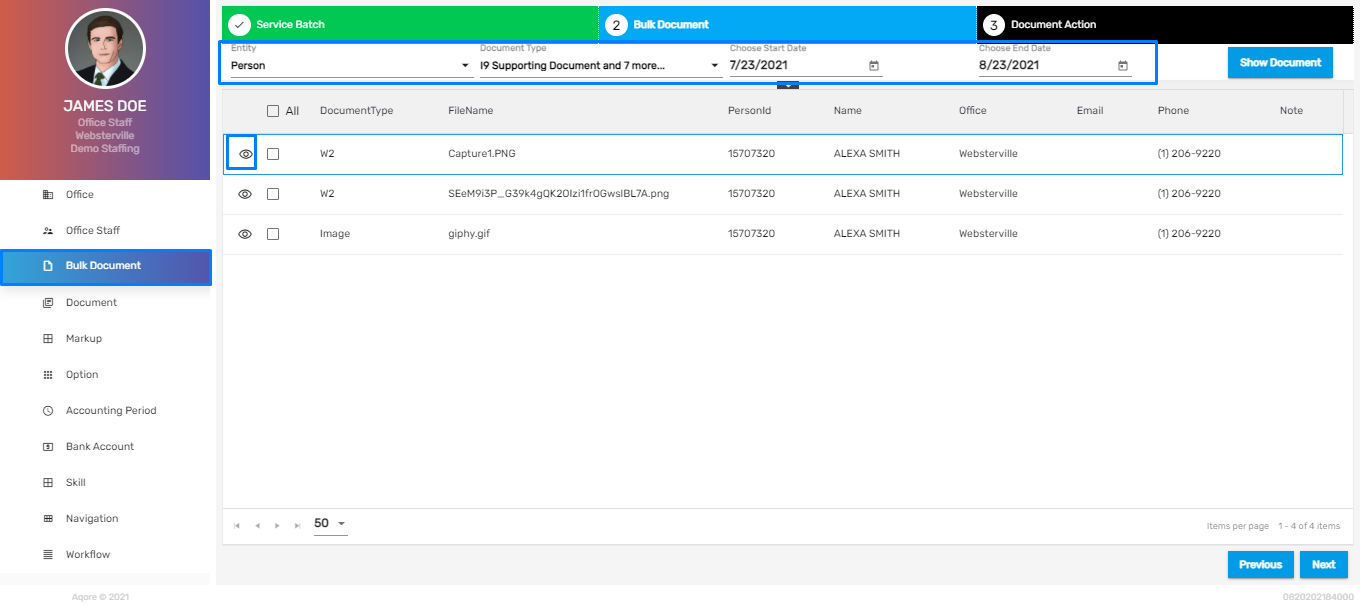
Eye View Icon Added in Bulk Document
Eye view icon has been added in the Bulk Document main navigation. It allows the user to view the specific documents generated by the user using various parameters in the Bulk Document before downloading.
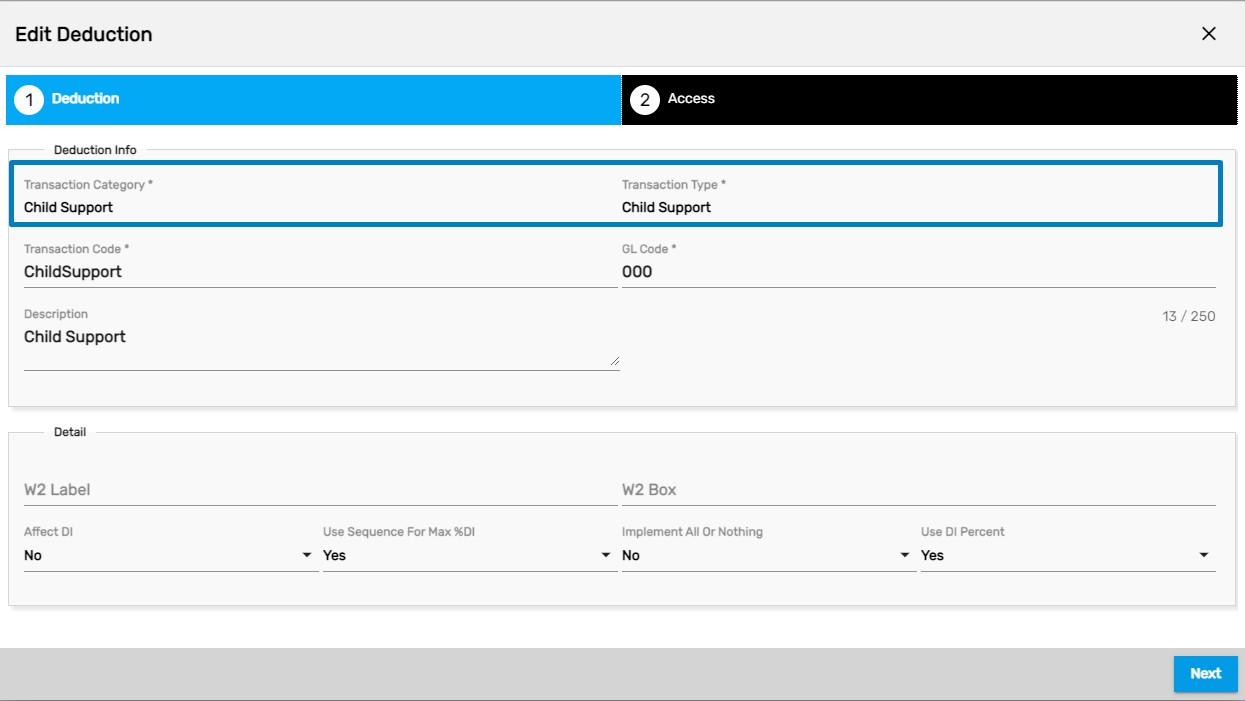
'Transaction Category' and 'Transaction Type' Field Disabled
Earlier, the user could edit the 'Transaction Category' and 'Transaction Type' of a transaction from the 'Deduction' under Back Office main navigation of ATM. Now, the 'Transaction Category' and 'Transaction Type' are disabled while editing the deduction, if the deduction is already in use for the payroll. Not being able to edit the 'Transaction Category' and 'Transaction Type' will prevent discrepancies in the calculations of deduction in Payroll.
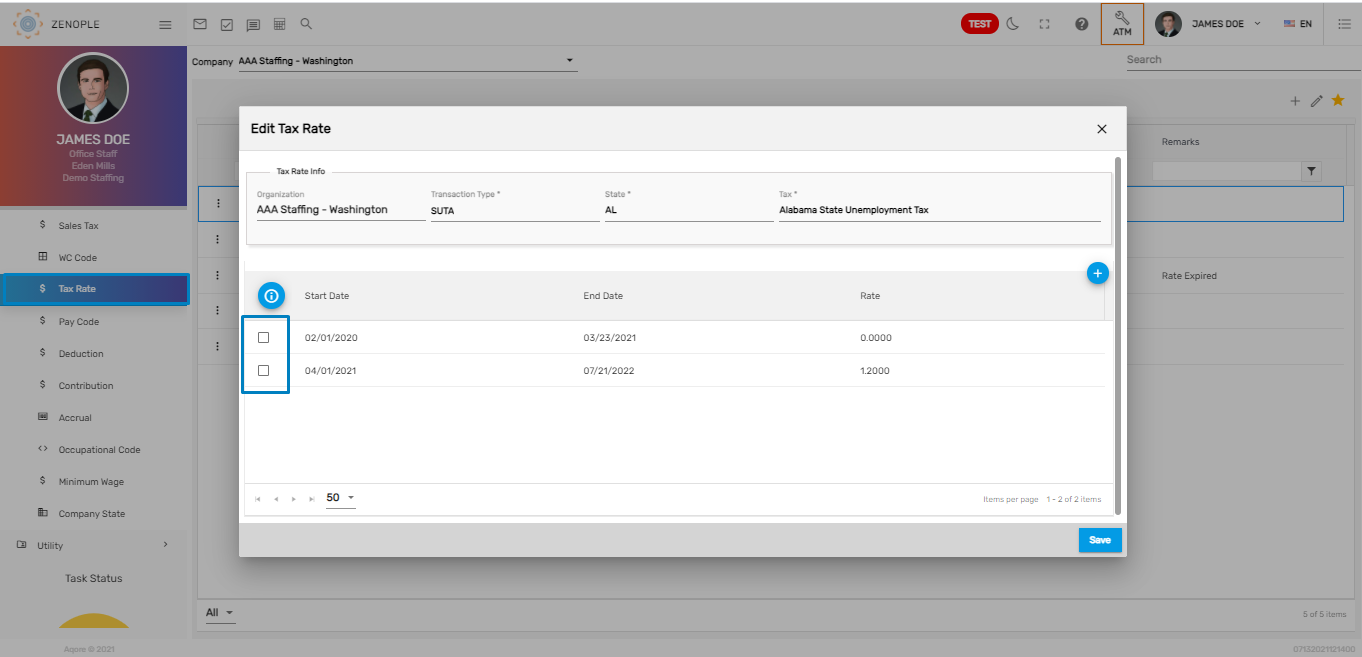
Tax Rate UI Change Implemented
Users can view mapped Unemployment Taxes on the UI itself from the 'Tax Rate' under the Back Office of the ATM.
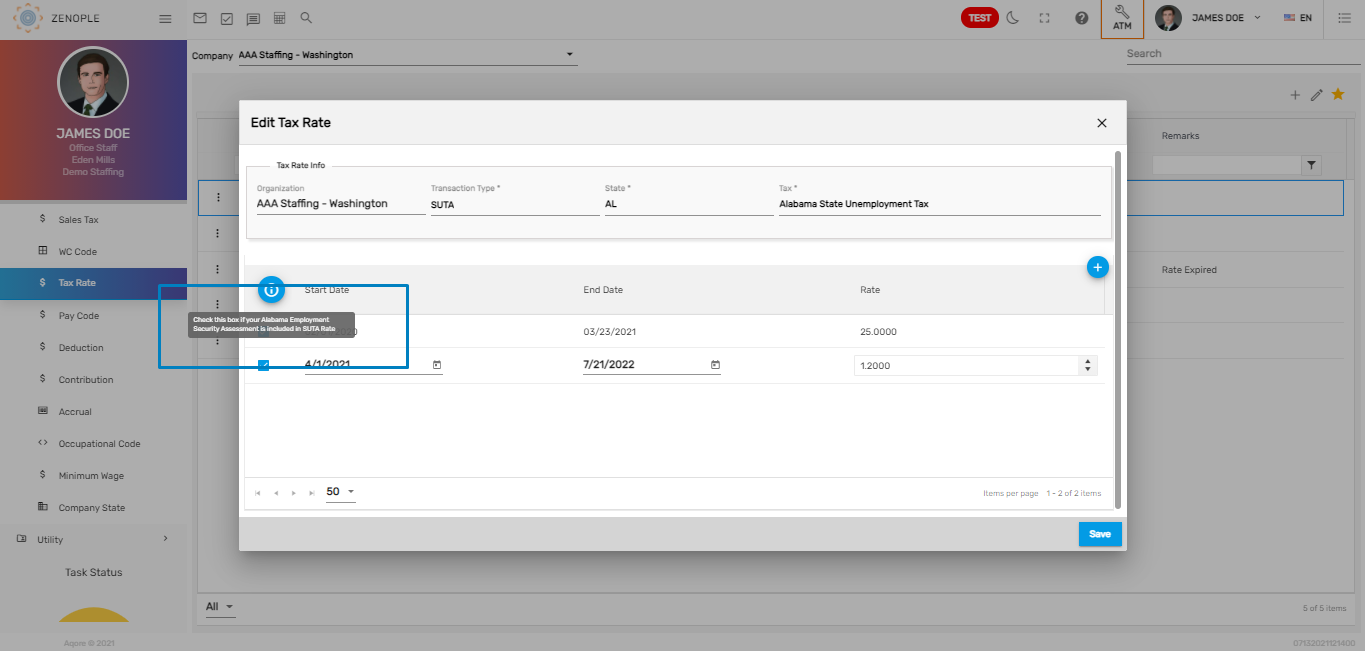
Some UI changes have been implemented while adding/ editing Tax Rates. The states may have multiple SUTA taxes such as Administrative Assessment Tax, Employee Training Tax other than the SUTA Unemployment Tax. This change in UI will allow the users to select the particular tax rate for the state which already includes such taxes mentioned above with the primary/ main unemployment tax. It will prevent discrepancies with the official tax authority.
- The info card states ‘Check this box if [Tax name] is included in SUTA rate.
Email Profile Implemented in Office Level
Earlier, the email profiles were set up on an organizational level whereas now the email profiles can be set up on the office level as well. The user can set up various email profiles for every other office as required.
How to Use This Feature
- Go to the 'Office' under Setting main navigation of ATM application.
- Click on an office from the list of offices and go to the Office Detail for which email needs to be set up.
- Click on the 'Email Profile' side navigation of 'Others' top navigation then, click on the 'Add' icon.
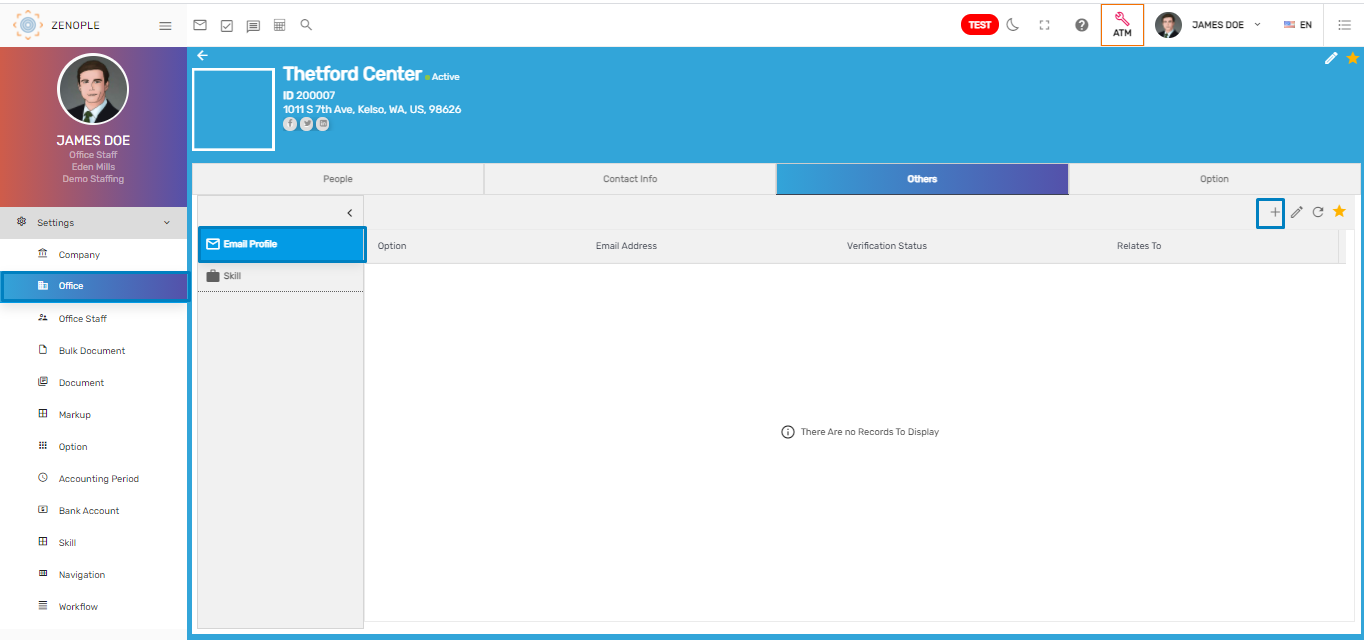
- 'Choose An Email Profile' as required and Save them.
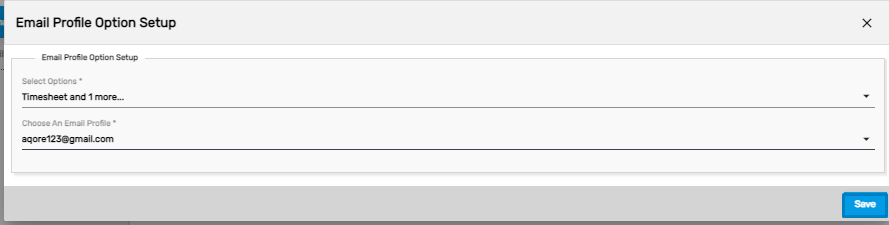
Users can choose email profiles for every 'Option' as required.
The user can also edit the Email Profile from the 'Edit' icon.

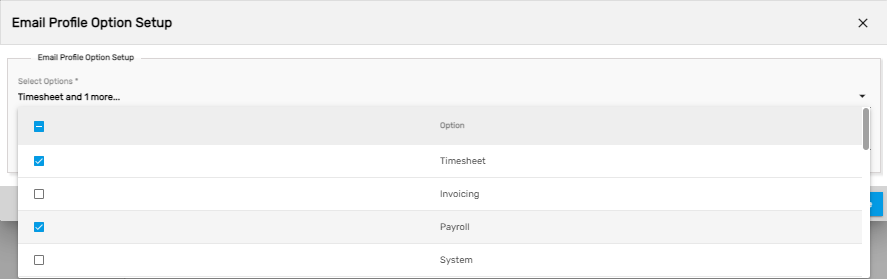
'State' Field Disabled While Editing Sales Tax
Users can edit the sales tax from the 'Sales Tax' under the Back Office main navigation of ATM and clicking on the 'Edit' icon. On the 'Edit Sales Tax,' the ‘State' field of 'Sales Tax Info' is now disabled while editing to prevent discrepancies in the Sales Tax calculations. As the field is disabled, the user will not be able to change or edit the 'State' field if the customer has already used the sales tax.
Transaction Category & Transaction Type Field Disabled While Editing Pay code
‘Transaction Category’ and ‘Transaction Type’ of the Pay Code under Back Office of the ATM is now disabled while editing to prevent discrepancies in the payroll and invoice calculations. As these fields are disabled, the user will not be able to change or edit them if the pay code is already used.
![]()
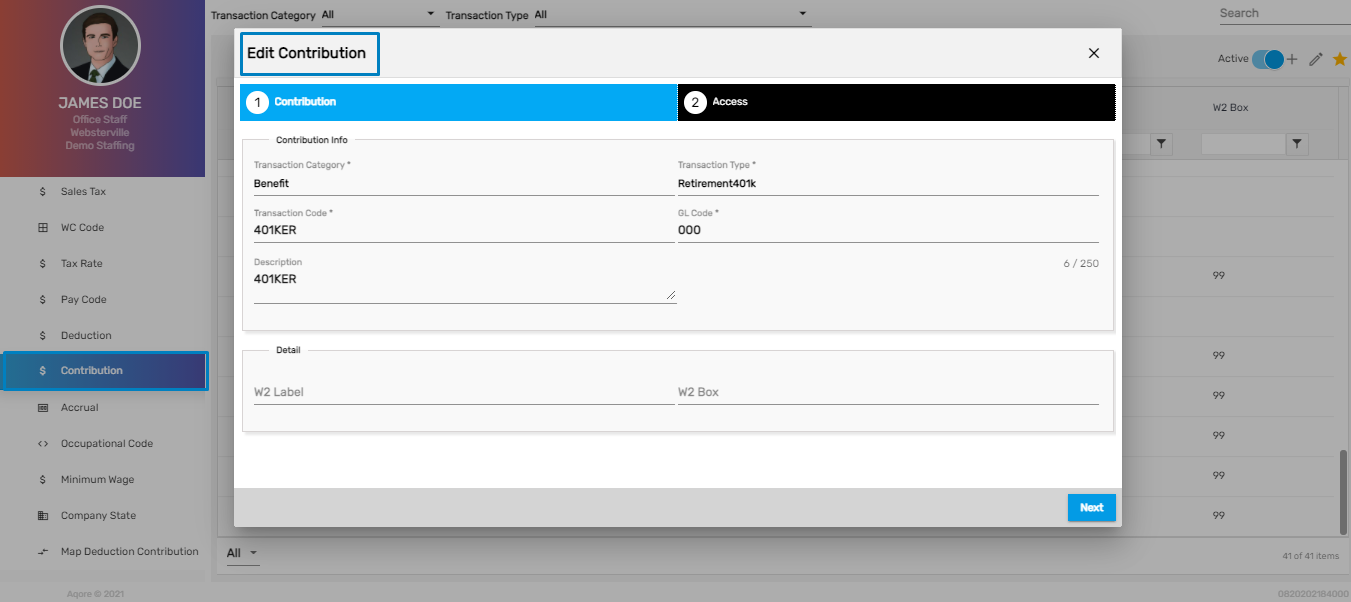
Transaction Category and Type Field Disabled while Editing Contribution
‘Transaction Category’ and ‘Transaction Type’ ‘of contribution is now disabled while editing to prevent discrepancies in the Payroll. As these fields are disabled, the user will not be able to change or edit them if the contribution is already used.
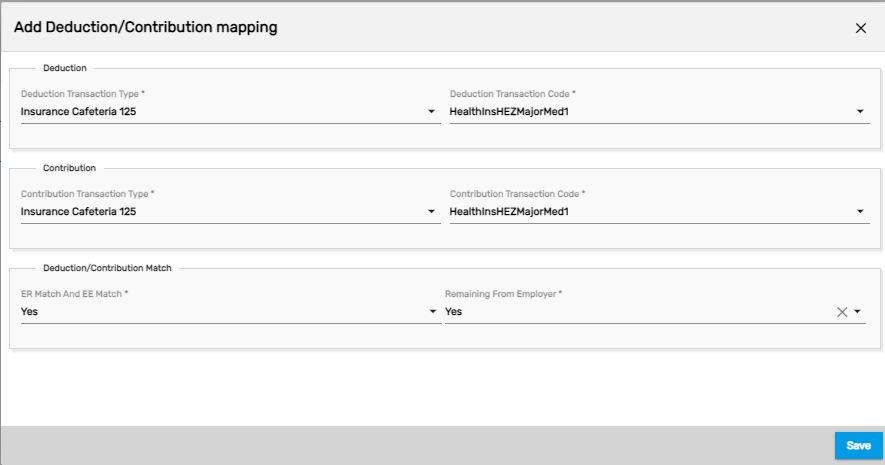
Map Deduction Contribution Navigation Added
This main navigation has been added to map out the deduction and contribution amount for Payroll. It allows users to set up the mapping and edit it as well. When the user setup the mapping from ATM, the mapping is reflected while adding deduction and contribution in Employee Detail.
How to Use This Feature
- Go to Map Deduction Contribution main navigation and click on Add icon

- Select the Deduction and Contribution transaction types and transaction codes that are to be mapped with each other
- Select ‘Yes’ for ER Match and EE Match denoting Employer and Employee match and Save it
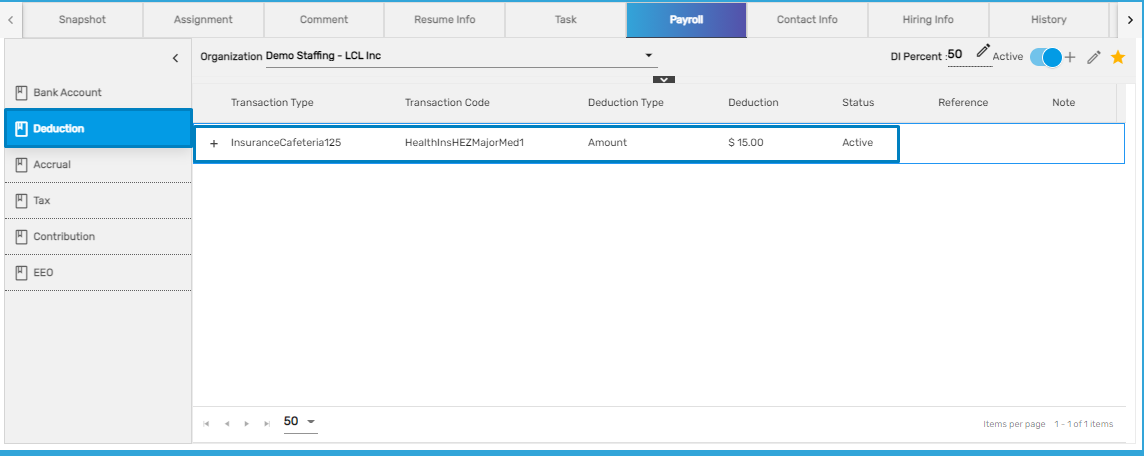
- Now, when the Deduction and Contribution transaction type and code are added in the Employee Detail based on the mapping setup, the settings will be reflected likewise.
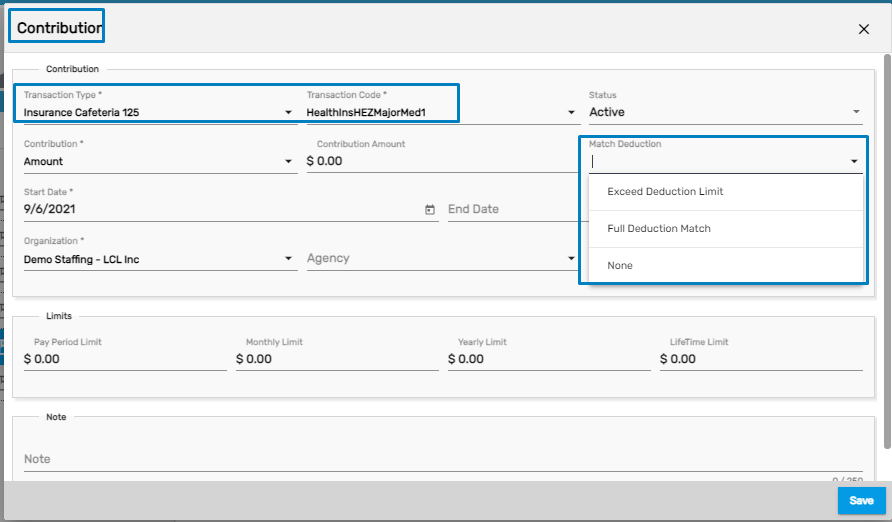
Deduction Setup
When the user selects the mapped Contribution Transaction Type and Contribution Transaction Code, the Match Deduction field will be enabled with three dropdown options. They are:
- Exceed Deduction Limit
- Full Deduction Match
- None
Exceed Deduction Limit
When the deduction lifetime limit exceeds, then the contribution rate will continue deducting as per its rate. For e.g. If the deduction lifetime limit is $1000 and until it exceeds, the contribution amount will also deducted be as $1000. After the deduction lifetime limit exceeds then the deduction amount will be $0 and the original contribution amount added while adding the contribution will be used in the Payroll.
Full Deduction Match
This states that the deduction amount will exactly match the contribution amount. If the deduction limit exceeds then the deduction will stop following which the contribution amount will also be stopped.
None
If the user selects the ‘Yes’ value in the 'Remaining From Employer' field while setting up the Mapping in ATM and selects ‘None’ here in the 'Match Deduction' field of 'Contributor,' then this will ignore the contribution amount that is mapped with deduction and deduct the remaining amount from the full contribution amount added.
For e.g. Upon choosing the values mentioned above, if the deduction amount is $100 and the contribution amount added is $500, in the payroll, the deduction amount will be displayed as $100 and the contribution amount will be displayed as $400.This states that the $100 deduction mapped with $100$ contribution will be ignored and the remaining amount of $400 will be paid by the employer.
- If the user would have added a different transaction type for both the Deduction and Contribution which is not mapped in ATM, the field ‘Match Deduction’ would not have been displayed.
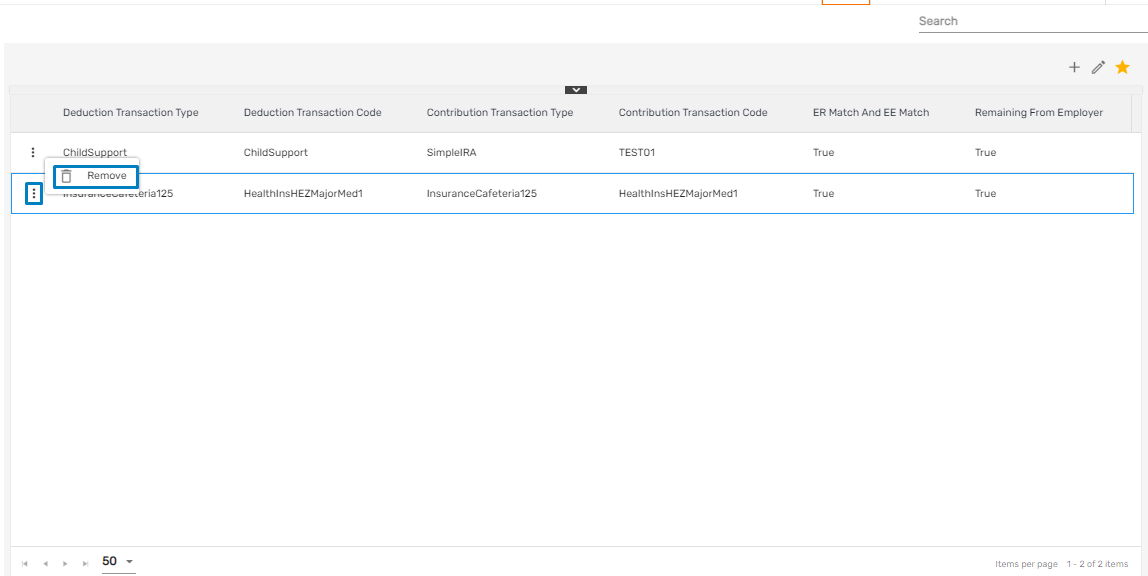
- The user can remove the mapping using the 'Remove' action from the vertical ellipsis button.
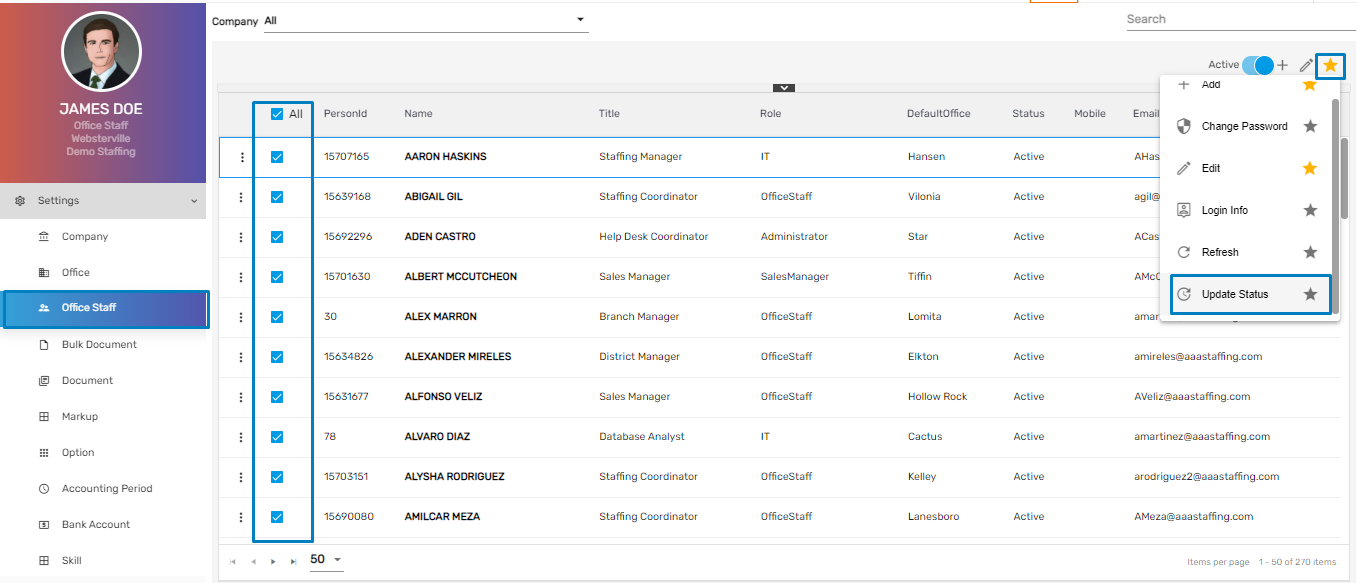
‘All’ Option Implemented for a Status Update
The user will now be able to select all the records from the directory of company, office, and users and update their status all at once.
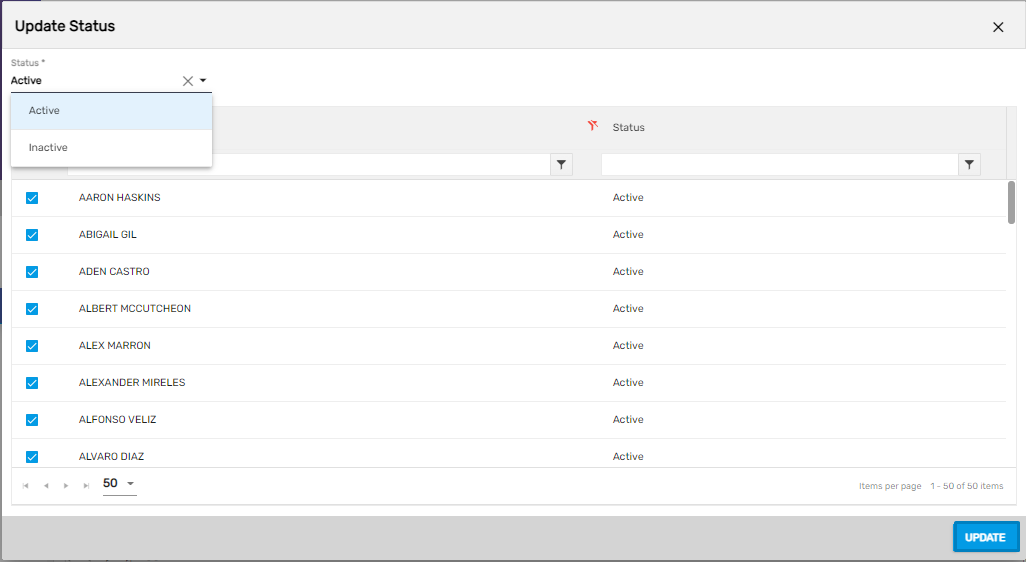
- Select all the records at once or select as per requirement and click on ‘Update Status’ from the Favorite Action.
- Choose the Status and check/ uncheck the users as required and click on Update. The status will be updated as required.
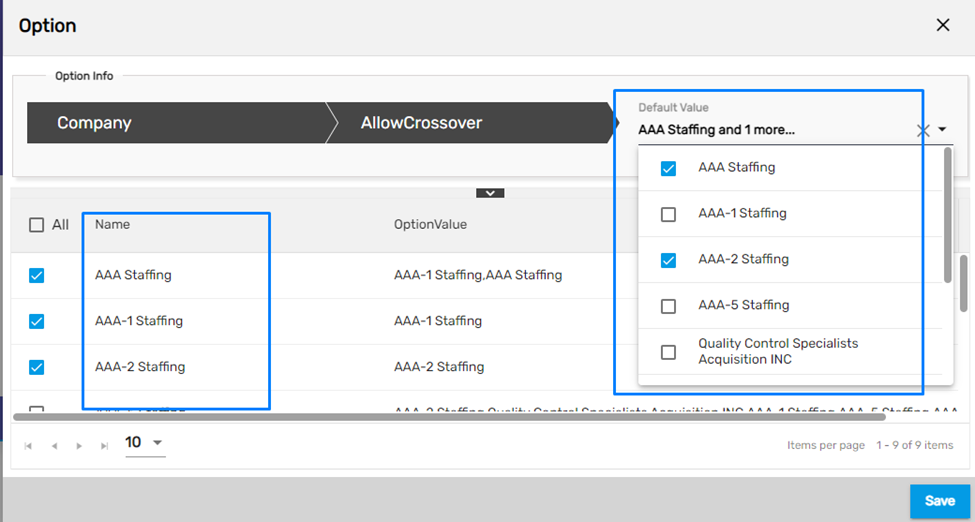
Crossover Grouping
Earlier, users could select if the organization uses the crossover feature by using the True/ False value.
Now, users can select multiple organizations for crossover grouping.
- Select the 'Default Value' for the organization in the ‘Allow Crossover’ dropdown.
- Checkmark the organizations that will have access to the default organizations selected from the ‘Allow Crossover’ dropdown.
- Now, the selected organizations in the grid will have access to the selected default organizations from the dropdown.
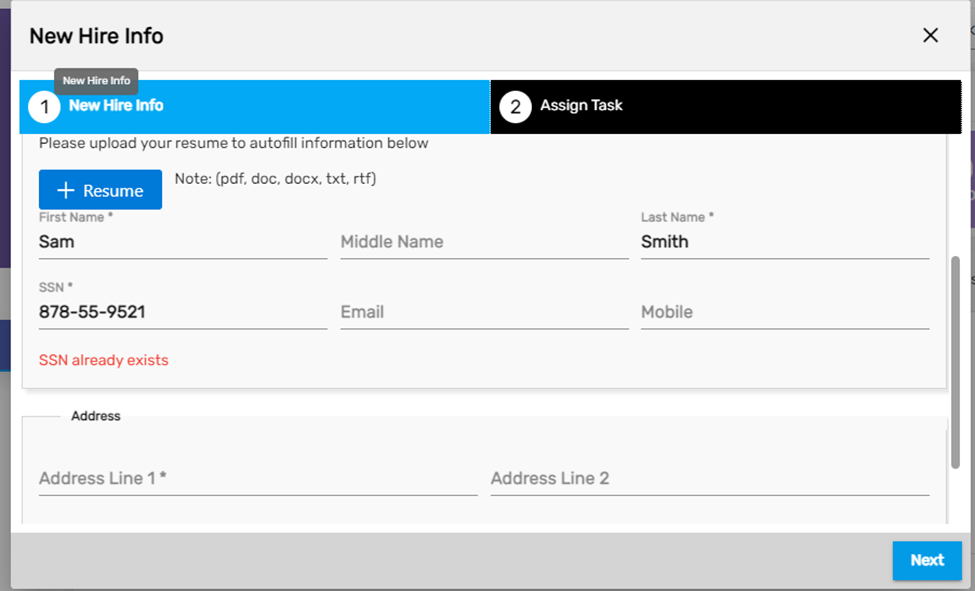
While creating a new user, SSN will be checked among the crossover organizations and if the SSN already exists then the duplicate SSN records will be notified.
For example, if the SSN of an employee already exists in the organization selected for allowing crossover, then an error message of SSN duplication will be displayed.
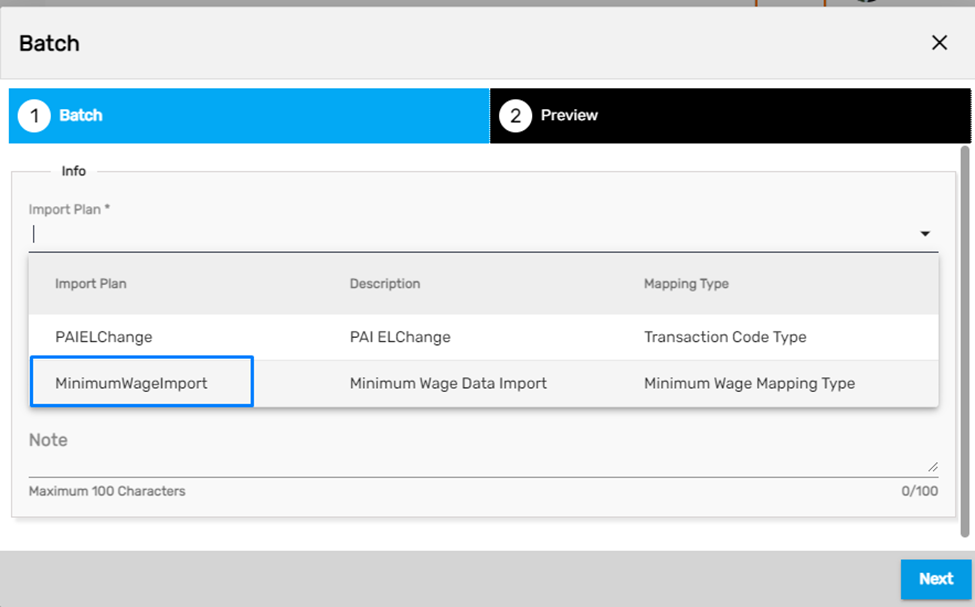
Minimum Wage Import Plan Added
Minimum Wage Import Plan allows users to import and update minimum wages in bulk. Earlier users could only update and edit minimum wage from Minimum Wage main navigation under Back Office one at a time.
Now, users can import and update many minimum wages into the application. The changes will be reflected in the minimum wage directory as well. The records of the minimum wages should be in the standard format to be imported correctly.
The minimum wages that are not set up for states in the application will also be allowed to be imported and will be imported likewise.
How to use this feature
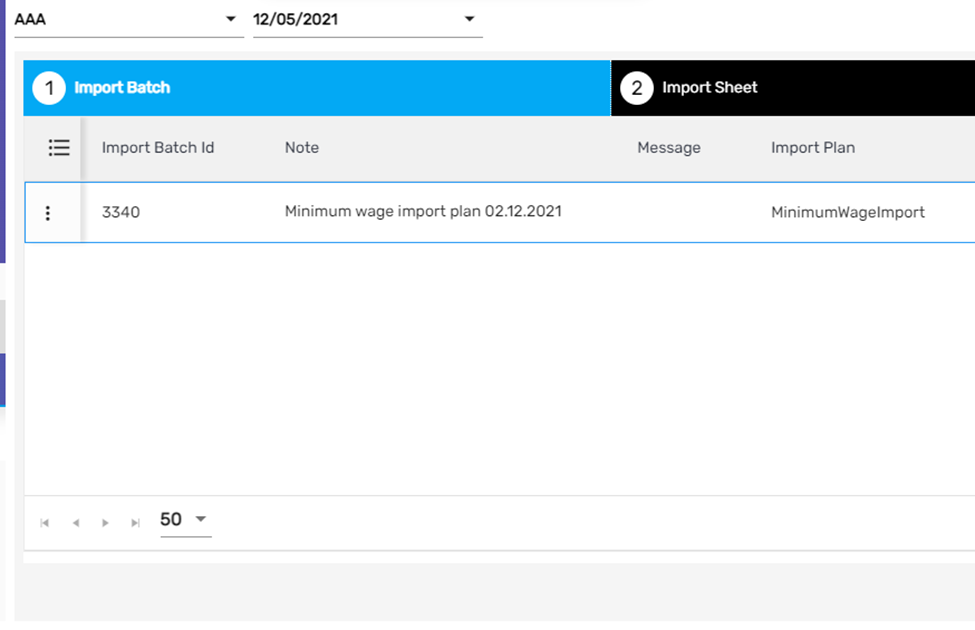
- Go to 'Import' under Utility main navigation of ATM, select the Organization and Accounting Period and click on the 'Add' icon to create an Import Batch.
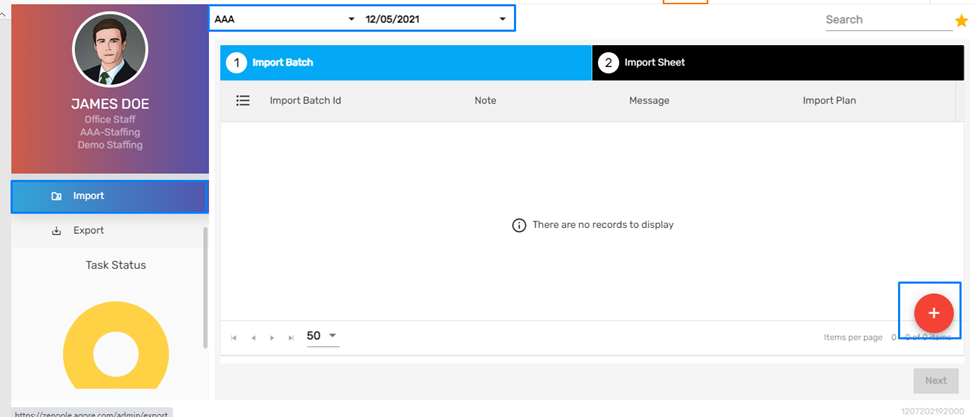
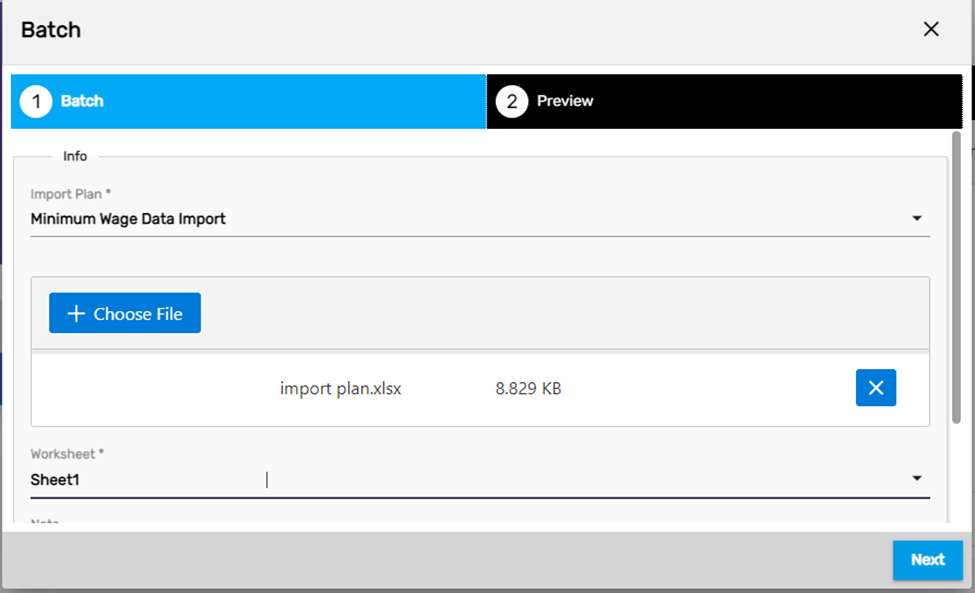
- Then upload the import file as per the recommended format and click on Next for preview.
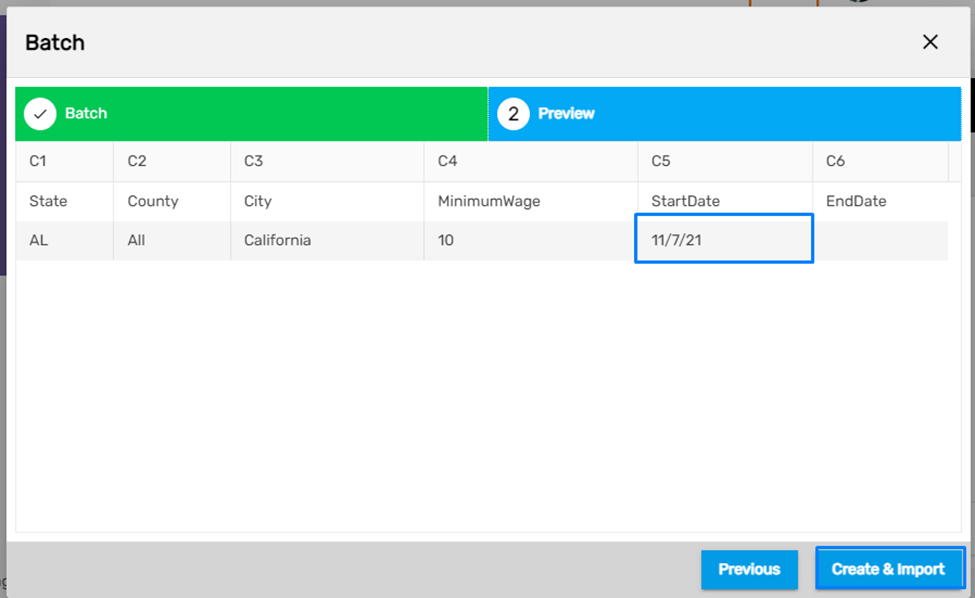
The format of the minimum wage import file is as shown below. State, County, City, Minimum Wage Rate, Start Date are the mandatory fields whereas End date is optional.

Note: The start date of the minimum wage should always be a Sunday.
Upload the import file according to the recommended format and click on the Next button.
The imported details will be displayed for preview and click on ‘Create & Import.’
Now, the import batch will be created. Click on Next to import the sheet.
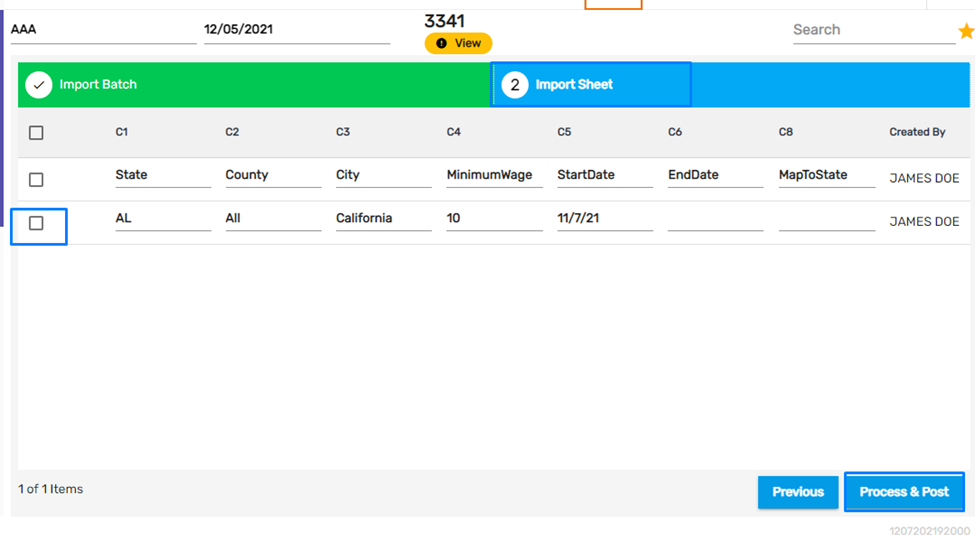
The imported sheet will be displayed in the grid. Checkmark the row and click on 'Process & Post.'
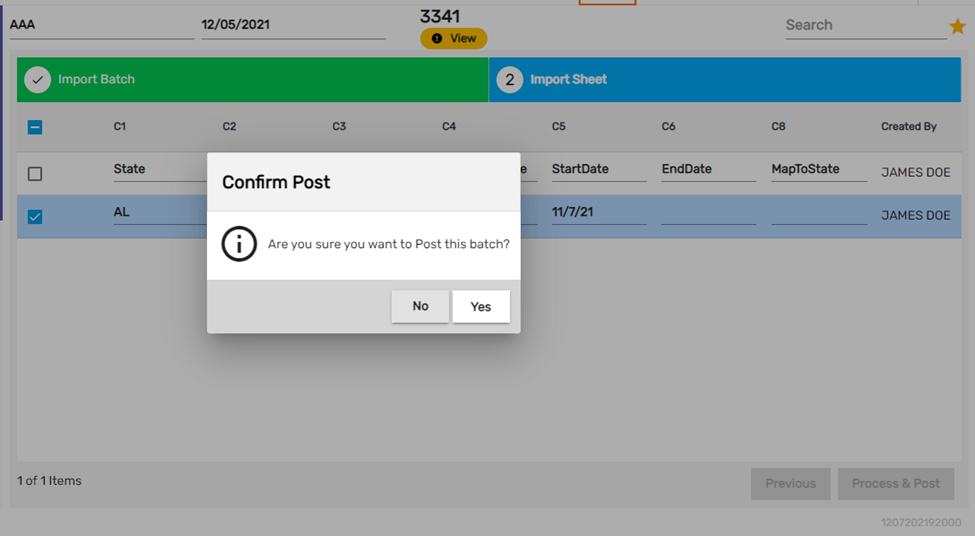
Click on Yes to confirm and post the batch.
The imported minimum wage will be reflected in the Minimum Wage navigation directory.
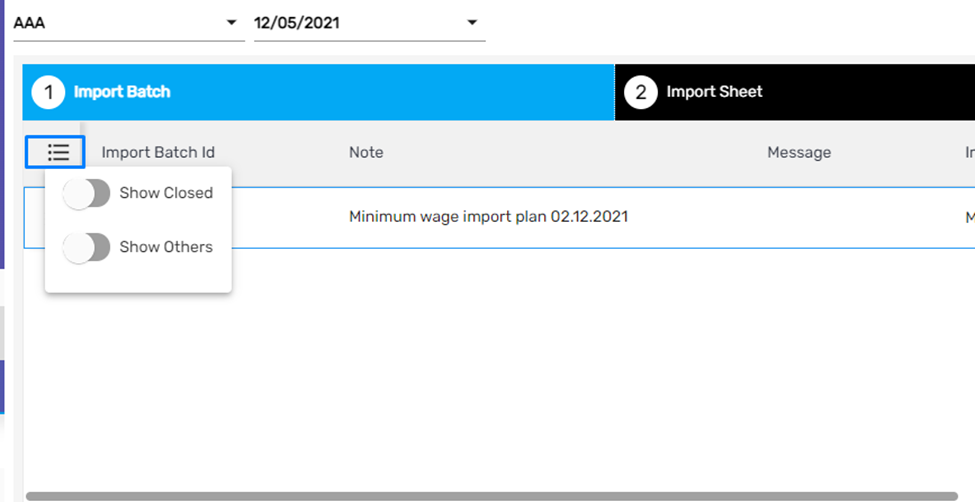
There are two toggle button options under the grid option. They are:
- Show Closed
- Show Others
Show Closed
This will display the Import Batches that are closed.
Show Others
This will display the Import Batches that are created by other users as well.
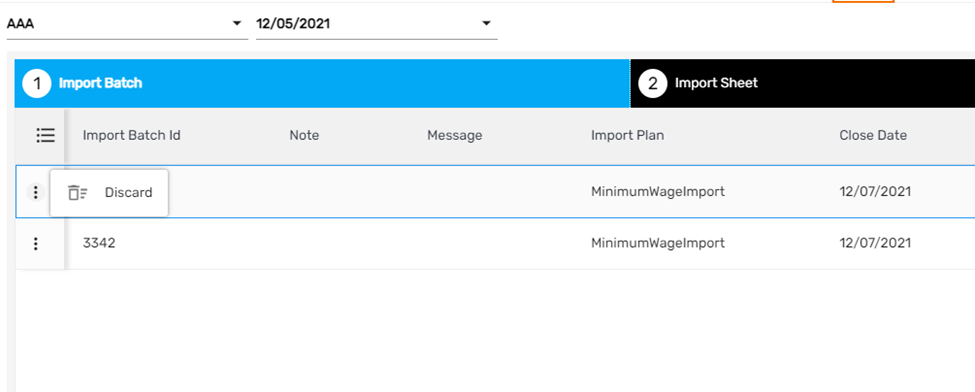
The vertical ellipsis button of Import Batch Id has a ’Discard’ option that will allow the user to discard the Import Batch.
- The start date of the Minimum Wage Effective Rate should always be a Sunday.
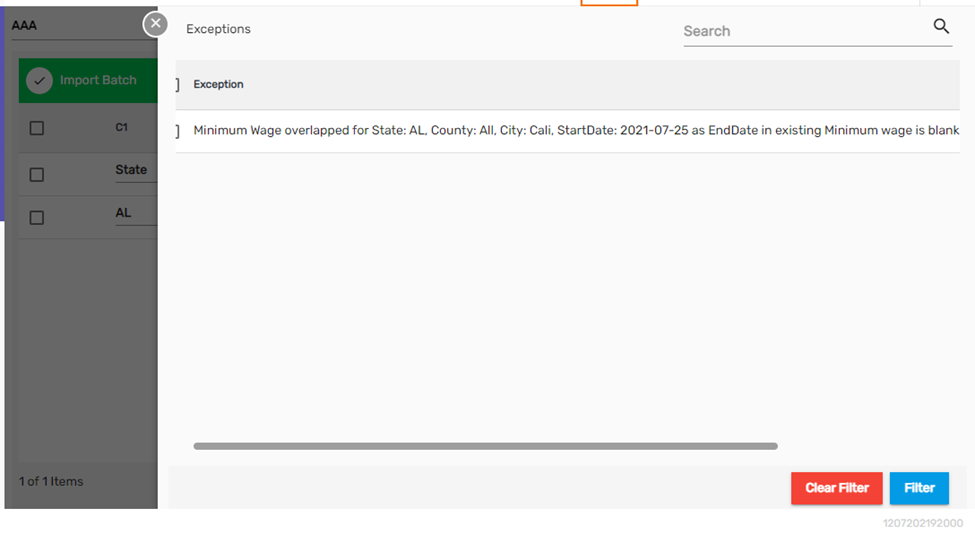
- Overlapping Dates are not allowed.
- In case of Overlapping Dates, end the previous Minimum Wage as required and then Import again.
- The state and city should be correctly entered.
Email/ Phone Requirement Moved to Office Level During Registration
Previously, the email and phone number options on the Registration page were set up at the company level.
Now, the value to be entered in the phone and email are based on the records configured at the office level.

As per the value set up, an applicant can then enter phone or email or both while registering.
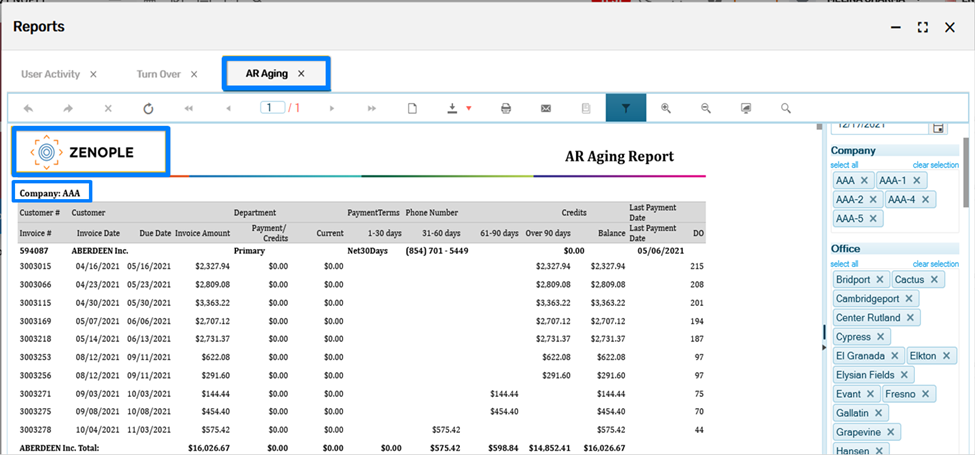
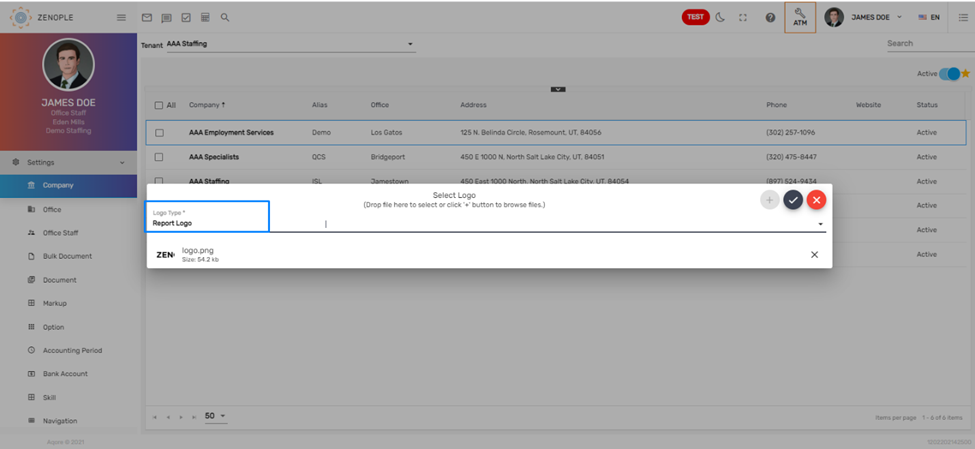
Report Logo Implemented on Organizational Level
Earlier, the report logo was uploaded based on tenant level and it would have been the same for every organization under a Tenant. Now, the report logo can be set up on an Organizational level. Users can set up Report Logo for every specific organization now.
- The report logo of the tenant's default organization will be the logo of the tenant. If the default organization hasn’t uploaded the report logo, then the tenant will not have any logo, either.
- If an organization doesn’t have any report logo, then it will display the report logo of the tenant's default organization.
- When the user runs the report, the report logo will be displayed based on the current default office.
Report Logo can be uploaded for a specific organization as,
Report Logo will be displayed in a report as,