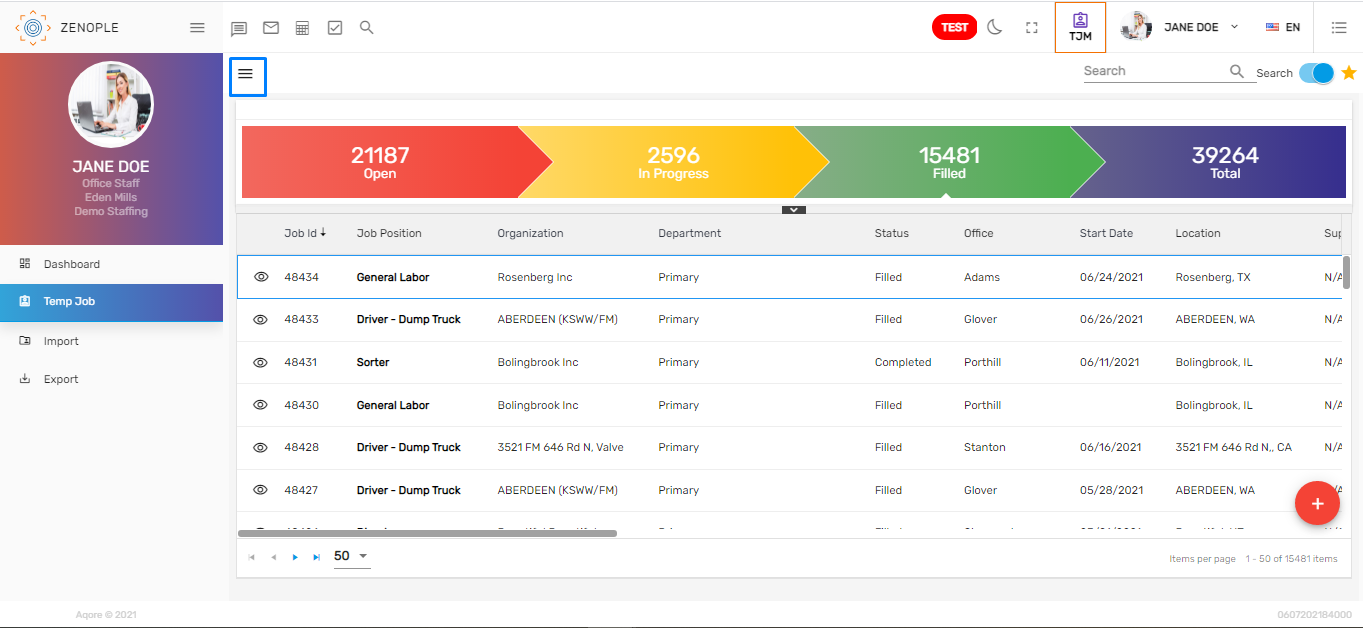
Overview
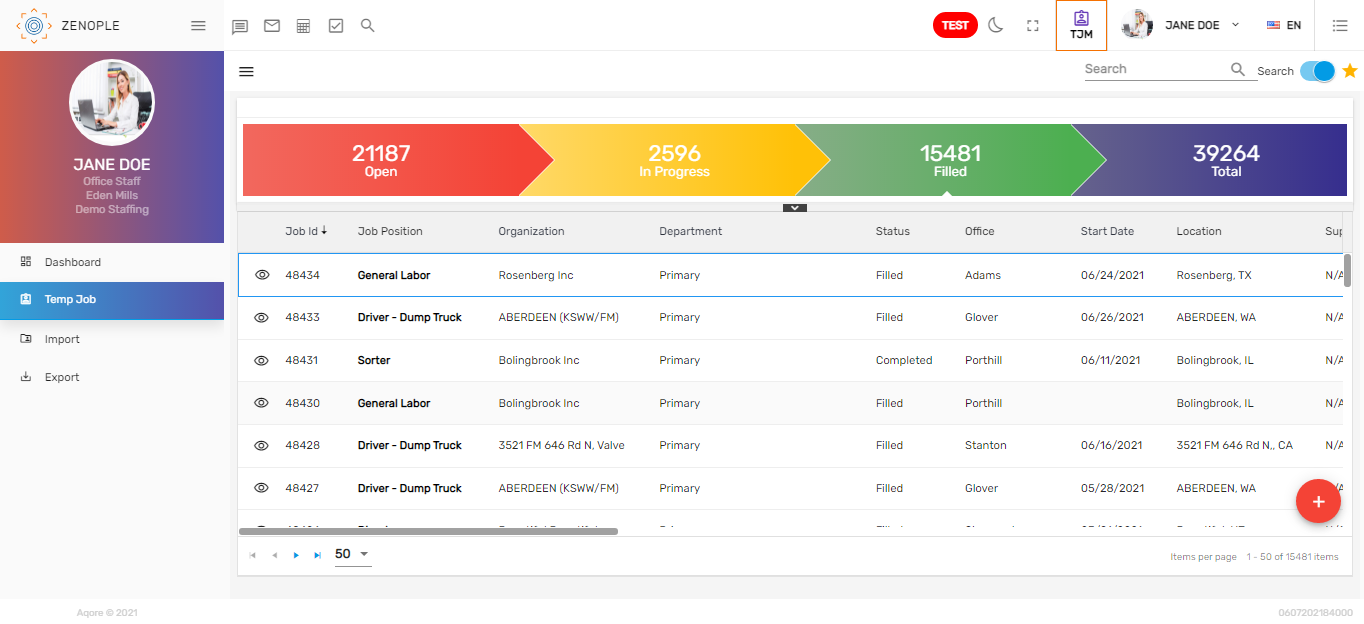
Temp Job main navigation consists of detailed information of temp jobs. The directory displays information like the 'Job Position,' 'Organization,' 'Department,' 'Office,' 'Location,' 'WC Code,' etc of the jobs.
Users can search the job detail from the search bar. The details of the searched job will be listed in the directory. Users can redirect to the job detail from the directory. They can also add the job for a customer from the directory which will be displayed in the directory.
There are four stages in the temp job workflow. They are:
- Open
- In Progress
- Filled
- Total
1. Open
This is the first stage of the temp job workflow where new temp jobs will be listed.
2. In Progress
Any person who is searching for a job based on their skills will apply for the job. These jobs will be listed in this stage.
3. Filled
After the required number of candidates is fulfilled for the job, the job will be listed in this stage.
4. Total
All the jobs will be listed in this stage.
Note: The stages can be set up as per the requirement.
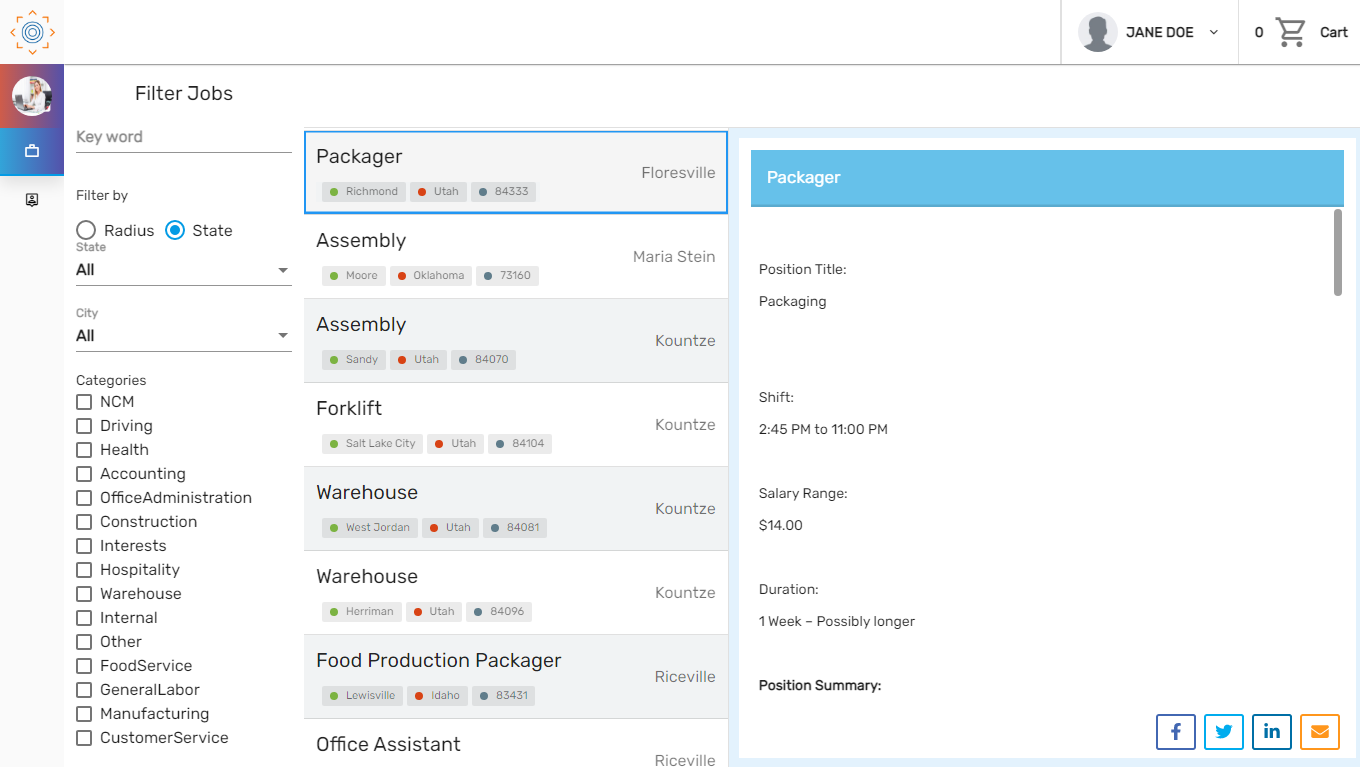
Temp Job Directory
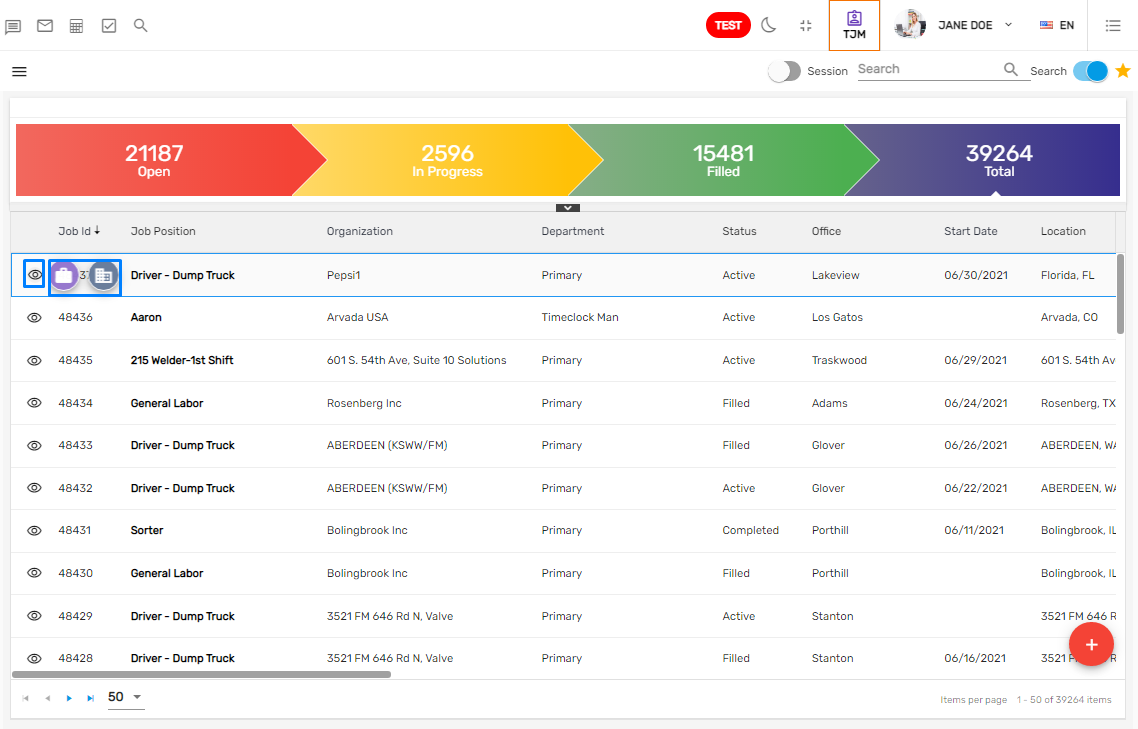
The temp job directory consists of favorite actions, filter, add job feature, a search/recent toggle button, temp job detail with favorite actions and navigations.
Users can search for the job from the 'Search'/ 'Recent' toggle button and 'Session' toggle button, the list of jobs will be displayed. The filter helps to filter the required job records. Users can also add jobs and redirect to the job detail from the directory. They can use different favorite actions in the directory like 'Copy Job' and 'Refresh.'
The 'Search' toggle button allows users to search for all the jobs or only the recently searched jobs records. The 'Session' toggle button allows users to view the job details added in the current session.
When a user searches for a job from the search bar, the available job will be listed. This includes the main information of the job including 'Job ID,' 'Job Position,' 'Organization,' 'Department,' 'Status,' 'Office,' 'Start Date,' 'Location,' etc.
Slider View
The eye view icon of the temp job has a slider view feature. Users can go to the 'Temp Job' and 'Customer' detail from the temp job directory's eye view icon. These options will be visible only when hovering on the eye view. On clicking the icon, users will be redirected to the detail of either the temp job or customer detail based on the clicked options.
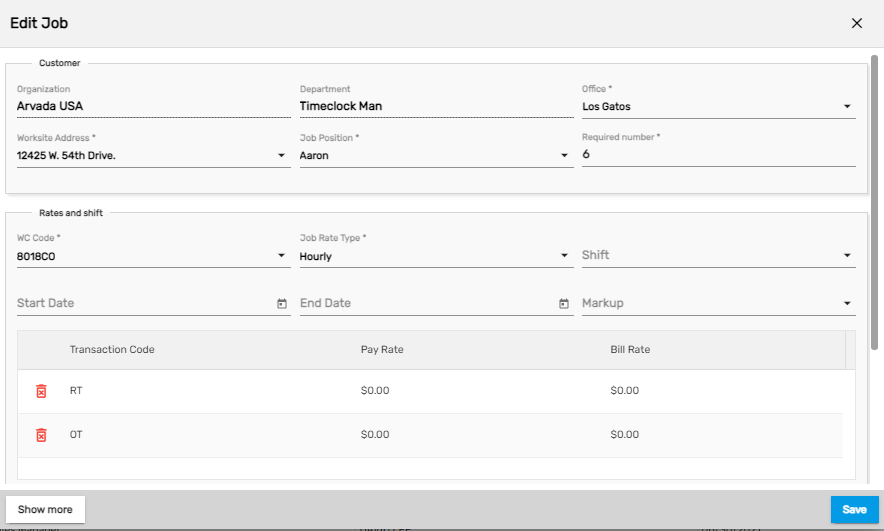
Add Job
The 'Add' button allows users to add a job under the customer from the directory. Click on the 'Add' button following which an 'Add Job' form will open, and upon entering the required information the job will be added. The temp job added will be listed at the top of the directory list. A feature of redirecting to the job detail option directly is also available for the user's convenience.
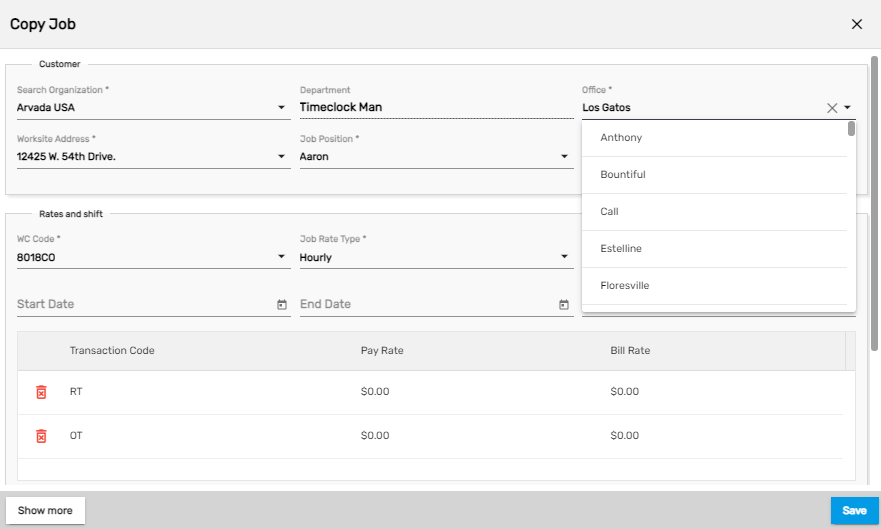
Users need to set the required number of jobs while the job positions, rates, and shifts for a job should be selected that will be copied from the customer.
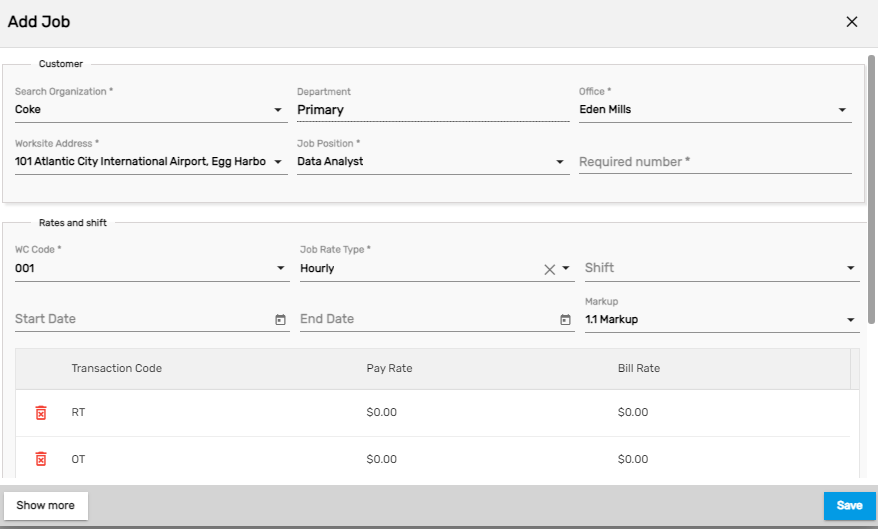
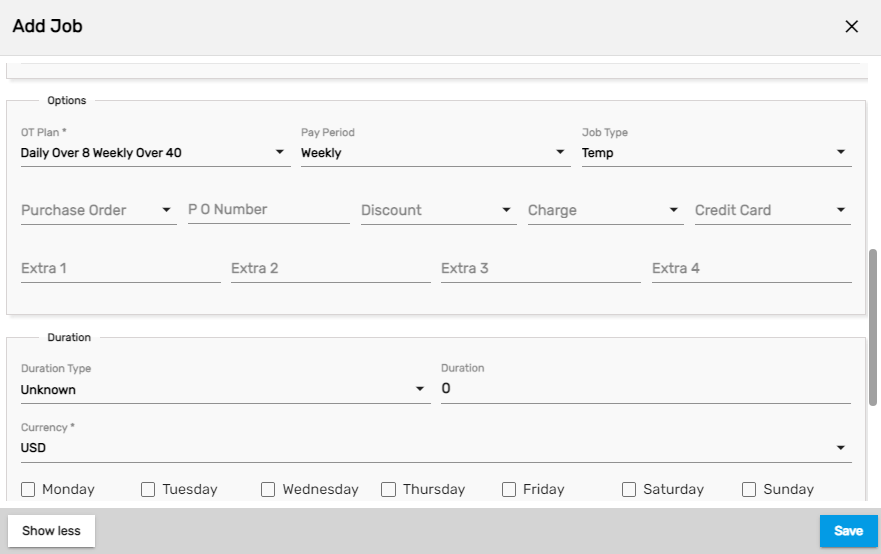
Users can add more details by clicking on the show more button.
| Fields | Description |
|---|---|
| Organization | The user can search for the customer under which the job will be created |
| Department | The department can be selected for the job |
| Office | The job for the required customer's office can be set |
| Job Position | The job position for the job can be set |
| Required Number | The required number of employees for the job can be set |
| Rates and shifts | The code, job rate, shift markup can be set |
| Options | The user can define more options for the job like OT plan, pay period, job type, purchase order, PO number, discount, credit card, etc |
| Duration | The user can define the duration, duration type, and currency for the job |
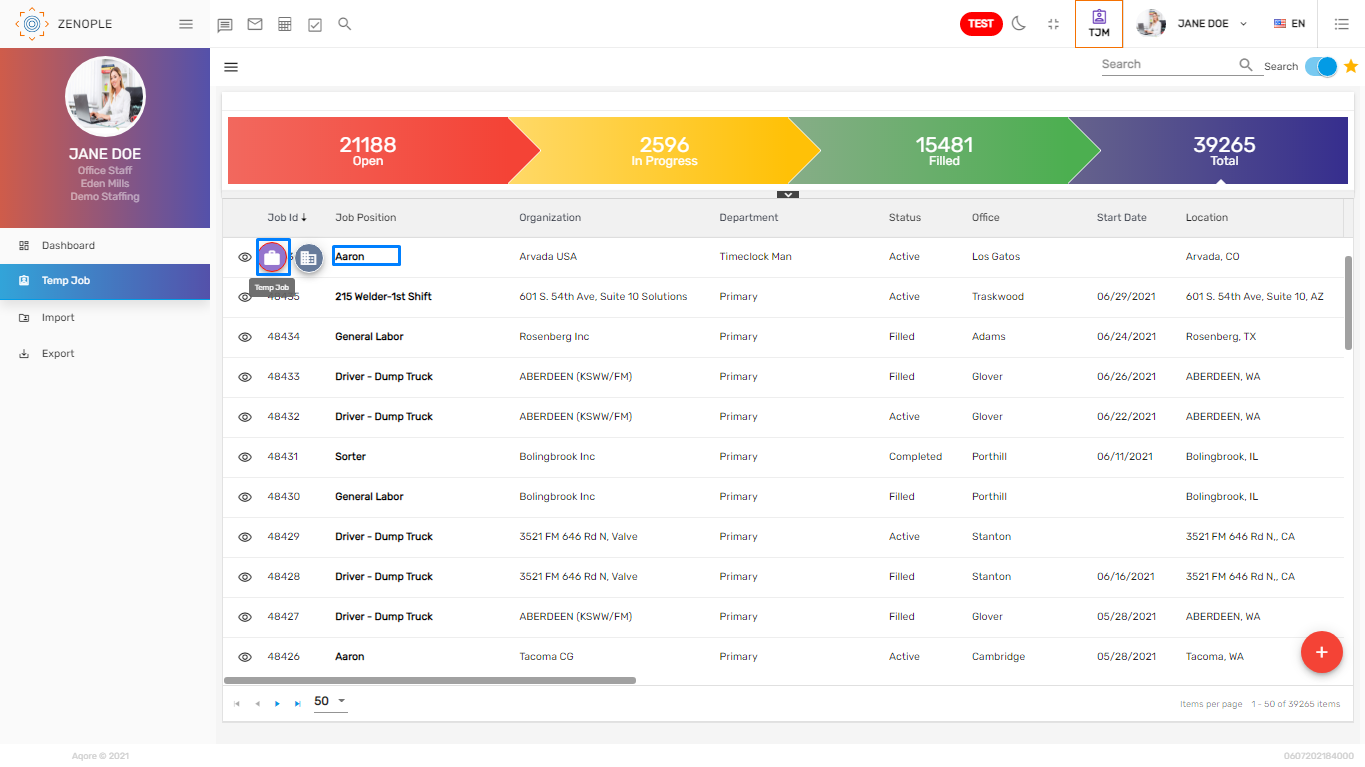
The newly added job will be listed on the temp job directory.
Filter
The filter in the temp job directory allows users to filter the temp job records by selecting various options. This filter feature can be used from the hamburger icon. It saves a lot of time while filtering the temp job records. According to the selected options, the filtered records will display throughout the 'TJM' application.

Search/ Recent Toggle Button
When the toggle button is set 'On,' the 'Search' toggle button allows searching the temp job from the temp job directory, whereas in case it is set 'Of,' the 'Recent' toggle button displays the recently searched and visited temp job data till 7 days before today's date. By default, the toggle button will be set 'On.'

Session Toggle Button
The 'Session' button allows searching the temp job records added in the current session from the temp job directory. By default, it will be set 'Of'.

Favorite Action
The actions under the star icon are the favorite actions. The temp job directory includes various favorite icons with unique functions. They are:
- Copy Job
- Refresh
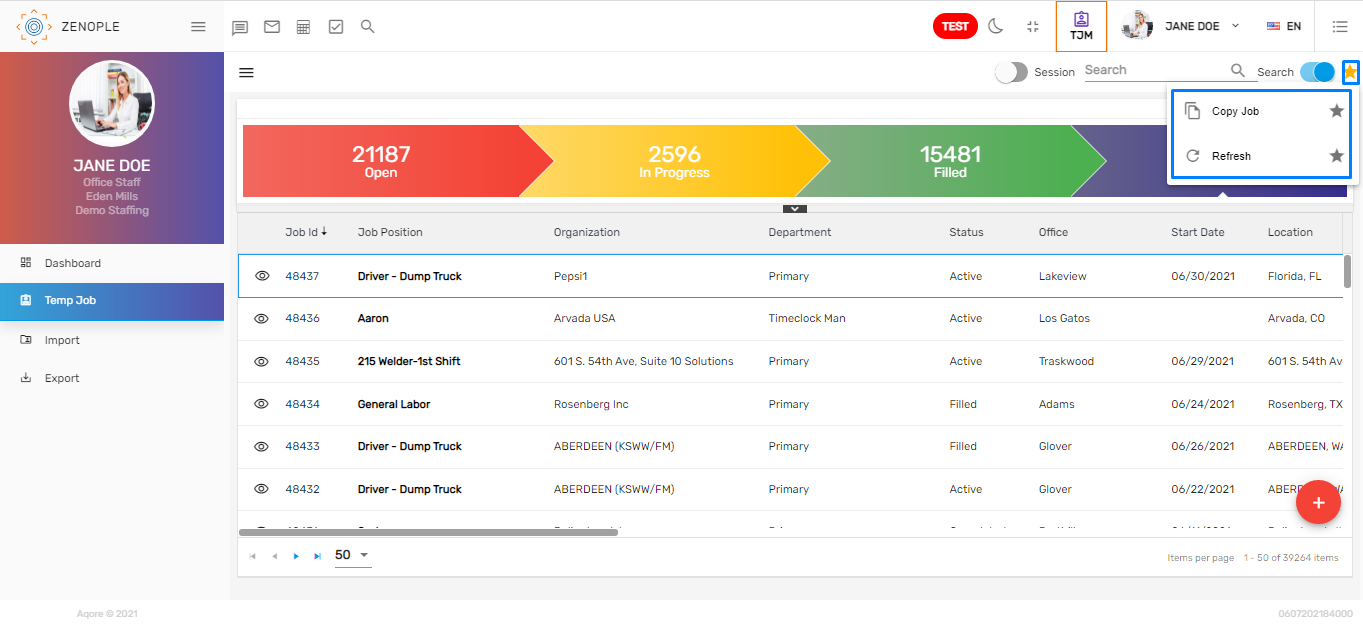
1. Copy Job
Users can copy the job created under a customer to multiple offices. They can change the details as per their requirements.
2. Refresh
This action refreshes the temp job directory and users can use the action to reload the records.
Temp Job Detail
The entire temp job detailed information is in the temp job detail. Users can redirect to the temp job detail, by searching the temp job from the search bar on the directory. When the 'Search' toggle button is turned off, it will filter the recently searched and viewed temp job data only. Users can redirect to the temp job detail by clicking on the job position or the eye view.
The Temp Job Detail consists of
- The temp job detail includes ID, the customer, office, company, and the full address
- Favorite action
- Navigations
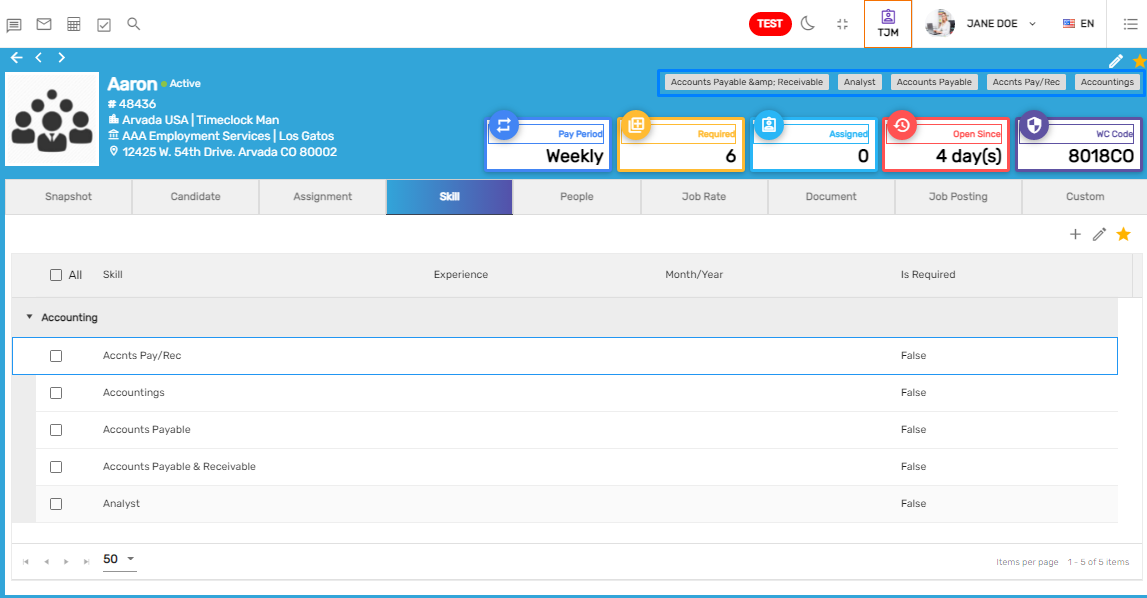
Temp Job Detail
Temp job detail also consists of temp job information like,
- Pay Period
- Required
- Assigned
- Open Since
- WC Code
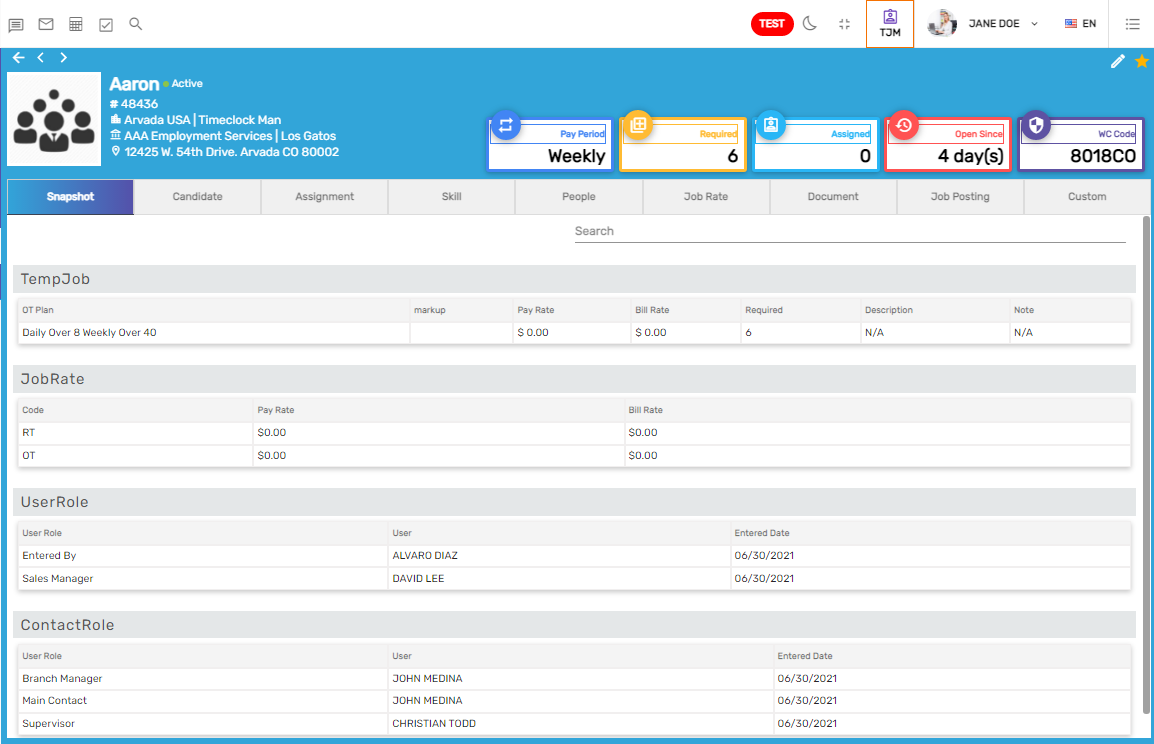
1. Pay Period
The 'Pay Period' defined for the customer will display here and it will be the pay period for the employees while calculating the payroll. Users can view the pay period for the job. The pay period may be daily, weekly, biweekly, monthly, semimonthly, hourly, quarterly, yearly, or weekdays.
2. Required
The 'Required' shows the total required candidates count for the job.
3. Assigned
The 'Assigned' shows the total assigned employees count for the job.
4. Open Since
The 'Open Since' shows the number of days from when the temp job was opened.
5. WC Code
The 'WC Code' shows the WC code defined for the job which is copied from the customer while creating the temp job.
Favorite Action
The temp job detail consists of the following favorite actions. They are :
- Copy Job
- Edit
- End Assignment
- Refresh
- View Assignment Report
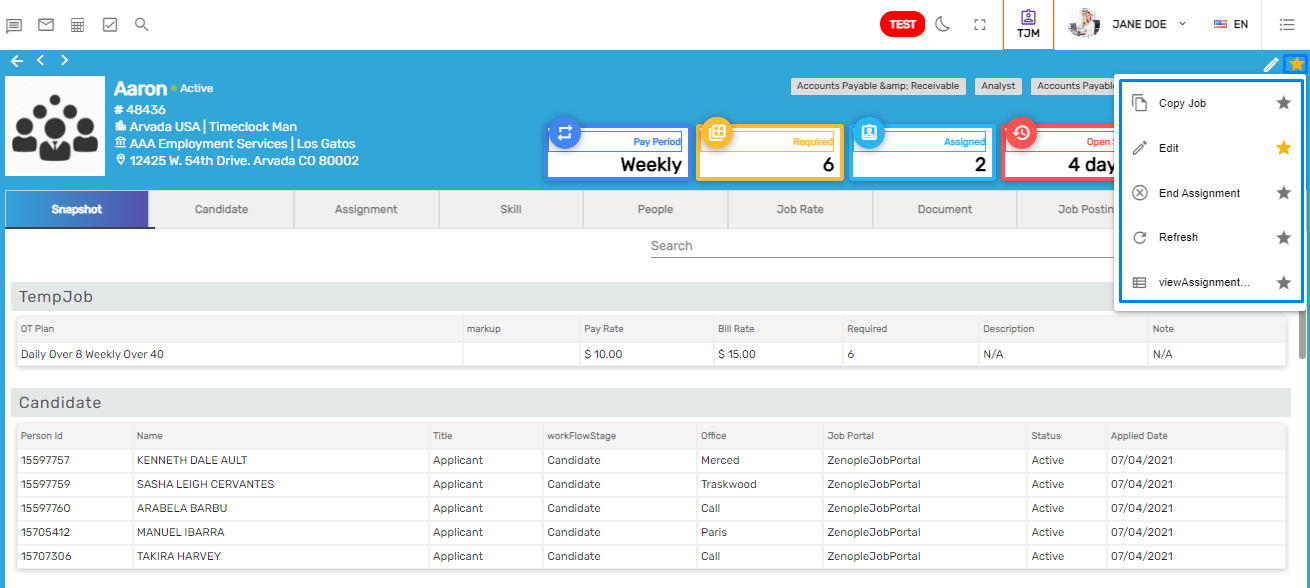
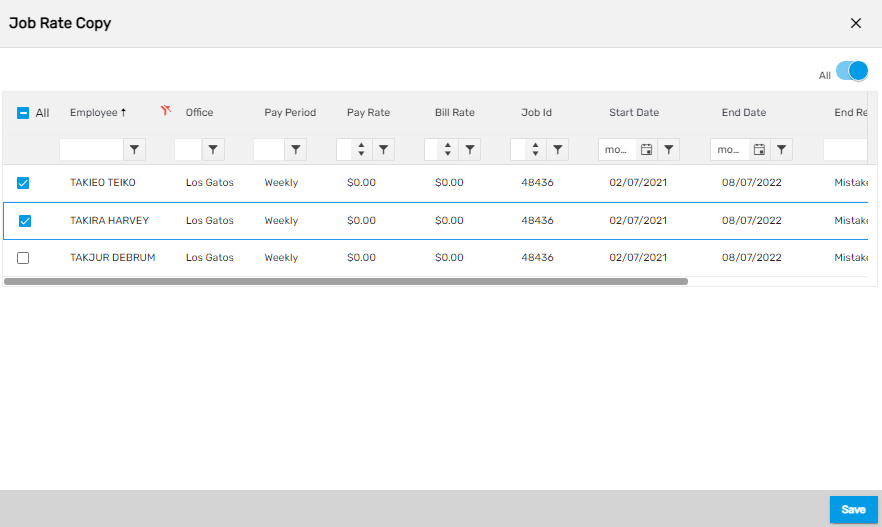
1. Copy Job
Users can copy the job under a customer to multiple offices. They can change the details as per their requirements.

2. Edit
This action allows users to update the details of the temp job. Clicking on the 'Edit' action in the favorite icon and updating the details will edit the contact details.
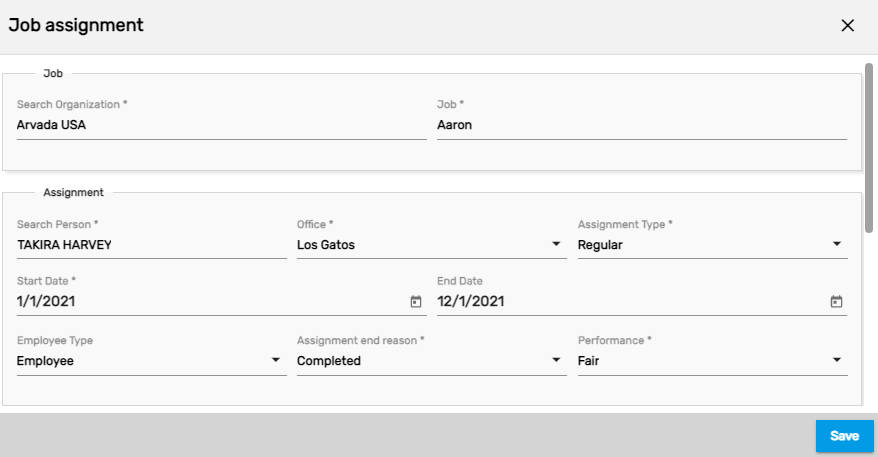
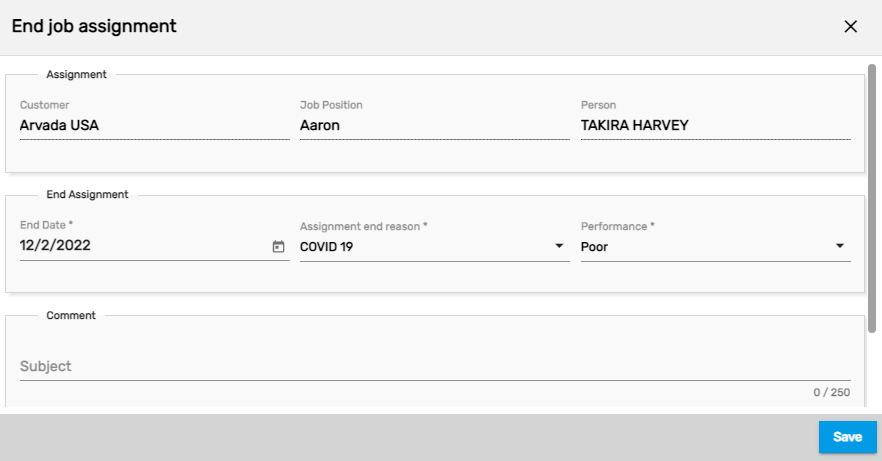
3. End Assignment
If an employee's assignment under a job has ended or needs to end due to some reason then users can use the 'End Assignment' action to end the assignment for the temp job.
However, users need to provide the reason for ending the assignment and enter the performance of the employee as well. Users can also select multiple employees at once and end the assignment.
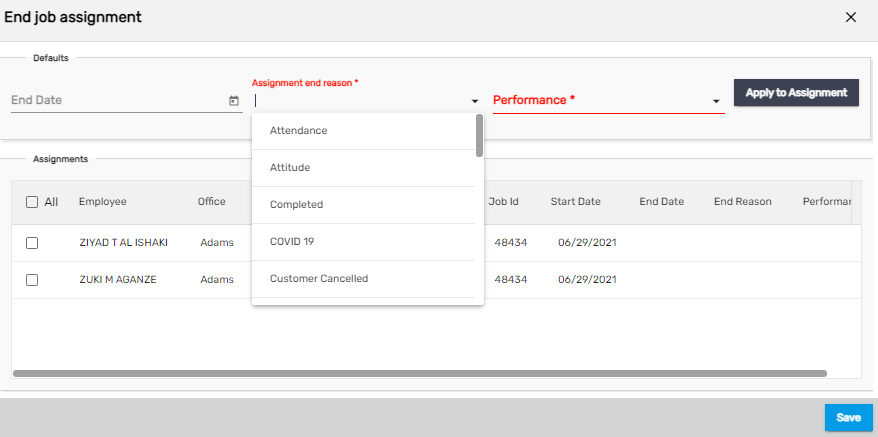
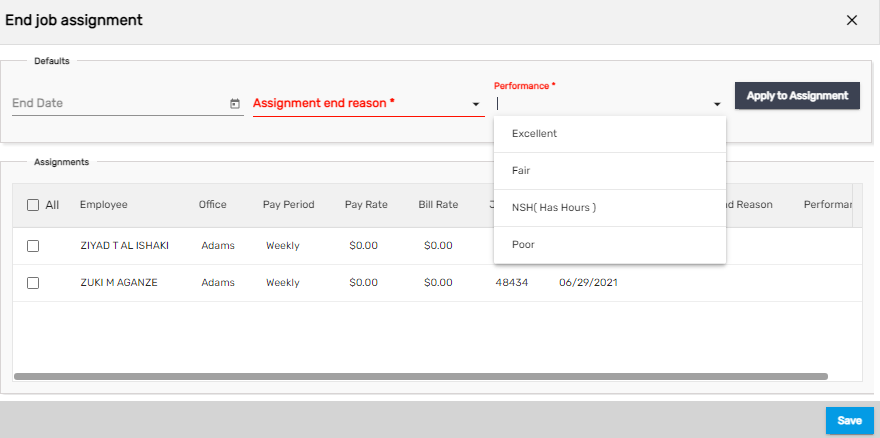
After required records are filled in click on 'Apply to the Assignment' to end the assignment.
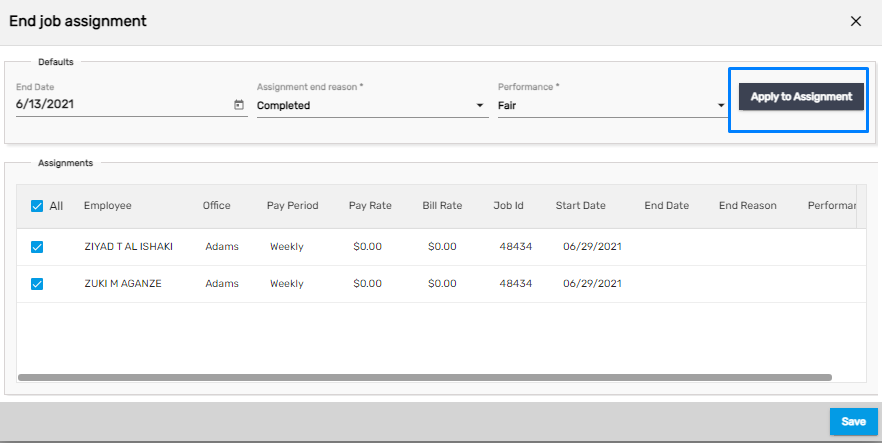
Note: The 'Assignment End Reason' and the 'Performance' for the assignment can be customized as per requirements.
4. Refresh
This action refreshes the temp job detail and users can use the action to reload the records on the page. Similar refresh actions are found in the side navigations which are used to refresh the records.
5. View Assignment Report
This action allows users to view the start sheet report. This report shows the job description, work information, and contact information of the employees for the job.

Navigation
The 'Temp Job Detail' consists of the following navigations.
- Snapshot
- Candidate
- Assignment
- Skill
- People
- Job Rate
- Document
- Job Posting
- Custom
Snapshot
It displays the summarized description of the temp job's profile. Users will be able to view all the information in a summarized form added through other navigations available in the profile.

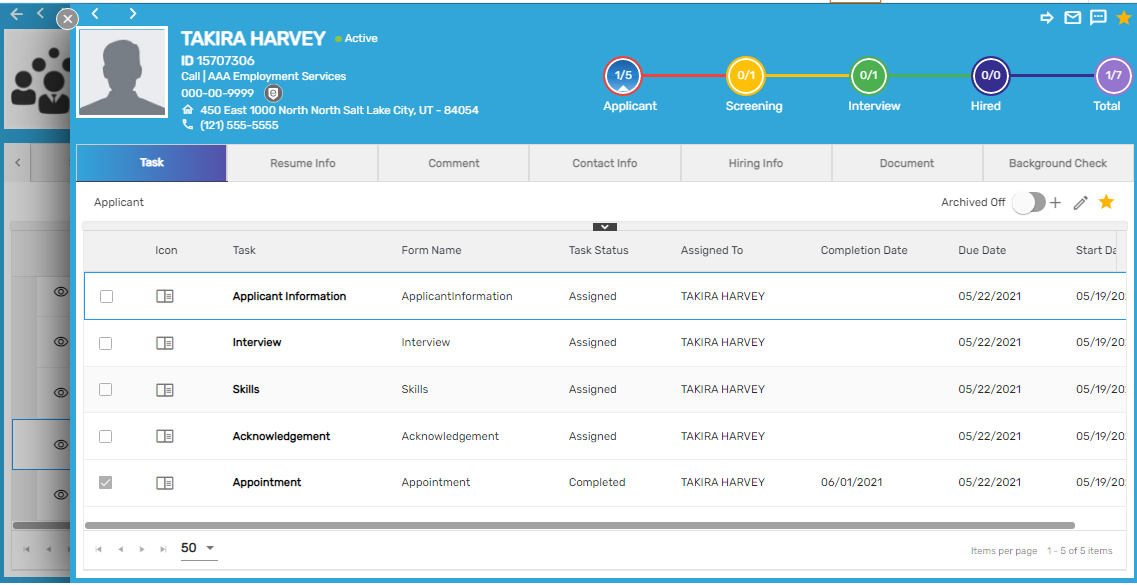
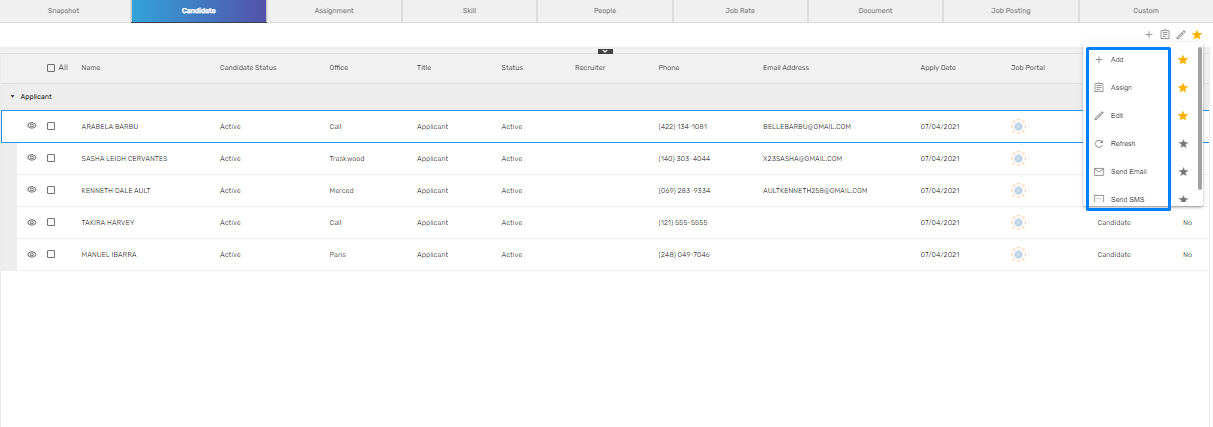
Candidate
The candidates for the temp job records are displayed in the candidate side navigation. Those who have applied for the job are referred to as candidates. It allows users to view and update the task, resume info, comment, contact info, hiring info, document.
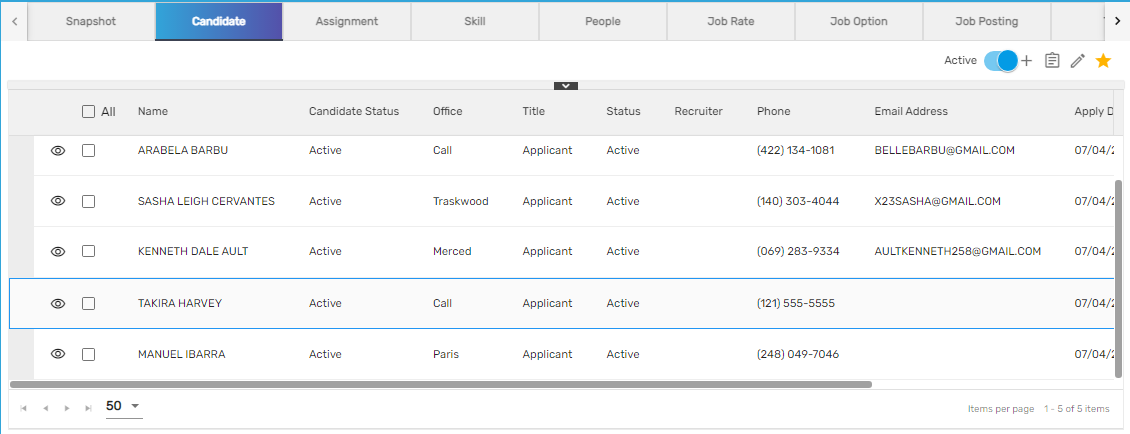
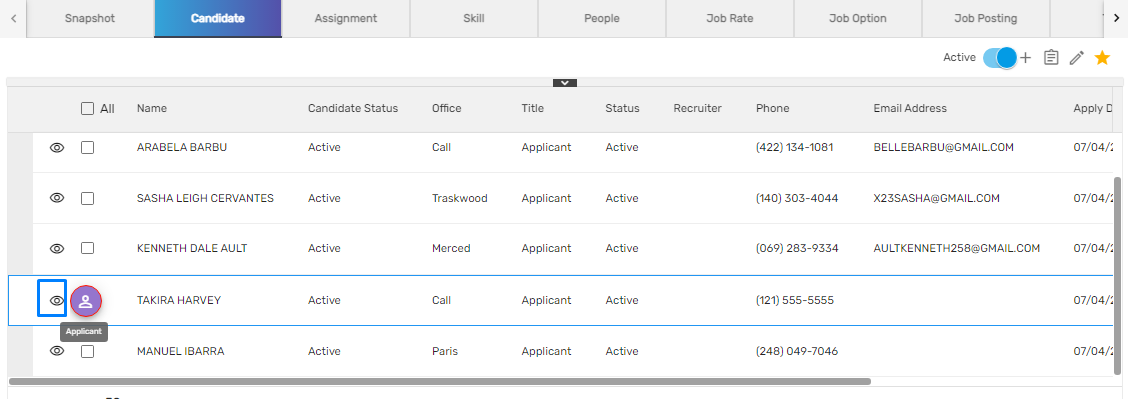
Hovering on the eye view will show the option to redirect to the detail. Users can redirect to the detail of the candidate through the eye view icon option.
The top navigation, 'Candidate' has multiple actions with unique features. They are:
- Add
- Assign
- Edit
- Refresh
- Send Email
- Send SMS
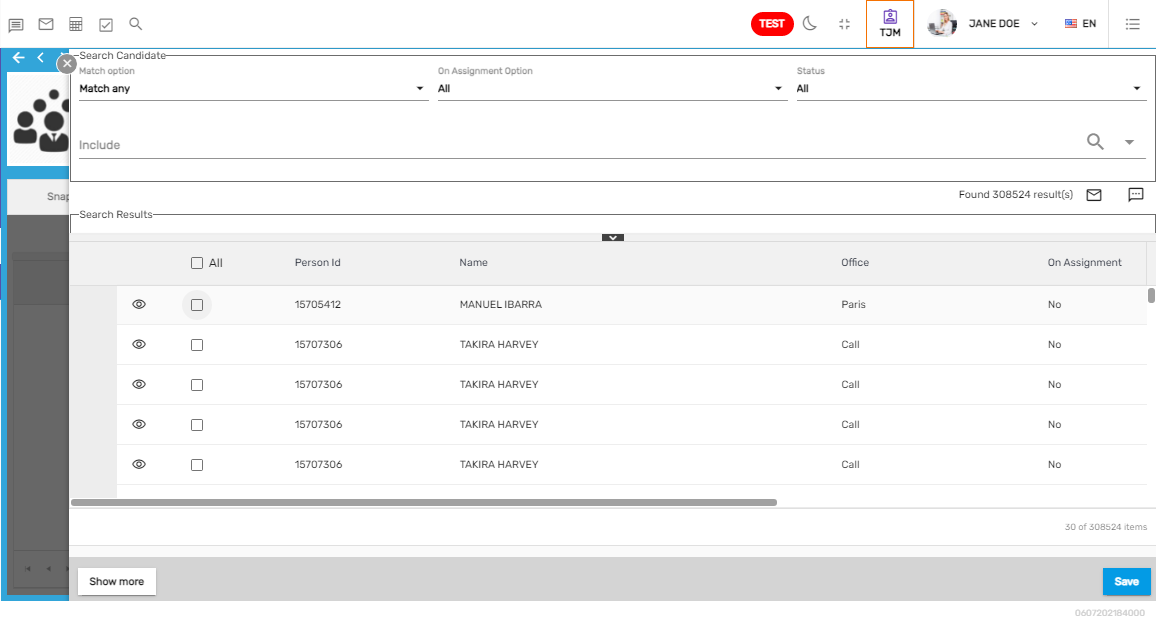
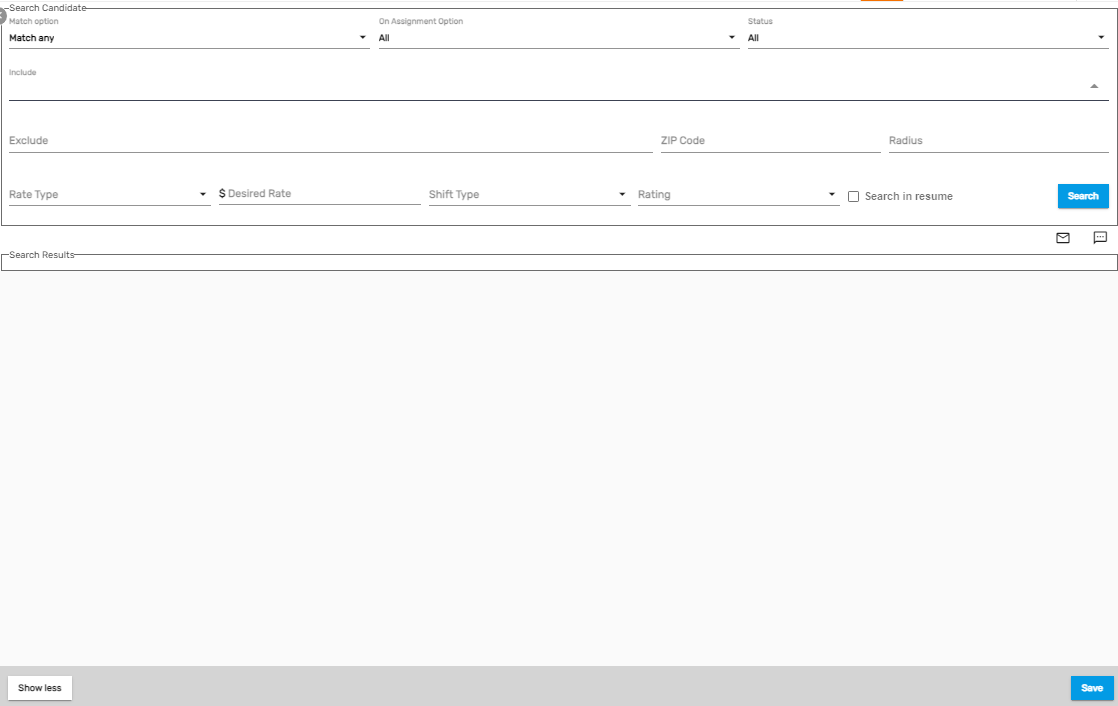
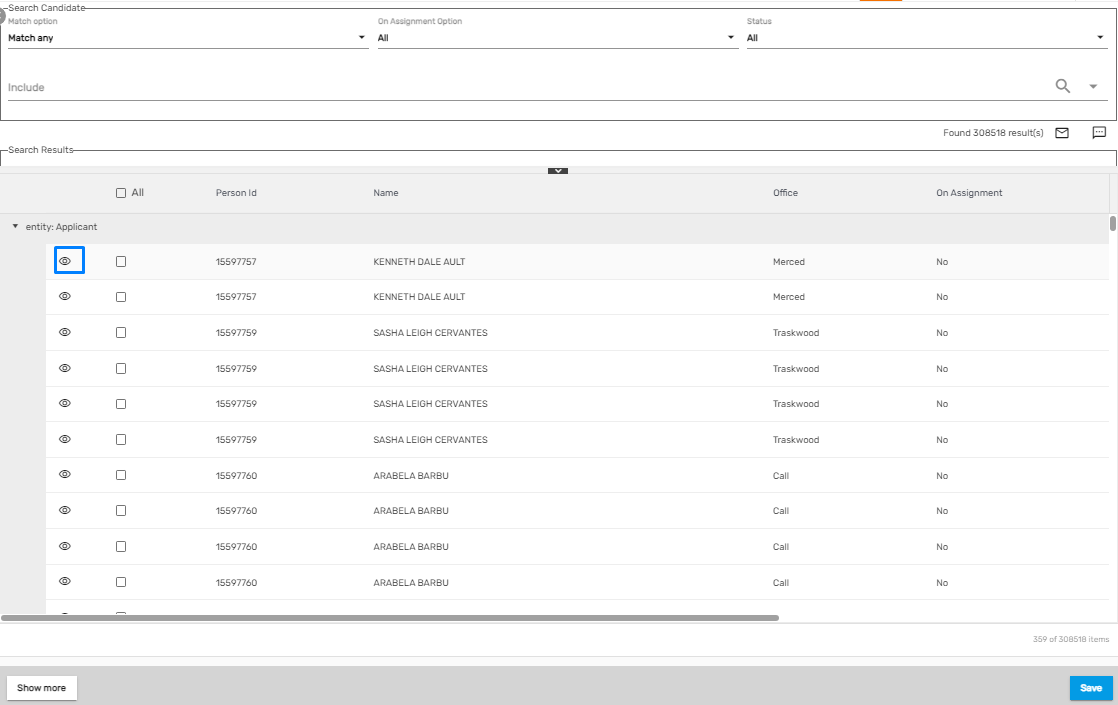
Users can add candidates for the job position. While adding the candidates, users can use the filter option for searching people who can be an applicant, new hire, or employee. Only those that match the skill for the job can be filtered while adding the candidates.
| Fields | Description |
|---|---|
| Match option | Users can match all or match any person for the job while searching |
| On Assignment | Users can search for all the persons or those who are on assignment only or are not on assignment |
| Status | Users can filter the persons status and search for the candidates |
| Include | Users can include those persons on the basis of the selected criteria |
| Exclude | Users can exclude those persons on the basis of the selected criteria |
Users can also redirect to the detail of the entity i.e applicant, new hire, employee through the eye view icon and see their detailed information.
Using the 'Assign' action, users can assign candidates for the job. The candidates should be an employee to assign.
Using the 'Edit' action, users can edit the candidate's detail.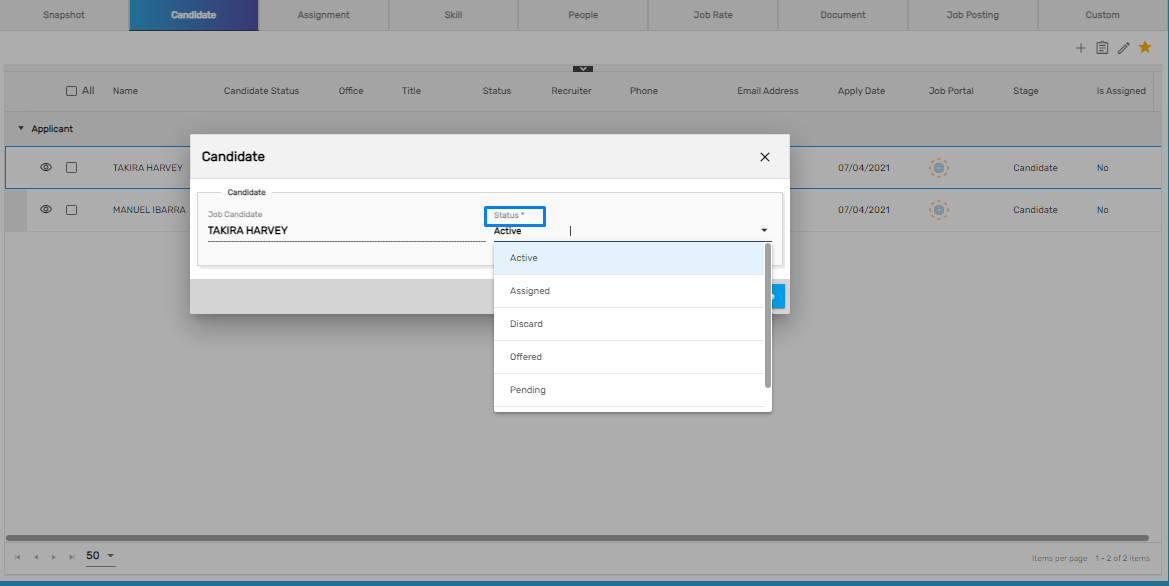 Users are also able to send bulk 'Email' and 'SMS' to the candidates which work the same as the 'Send Email' and 'Send SMS' feature on all the applications.
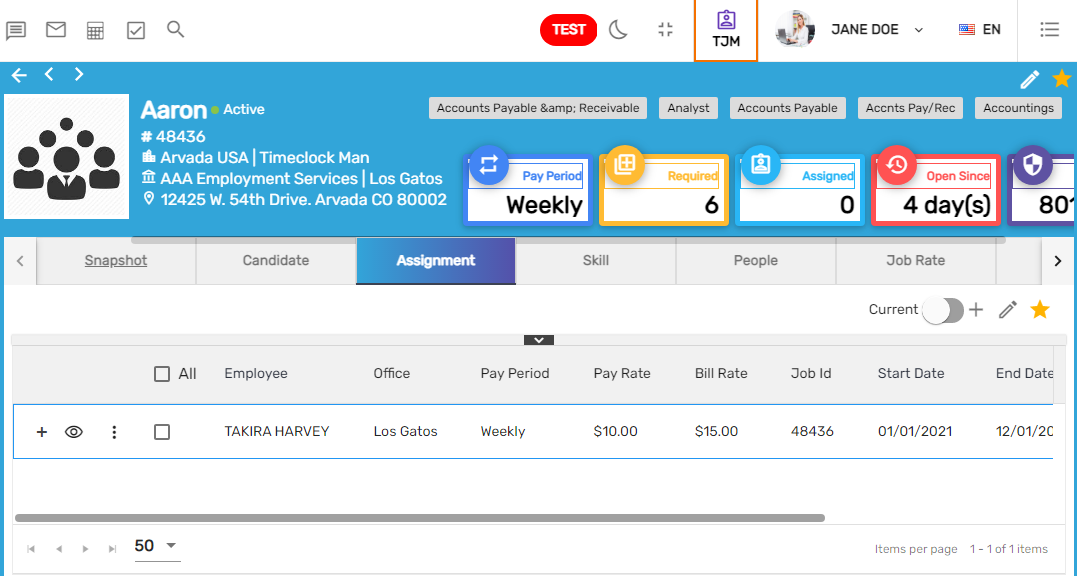
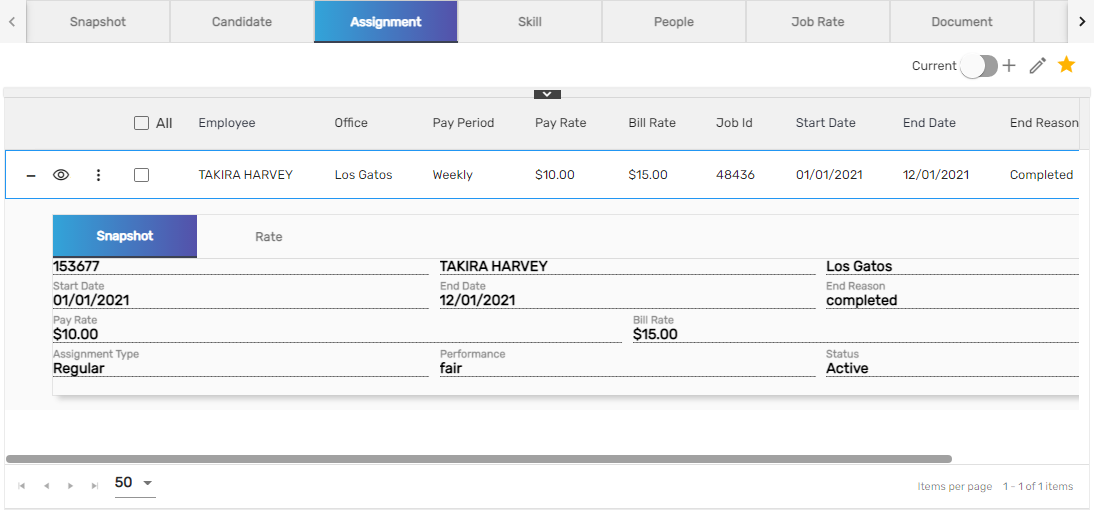
Assignment
The 'Assignment' top navigation displays the list of assignments under the job. It helps users to view the details of the temp job assignment. Users can view the current assignment as well as all assignments using the toggle button. Those assignments which have no assignment end reason or assignment that are running will be listed under the current assignment. From the 'Assignment' top navigation, users can assign the assignment for employees and filled the required number of candidates for the job.
Candidates that were assigned for the job from the 'Candidate' top navigation will also be displayed as a record in the 'Assignment' top navigation.
 There are multiple actions under the 'Assignment' top navigation. They are:
- Add
- Copy Assignment
- Edit
- New Work Injury
- Refresh
- Send Email
- Send SMS
- View Assignment Report
1. Add
Users can add assignments and assign an employee for the job using the 'Add' action. While adding the job assignment for an employee, users can filter the recently searched employees. 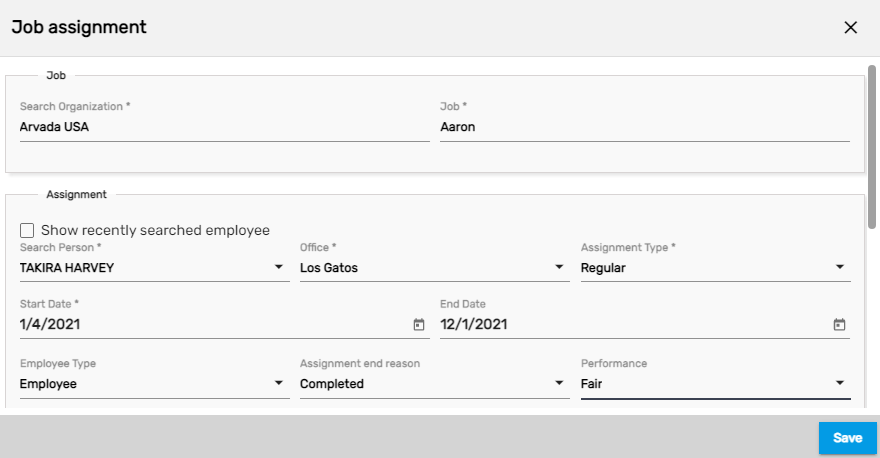
Users can assign multiple persons under the same job. They can multiple select the persons from the search person drop-down records.
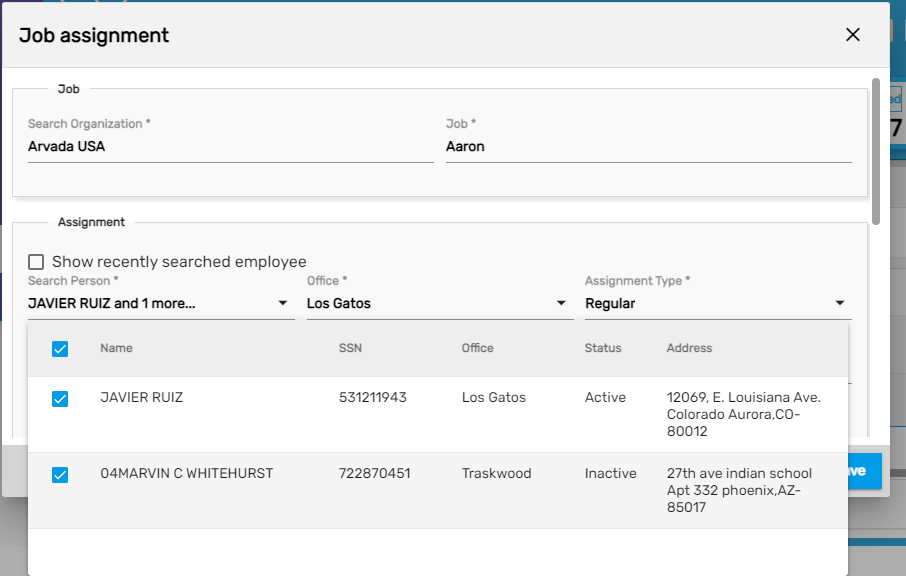
Users can redirect to the assignment, customer, and employee detail from the eye view icon.

Also, the details of the assignment can be viewed by clicking on the 'Expand' icon which is on the left side of the eye view icon.
While adding the job assignment, the job order records on the dropdown are sorted by Start Date in descending order (with recent on top) and show the Job Id (with latest on top).
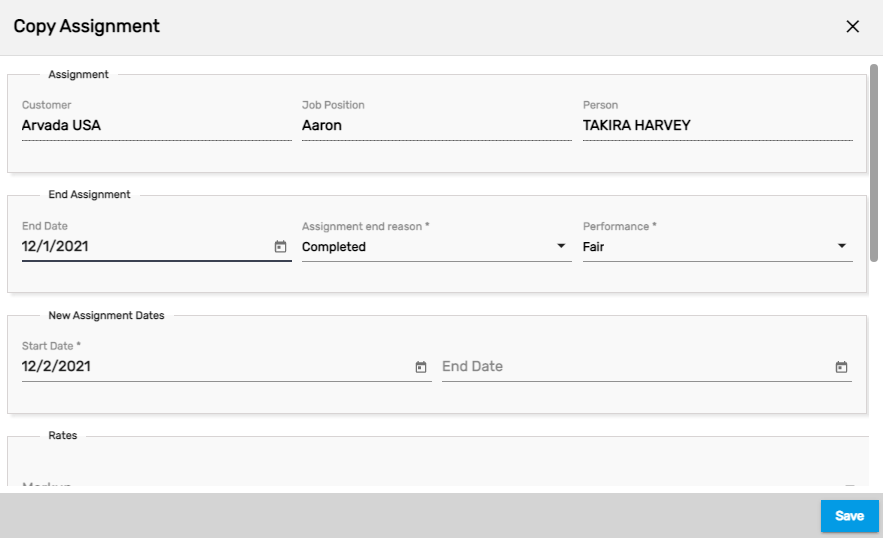
2. Copy Assignment
The job assignment of the employee can be copied or the same assignment can be assigned to the same employee again, on the basis of the requirements. Some of the details can be edited like 'Assignment End Reason,' 'Performance,' 'Start Date,' 'End Date,' 'Markup.'
3. Edit
Using the 'Edit' action, users can edit the assignment details.
Users can end the assignment for the temp job using the 'End Assignment' action if the employees' assignment of the job has ended or needs to be ended due to some reason. Users can also select the employees for whom the assignment should end. For ending the assignment, users have to provide a reason for ending the assignment and enter the performance of the employee. Moreover, users can add comments for ending the assignment.
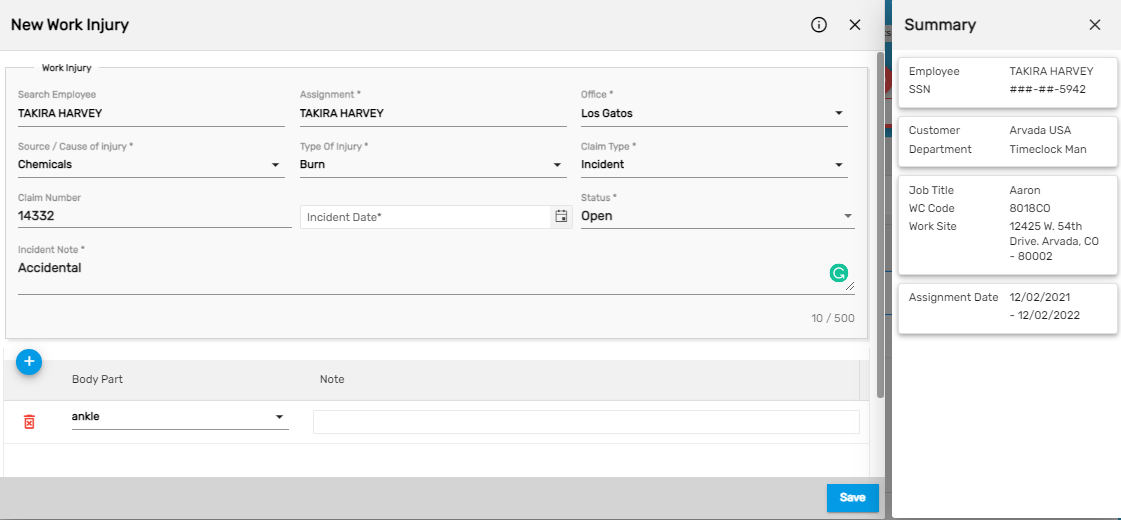
4. New Work Injury
The 'New Work Injury' action allows users to add work injury for the employee under the assignment.
5. Send Email and Send SMS
The 'Send Email' and 'Send SMS' allow users to send emails and SMS to the employees in bulk. The process is similar to the 'Send Email' and 'Send SMS' actions in all the applications.
6. View Assignment Report
The 'View Assignment Report' action allows users to view the start sheet report of the assignment IDs that are displayed on the 'Assignment' top navigation. If the assignment records are updated they will be updated on the report as well.
This report shows the job description, work information, and contact information of the employees as per the assignment IDs.

Skill
The top navigation, 'Skill' displays the skills defined for the job. Users can filter and add candidates as per the defined skill.
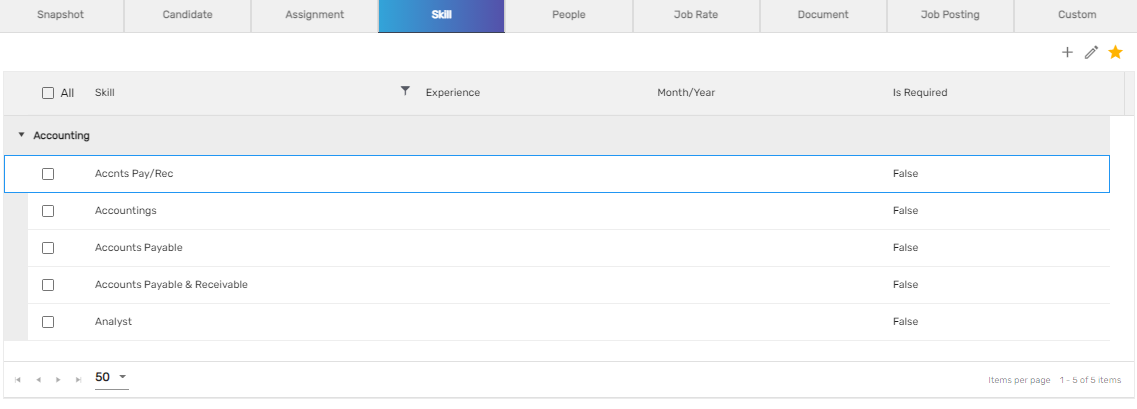 Users can add multiple skills for the job that are listed under multiple skill categories.
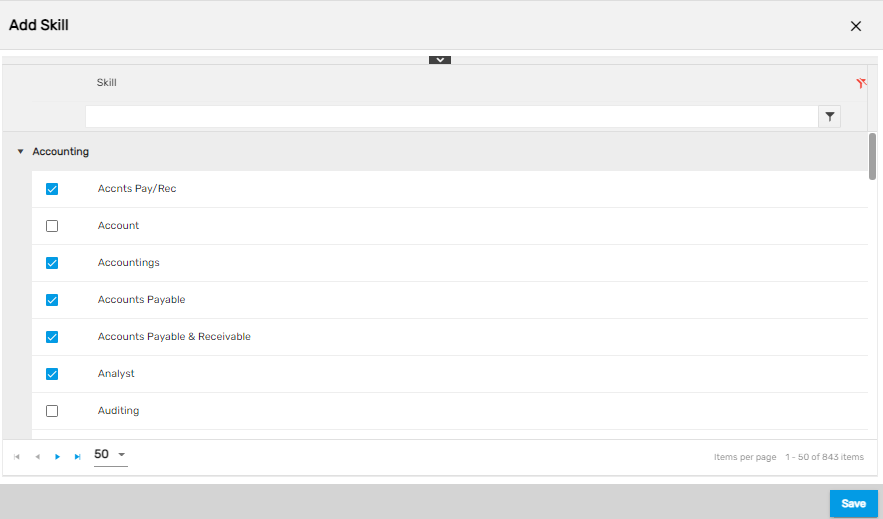
The added skill records will be displayed under the 'Skill' top navigation and will display in the temp job detail as well.
Users can edit the skill details and can also set the experience per month/year that is required for the skill.
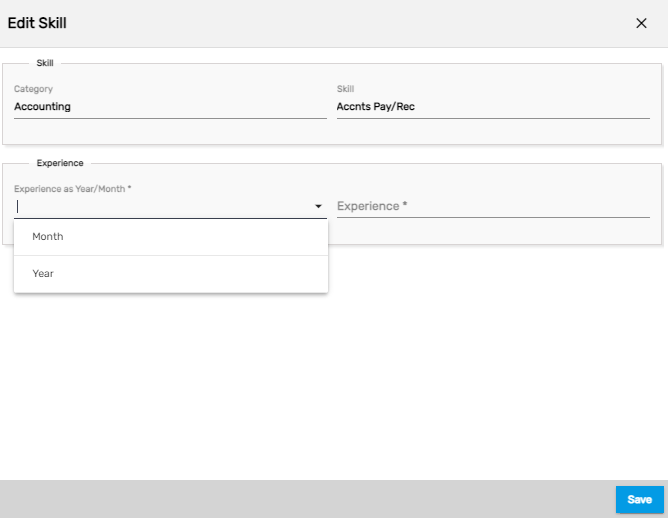
The top navigation 'Skill' also has the 'Delete' action. It allows users to delete the skill for the job.
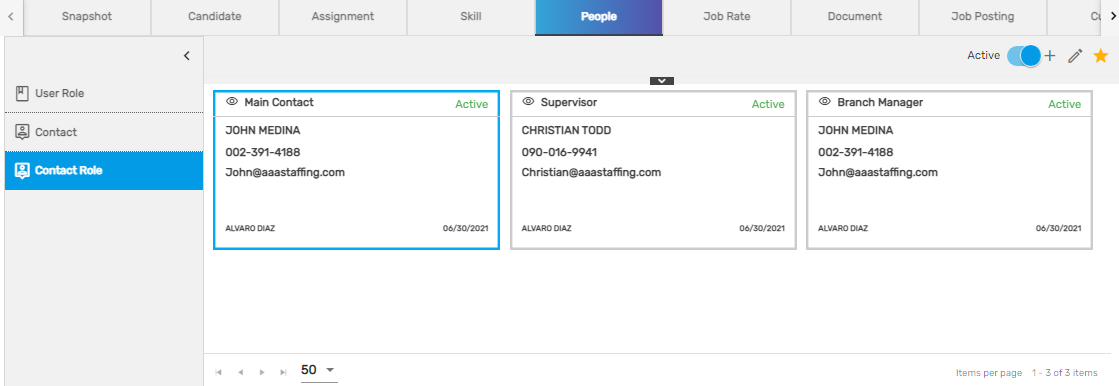
People
This top navigation consists of three side navigations. They are:
- User Role
- Contact
- Contact Role
1. User Role
The 'User Role' side navigation shows who is directly involved with the temp job like the user who added the temp job (Entered By), account manager, sales manager, and the staffing representative. It allows users to add and edit user roles of the temp job. Users can't add multiple user for the same role.
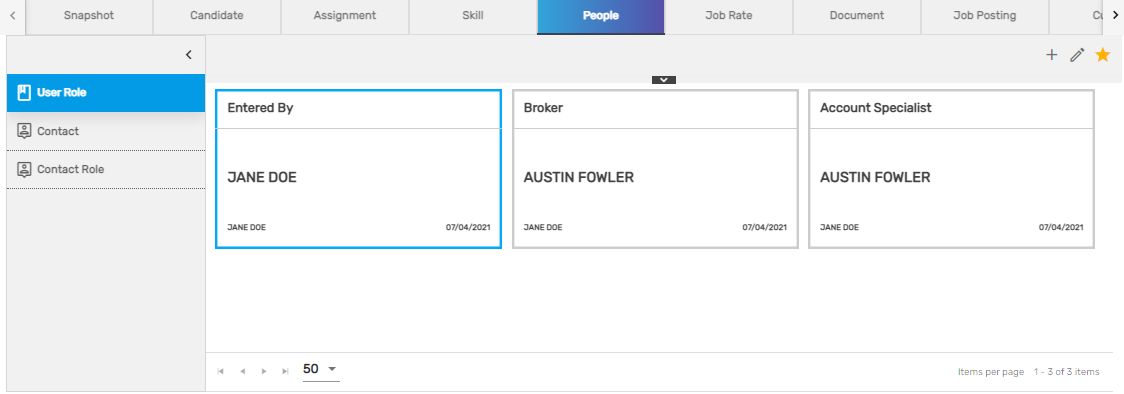 The standard user roles are entered by, account manager, sales manager, and staffing representative but these roles can be customized as per the organization's requirement.
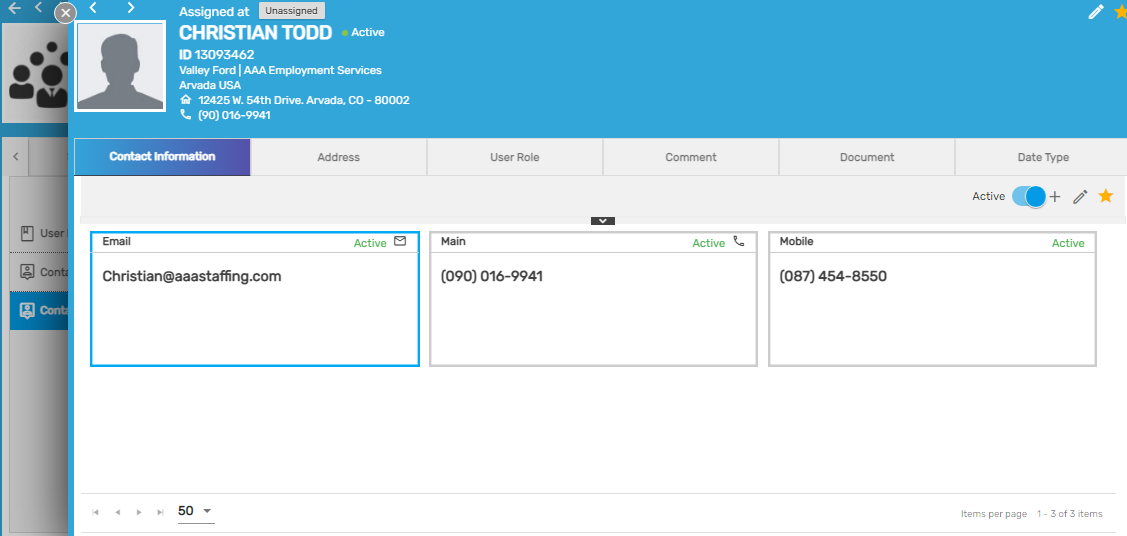
2. Contact
The 'Contact' side navigation shows the contact records. It allows users to view the login info of the contact, add and edit the contact details. The toggle button shows the active contact or all of the contact list.
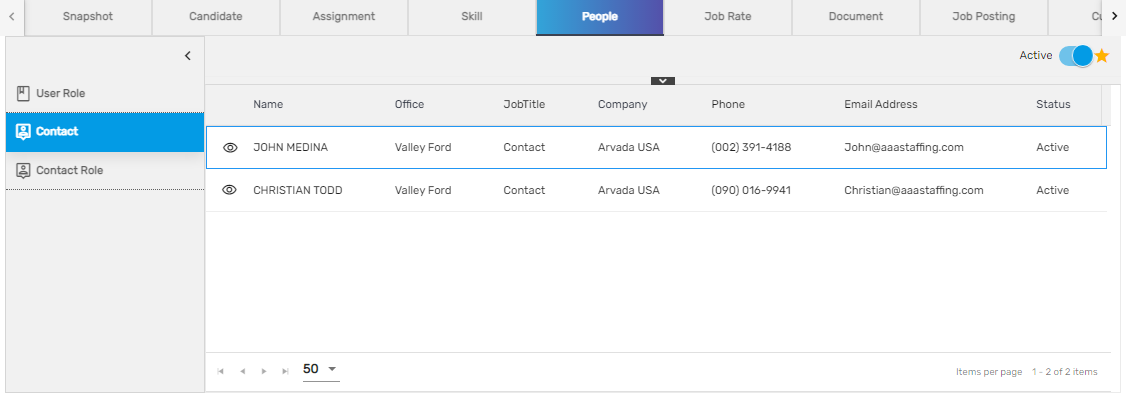
Users can view the detailed information of the contact by clicking on the eye view icon from the contact detail.
The users can also redirect to the contact detail from the eye view where the users can view the detailed information of the contact.
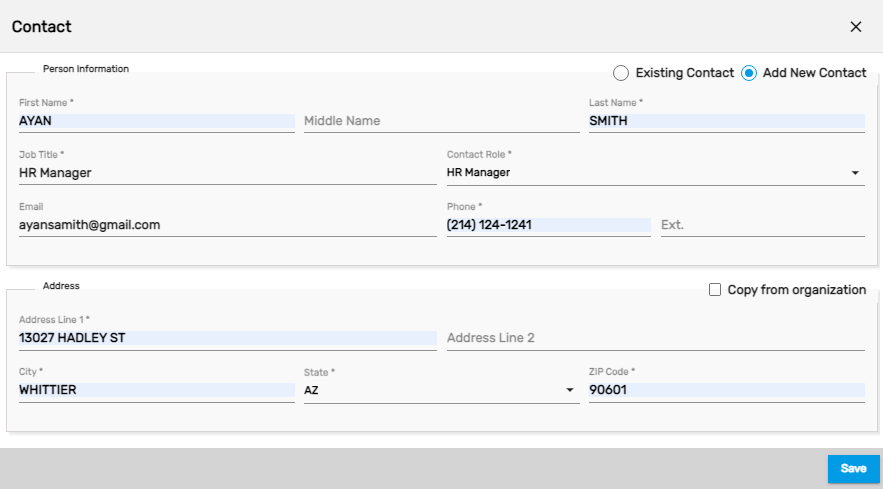
The users can add the contact from the existing contact list ( contact list from the contact records) or can add a new contact for the temp job. They can select the option either 'existing contact' or 'add new contact'.
- Existing Contact
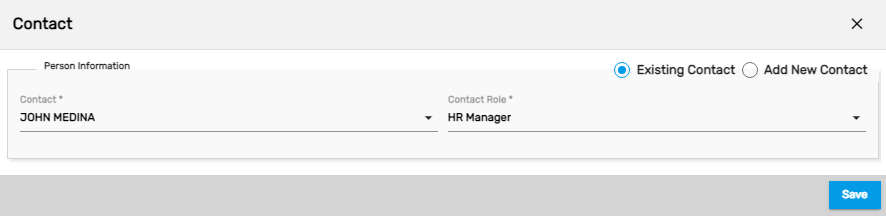
- Add New Contact
3. Contact Role
The 'Contact Role' side navigation shows the role for the contact. The roles are like an HR manager, main contact, supervisor, branch manager, invoice attn to., marketing main, order by, other, payroll contact, report to, time approval, web portal user.
It allows the user to add and edit contact roles. The users are only allowed to add the roles for the contact. Multiple roles can be assigned to the same contact but multiple contacts for the same role are not allowed to add.
Users can redirect to the contact detail from the eye view.
Job Rate
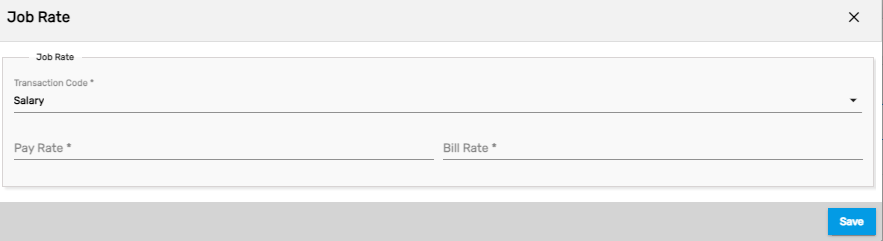
The 'Job Rate' top navigation displays the job rate defined for the transaction codes that are related to the temp job.
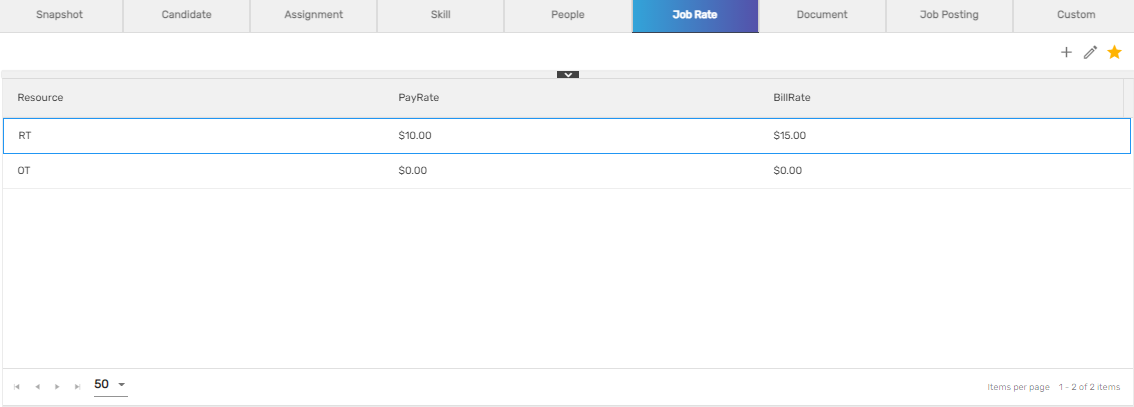
The users will be able to add and edit the pay rate and bill rate for various transaction codes. 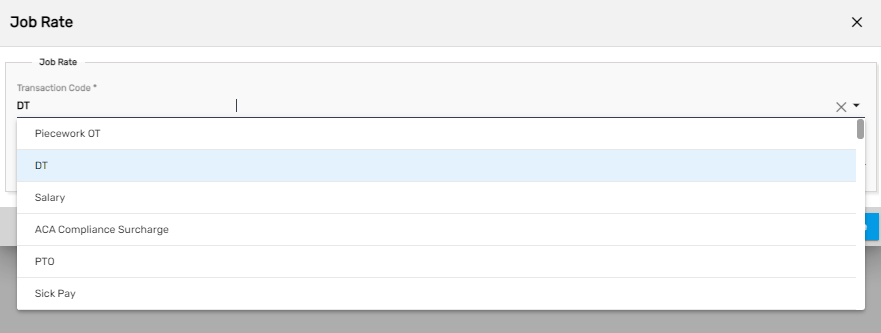
| Fields | Description |
|---|---|
| Transaction Code | All the transaction codes will be listed. Users can select the transaction code and add the job rates |
| Pay Rate | Users can define the pay rate for the transaction code which is set for the employees under the job |
| Bill Rate | Users can define the bill rate for the transaction code which is set for the customers under the job |
There is a feature where users can also update the assignment rates of the job. This feature will appear just after the job rate is added or edited.
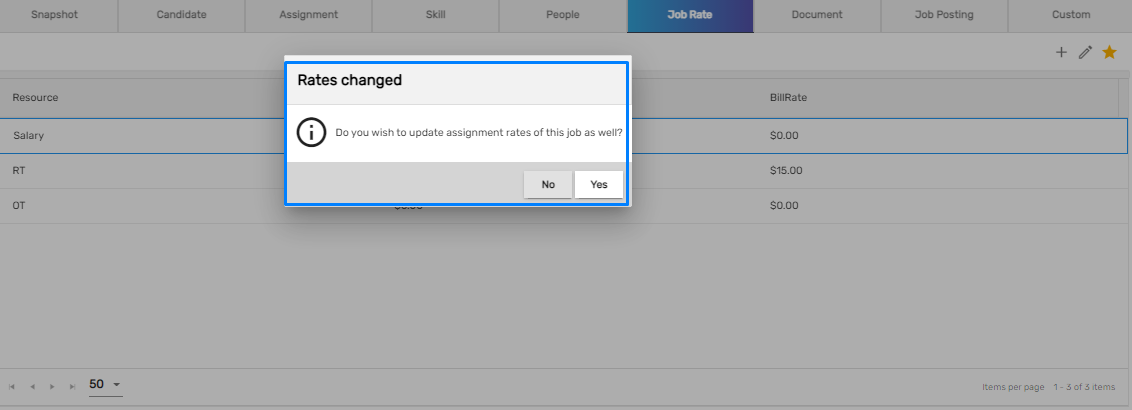
If the users wish to update the assignment rate, the job rate can be copied to multiple employees as well. The toggle button allows the user to see the list of all or the list of current employees only. Those assignments which have no assignment end reason or whose assignment is still running will be listed under the current assignment.
Document
The 'Document' top navigation shows the temp job documents having document types like file, image, or new hire onboarding. It allows the user to view and download the documents. Users can download single documents as well as bulk documents at once. The user can also add and edit the temp job's document.
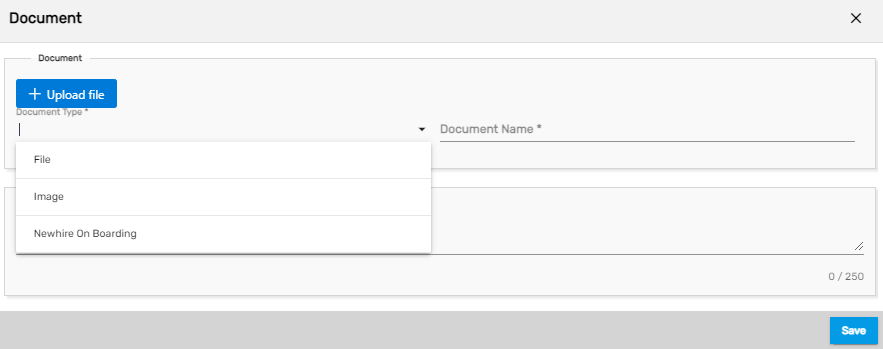
| Fields | Description |
|---|---|
| Document | Users can upload documents related to the job and can also set them to show in the portal or not. |
| Note | Users can add document notes |
Users have access to view the document by clicking on the eye view and click on the download button to download the document. If the document is not required for the job, users have access to delete the document from the 'Delete' action. 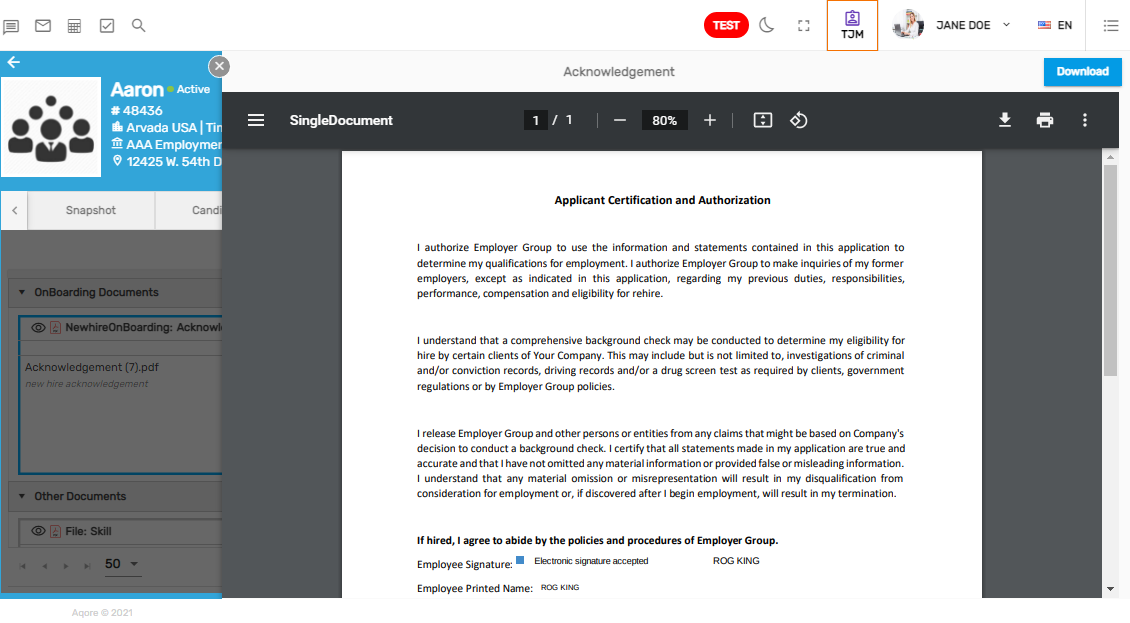
To view, download, add and edit the document, the process is similar to all the applications.
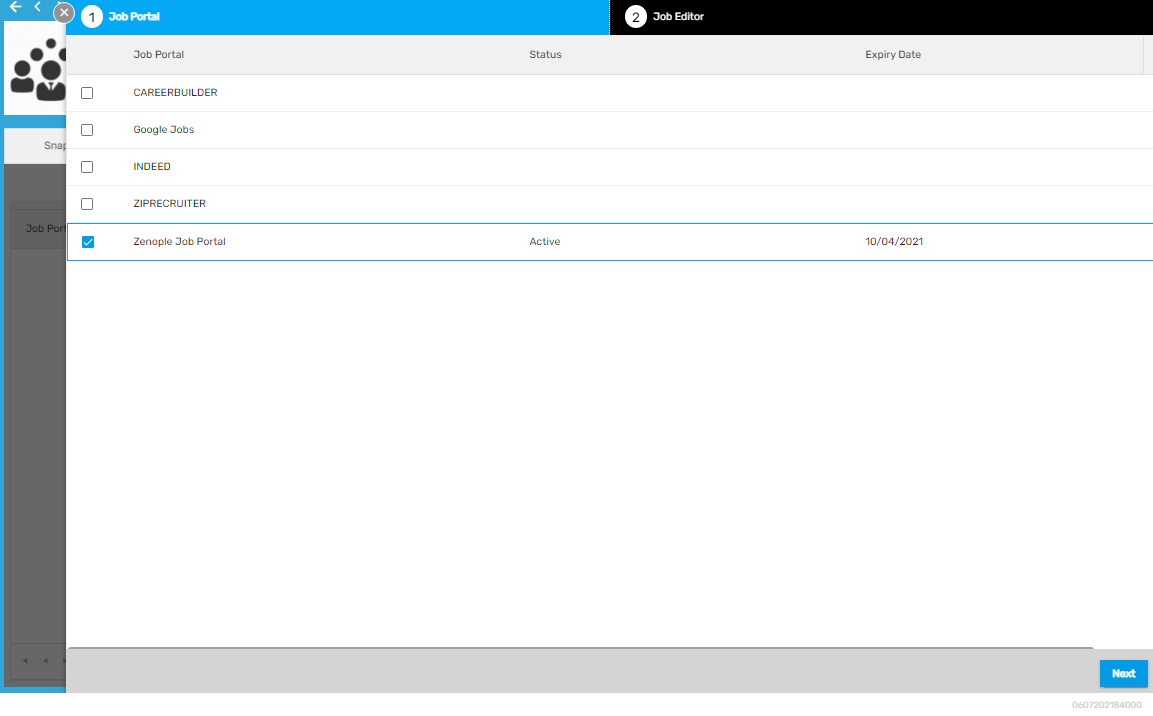
Job Posting
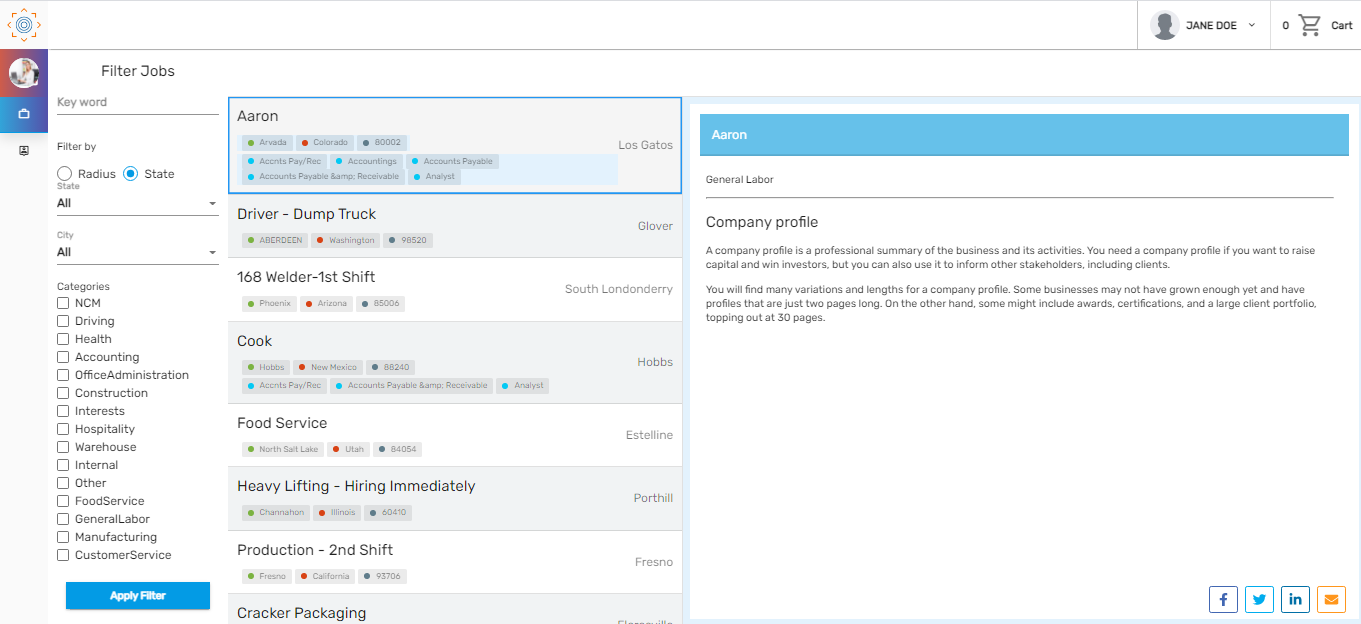
The top navigation 'job posting' displays the records of the job posted under different job portals. It allows users to save and post jobs from different job portals defined. The job portal can be customized as per requirements. The job can be posted from the 'Zenople Job Portal' as well. The job posting under the Zenople portal will be listed on the 'Job Portal' of Zenople. It makes users easy to post jobs so that persons who are seeking the job can visit the job portal and apply for the job from the portal.
 Users can select the job portal under which the postings have to be done or needs to post a job, set the expiry date till which the job post is valid, and save and post the job from the 'Setting' action.
 Users can add the portal description, view the job title, location, and job type. Clicking on save&post will save the job and post the job on the selected job portal. The job posting will be displayed as a record under the 'Job Posting' top navigation.
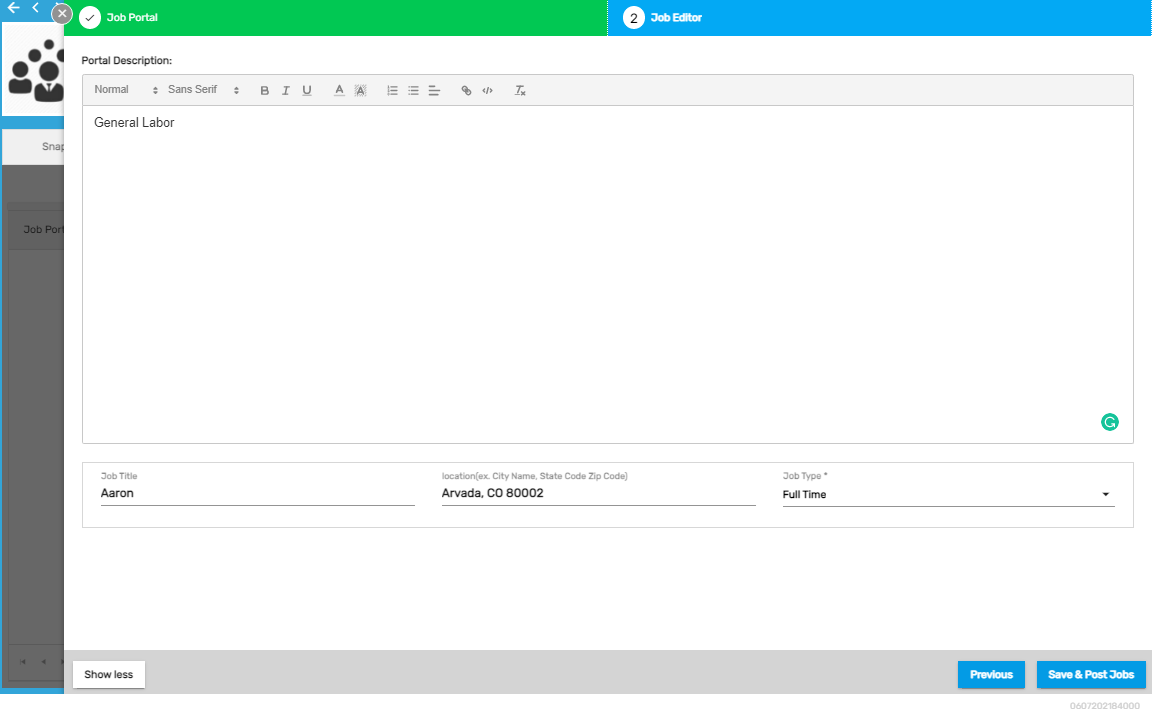
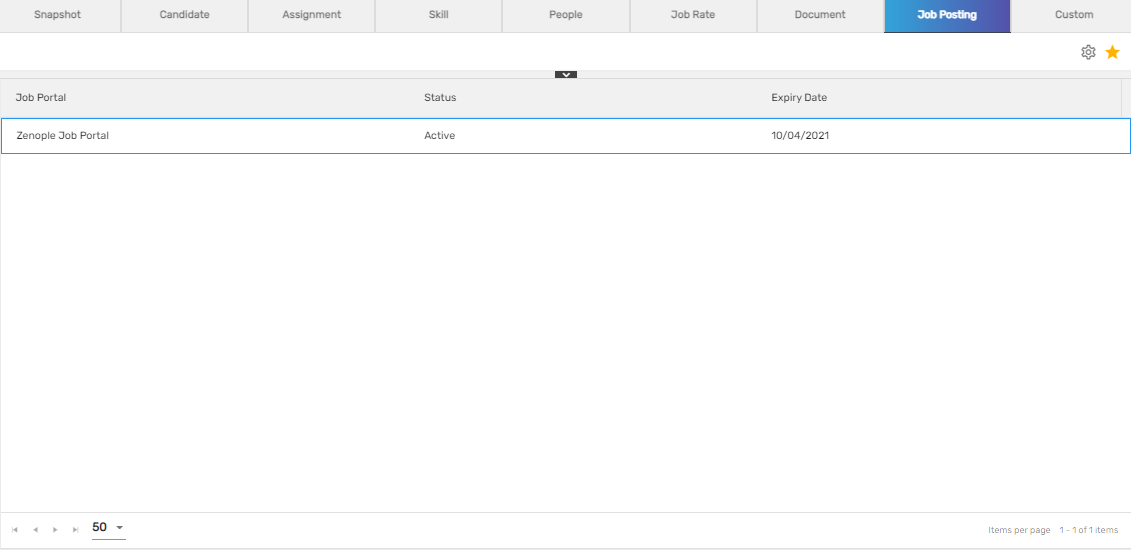
Users can update the expiry date of the job posting and the status from the 'Setting' action.
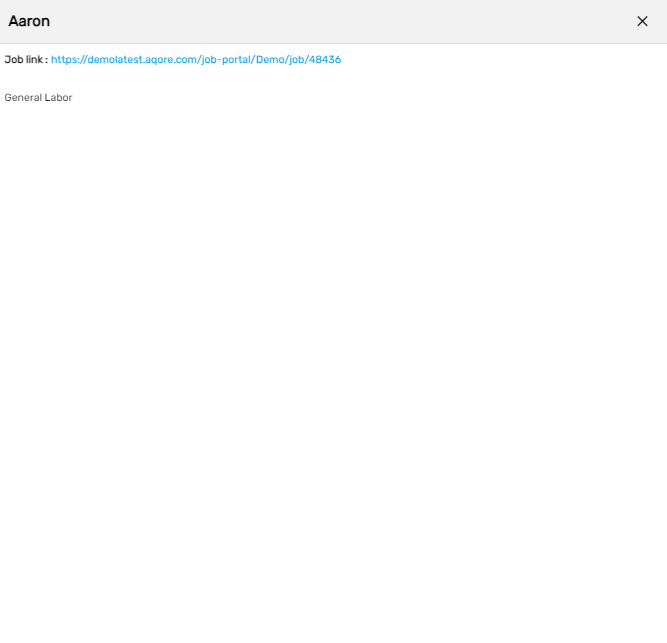
Users can preview the job posting through the 'Preview' action. It shows the job link and the job posting description. Users can visit the link to see the job posting details on the job portal, only if the job posting status is 'Active.'
Custom
The 'Custom' top navigation allows the users to add extra information related to the temp job. Users can add the custom types, their values, and notes.
The categories are defined for each custom type.
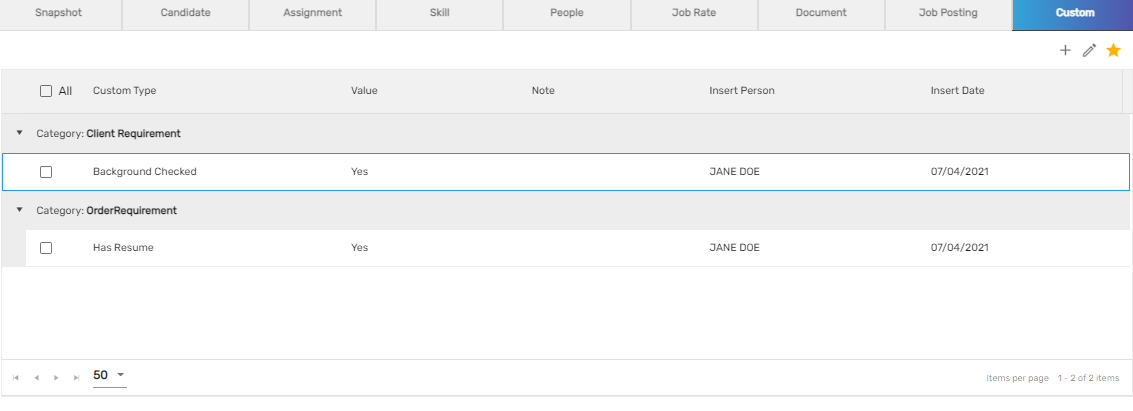
The users can add a custom label which is the custom type, set the values for the types, and add notes if necessary. 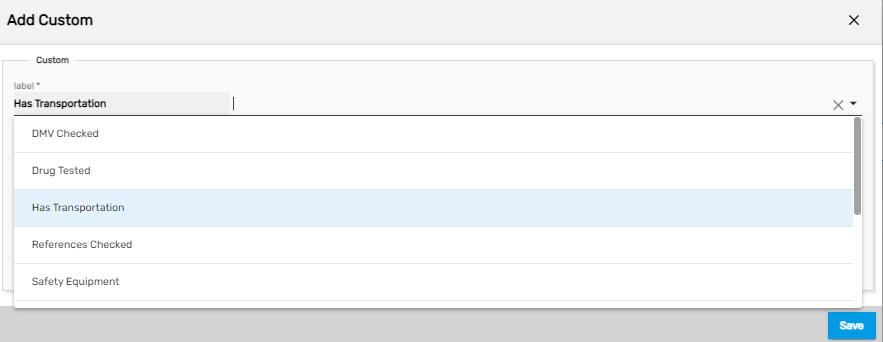

| Fields | Description |
|---|---|
| Label | Users can add extra information related to the job. The categories are defined for each label |
| Value | Users can set the value for the label which is the custom type |
| Note | If necessary, users can add notes for the labels |