FAQs with Solutions
Here are some frequently asked questions
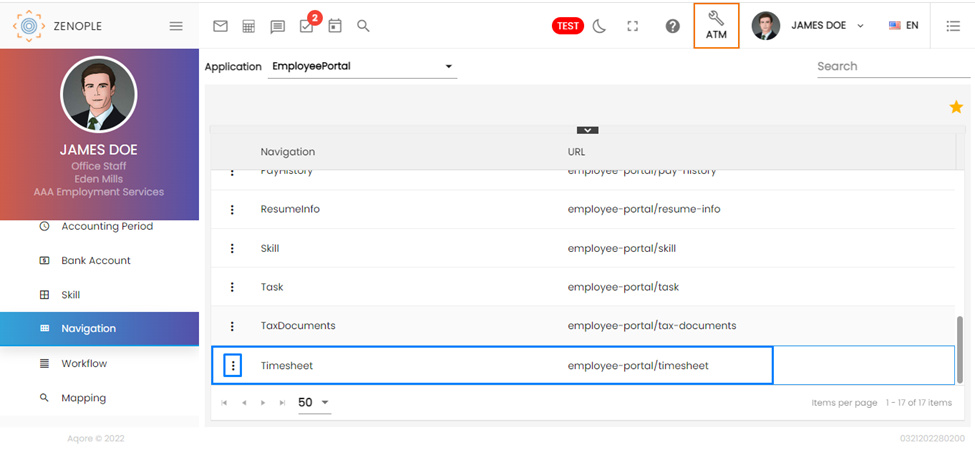
How to remove the 'Timesheet' on the Customer Portal for a particular company/ office?
You can remove the Timesheet option on the Customer Portal from the ATM.
- Go to ‘Navigation’ under Settings main navigation of ATM (ATM>Settings>Navigation)
- Choose the ‘Customer Portal' as 'Application' from the dropdown.
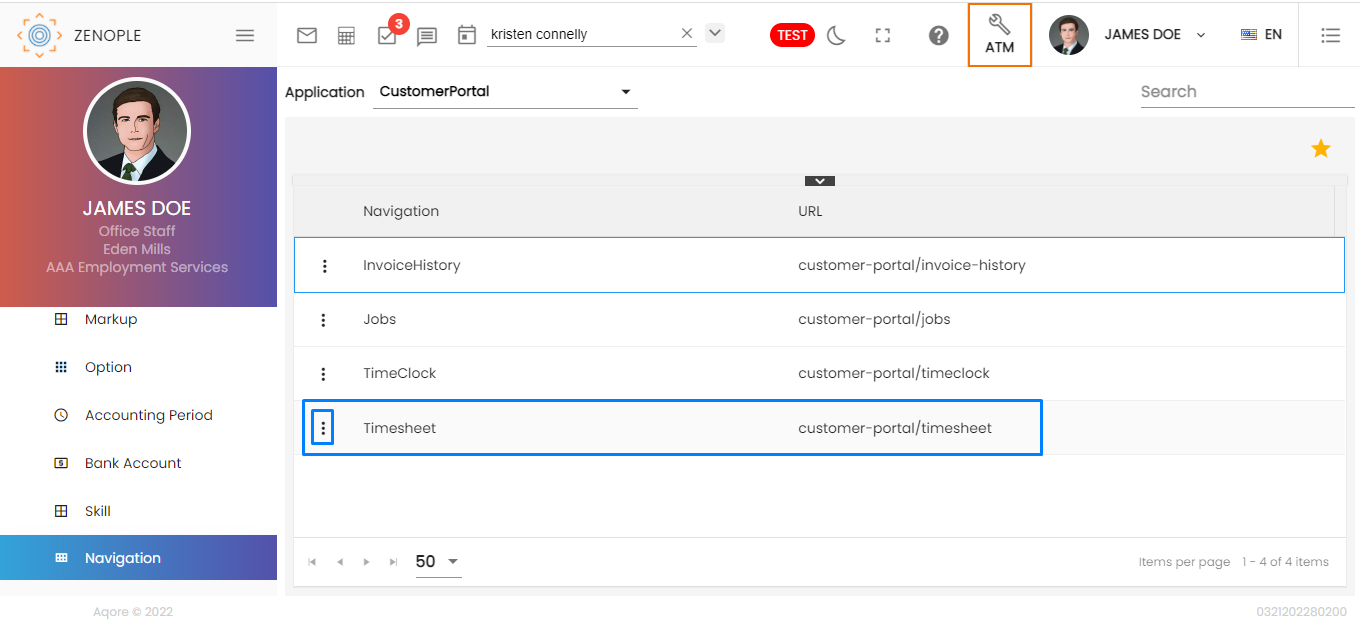
- Edit the access from the three-dot vertical ellipsis and uncheck the offices that aren’t required.
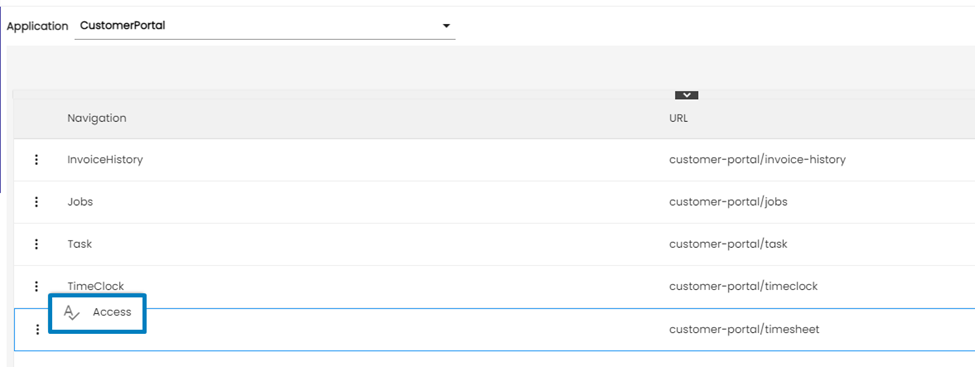
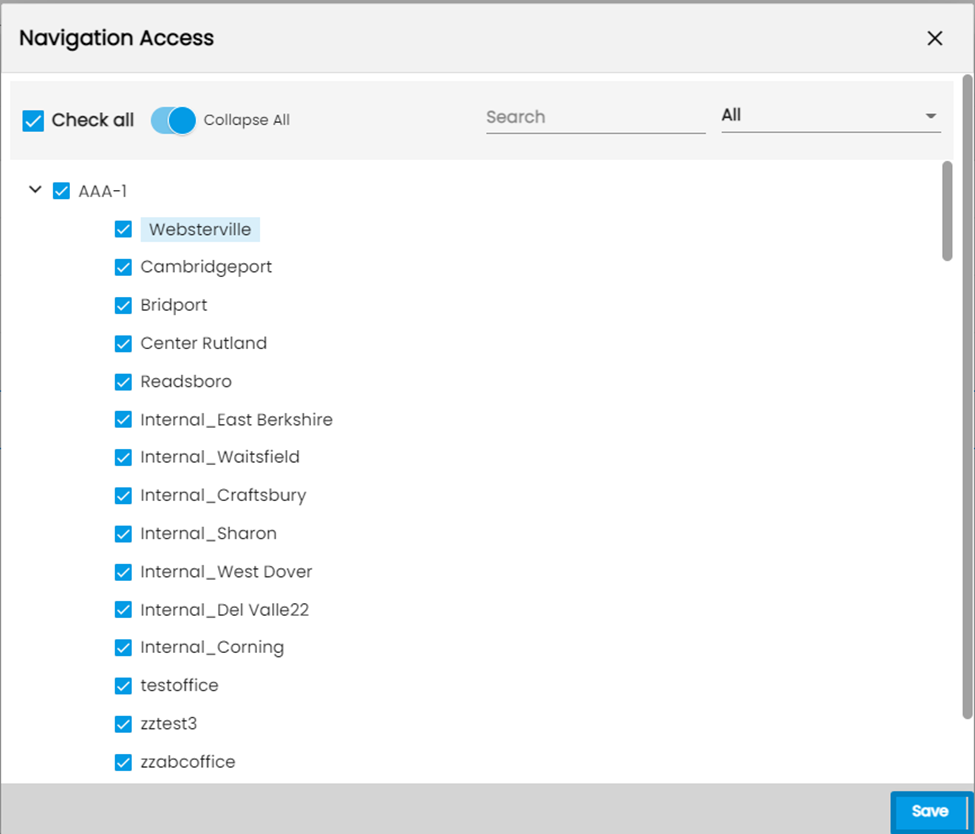
After saving the changes go to the Customer Portal, the Timesheet navigation will not be displayed anymore.
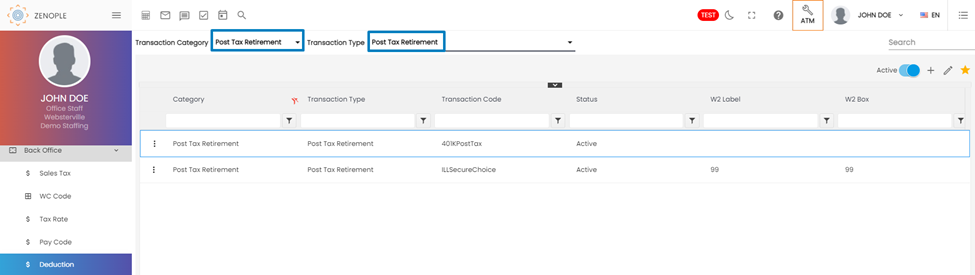
How to set up Post Tax Deductions?
The deductions can be set up from the ATM application.
- Go to the ‘Deduction’ under Back Office main navigation of ATM. (ATM>Back Office>Deduction)
- Select ‘Transaction Category’ and ‘Transaction Type’ as ‘Post Tax Retirement’ from the dropdown.
Similarly, users will be able to set up these deductions as well.
- Advance Bank
- Child Support
- Fees
- Garnishment
- Levy
- Other Deduction
- Post Tax Insurance
- Post Tax Retirement
- Pre Tax Insurance
- Pre Tax Retirement
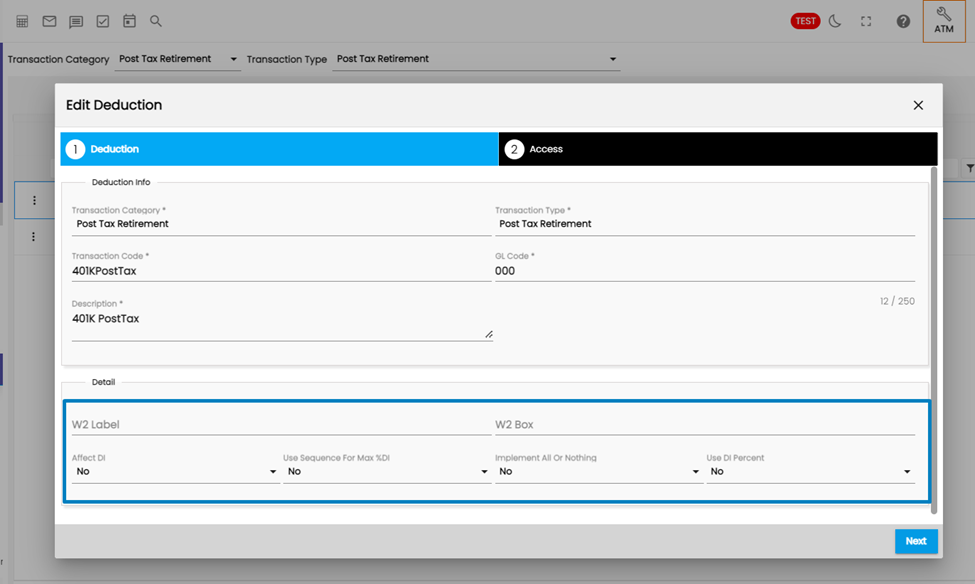
How to include deductions in W2?
The deductions can be set up from the ATM application.
- Go to the ‘Deduction’ under Back Office main navigation of ATM. (ATM>Back Office>Deduction)
- Select ‘Transaction Category’ and ‘Transaction Type’ as ‘Post Tax Retirement’ from the dropdown.
- To show the deduction in W2, please include the Details of the W2 in the Setup.
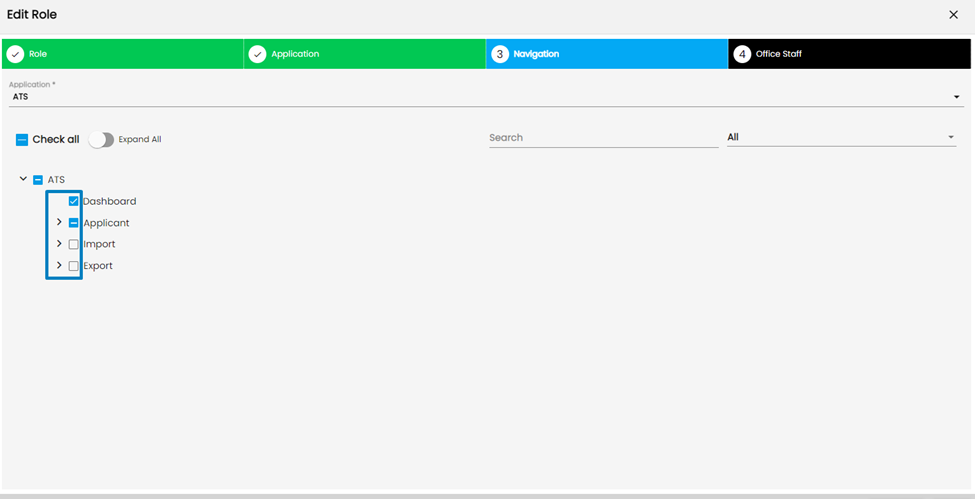
What to do when the 'Please select the navigation for main application before processing.' error occurs?
While editing the ‘Role’ under Settings main navigation of ATM application this error occurs, if users try to move to the next step without selecting any navigation for the selected application.
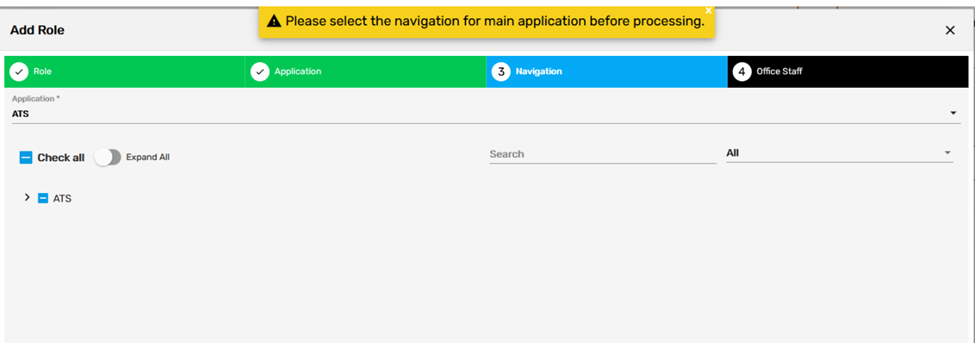
Select a navigation/s by check-marking the boxes beside the navigation/s to avoid this error.
Why doesn’t the PO number print on an Invoice?
The Purchase Order number or PO number in an invoice is shown in accordance with the customer's service profile. Go to the Service Profile side navigation under Sales & Service top navigation of Customer Detail.
While adding or editing the Service Profile, select the PO Number option for either the ‘Invoice Display’ field or the ‘Separate Invoice By’ field. If the PO number requires to be in the top-right position, then select the ‘Purchase Order Number’ option as ‘Separate Invoice By’ on the Service Profile.
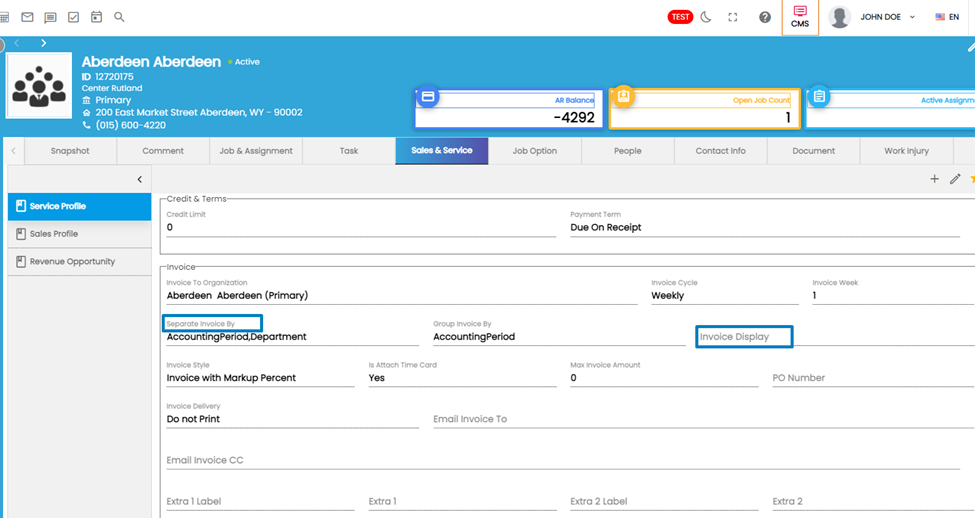
Users must regenerate the document to view the changes after setting up the Invoice Display or ‘Separate Invoice By’ field under a customer's service profile.
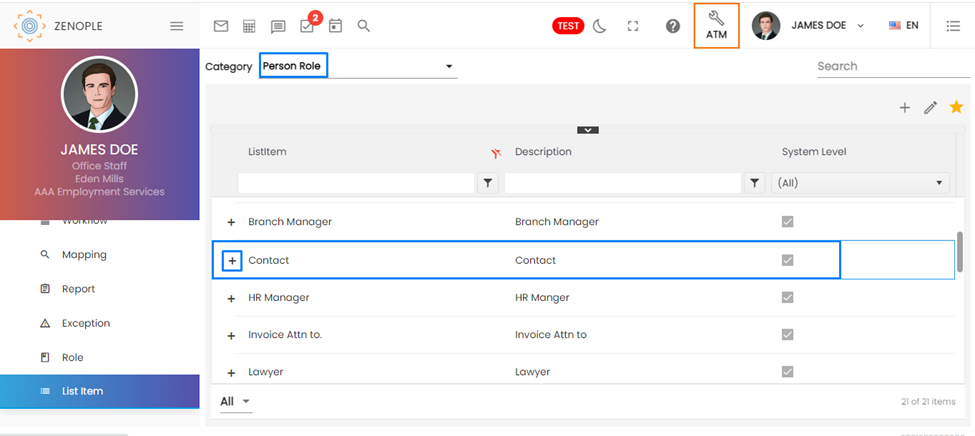
How to set up multiple people with the same contact roles?
Multiple people can be assigned to the same contact roles, but the property 'AllowMultiple' must be set to ‘True’ for each ‘Person Role’ from the ATM application.
Follow these steps to make AllowMultiple ‘True.’
- Go to the ATM application and click on ‘List Item’ under Settings main navigation. ((ATM>Settings>List Item)
- Choose ‘Person Role’ as the ‘Category’ from the dropdown
- Click on the ‘+’ icon beside Contact
- In the 'List Items,' you will see 'Allow Multiple' and click on edit to change the property.
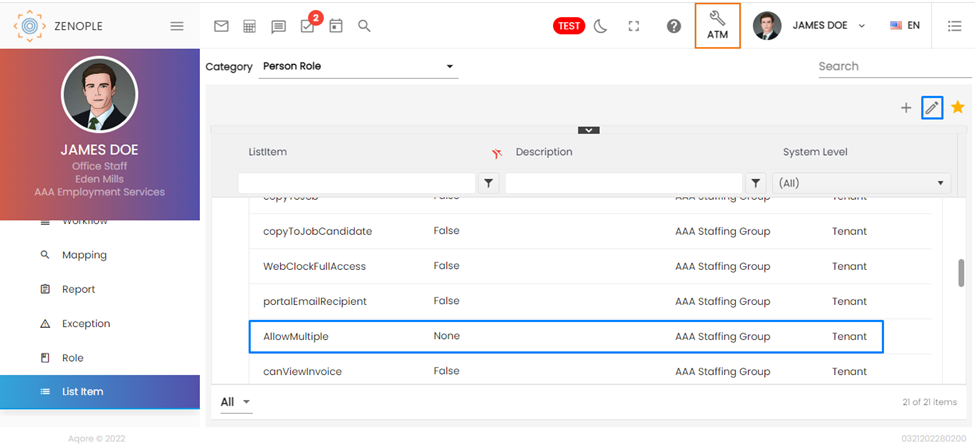
Edit the property 'AllowMultiple' and select multiple roles that you want to set up in the ‘Value List.’

After saving the changes, you will be able to set multiple people for a single role.
How to hide the accrual balance on the checks?
Accrual balance on the checks can be hidden by setting up from ATM.
Go to the ‘Accrual’ under Back Office main navigation in ATM. (ATM>Back Office>Accrual)
Search the plan for which the accrual needs to be hidden and click on the ‘Edit’ icon. Enter a higher number on Available Unit like 99999, then choose Available Unit Type as 'Days,'Available Trigger as 'End,' and Save the plan.
This setting means to show accruals in paystubs after the end of 99999 days from the Start Date of the Person Accrual. The basic idea is that 99999 days will never pass and accruals will be never shown on the checks for that plan.
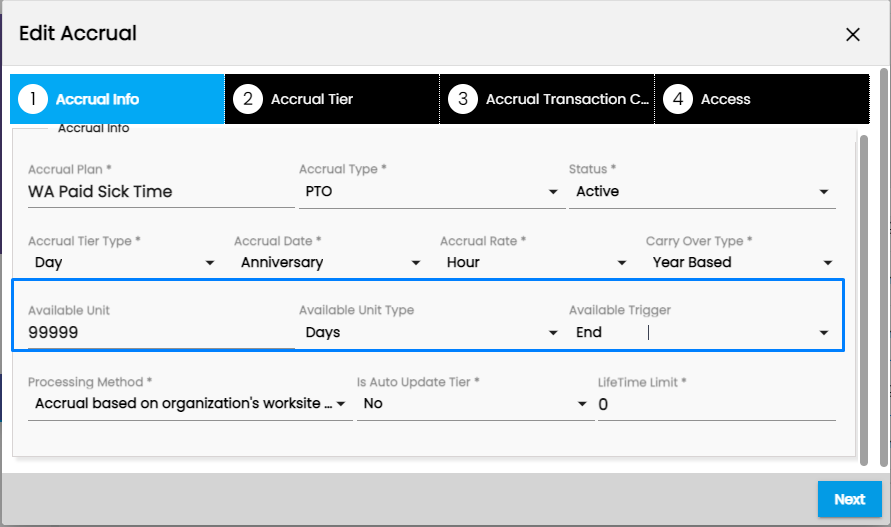
If Accrual Balance needs to be displayed for the Accrual plan on paystubs, then just clear all the values of these columns and it will be shown on the checks.

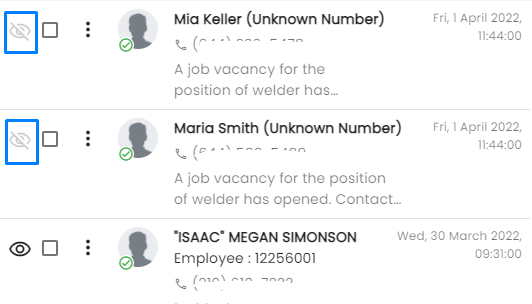
Some of the eye view icons in the SMS menu are crossed out, what does this mean?
The crossed-out eye view icon means that contact information is not linked with a personal profile on Zenople. It is disabled since it is not possible to redirect to any profile page on Zenople.
How to create a custom Task Template under any workflow stage?
Task template can be added from ‘Task Template’ under Settings main navigation of ATM (ATM>Settings>Task Template).
Click on the Add icon and choose Task Template with Form. Enter all the required fields to set up the Task Template.
| Fields | Descriptions |
|---|---|
Application | Application when task template is to be added |
Task Template | Name of the Task |
Parent Task template | Select the parent task template of the task template that you are about to add if required. |
Group | Choose the corresponding group according to the application |
Review required | If it's 'True' it will be seen on the review step before completing a task |
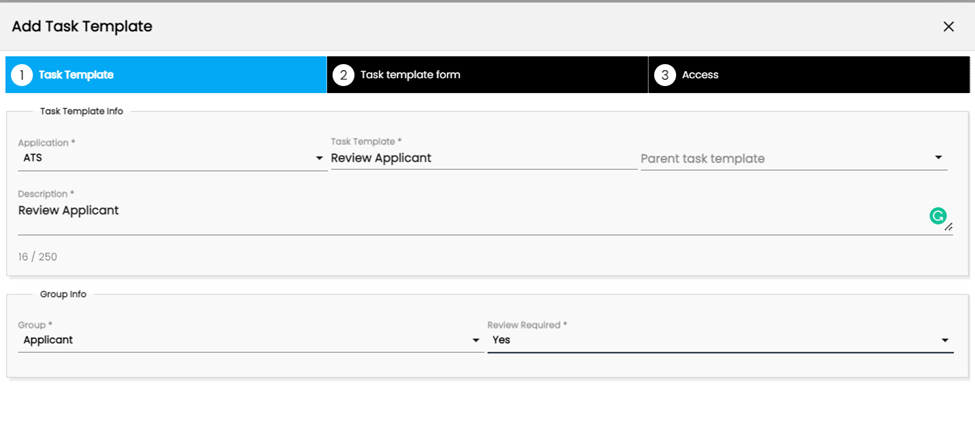
Select ‘Task Template Without Form’ in case of To-Do tasks, and give access accordingly.
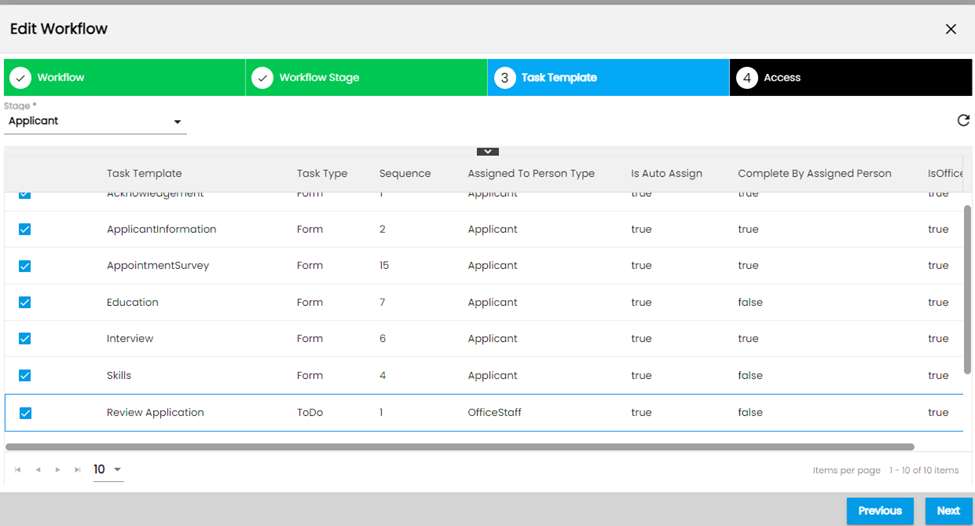
After setting up the Task Template, users need to tag it with the Workflow stage. Moreover, edit the workflow from the 'Workflow' under Settings main navigation of ATM. (ATM>Settings>Workflow)

Set up the configuration as required by entering all the required fields.
| Columns | Descriptions |
|---|---|
Task Template | Select the task template which needs to be edited |
Task Type | Is it tagged with any form or just To-Do (Simply checkmark the boxes) |
Sequence | the order in which the task needs to be assigned |
Assigned to Person | the person's role to which this task will be assigned |
Is auto Assign | If 'True' the task will be auto-assigned when an applicant is created, else need to assign manually |
Complete By Assigned person | If 'True' the task needs to be completed by an assigned person only else anyone can complete it |
Is Office Level | It should be True for ATS, NHO, and EIS tasks |
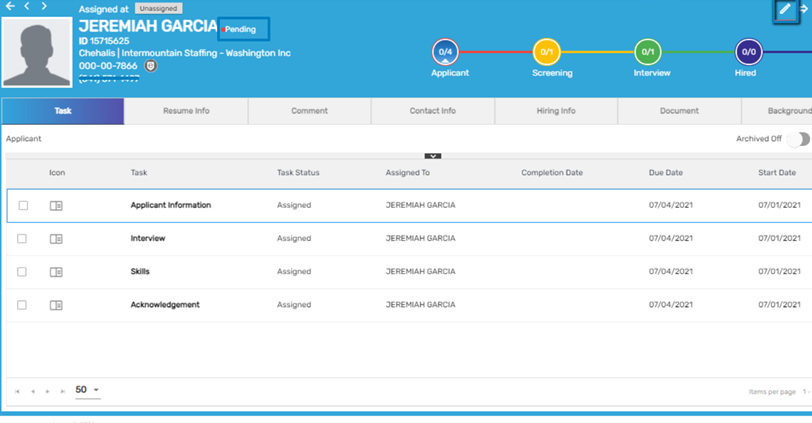
Error when moving a Person/ Customer to the next stage?
Until and unless the person/ organization doesn't have an 'Active' status, users cannot move to the next stage.
The Person/ Organization without ‘Active’ status cannot be moved to the next stage so ensure that they have ‘Active’ status.
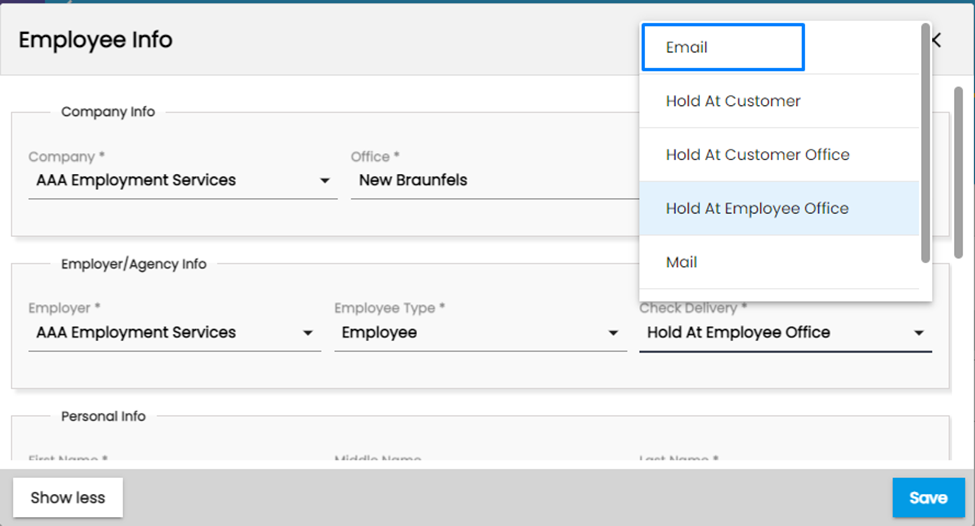
How to fix the issue of an employee not getting their pay stubs on emails?
Zenople will send Check on email if the ‘Check Delivery’ option is set as ‘Email’ but not for the other options like ‘Hold at Employee office,’ ‘Hold at Customer,’ ‘Hold at Customer Office,’ and so on.
To provide a pay stub on email, edit the Employee Info and select ‘Email’ for the ‘Check Delivery’ option and from the next payroll, the pay stub will be emailed.
Why report subscription is blank without any information?
Report Subscription will appear blank if there are no records to be displayed for the selected parameter. The report subscription will run the report with records if the parameters set contains records.
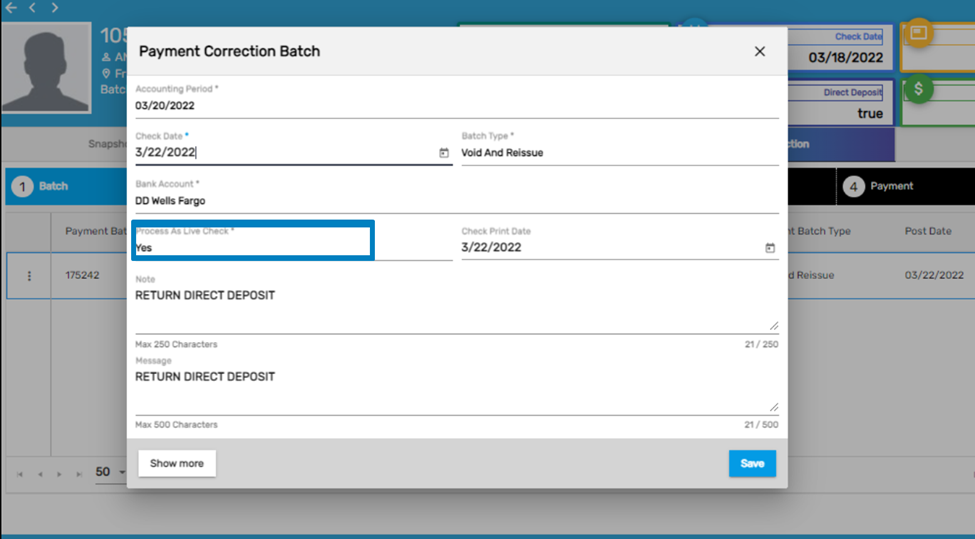
Why ACH bank feed file is not generated after void and reissue?
The correction batch is processed as a live check then the payment file won’t be generated. In this case, you need to make another correction for the check and should not process the check as a live check.
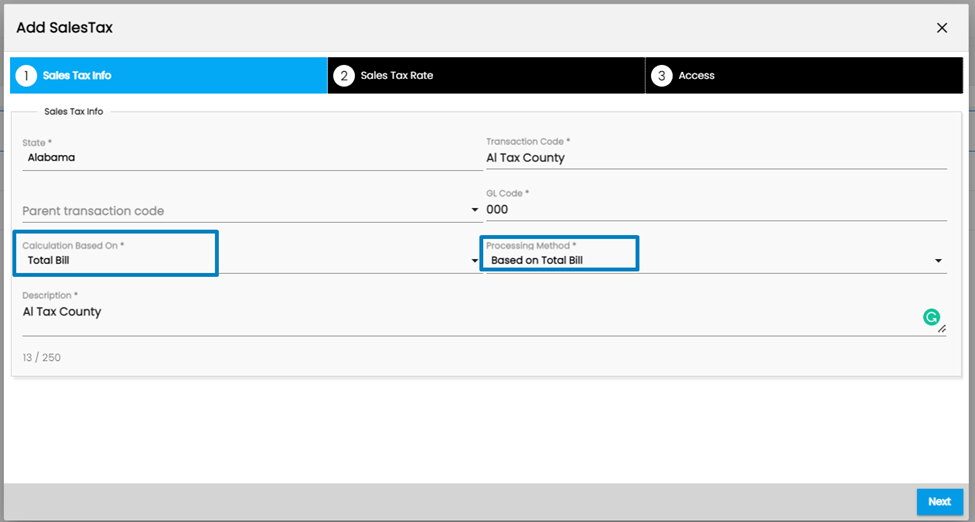
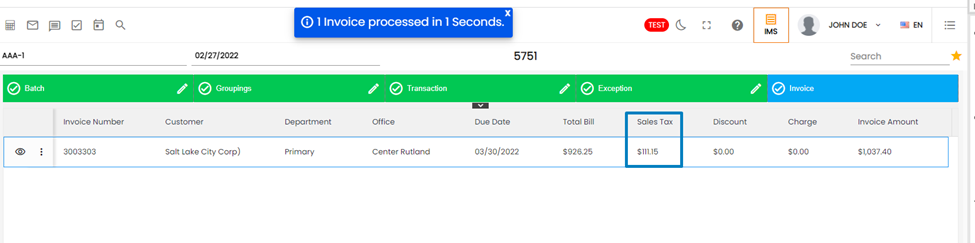
How to set up sales taxes to invoice clients in different states?
The invoice of clients with sales taxes under different states can be set up from ATMs.
How to Set Up This Feature
Go to ‘Sales Tax’ under Back Office in ATM and select the required State.
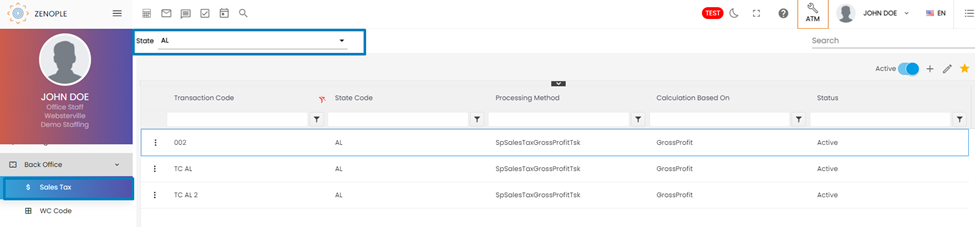
Click on the ‘Add’ icon to add a Sales Tax. Enter a Transaction Code based on the location and select 'Calculation Based On' as per the requirement.
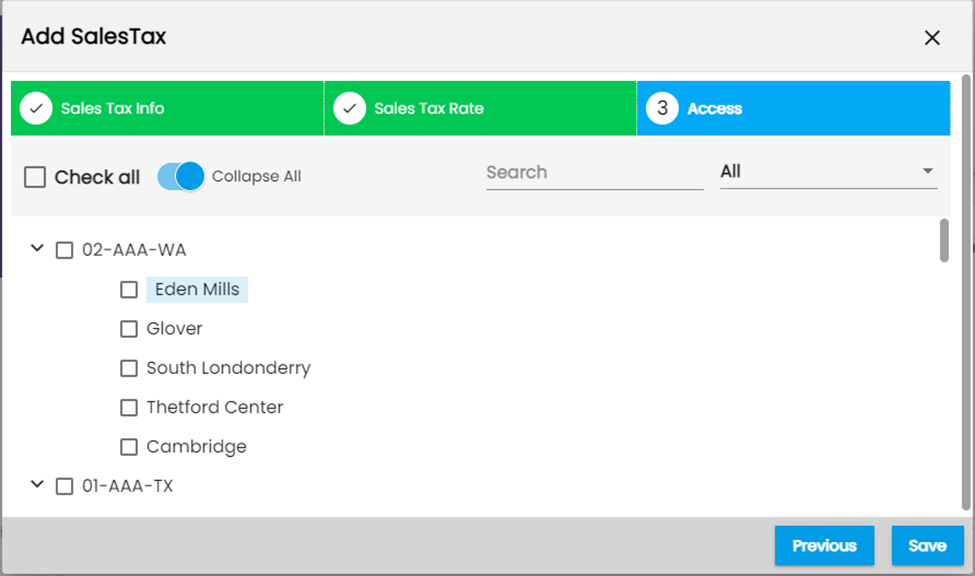
Add the sales tax rate for a required duration and provide access to the company and offices as per the requirement.
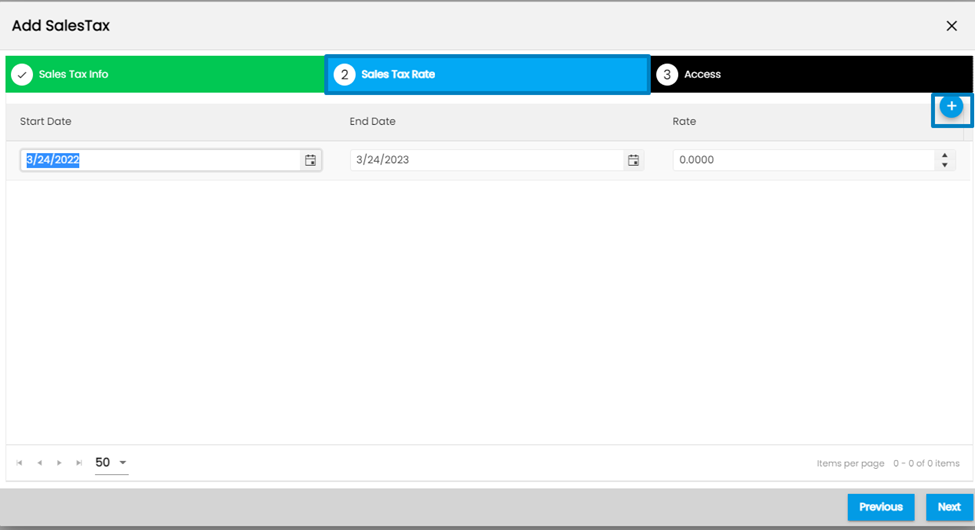
Moreover, Sales Tax based on the location can be added so that different rates can be tagged in different counties.
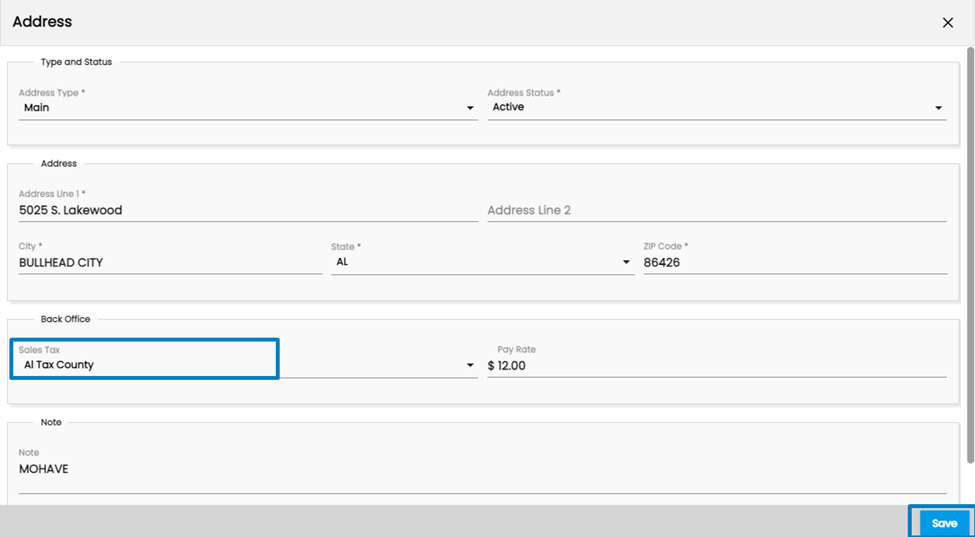
Users can view the added tax on the customer detail. Go to the Contact Info top navigation of Customer Detail, click on Address side navigation and edit the address. Select the Sales Tax you want to tag the client based on the county of the client's address.
While processing the batch for the client on IMS, the Sales Tax will be added to the invoice of that client.
Why Internal staff are not being able to see all of the employees associated with their offices?
Options chosen under the Advanced Filter might affect the records and required users might not be visible. Make sure that the options chosen on the filter include the required employees on the search results.
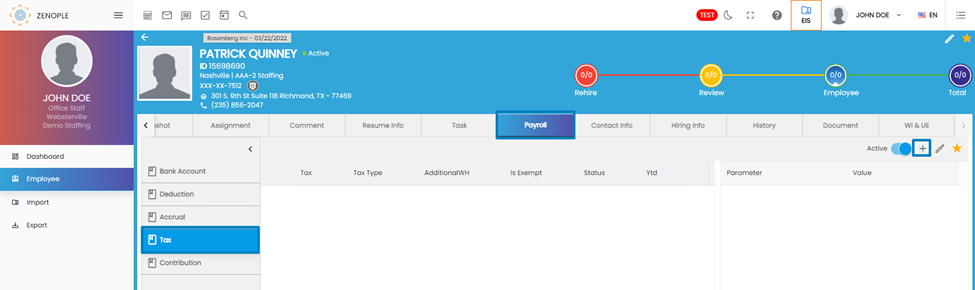
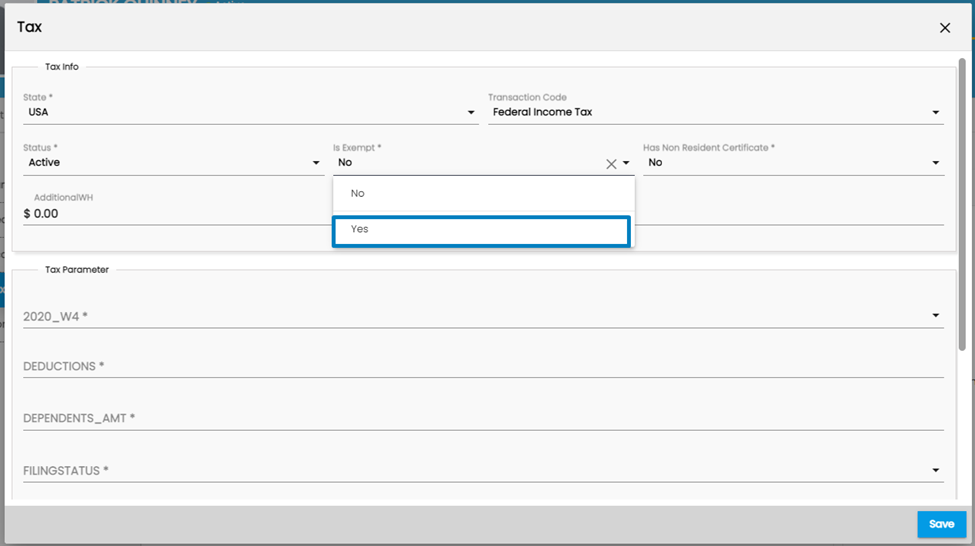
How to add Tax Exempt status for an employee if they want to file for tax exemption?
There are two ways to file Tax Exemption for federal taxes.
- The tax exemption can be filled when an employee fills up the W4 form in Onboarding Stage/ Rehire Stage.
- Office staff can also make the changes by editing the employee profile from the Tax side navigation under Payroll top navigation of employee detail page. Moreover, select ‘Yes’ in ‘Is Exempt’ field to allow tax exemption for federal taxes.
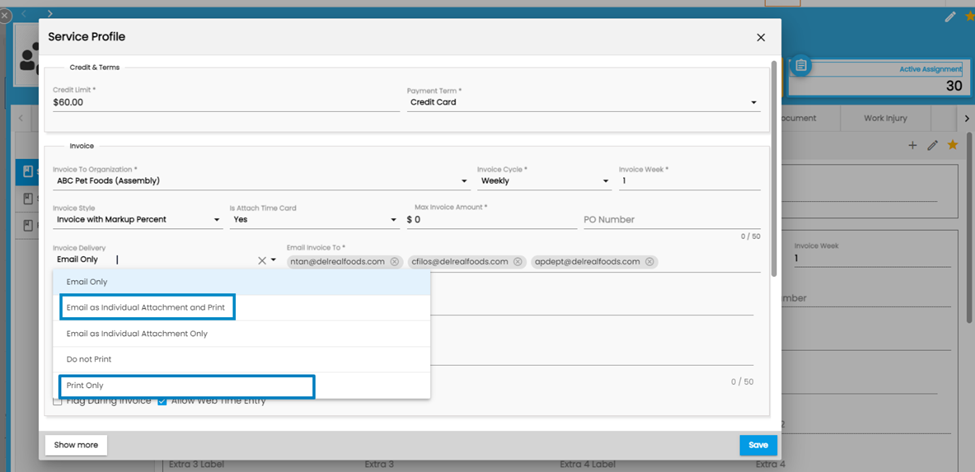
Why there is no printing option when we try to print invoices?
If the ‘Invoice Delivery’ option for a particular customer is not set up, then it won’t be seen. Follow these steps to make the printing option available.
- Go to the Customer Detail.
- Click on the ‘Sales & Service Profile’ top navigation and go to the ‘Service Profile’ side navigation.
- Edit the Service Profile and in the ‘Invoice Delivery’ field choose ‘Print Only’ or ‘Email as Individual Attachment and Print’ as per your requirement.
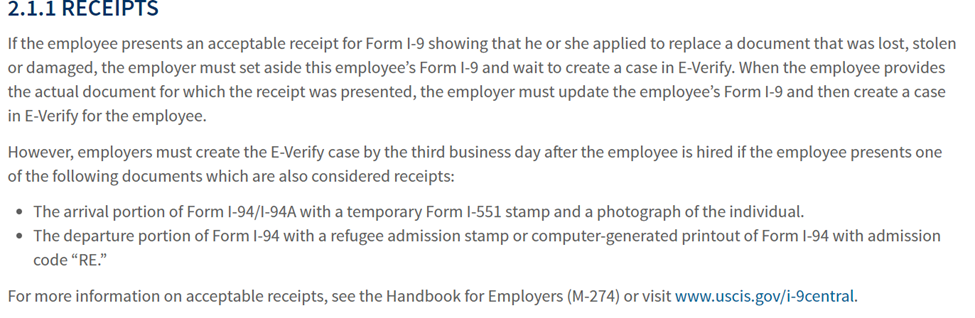
Why Document details are not populated in E-Verify?
E-Verify does not allow us to run a case with a Receipt, even though a Receipt is a valid form of the I-9 Document. So, Any Section 2 completed with the Receipt Document can not be fed over E-Verify. In such cases, you need to manually move a New Hire to the next stage.
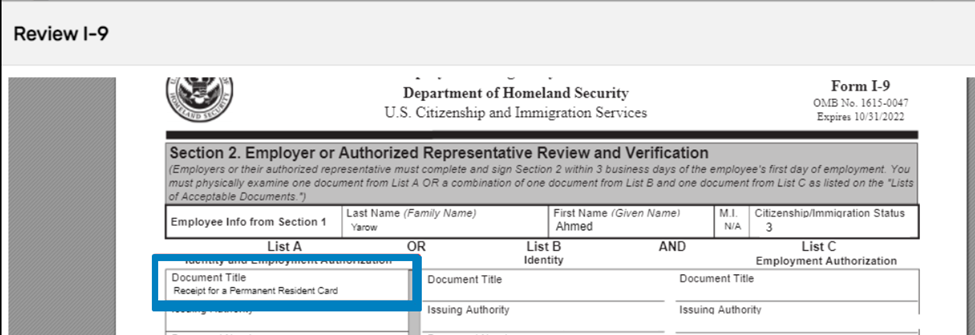
Refer to the image for further information on cases of E-Verify with receipts.
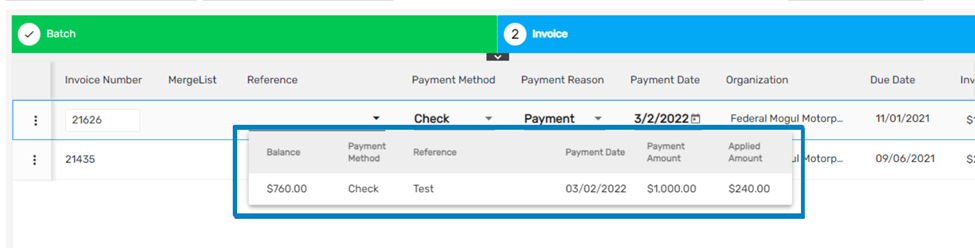
How to create and issue Credit Memos for your clients?
Follow these steps to create and issue credit memos for your clients.
- Go to the ARS application and click on Payment main navigation.
- Click on ‘Add’ to add a batch and click Next.
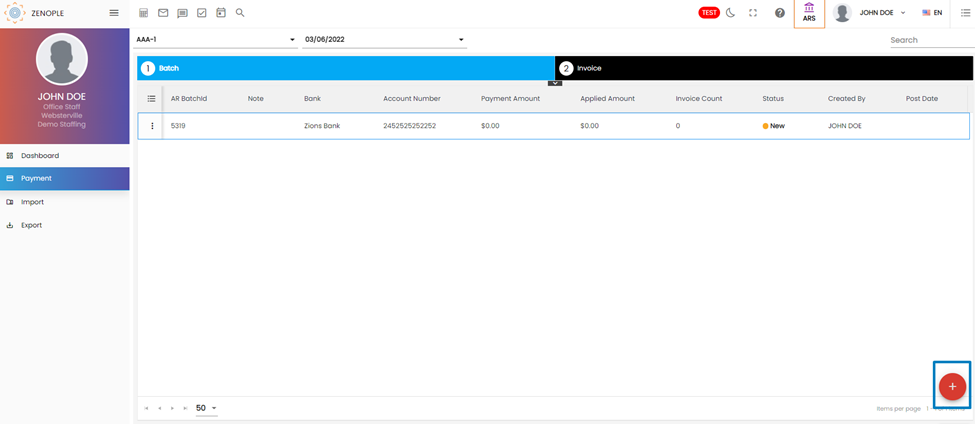
Search the invoice number you want to make payment for and set a name for reference. If you enter a payment amount more than an invoice amount then a dialog box appears asking whether to proceed or not. Upon choosing ‘Yes,’ another dialog box appears asking whether to create a ‘Credit Memo’ or ‘Over Pay Invoice.’
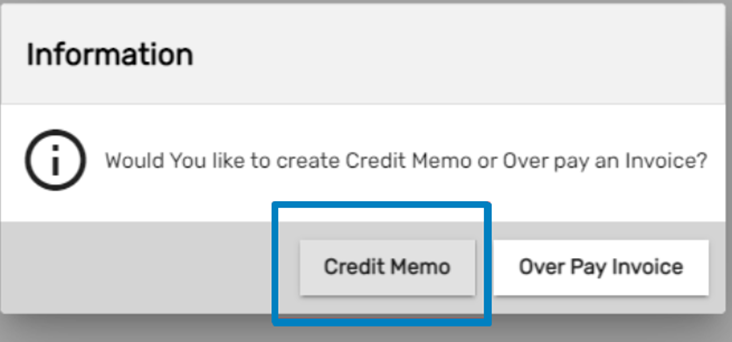
Click on Credit Memo following which credit memo will be created and the remaining balance will be used in other invoices.
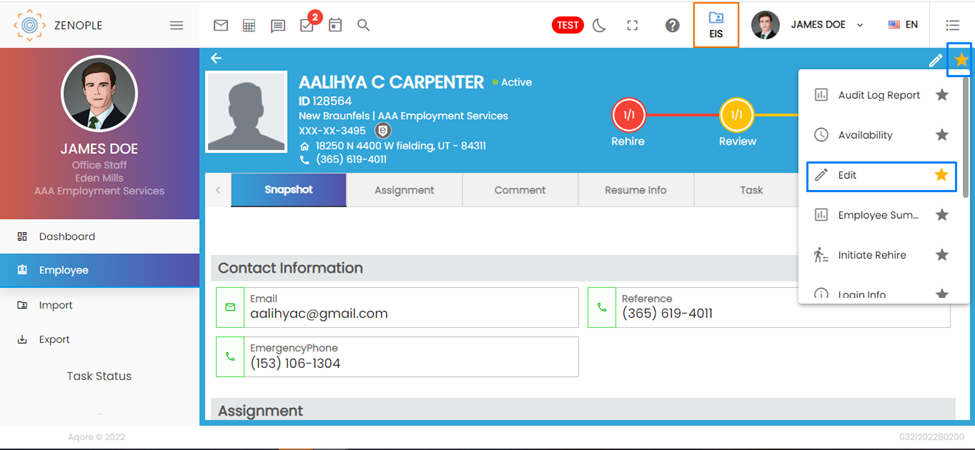
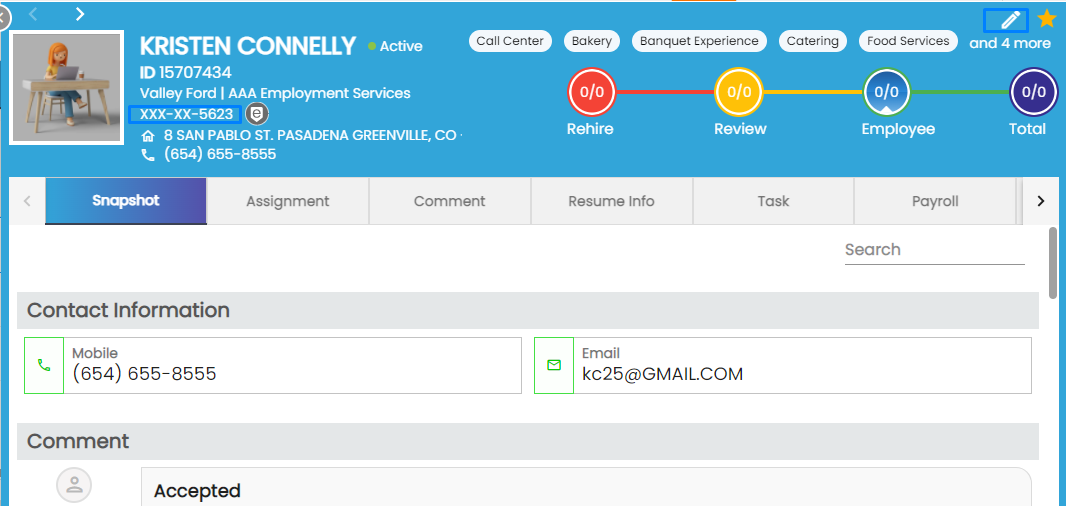
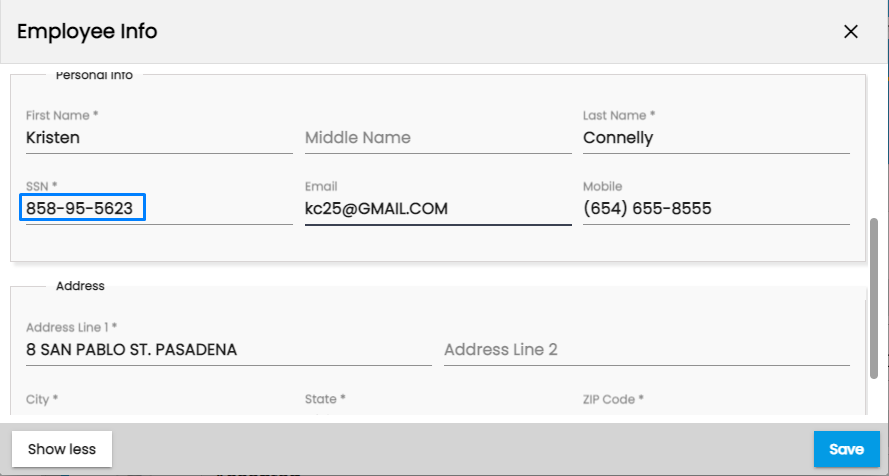
Is there a way to be able to view the employee’s social security?
Users can view the employee’s social security number by clicking on the ‘Edit’ icon on the top right corner of the screen.
How to remove the Timesheet on Employee Portal?
You can remove the Timesheet option on Employee Portal from the ATM.
Go to ‘Navigation’ under Settings and choose the Employee Portal as Application. Then edit the Access from the three-dot vertical ellipsis and uncheck the offices that are not required.

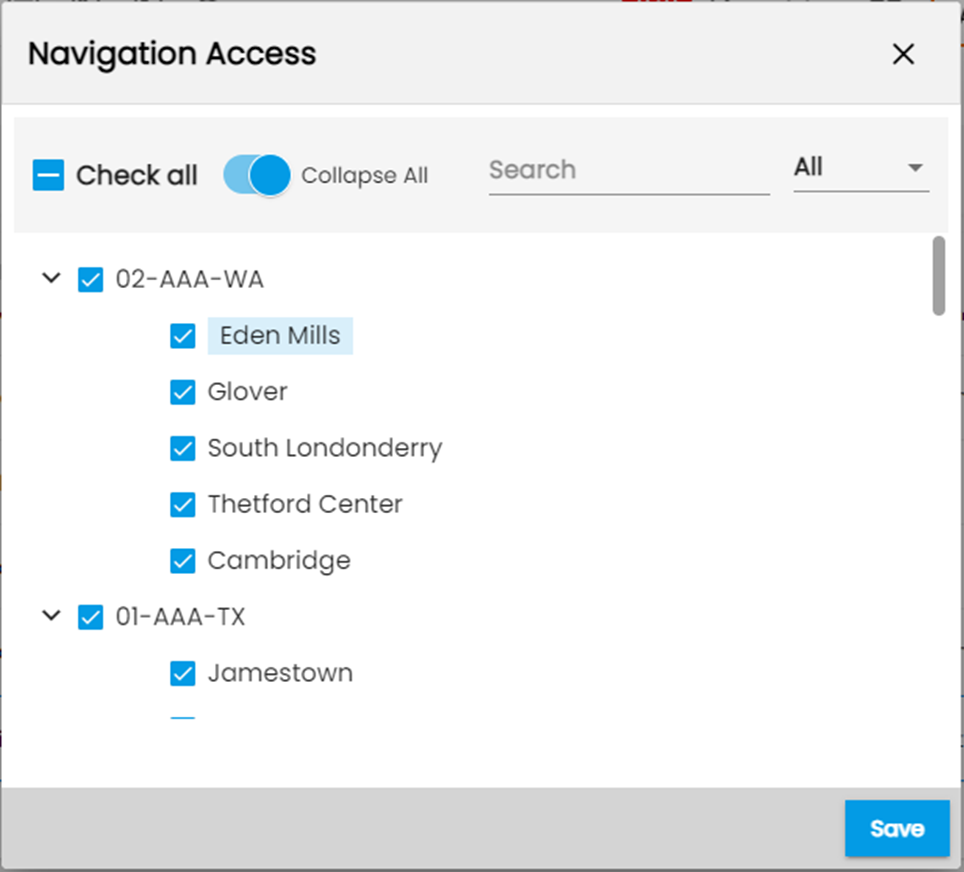
After saving the changes, go to the Employee Portal, and the Timesheet navigation will not be displayed anymore.
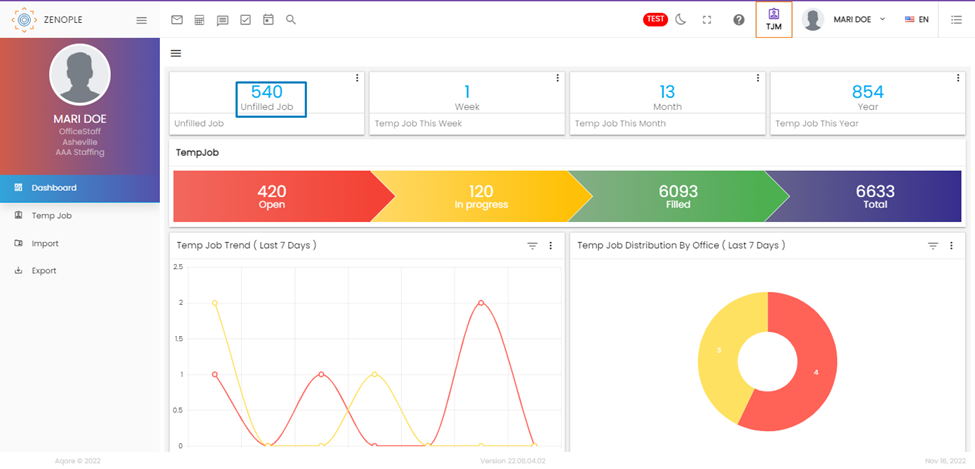
What are Unfilled Jobs, and How Does the System Calculate their Numbers?
The Unfilled jobs tile gives the sum of jobs with both the “open” and “in Progress” stages. Since the system already has a fixed logic that qualifies a job as unfilled, users cannot change that from ATM. Also, the “Filter Status” that filters the jobs in the job directory ignores the logic for this tile. This means the filter status can be “Enable” but will not affect the count for unfilled jobs.
Does Assignment End Reason Affect the Job Stage?
Yes. Unless the assignment end reason is of type “CountAssign” true, the job will not go to the open/filled stage. The end reason type is determined on the backend level and is not customizable.
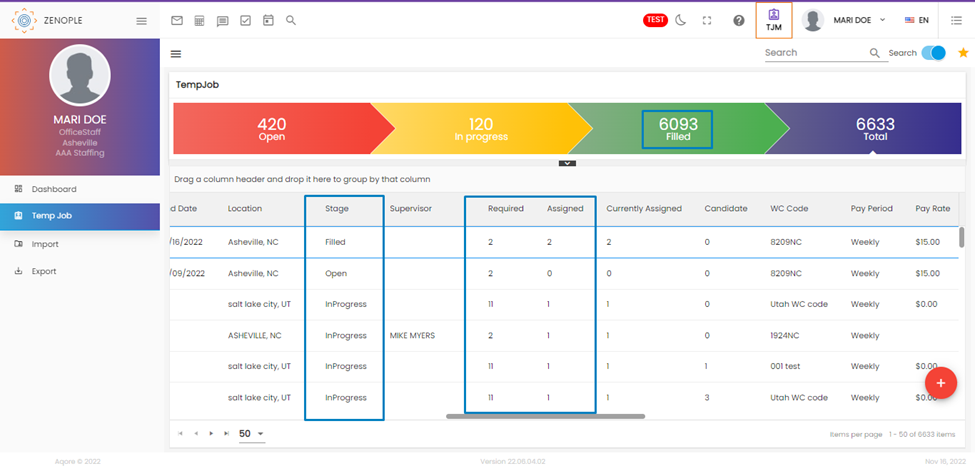
What is the Logic Behind Job Stage and Job Status Change?
When the assigned people number exceeds or is equal to the required number, the job automatically shifts to the “Filled” workflow stage. However, the “Status” field in the directory is not always related to the workflow stage. Users can manually change the status values as per their necessity.
However, if a company wishes to make the job status update autonomous, an ATM property “AutoUpdateStatus” needs to be set as “True” for the company.
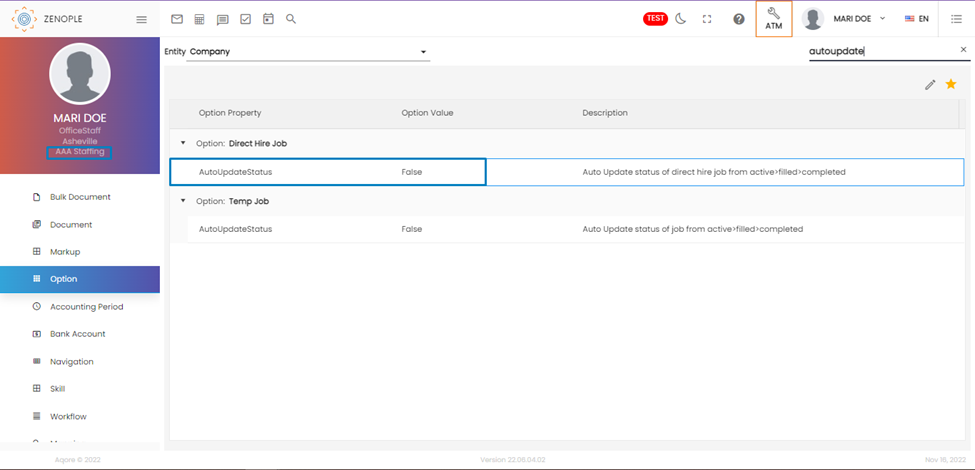
As we can see, the option property is set to false for the “AAA” company, and therefore any jobs under this company will not auto-update their status.
What are the Ways Jobs Can be Pulled Down from Job Portals?
There are three ways users can pull down jobs from the job portals:
1. Change the expiry date of the job
The expiry date of the job defines the time a job gets seen in the job portal. It can be changed from the “Job Posting” top navigation of the job detail page.
 As we can see in the screenshot above, the job will expire on the 12th of December for the Zenople Job Portal. To change this, users can click on the settings icon on the right beside the star icon.
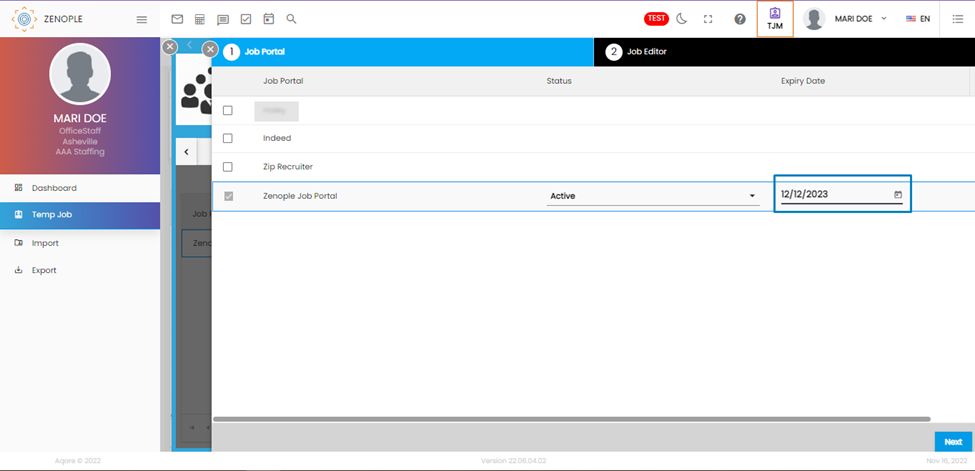
As we can see, the system allows editing of the expiry date. So, if the current date exceeds the expiry date the job will get pulled down from the portal.
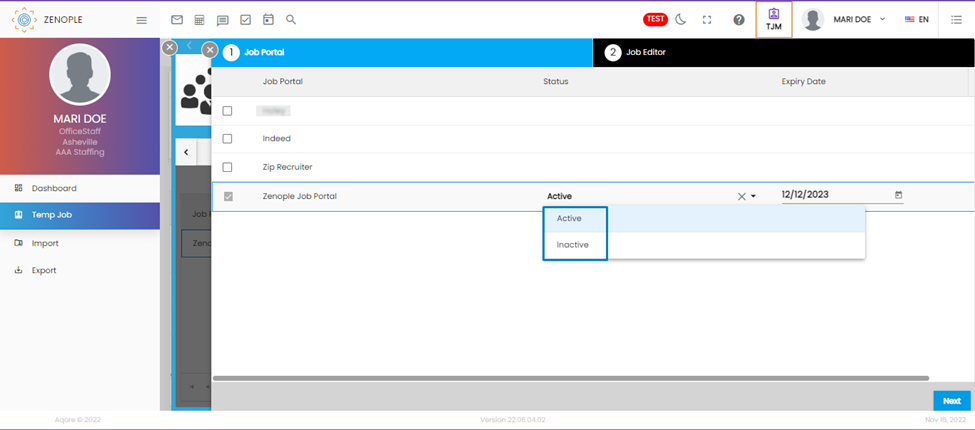
2. Change the status of the job posting once the hiring is completed
If the job order status is changed to inactive type, it will get pulled down from the portals. Changing the status of the job is the same process as changing the expiry date of the job. Once the hiring process for the job has been completed, users can change the status of the job. If selected “Inactive,” the job gets pulled down from the job portal.
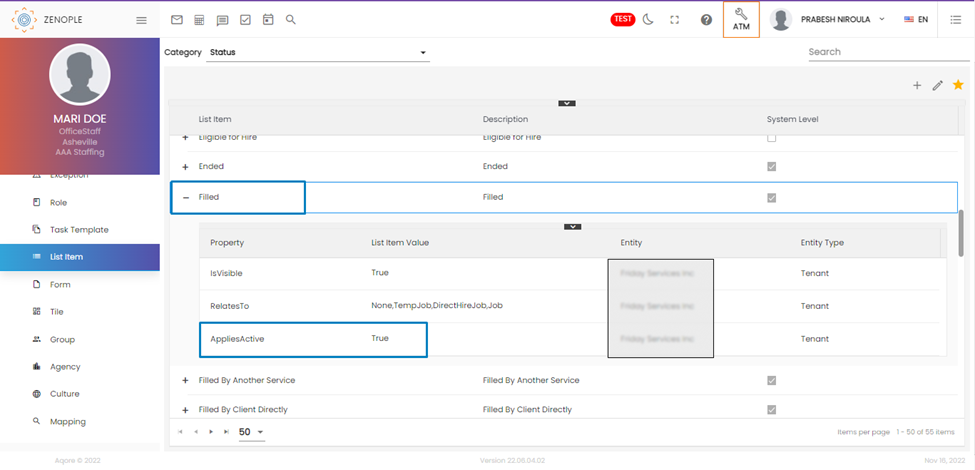
3. If Job Order Status Changed to Inactive Type
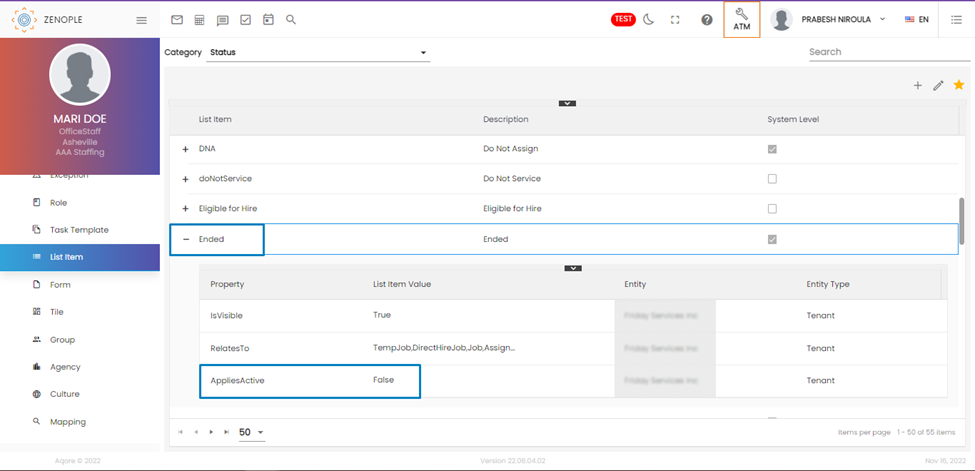
Job status can be updated (active and inactive) based on the “appliesActive” property from the List Item Navigation of ATM. If the “appliesActive” value for any status is true, it will be treated as Active status. Therefore, the jobs having those statuses will be pulled into the job portal.
In the following two screenshots, you will see the “appliesActive” property for the Filled status has the value true and the for the Ended status has the value false. So, jobs with Ended Status will be treated as inactive, while those with Filled status will be treated as active.
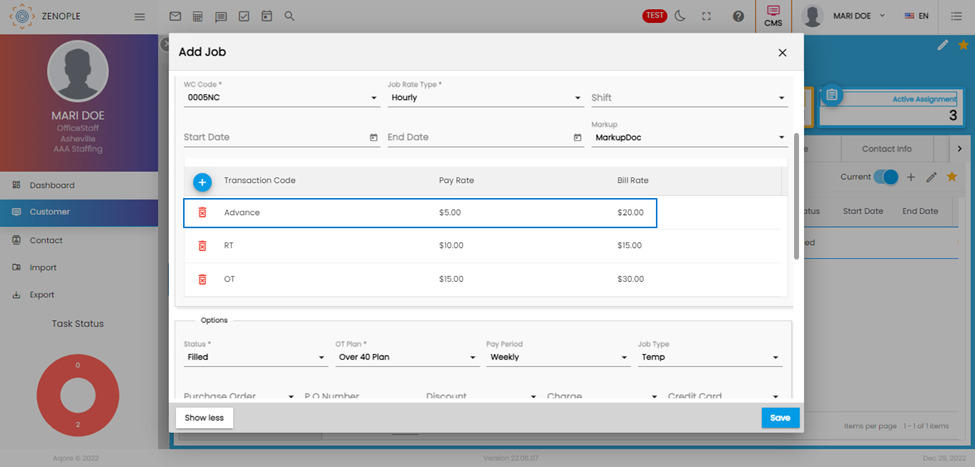
Why Won’t Some Transaction Codes Get Auto-Calculated Based on Markup Setup?
Transaction codes only get calculated if they have been set up while creating a Markup. So, if a transaction code is not auto-calculated, the markup rate for those codes has not been added.
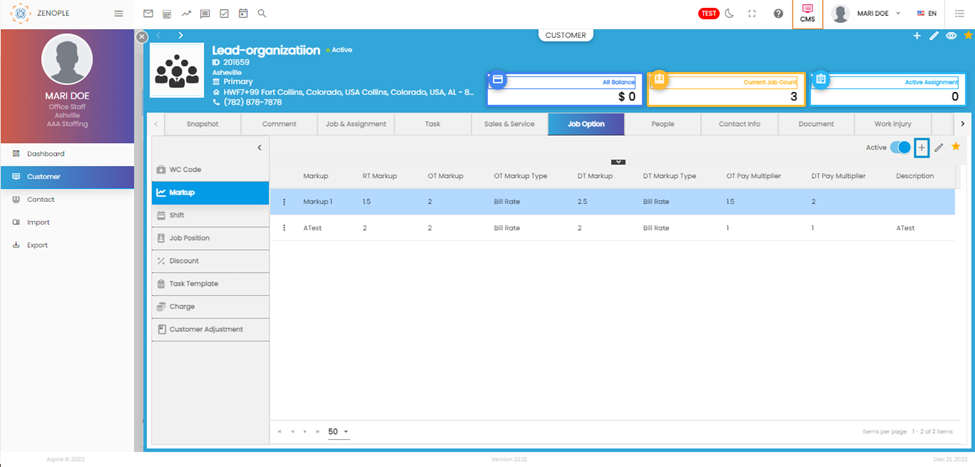
If not set up, users can add the additional pay codes and their markups from the “Job Option” navigation of the customer detail page (CMS). The plus button alongside the toggle allows users to add new markup rates for selected pay codes.
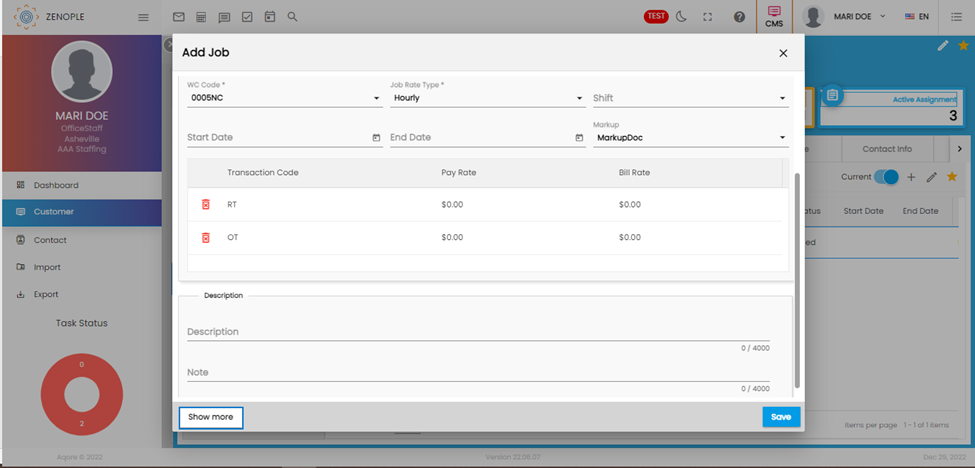
After users have added the necessary details regarding the new markup, the lower section of the Add Markup wizard allows them to add pay codes other than RT, OT, and DT and set up their Markup rates.
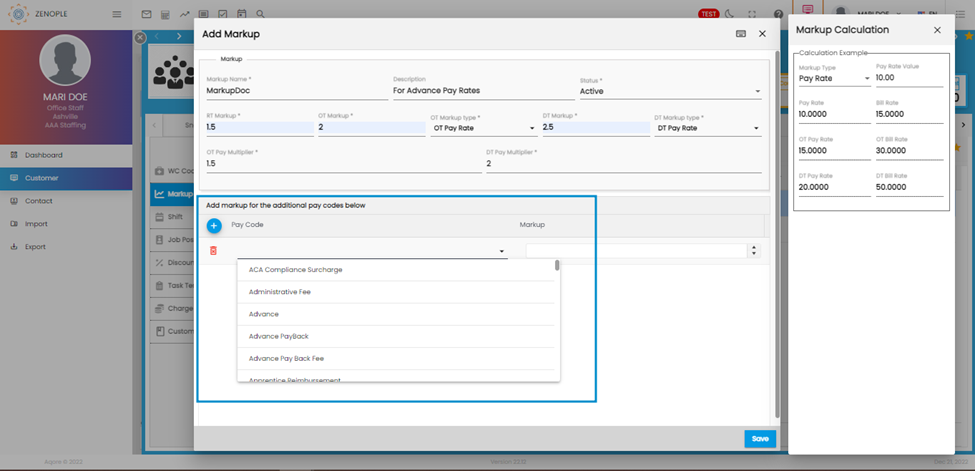
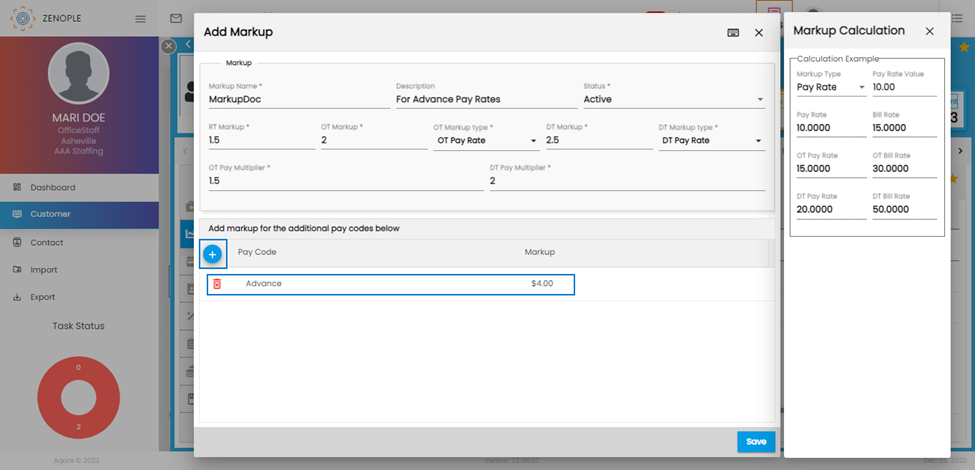
As we can see in the Screenshot below, users add the new Pay code and set up the markup multiplier. Please note that the markup value here is the multiplier, not the pay code's actual value.
After this, if the users now choose to add a Job under the customer, they can add the new pay code. The task can be done from the "Job" side navigation of the "Job and Assignment" top navigation of the customer detail page.
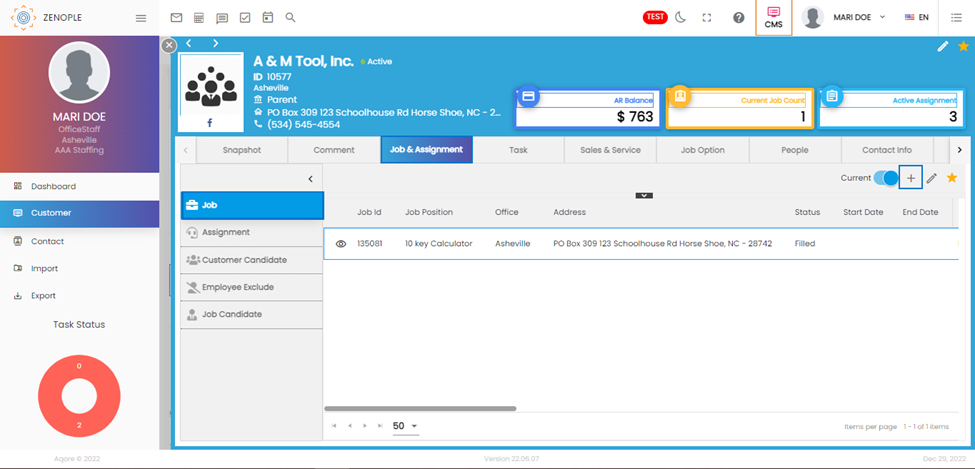
In the Add Job wizard, users need to select the markup with the additional pay code and click on the “Show More” option below the wizard to add an extra transaction code (by default, DT). Then, users edit the DT section to add the code they previously added while creating the markup.
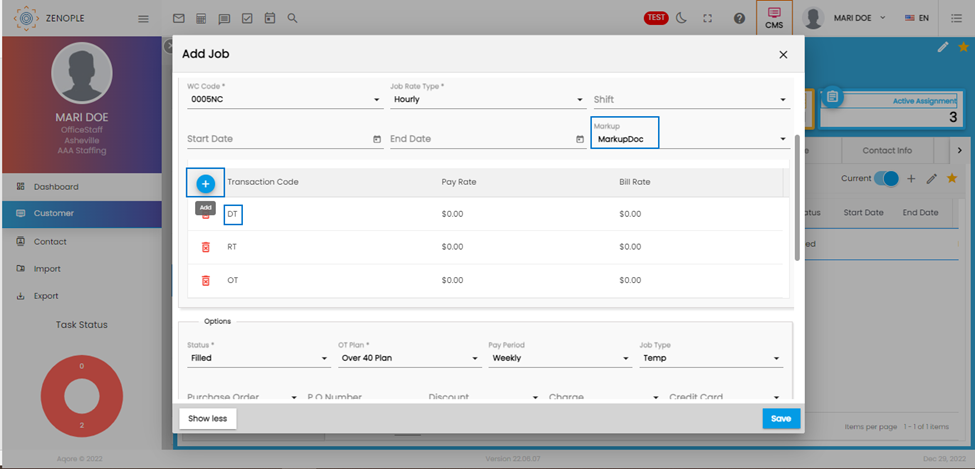
Now, users edit the added DT code and replace it with the additional code they added in the markup. Then, they add the pay rate for the codes, which will get reflected in the bill rate as per the markup percentages.