Features Added on CMS
The features added on CMS are:
Extra Fields Value and PO Box Number Updated
The extra fields and PO number field in the Service Profile can be directly updated for jobs and transactions while editing the customer's service profile.
How to Use This Feature
- Go to the Service Profile top navigation in the Customer Detail and edit the Service Profile.
- Update the PO box Number, Extra fields as required, and Save it.
.png)
- While saving, the user will be asked to update the jobs as well according to the updates on the Service Profile.
- Click on 'Yes' to update accordingly.
.png)
- Select the job on which the changes are to be reflected.
.png)
- Click on the 'Yes' button to apply the changes for an open existing transaction as well.
.png)
- The changes will be reflected in the Job & Assignment top navigation of the particular customer.
.png)
Options Property ServiceProfileEmailInvoiceTo Implemented
Option property 'AllowEditServiceProfileEmailInvoiceTo' has been implemented to handle the email invoice option on the Service Profile. This option property can be set up from the ATM application.
How to Use This Feature
- Click on Option main navigation
- Choose 'Person' Entity from the dropdown
- Select the Option Property under the Person Entity as 'AllowEditServiceProfileEmailInvoiceTo' and click on the 'Edit' icon to set the property
.png)
- Choose the default value as 'True' which determines the access for editing 'Email Invoice To' in the Service Profile and 'False' for the opposite
- Checkmarks the users to whom the setup is to be applied and click on the Save button
.png)
- After setting up the option value to 'True,' the user will be able to edit the 'Email Invoice To' field
.png)
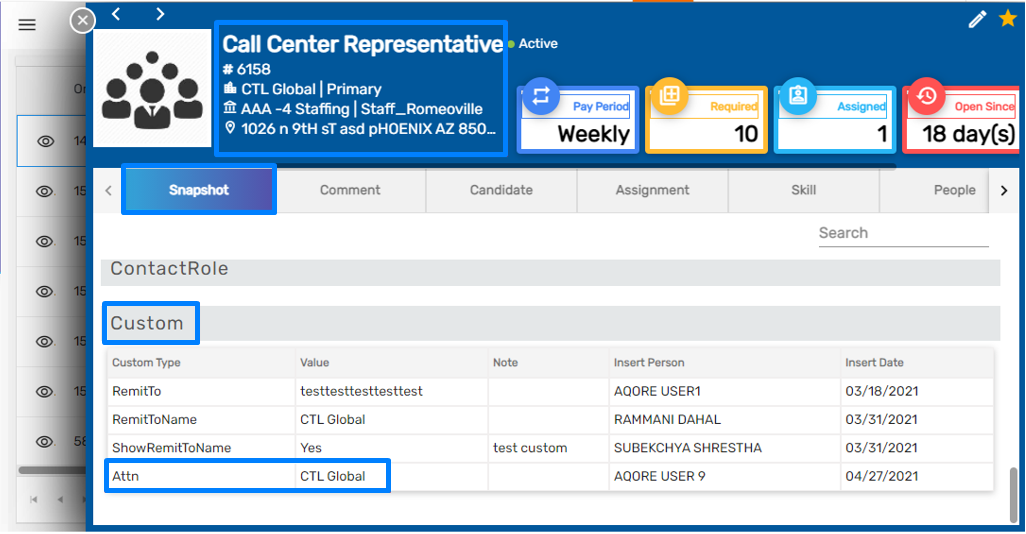
Custom Side Navigation Information Displayed
Any records added and updated from the Custom side navigation will now be displayed on the Snapshot top navigation of temp job detail.
How to Use This Feature
- Go to Other top navigation and click on Custom side navigation of Customer detail
- Add any custom records
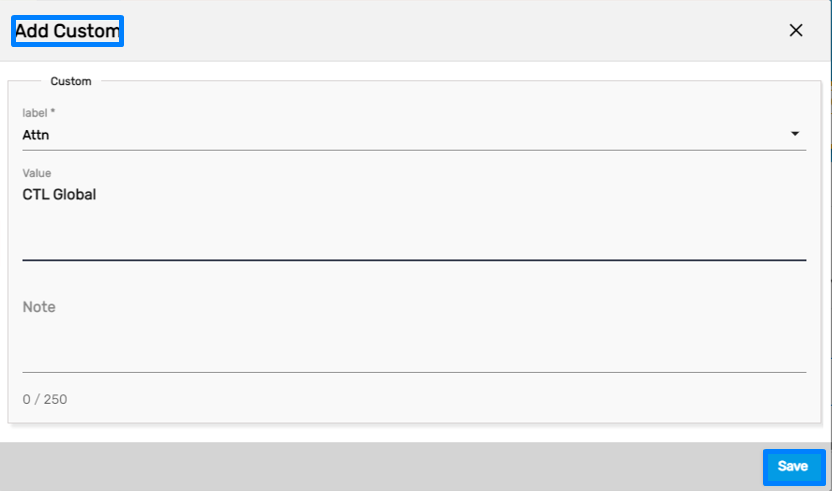
- The custom info added will be reflected on the Custom section of Snapshot under temp job detail of TJM application
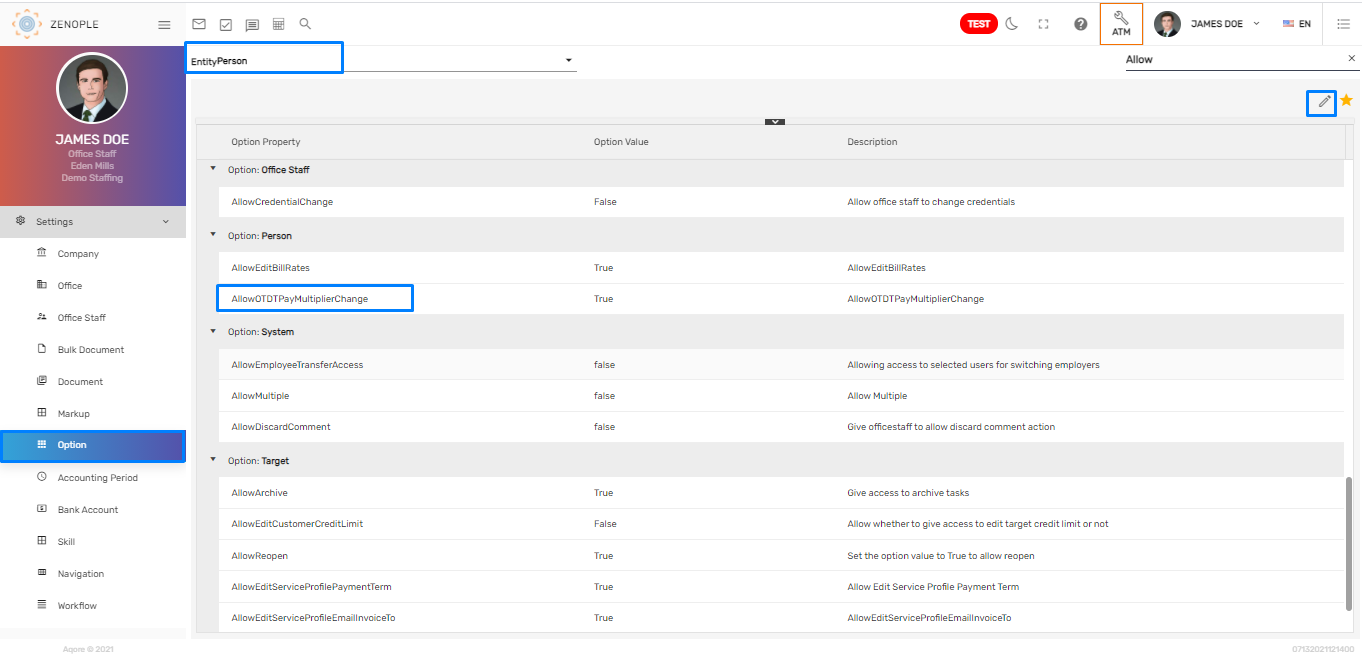
Option Property for Editing Assignment Bill Rates
This feature allows the users to update the bill rates. This property must be set up from the ATM application under the 'Person' Entity of the Option main navigation.
How to Use This Feature
- Go to Option main navigation of ATM and Select 'AllowEditBillRates' option property under Person Entity
- Click on the Edit icon to set up the options property
.png)
- Choose the default value as 'True' determining the access and check to mark the users to whom the setup is to be applied
- Click on the Save button
.png)
- Now, the users will be able to edit the Bill Rates of the Assignment
.png)
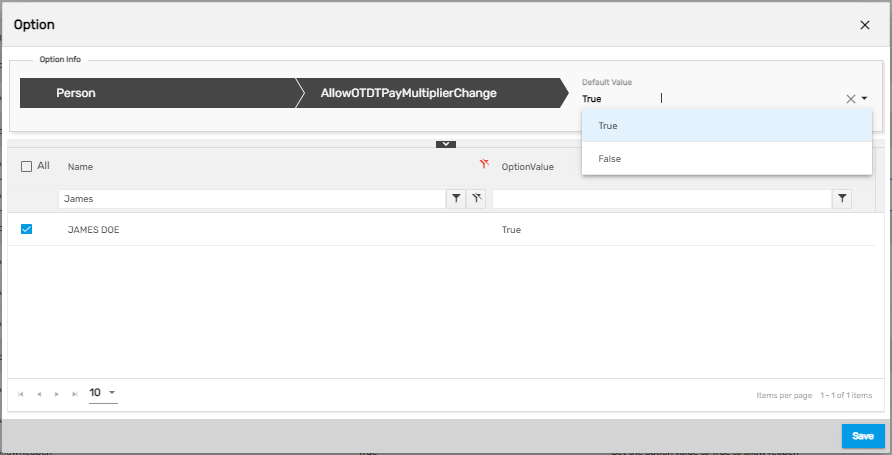
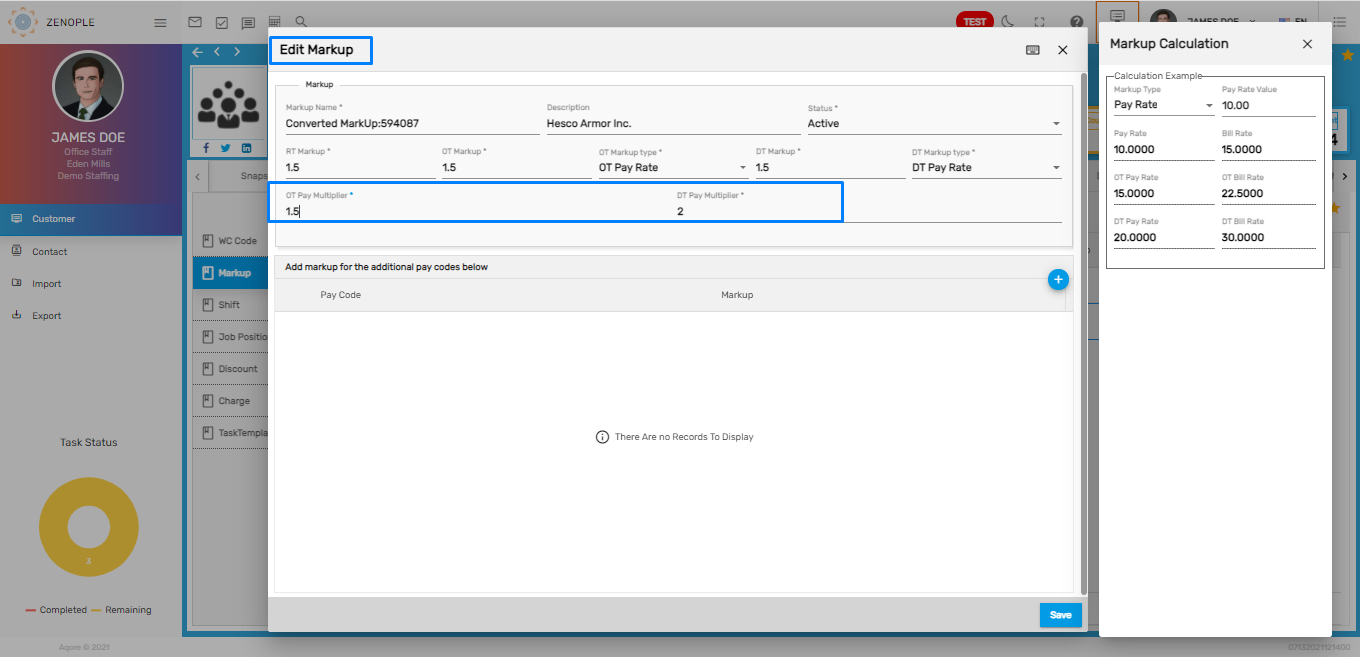
OT/ DT Rate Multiplier Implemented
OT/DT Rate Multiplier has been implemented while adding and editing Markup in Job Option side navigation of Customer Detail. This feature should be handled from the option property of the ATM application under Person Entity.
- Choose 'AllowOTDTMutltiplierChange' from the option property and click on the Edit icon
- Set the default value to 'True' determining the access and check to mark the users to whom the setup is to be applied
- Now, the users will be able to edit OT/ DT Multiplier while editing the Markup
Add/ Edit Office in Contact Form
This feature allows the user to add/ edit branch and office for the Contact.
How to Use This Feature
- Go to the Customer detail and click on Contact side navigation under People top navigation
- Click on Add icon
.png)
- The user can now select the Office from the dropdown to add and change the Office while editing contact
.png)
Addition of Extra Label Values
Extra Label values have been added in the 'Separate By' and 'Group Invoice' fields of the Service Profile form.
How to Use This Feature
- Go to Customer Detail
- To view these labels, Go to the Service Profile side navigation under Sales & Service top navigation
.png)
- While adding or editing the sales profile, the Extra Label values entered will automatically be added in the dropdown options of 'Separate Invoice By' and 'Group Invoice By'
.png)
- The 'Separate Invoice By' option will separate the invoice based on check-marked options as shown below,
.png)
- The 'Group Invoice By' option will group the invoice based on the check-marked options as shown below,
.png)
Preview of Override Values Before Saving
Override values of WC Code can be previewed before saving for user convenience.
- Simply, select the WC Code and Override the code
.png)
- Rate before overriding is displayed as below,
.png)
- Once the user edits the Admin and WC Override, the rate changes as per the field values without even saving for the preview
.png)
Contact Access to View Multiple Invoices
This feature allows the contact to view multiple invoices of other organizations/ offices as well. Earlier a contact was only allowed to view the invoice of his/ her office/ organization. This feature must be set up from the List Item main navigation of the ATM application. Users must have access to set up this list item and this access is handled from the option property of ATM.
How to Use This Feature
- The screenshot below shows one of the contacts under the 'Contact' role of an organization
.png)
- Now, Go to ATM, click on 'List Item' navigation
- Choose 'Person Role' from the category dropdown
- As the changes are to be done for the 'Contact' role, select the role and click on the Edit icon
.png)
- Select the property 'Canviewinvoice' and set the value to 'True'
- Update the property and Save it
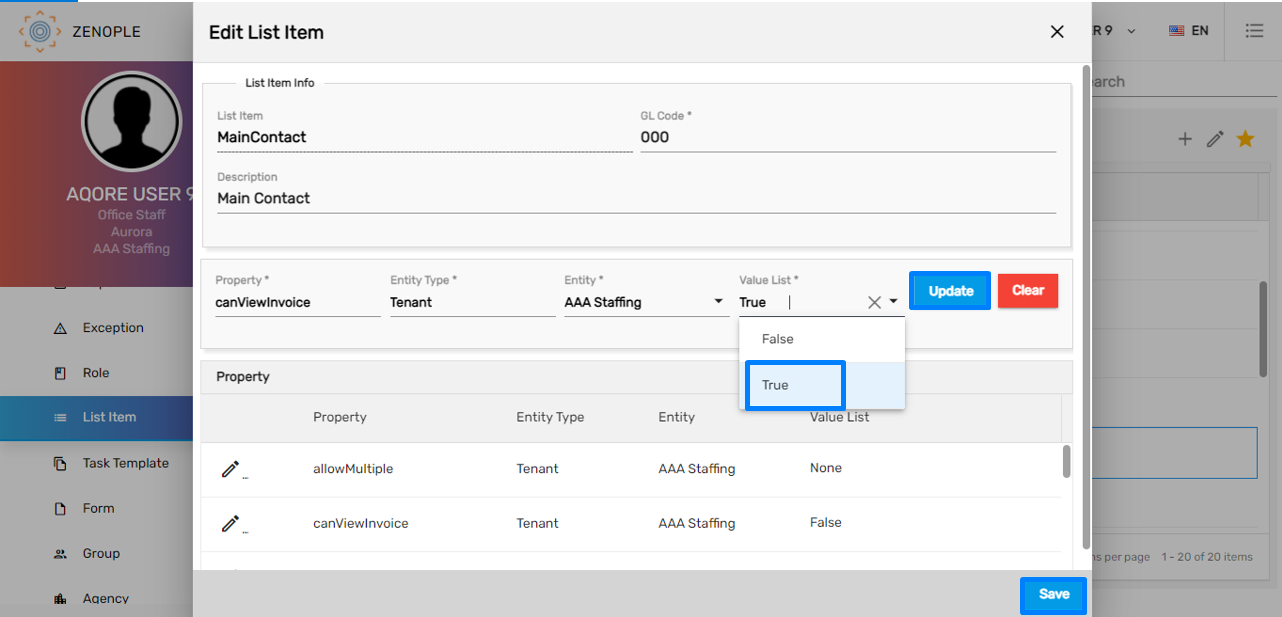
- Now the contact under the contact role will be able to view multiple invoices of other organizations as well
- The screenshot below is a portal of a user in the contact role who has access to view invoices of other organizations as well
.png)
How to Provide Access for Editing the List Item?
- Go to Option property of ATM and click on 'EditListItem' property under Person Entity and Edit it.
.png)
- Choose the default value to 'Yes' determining the access to the option property. Checkmark the user that needs to have the access to the setup and Save it.
.png)
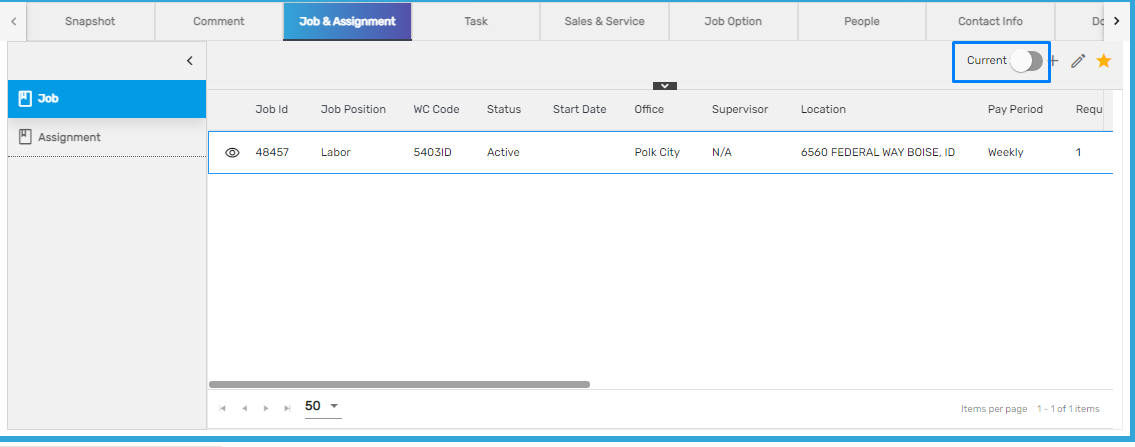
Toggle Button Improvised on Job Side Navigation
The toggle button displays current jobs or all jobs when enabled/disabled as required. If the users set the toggle 'Of' i.e. 'Current,' it shows filled and active job status, whereas if they set the toggle 'On' i.e 'ALL', it shows active, filled, and completed job status.
Can Edit Used Markup Name and Description
Earlier, when a user attempted to change the markup that is being used, the message would be displayed as below,
.png)
- Now, a user can change the name or description of the used markup as well
- Except for Name and Description, all fields for used Markup is disabled
.png)