Features Added on PAS
The features added on PAS are:
Exception Regarding Taxable Gross Added
When the 'Taxable Gross' is greater than 'Subject Tax' while processing for Payment Batch in PAS, then the exception ‘Taxable gross is greater than subject tax’ will be displayed. This exception is ‘Severe’ which implies that the user must fix the data to move forward.
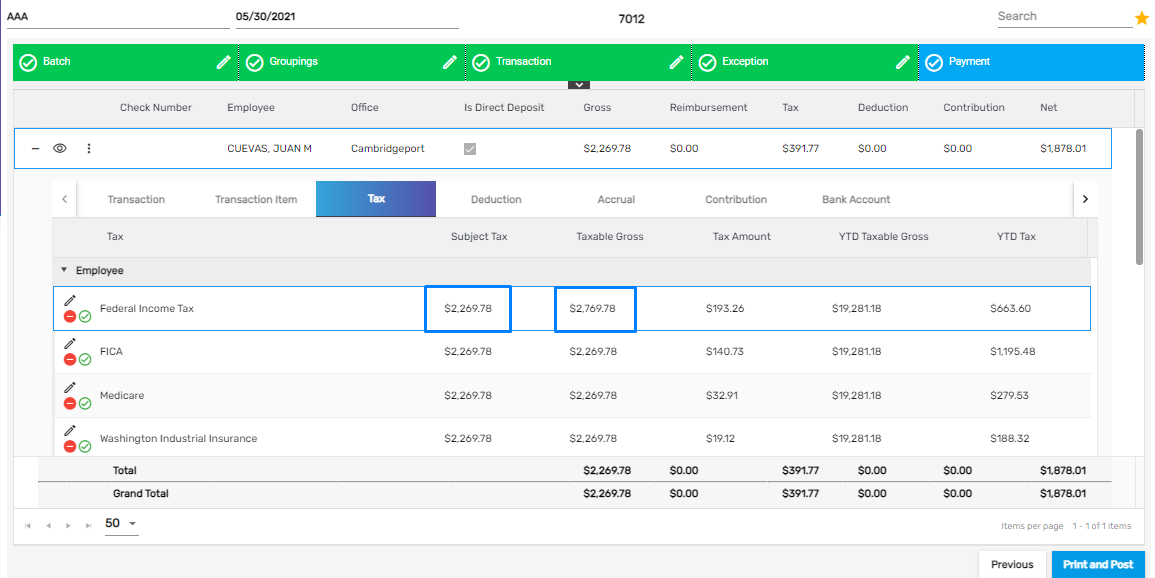
The exception will be displayed as below,
WC Cost Calculation Logic Updated
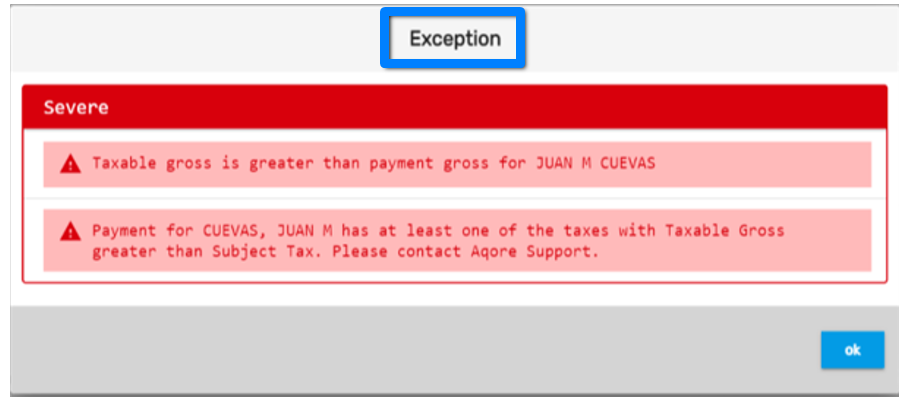
Earlier, the calculation for WC cost was based on the accounting period. But from now onwards, the calculation of WC Cost for a Payment Batch will be based on the Check Date for a Payment Batch in PAS.

The Check Date for the Payment Batch should lie within the time interval of WC cost added in CMS for the WC cost to be calculated in the Payment Batch.
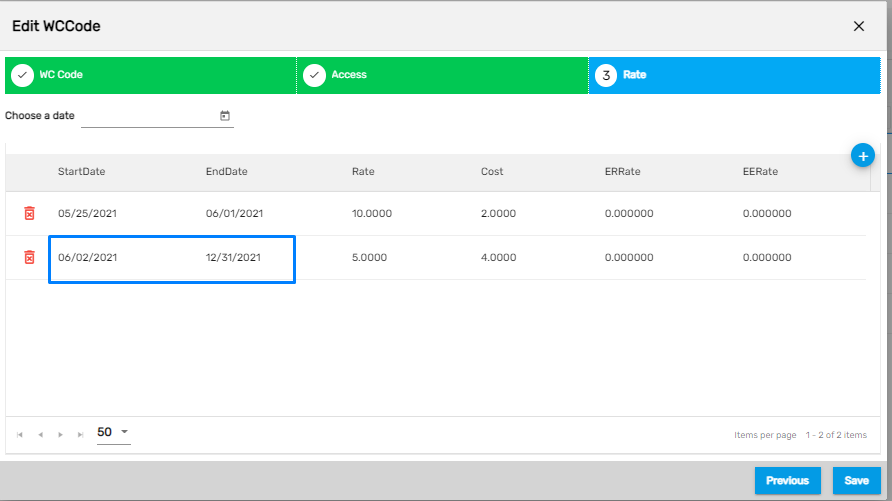
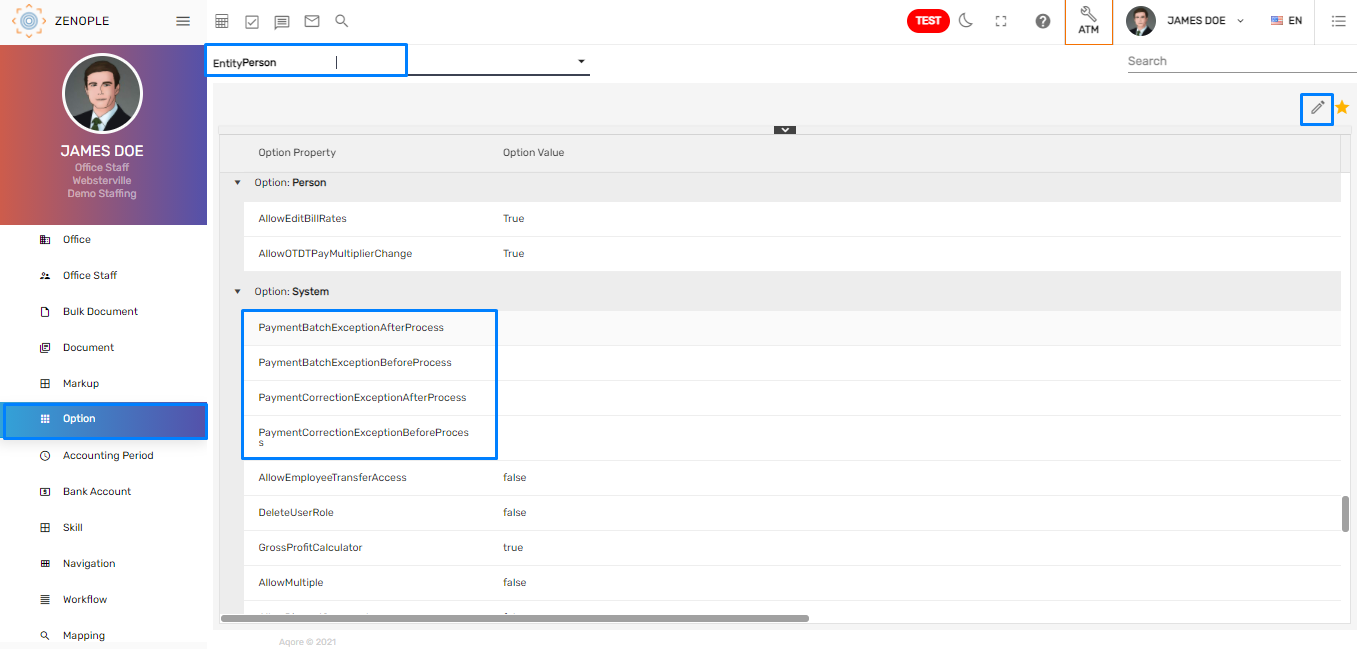
'AllowApproveSevereException' Option Property Added
The exception is handled by the Option property under the Person Entity from the ATM application. It allows the users to approve Severe Exceptions while processing for a Payment Batch and Payment Correction Batch.
Severe Exceptions previously displayed during the Payment and the Payment Correction Batch will now be displayed as a Warning Exception which can be ignored by the user and move forward during the payment/ correction batch if the users have access to this property.
How to Use This Feature
- Go to Option main navigation and select Person Entity from the dropdown
- Four Option properties have been added for this feature and they are,
- PaymentBatchExceptionAfterProcess
- PaymentBatchExceptionBeforeProcess
- PaymentCorrectionExceptionAfterProcess
- PaymentCorrectionExceptionBeforeProcess
- These are the stages where the exceptions are displayed and have related exceptions under them. The user will be able to handle the display for these specific exceptions as required.
- Select the 'Option' property and edit it.
Checkmark the exceptions that the user wants to be displayed as a Warning Exception. Moreover, the user needs to have access to this setup and Save it.
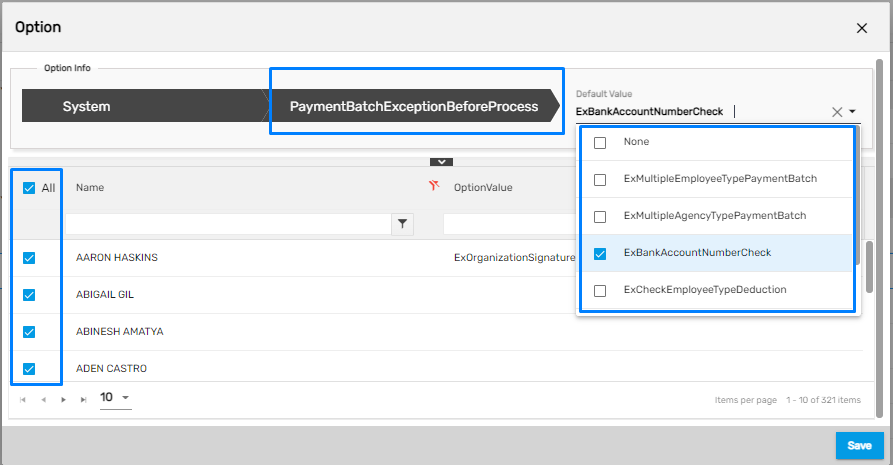
Now, the user having access to this will be able to approve the Severe Exception. The serve exception will now be displayed as a warning as selected from the dropdown of Option property and move forward with the Payment Batch.
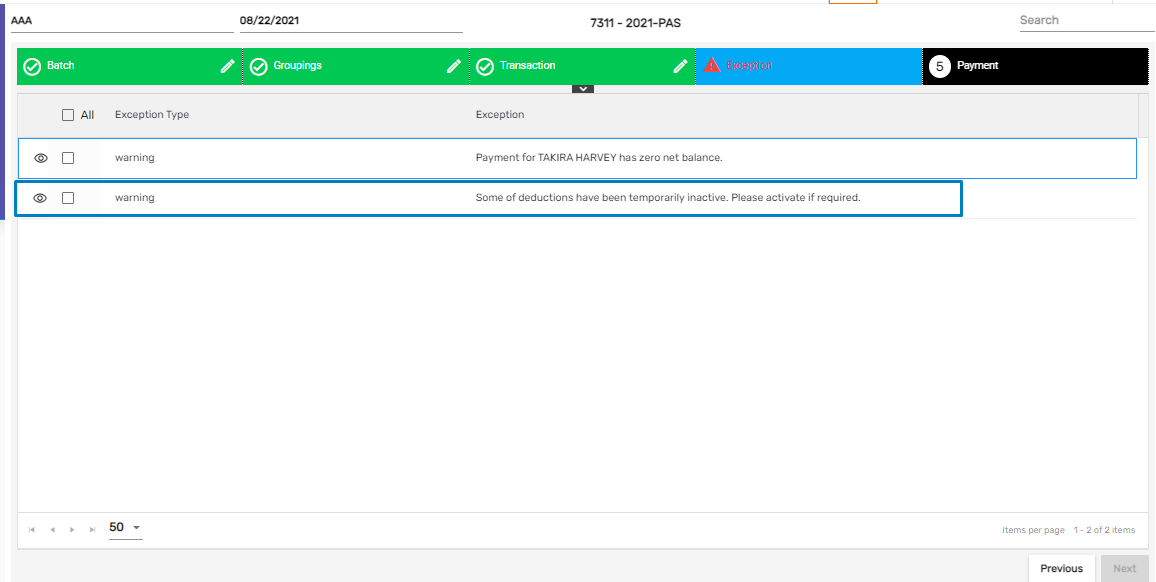
Disabling Deduction on Payroll Batch Added
This feature allows users to disable multiple deductions set up for the employee without changing the status of deduction from EIS for the current batch. Disabling the deduction will only be effective for the current batch and it will be as it was for the next batch. Moreover, disabling Deduction will not have any effect on its actual deduction setup in the EIS.
How to Use This Feature
- Expand the Transaction details of the Payment tab while processing a Payment Batch. Click on the Deduction tab to view deduction details for the employee.
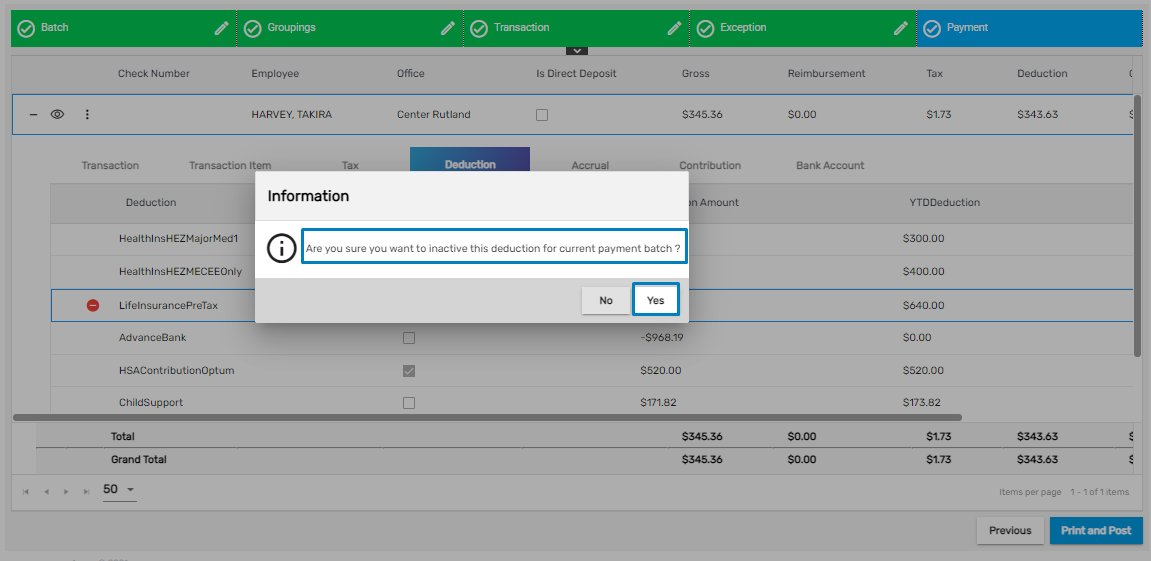
- Click on the red dot stating ‘Inactive deduction for this batch’ of the deductions that the user wants to disable.
- Multiple deductions can be disabled at once as required.

- Click on ‘Yes’ to confirm and disable the Deduction.
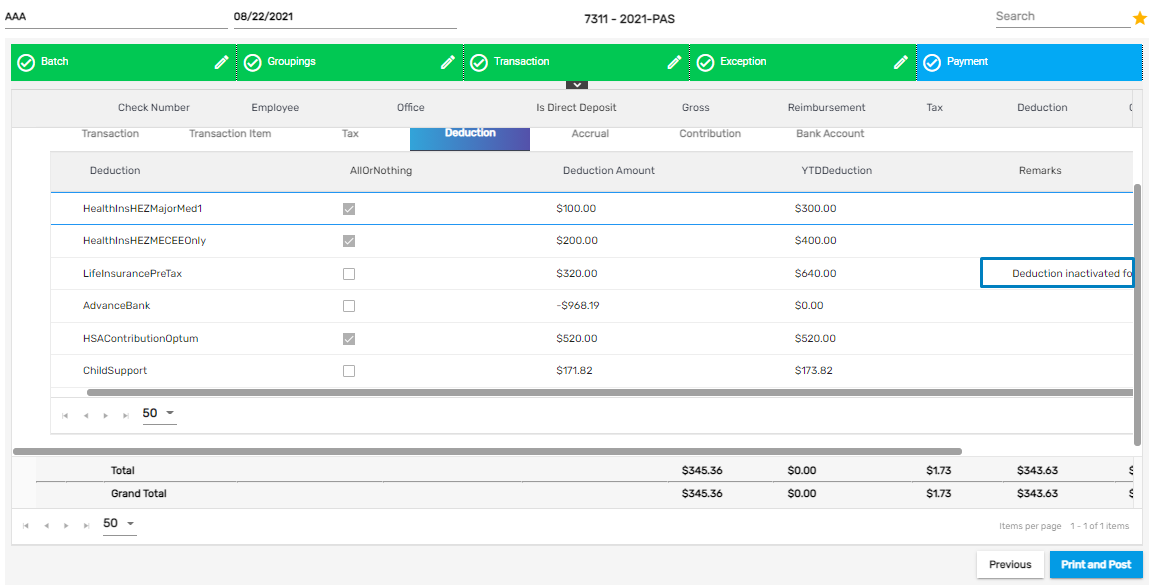
When the deduction is disabled, the remarks will be displayed accordingly as ‘Deduction inactivated for this batch.’
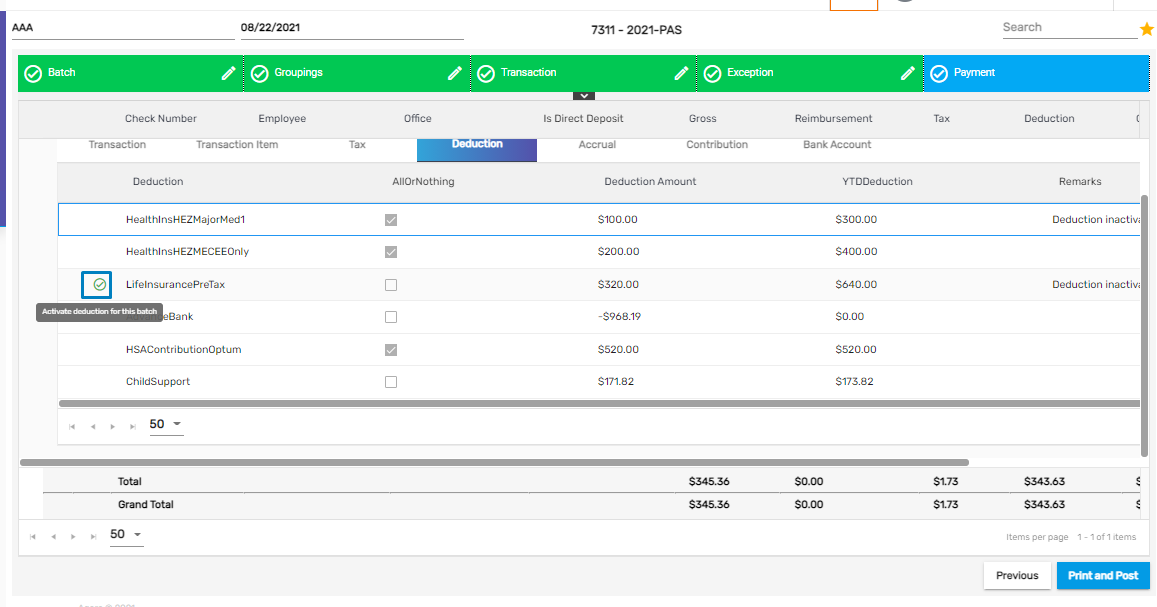
The user can also activate the batch as required.
After disabling, the user has to Reprocess Payroll to reflect the changes made from the Favorite icon.
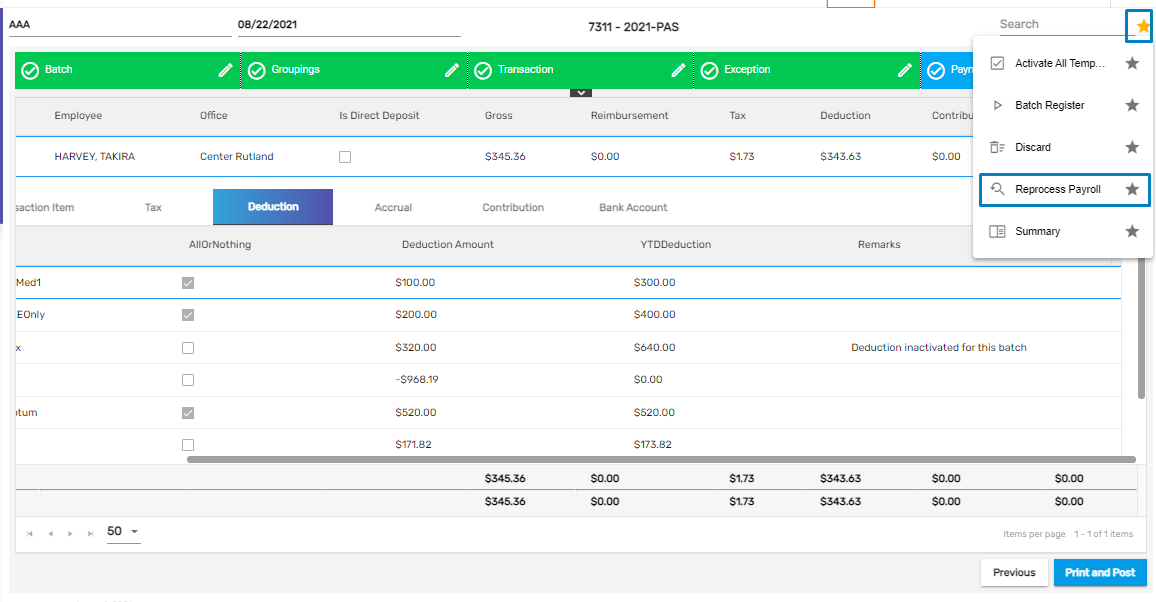
Once reprocessed, the deduction disabling process will trigger the Warning Exception. Select the exceptions and move ahead.
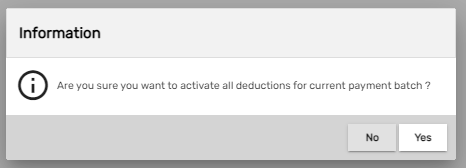
The user can also activate all the temporary deductions for this batch from the Favorite Action as required.
.png)
Click on ‘Yes’ to confirm activation.
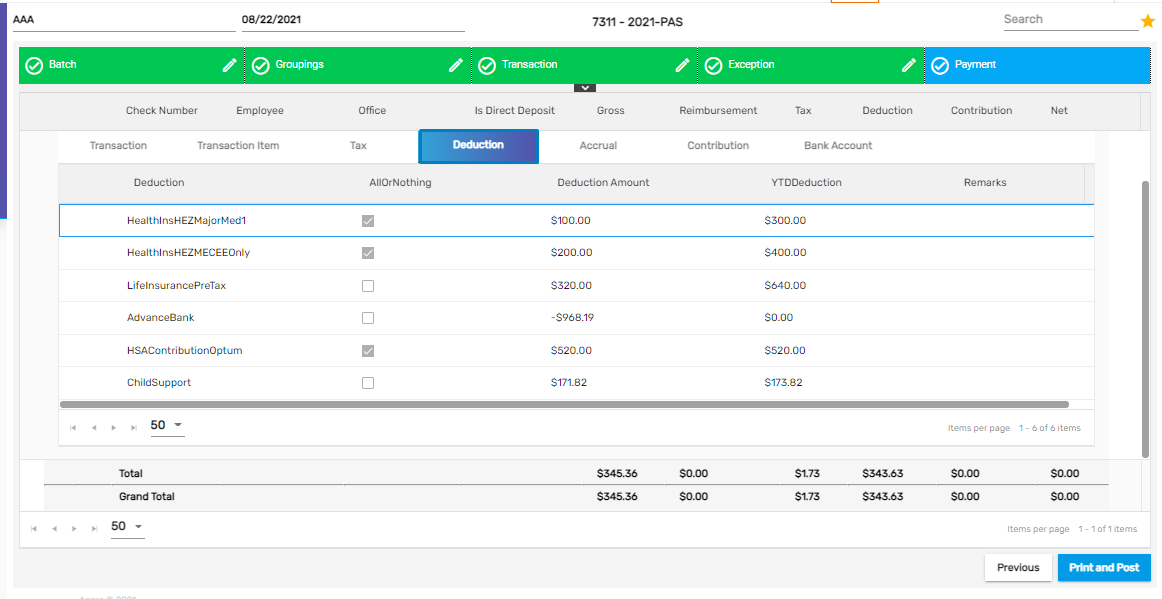
Once, the deduction is disabled and the Payment Batch is reprocessed, the Deduction will not be displayed in the Payment tab of the Payroll Batch.
Bulk Correction Added
Bulk Correction has been added in PAS that allows users to make the payment corrections in a bulk. Users will be able to make bulk payment corrections for all the correction types such as ‘Reissue,’ ‘Void,’ ‘Reverse,’ ‘Reverse and Reissue,’ ‘Void, and Reissue.’ Bulk payment correction can only be done for an open batch. The bank account used for the bulk correction is either an ‘Income and Expense’ or an ‘Expense’ bank account type which is set up from ATM’s Bank account main navigation.
How to Use This Feature
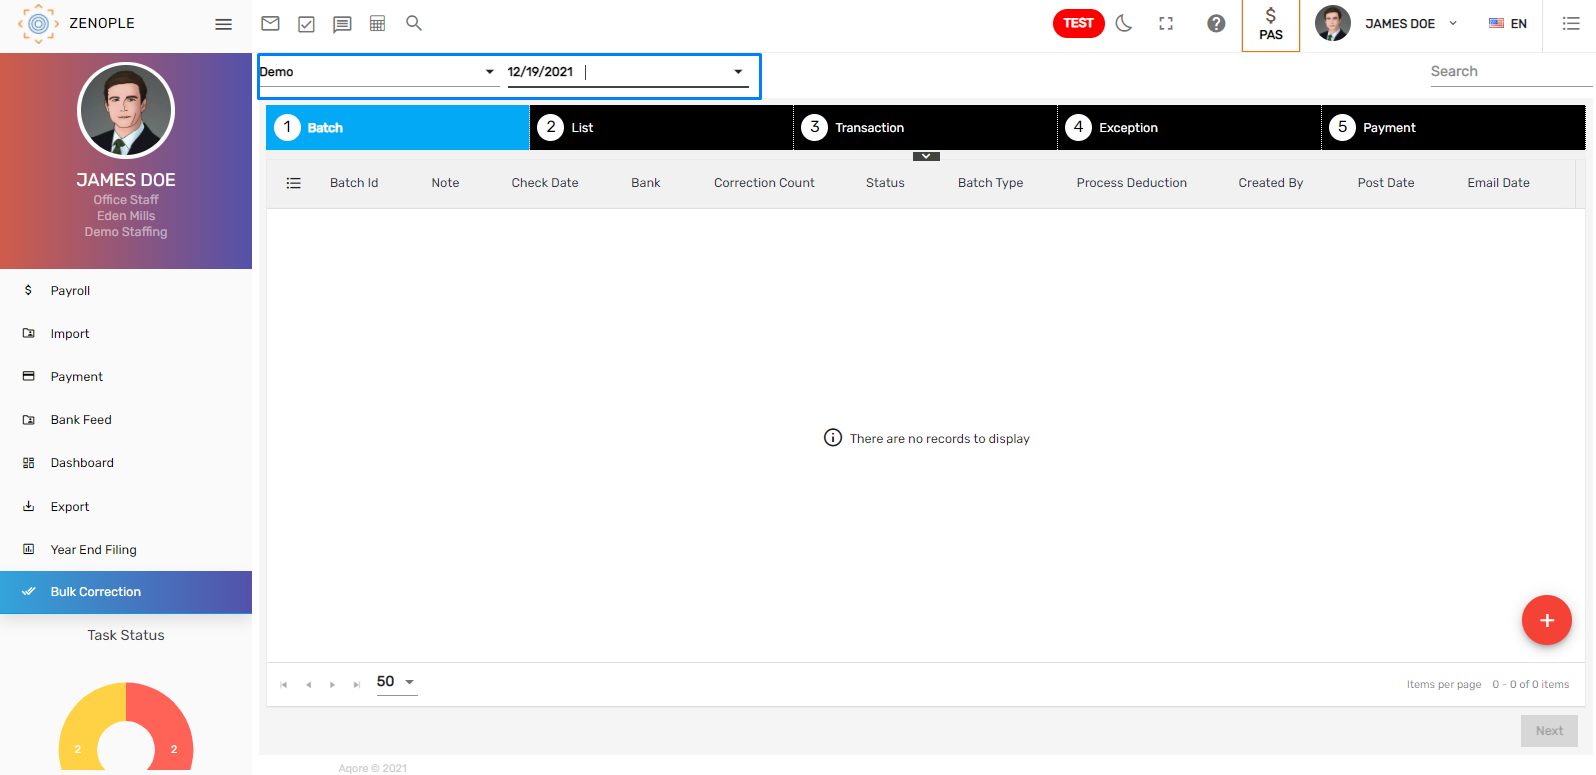
Go to Bulk Correction main navigation.
There are five steps to complete the bulk correction. They are:
- Batch
- List
- Transaction
- Exception
- Payment
Batch
Select the company and accounting period from the dropdown and click on Add icon to add the bulk correction batch.
Enter the Payment Batch details as required.
.png)
- Once the batch is created, the user will be able to edit the batch details or discard them from the vertical ellipsis button.
- Click on the Next button to go to the Correction Payment List tab.
.png)
The grid options have two toggle buttons. They are:
- Show Posted
- Show Others
Show Posted
It allows users to view the posted Payment Batch for bulk correction.
Show others
It allows users to view the Payment Batch of other users as well in the same accounting period.
.png)
List
- Click on Add icon to add multiple payments for corrections.
.png)
- There are various Correction Filters such as Payment Batch ID, Check Date, and Check Number.
- Choose the Correction Filter and its value as required.
- Based on the filter, the payment details are displayed, checkmark the payment details that are to be corrected.
- Click on 'Save & Continue' to further search and select the payment details from other filters.
- Click on 'Save & Close' to save the selected payment details and close the dialog box to redirect to the List tab.
- Click on the 'Remove Filter' icon on the bottom of the screen to discard the filter.
.png)
- After the payments are selected from the list, they are displayed as below.
- Users can directly search by Check Number and add the payment details for correction multiple times. The other details will be populated tagged to the searched check number.
.png)
- Users can redirect to the Employee Detail page from the eye view icon.
- Click on the next button to move forward to the Transaction tab.
.png)
Transaction
- All the transactions of payment selected are displayed in the Transaction tab.
- Click on the Edit icon to correct the transaction details as required.
.png)
- Users can add various transaction codes and amounts as required to the transaction from the add icon.
.png)
- Edit the Pay Unit/ Pay Rate as required.
- The details modified will have an info card as ’Row Modified’ similar to that of Payment and Invoice Correction.
- Click on Save to save the correction details.
.png)
Users can delete the added Transaction Code as required.

- The corrected transaction will be displayed in the Total Pay column whereas the old transaction will be displayed as Original Total Pay.
.png)
- Collapse the transaction to view corrected details.
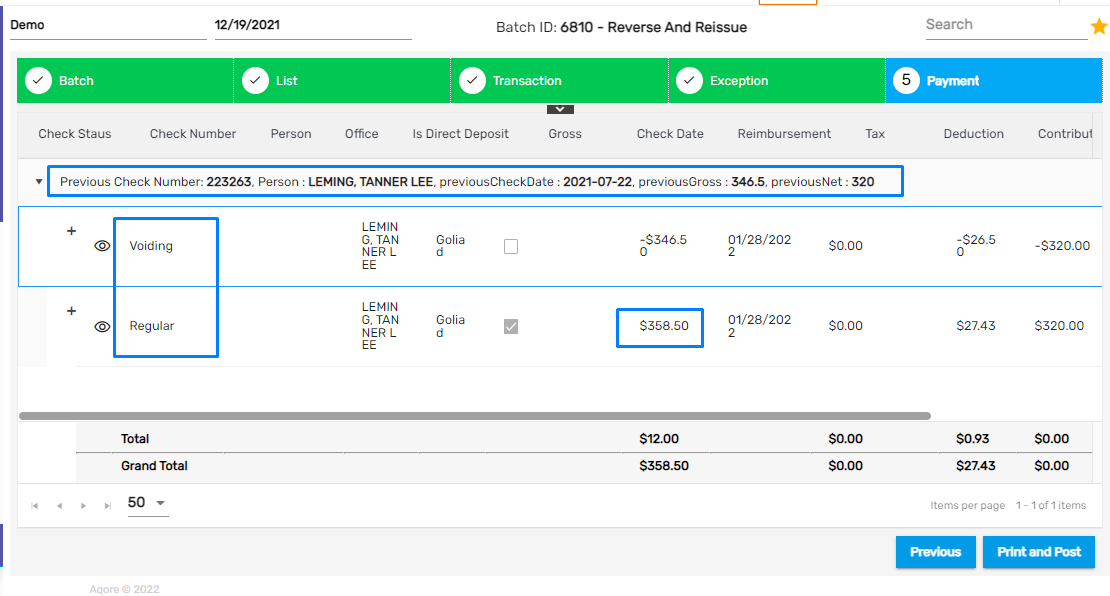
- There are two rows for the transaction. As this is a Reverse and Reissue correction batch, one row displays the transaction which is voided and the regular transaction displays the reissued transaction.
- Users can also view the previous net, previous gross, and previous check date.
- Click on 'Print and Post' to post the batch.
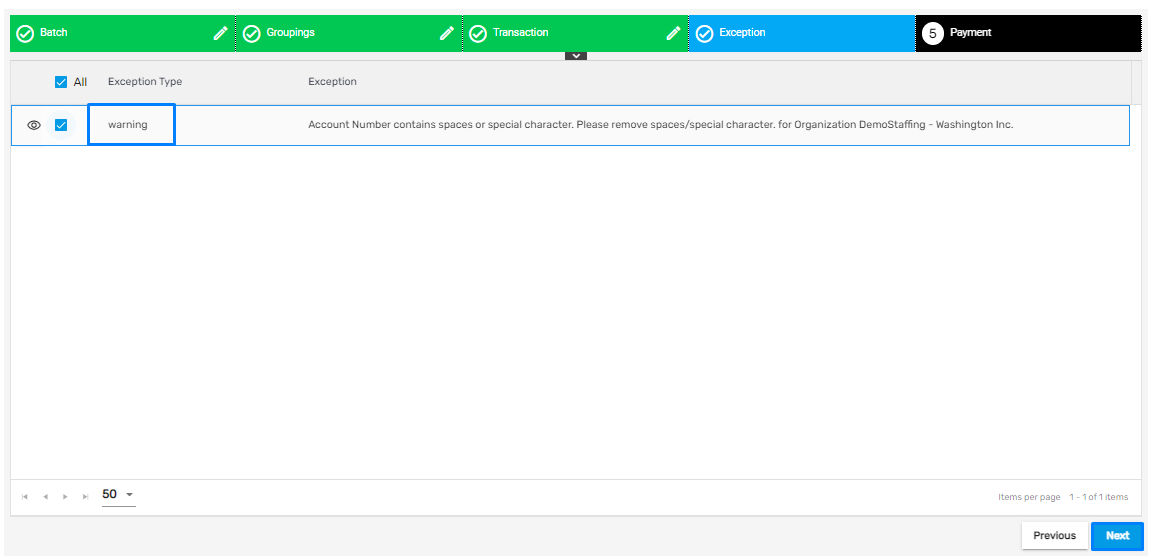
Exception
Exceptions will be displayed based on cases of errors. There might be severe or warning-type exceptions. Sever exceptions need data correction to move forward whereas warning exceptions can be ignored and move forward similar to corrections in Invoice or Payment.
If no exceptions are displayed, the user will be moved forward to the Payment tab.
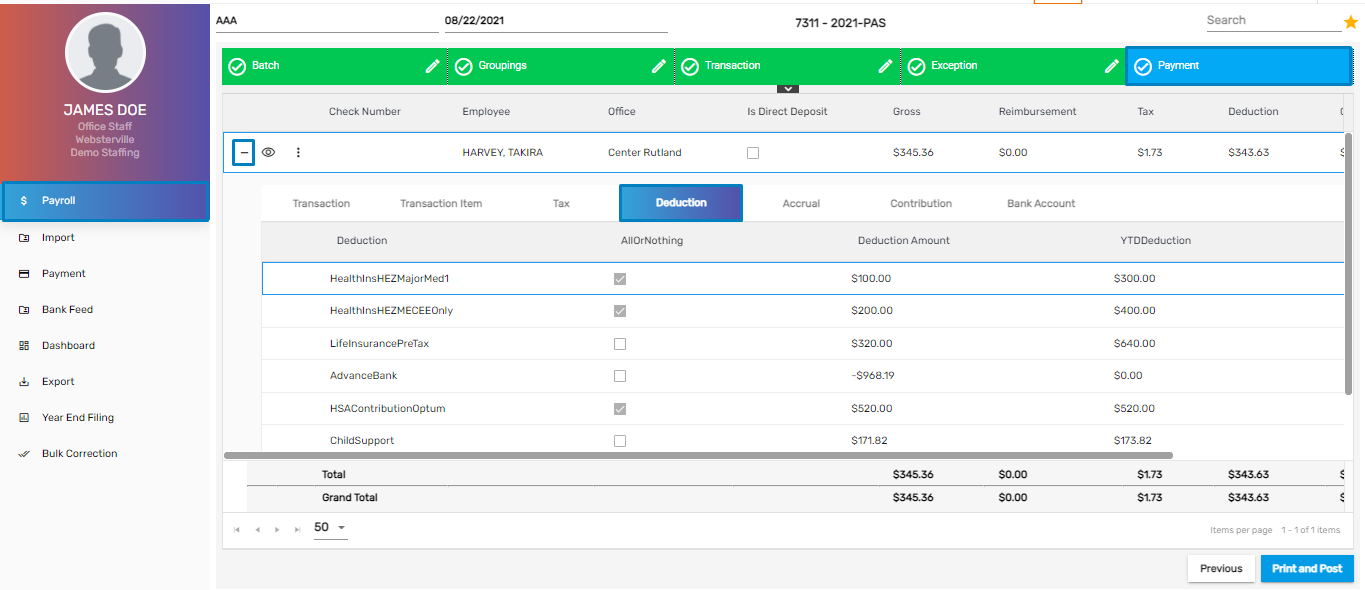
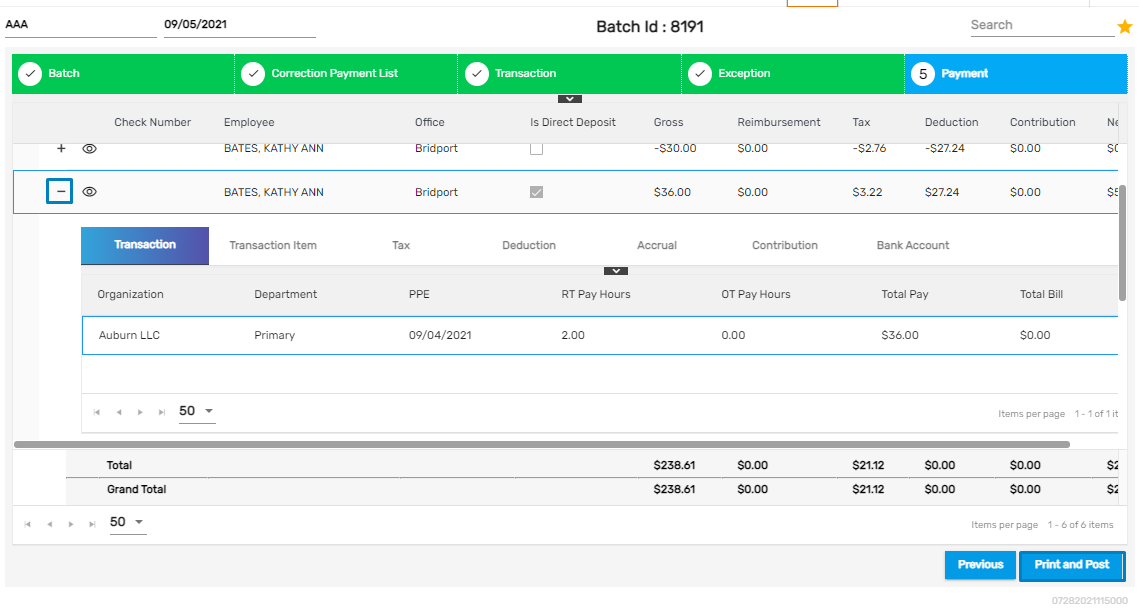
Payment
As this is a Reverse and Reissue Correction batch, the transactions are reversed with minus value and reissued with the corrected transaction.
- Click on the ‘+’ icon to expand the transaction details and click on the eye view to view the transaction details.
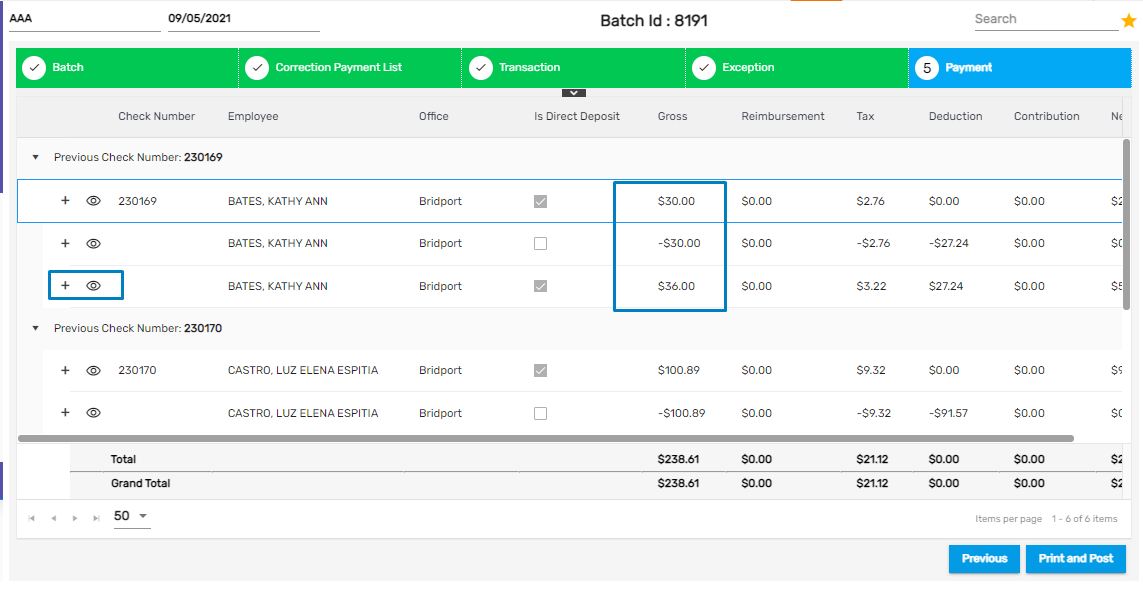
- Click on 'Print and Post' to post the Correction Payment Batch.
- Click on Yes to confirm the batch post

Favorite Action has five actions. They are:
- Activate All Temporary Deductions
- Batch Register
- Create Transaction
- Reprocess Payroll
- Summary
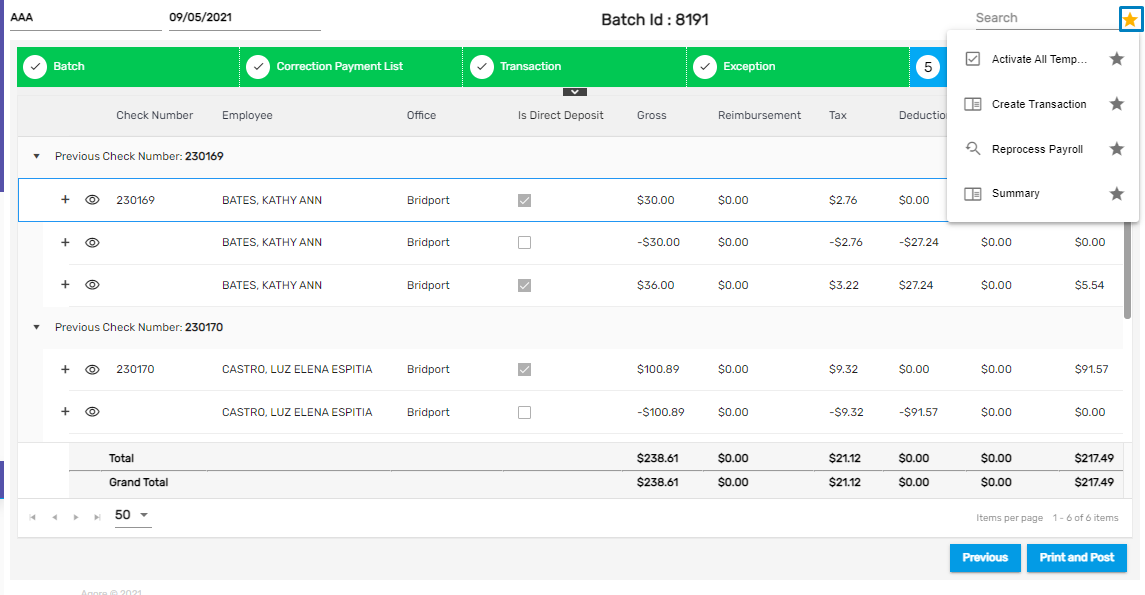
Activate All Temporary Deductions
This allows the users to activate all the disabled deductions for this batch in case of any. The deduction disabling feature is also added in the Payment Batch as well.
Batch Register
This allows users to view the Payment Batch report.
Create Transaction
This allows users to renew old transactions associated with the transaction.
Reprocess payroll
It allows the user to reprocess the batch and its transaction details in case of any changes associated with the transaction.
Summary
It allows users to view the summary report of the batch.
Once the batch is processed, it will be listed and it's the vertical ellipsis button has five actions. They are:
- Batch Register
- Discard
- Move to Payment
- Print and Post
- Summary

Batch Register
It allows users to view Payroll Batch Report.
Discard
It allows users to discard or cancel the Bulk Correction Batch.
Move to Payment
It allows users to redirect to the Payment tab.
Print and Post
It allows users to post the Correction batch.
Summary
It allows users to view the Summary Report of the Bulk Correction batch.
Once the batch is posted, the vertical ellipsis button has five actions. They are:
- Batch Register
- Move to Payment
- Regenerating Document
- Summary
- View Checks
Batch Register
It allows users to view Payroll Batch Reports.
Move to Payment
It allows users to redirect to the Payment tab.
Regenerating Document
This allows users to regenerate the document for all the invoices in the batch in case of any changes regarding the customer, employee, invoice batch, and transaction.
Summary
It allows users to view the Summary Report of the Bulk Correction Batch.
View Checks
It allows users to view the Paycheck Report of the Bulk Correction Batch.
Copy Federal Tax Parameters to State Tax
This feature is added for such a case where the state under which the user applies for a job uses Federal W4 and does not have their own state-level w4. In such cases, the tax parameters of the federal level are copied to state-level tax as well.
The states for which the federal level taxes are copied to state w4 are Colorado, North Dakota, Utah, and New Mexico.
Here, the user signs up under 'Colorado' state which uses Federal level tax so, the user will only fill the Federal W4 form.
.png)
.png)
In such cases, the Federal tax will be copied to the State tax as well.
.png)