Common Features Added
Company Field on GP Calculator Added
Company field is now added on GP Calculator which prompts users to choose the ‘Company’ first and then the ‘State’ to avoid conflict. The value of the 'Company’ will be chosen automatically depending on the user's default office.
![]()
Improvement in Task Feature
Users will get notifications of the newly assigned task instantly. They can click on the 'Task' icon and view the details of the task.

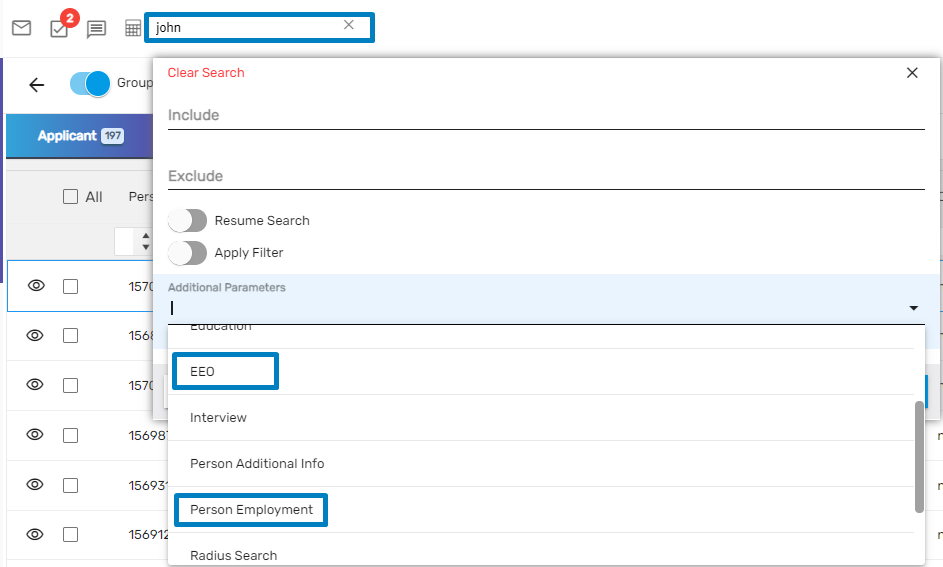
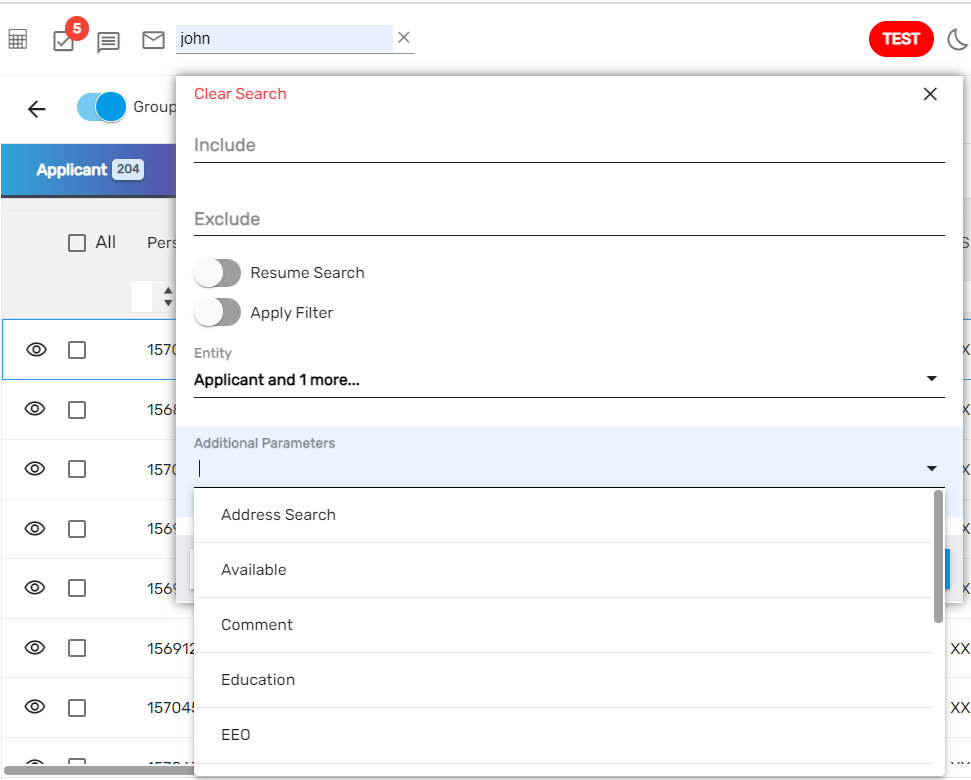
EEO and Person Employment Option Added on Additional Parameter
Additional parameters like EEO and Person Employment have been added on Additional Parameter in Advance and Global Search which makes it easier for users to search.

Template Field Added on Email
Users will be able to select the email template from the ‘Template’ dropdown. Users can pre-add the required template, select and compose an email.

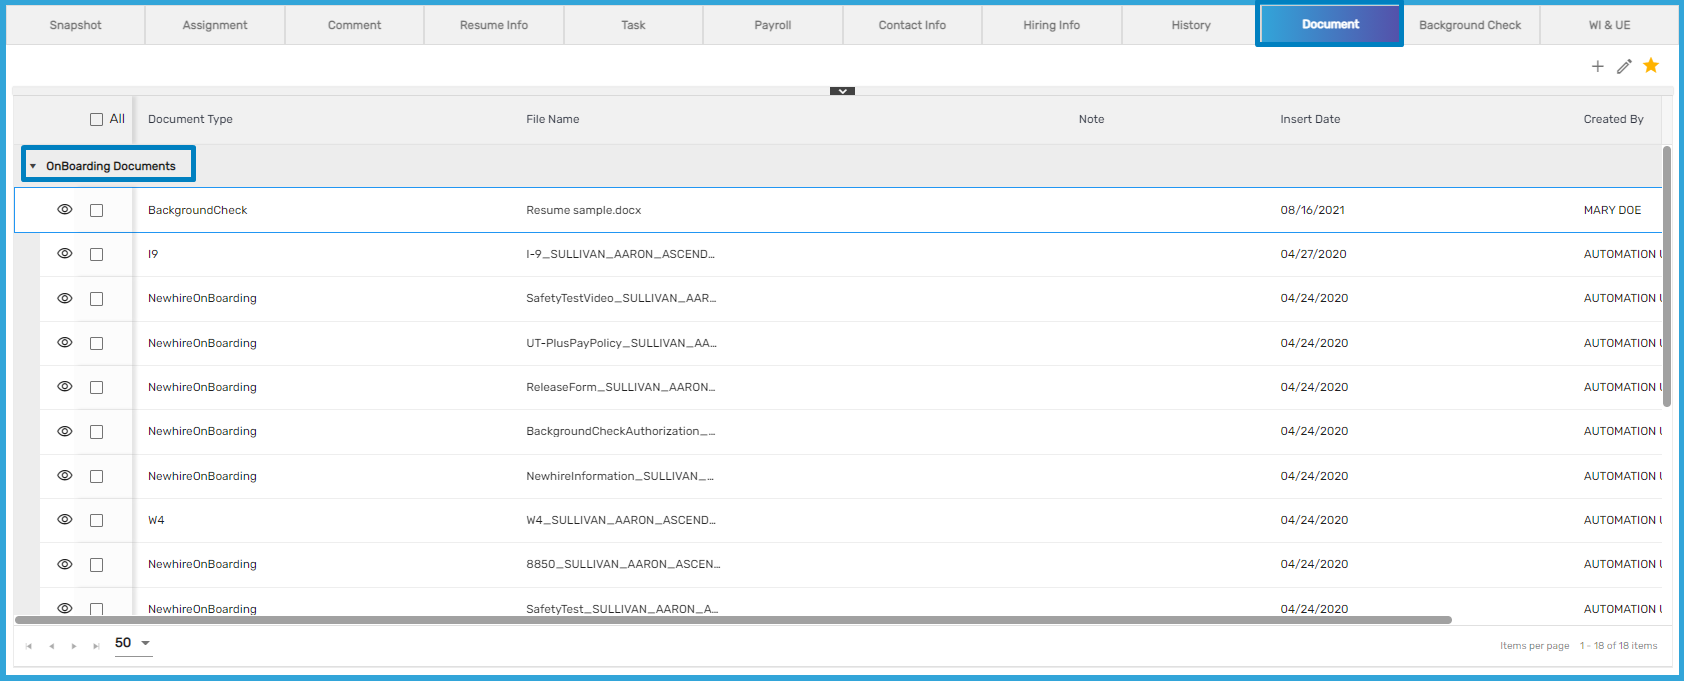
Grid View Added as the Default View on a Document
Users will be able to view the added documents in a grid format now. Previously, there was only a card view to view the added documents.
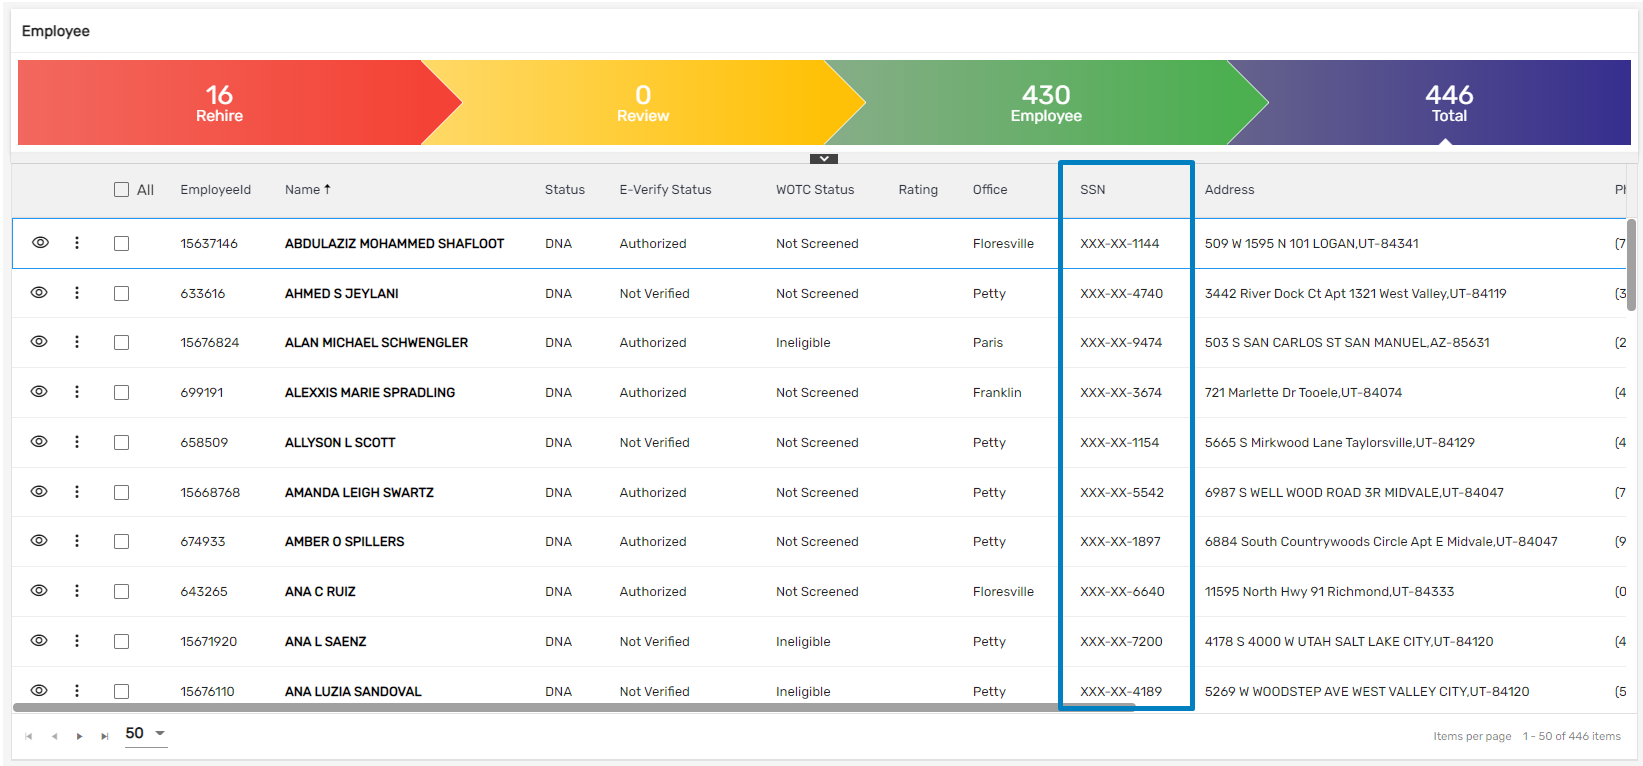
Hide SSN (Limit SSN Display) on Person Related Applications
Users will be able to view only the last 4 digits of SSN on a directory page. This feature is to limit SSN data to be easily accessible in the search result, directory page, etc.
Bulk Action to Update Status on All Person Related Applications Added
Users can select multiple employees, applicants, or customers and update their status in bulk.
- Select the employees, you want to update the status of
- Go to 'Favorite' action
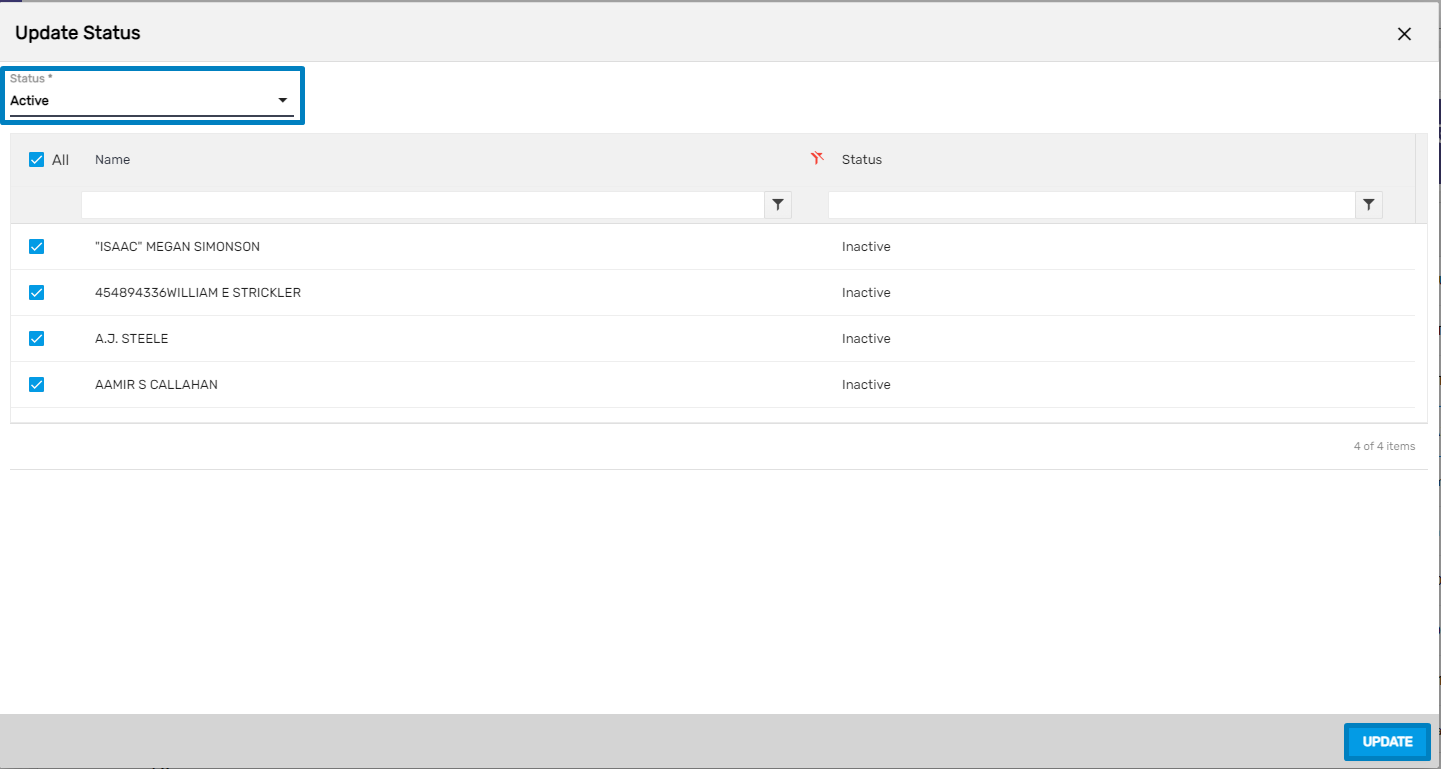
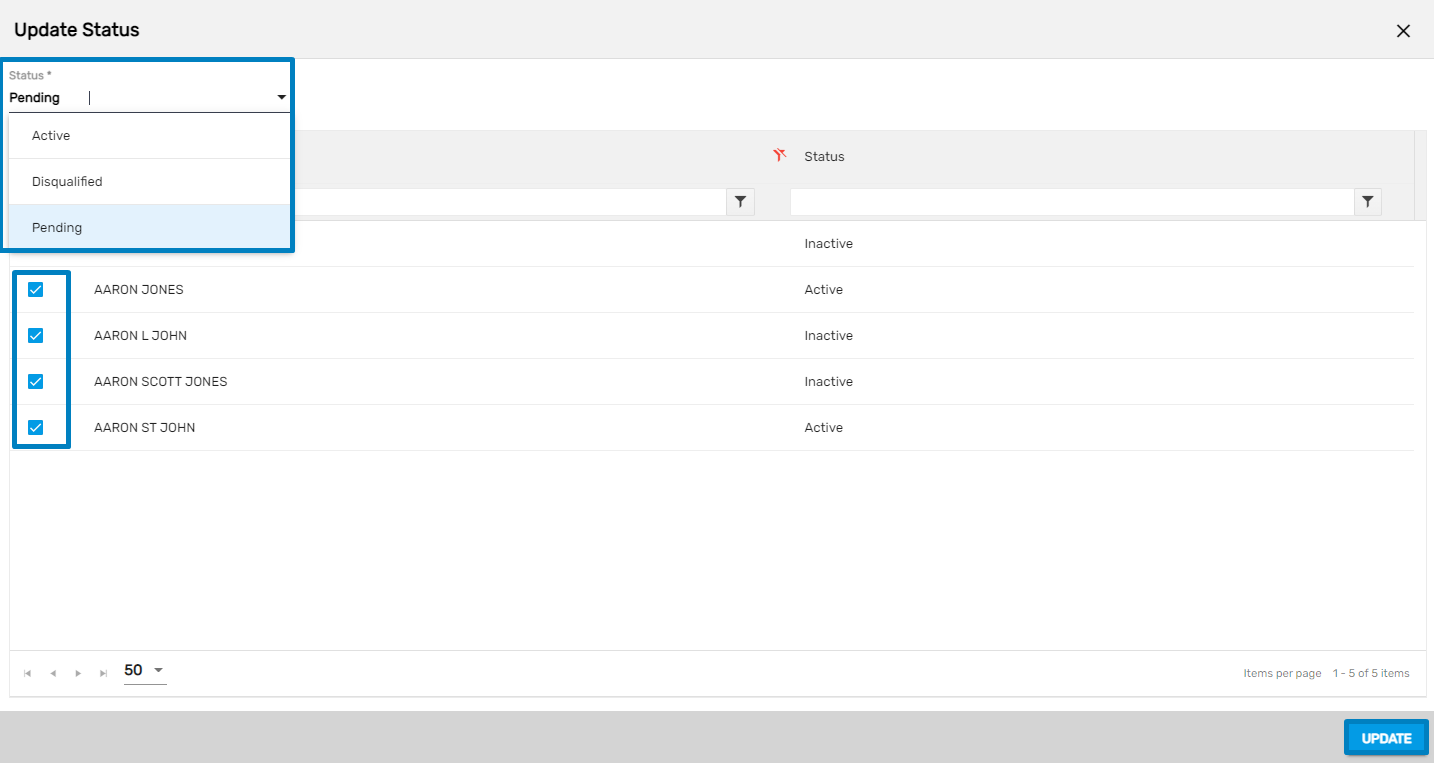
- Click on 'Update Status' following which the 'Update' status dialog box will appear
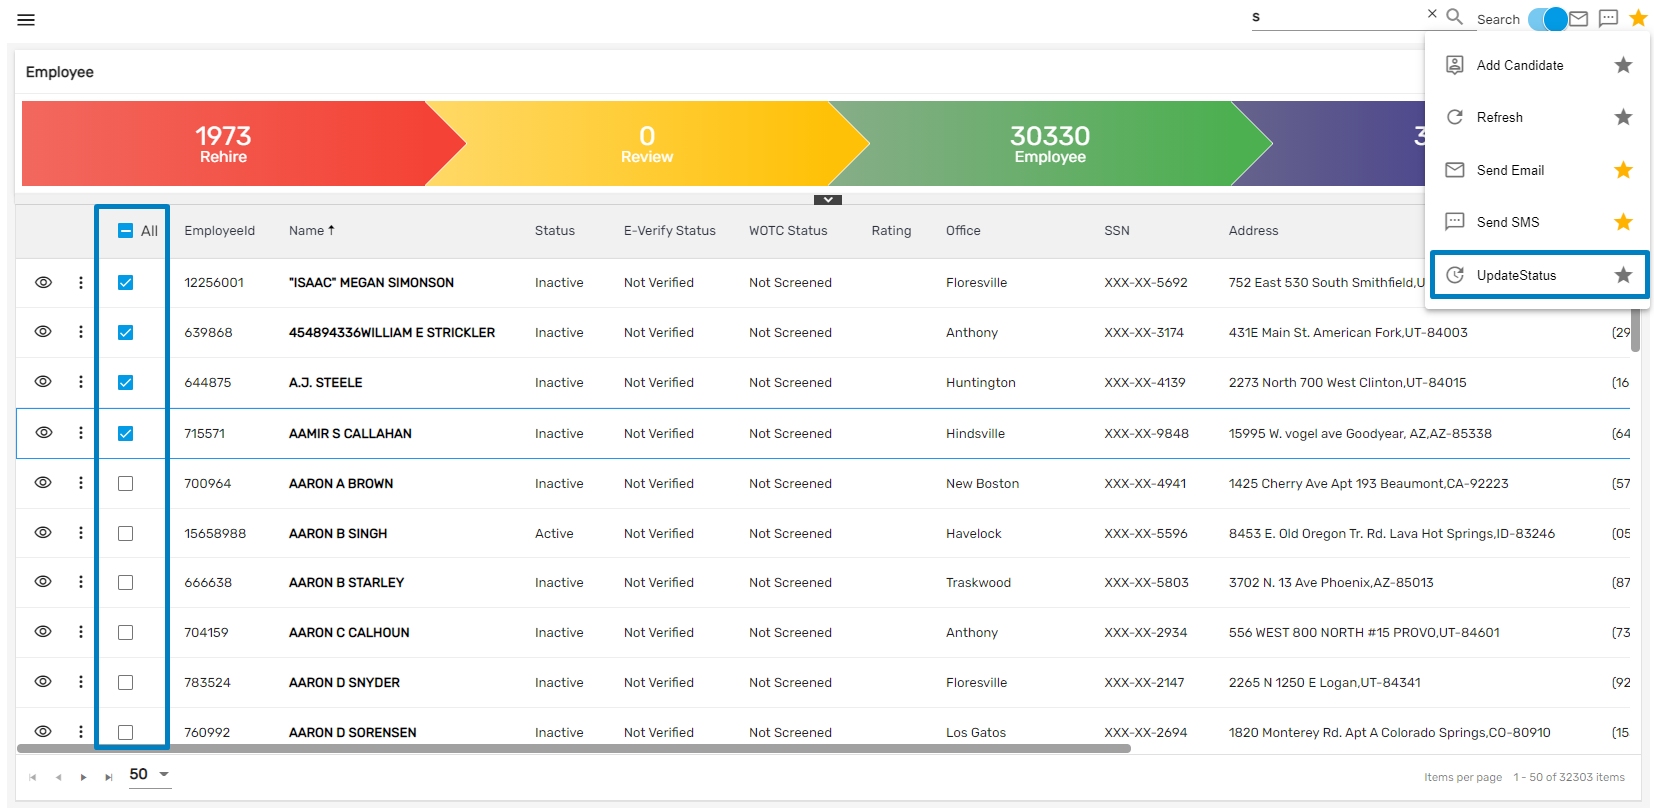
- Select status from the ‘Status’ dropdown
- Users can un-select the selected employee as well
- Click on 'Update'
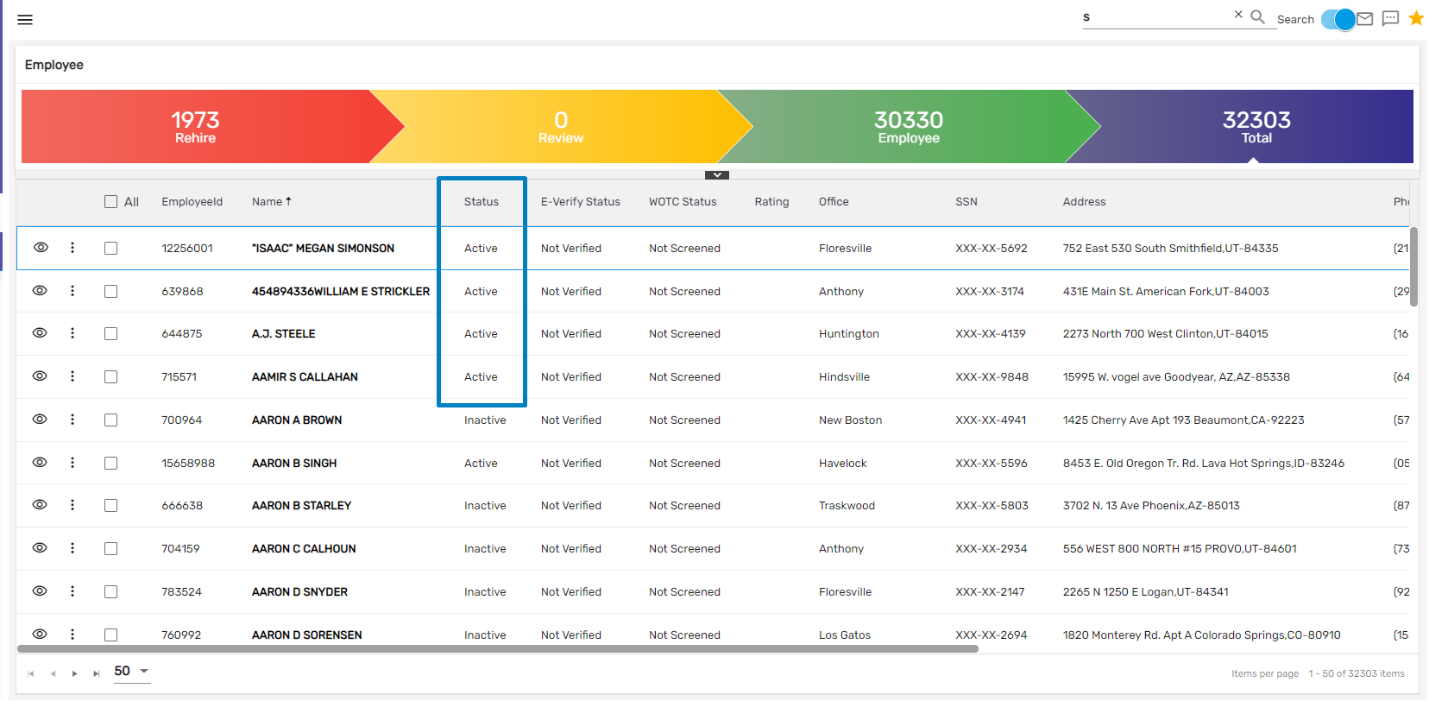
Users can view the updated status as,
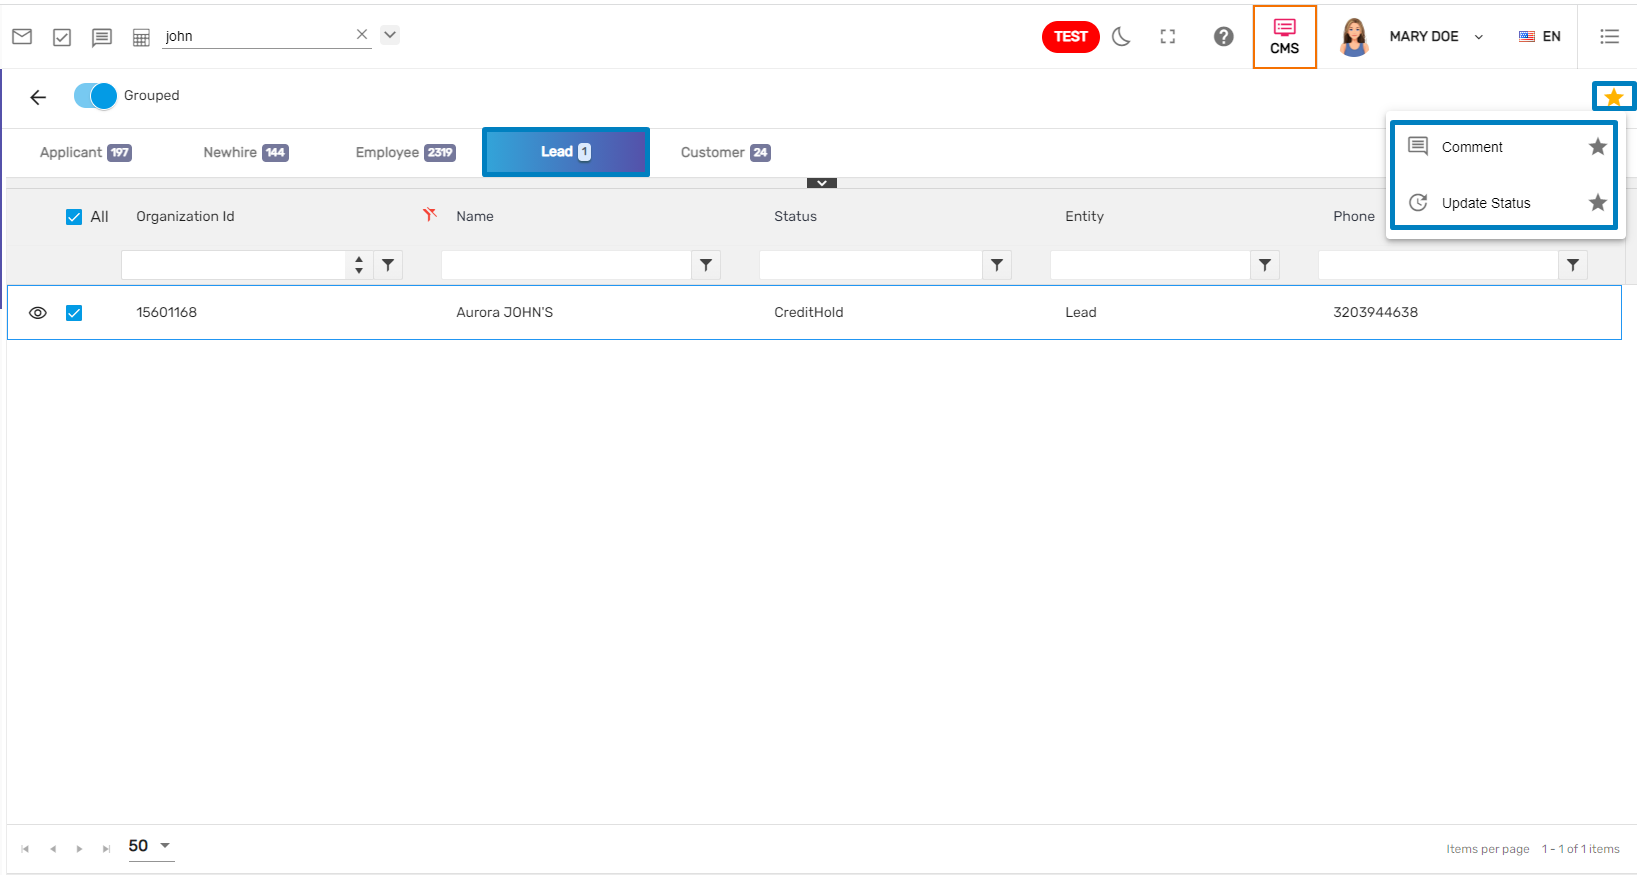
Global Search: Bulk Action to Update Status on All Person Related Application
Users can update Status in bulk from Global Search.
- Search person from Global Search
- A list of person and organization related entities will be displayed
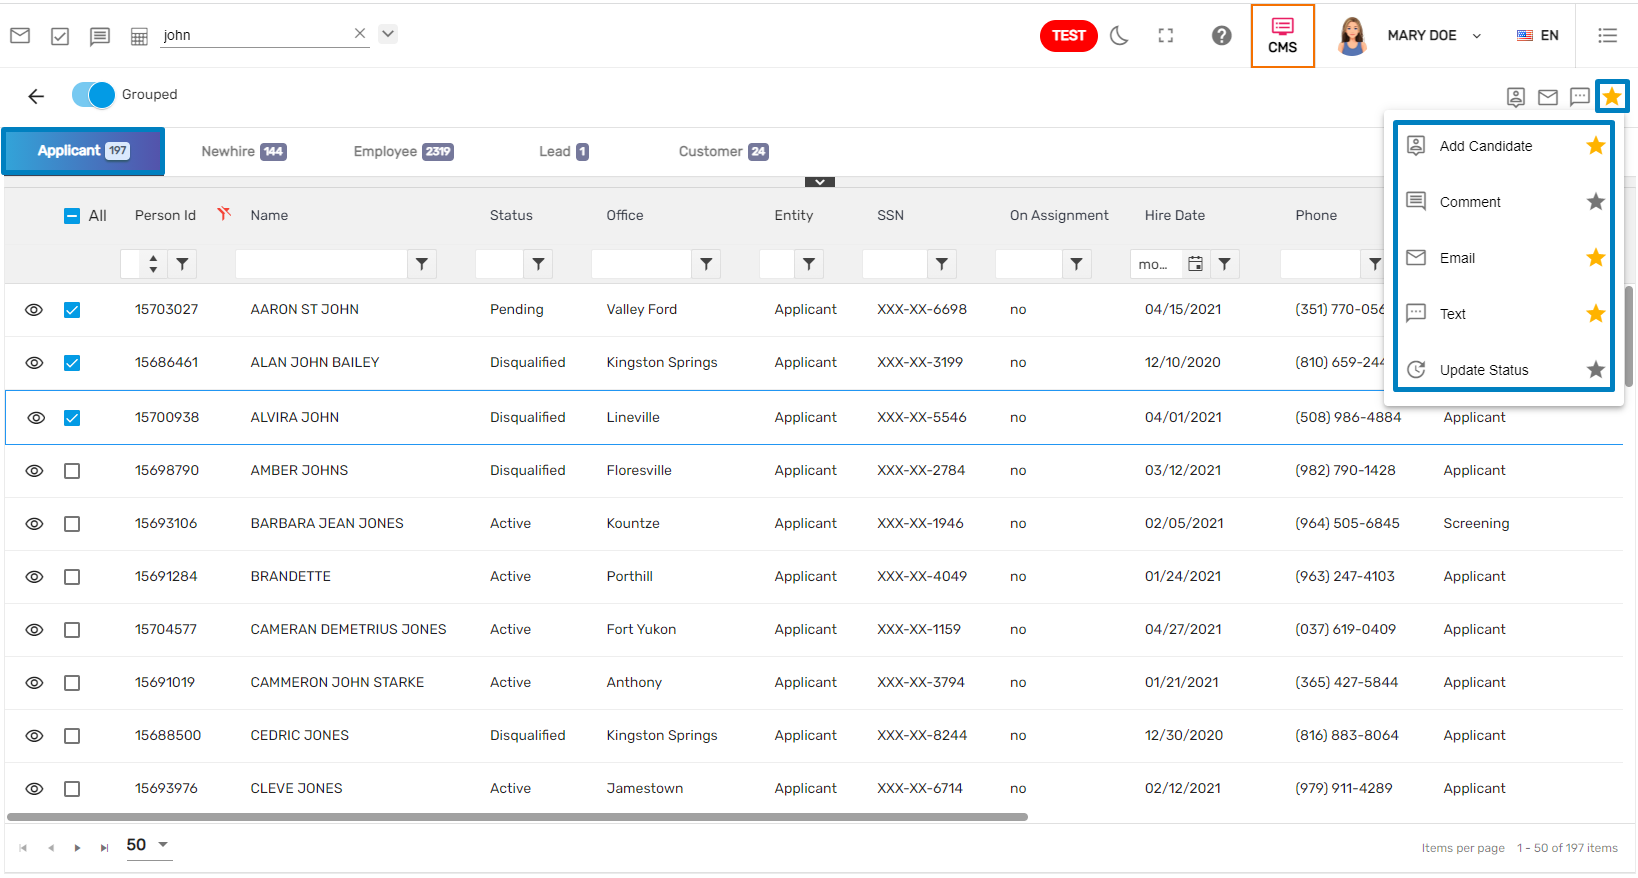
- Select the 'Person'
- Select the Entity and then click on the Favorite icon
- Click on the 'Update Status'
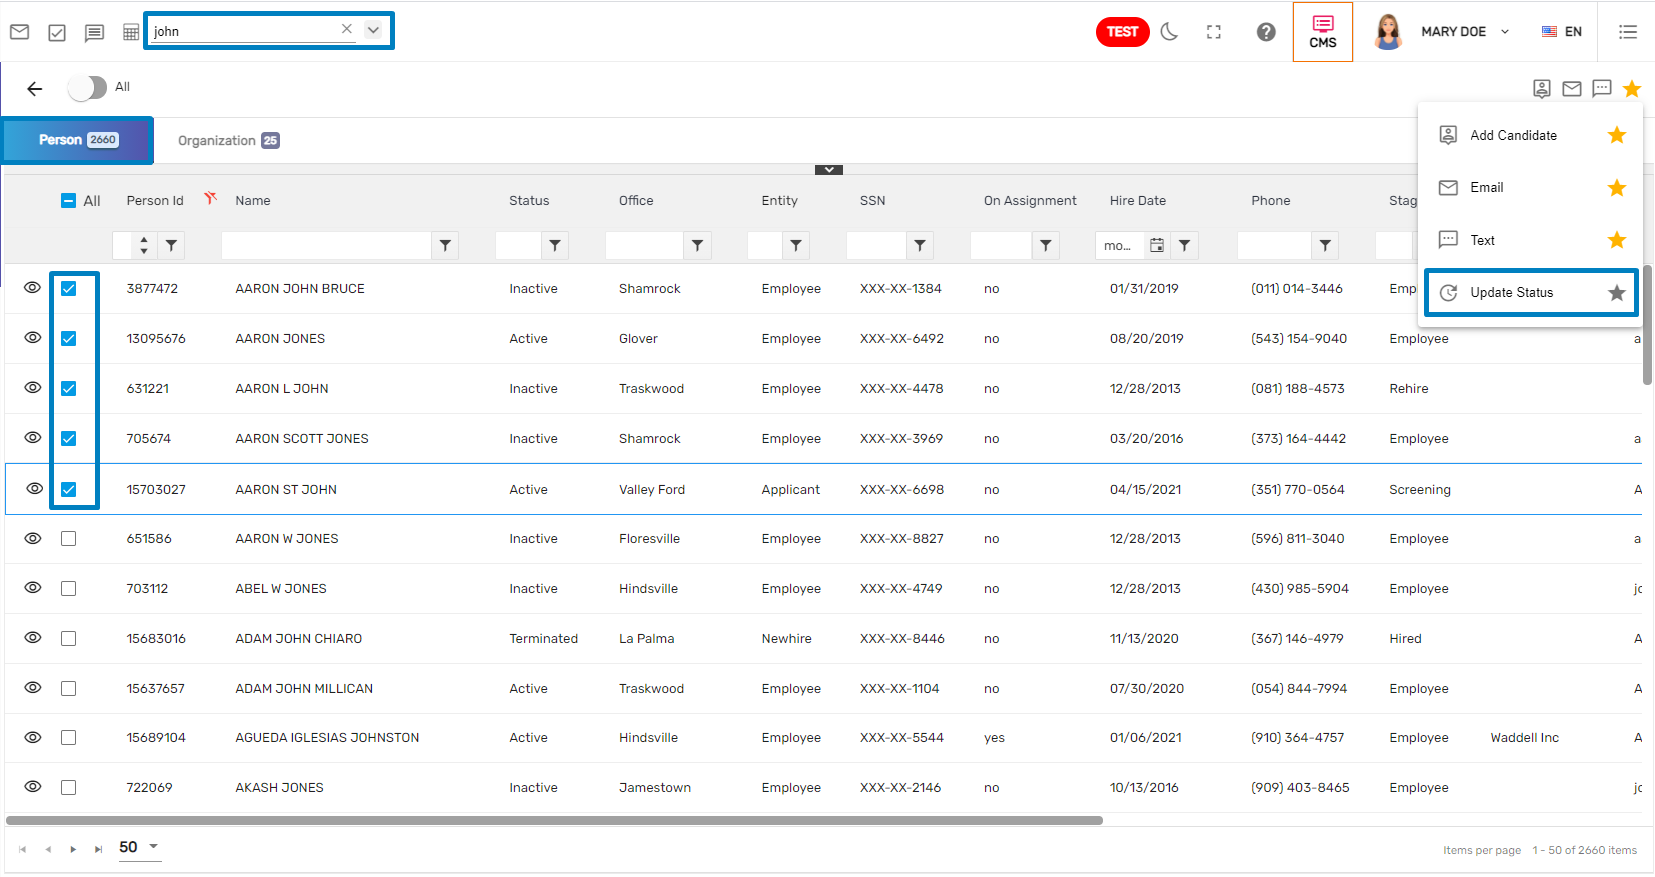
- After clicking on ‘Update Status,’ a dialog box will pop up where users can select the Status and Save. Users can unselect the status from the ‘Update Status’ dialog box as well.
- Click on Update.
Global Search: Bulk Action to Update Status on All Organization Related Application
Users can update the status of the organization-related applications similar to Update Status on person-related applications.
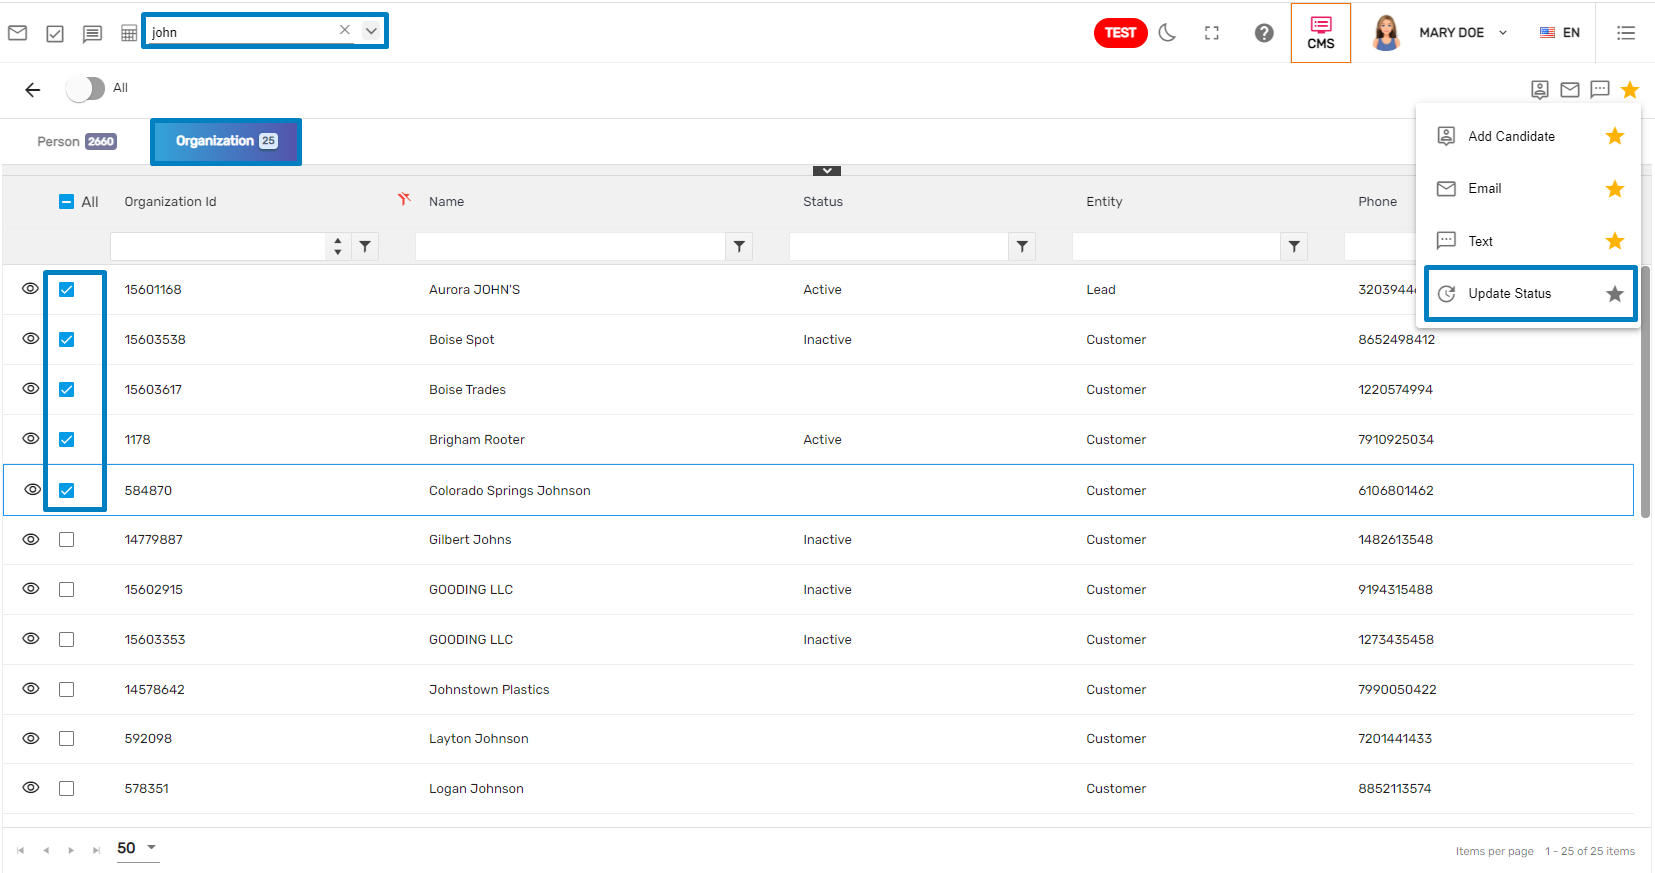
- Search Organization from Global Search
- A list of Person and Organization related entities will be displayed
- Select the 'Organization' tab
- Select the Entity and click on the Favorite Action
- Click on the Update Status
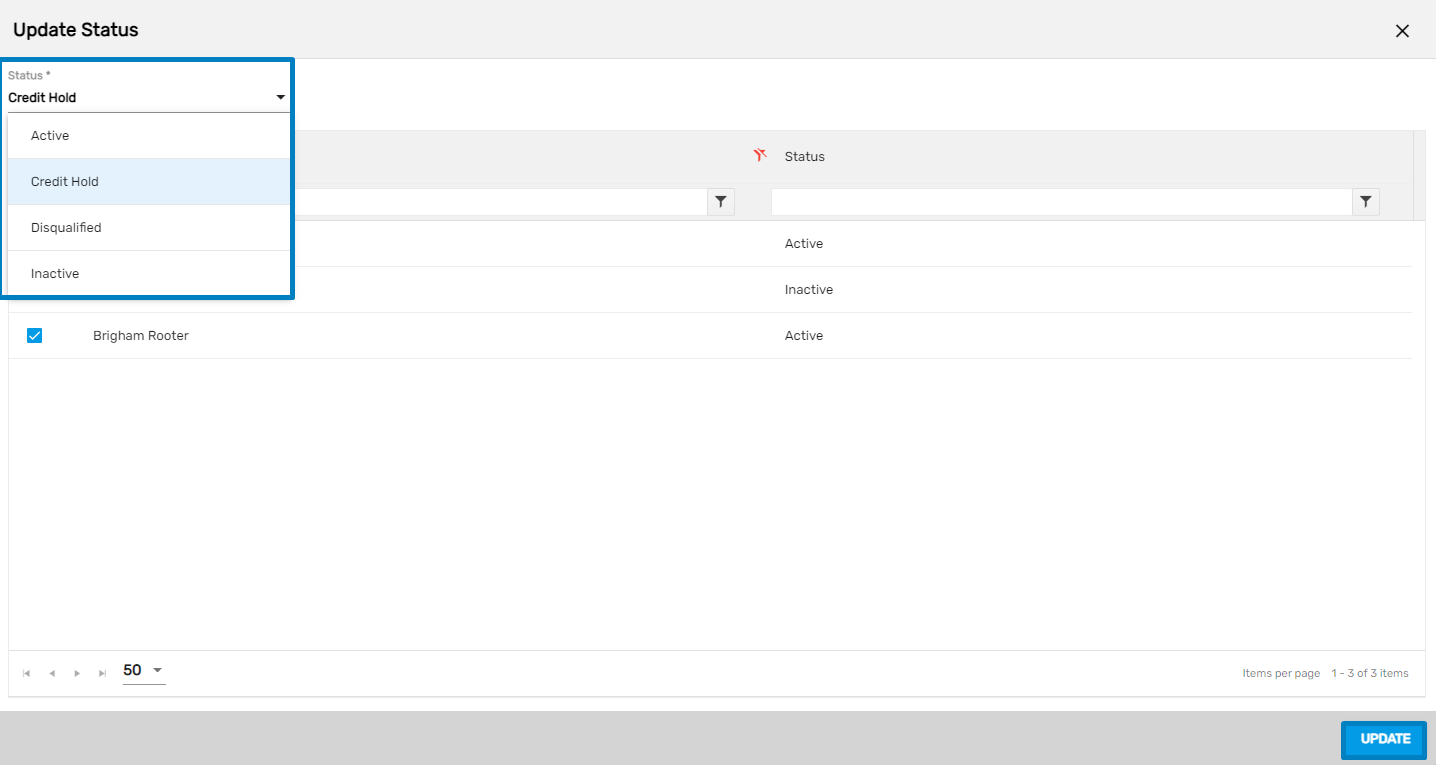
After clicking on ‘Update Status,’ a dialog box will pop up where users can select the Status and Save it. Users can unselect the status from the ‘Update Status’ dialog box as well.
Click on Update,
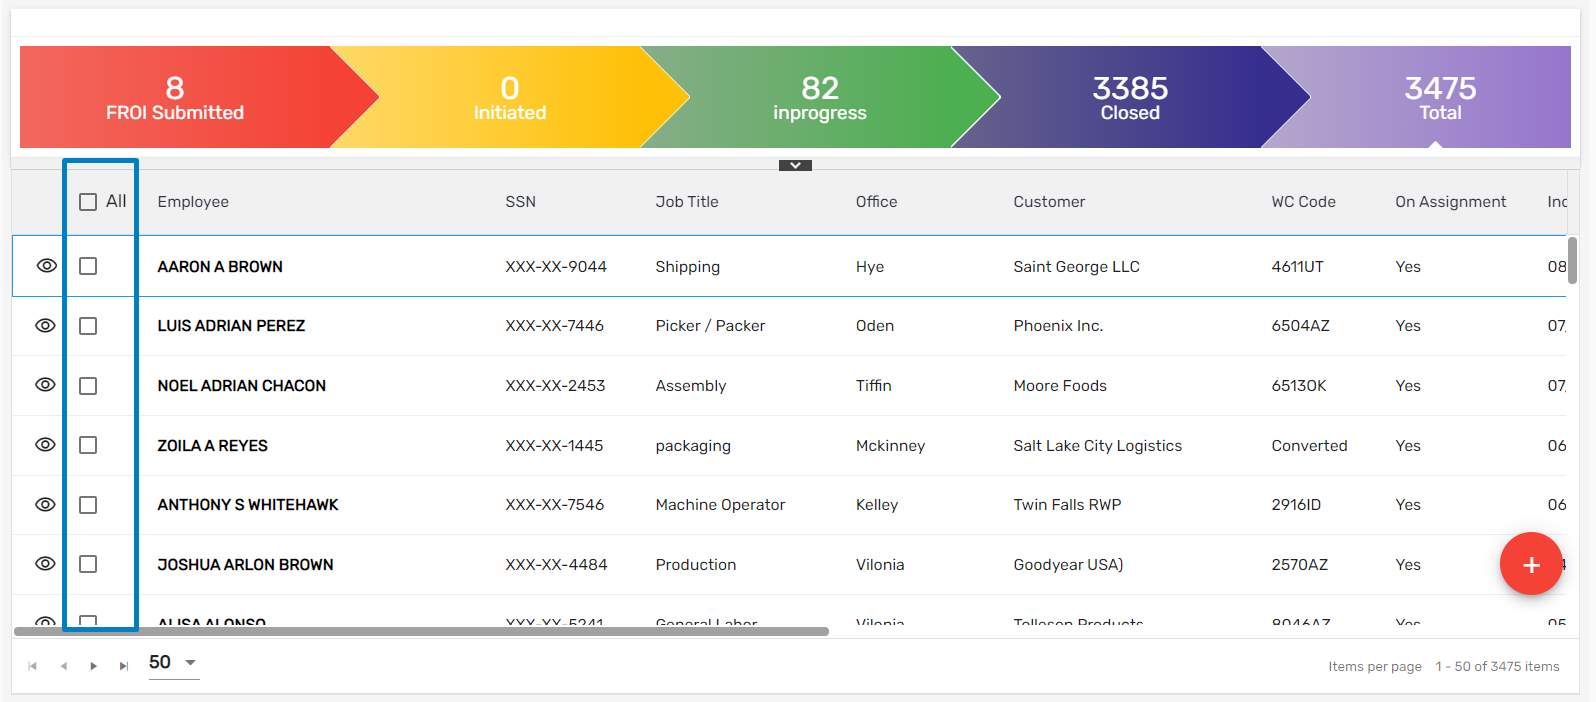
Select All Option Added on Directory Pages
Users can view the ‘Select All’ option on all the directory pages. Recently, select 'All' options have been added to Work Injury Management (WIM) and Unemployment Management System (UMS) directory pages. Users can select multiple work injuries or unemployment and update the comments at once.
Toast Message Added While Editing the Same Number on the Contact Information
If the users try to edit the number which has been used in SMS, they will receive a toast message. The message would display saying, 'This number is used in SMS. Do you want to change it? If yes, please inactive the current number and add a new number.'
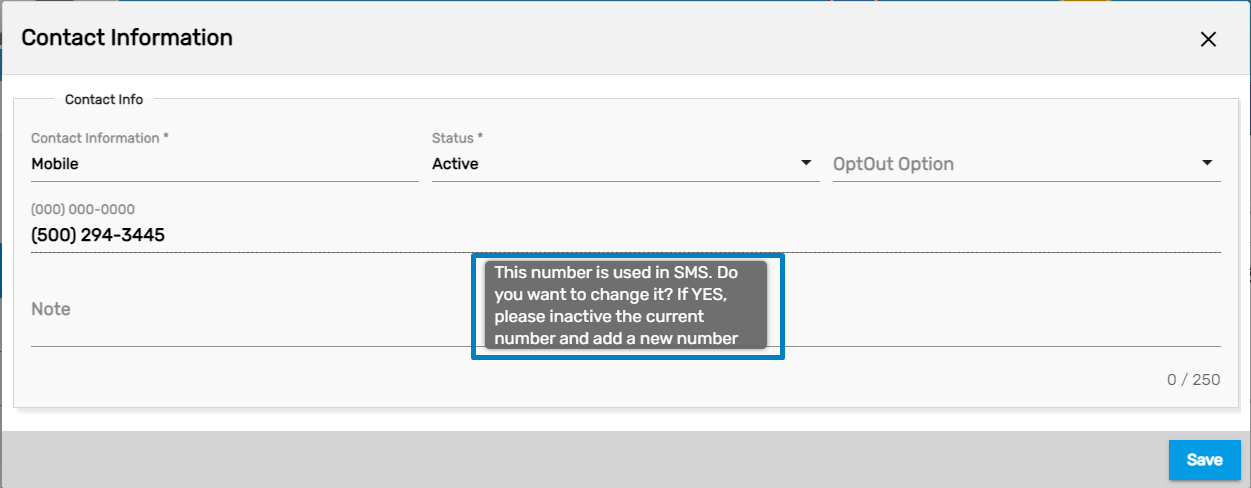
They can inactivate the current number, and add a new one and edit the required information.
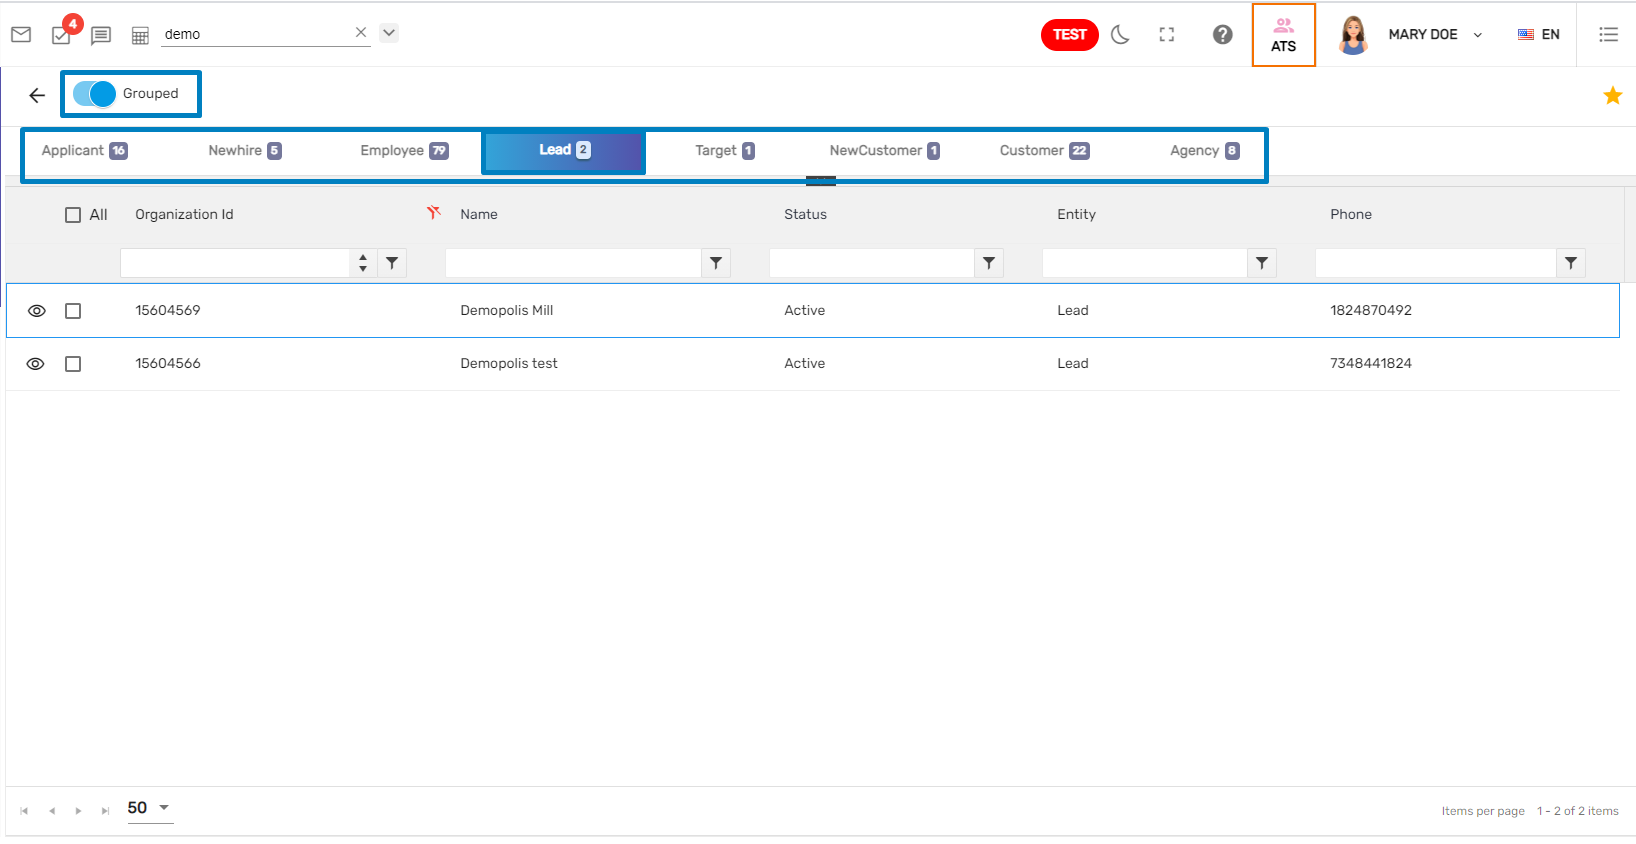
Global Search for an Organization Related Applications
Previously users could search for all person-related applications through Global Search; whereas, now they also can search all organization-related searches as well. Search is grouped as person and organization.
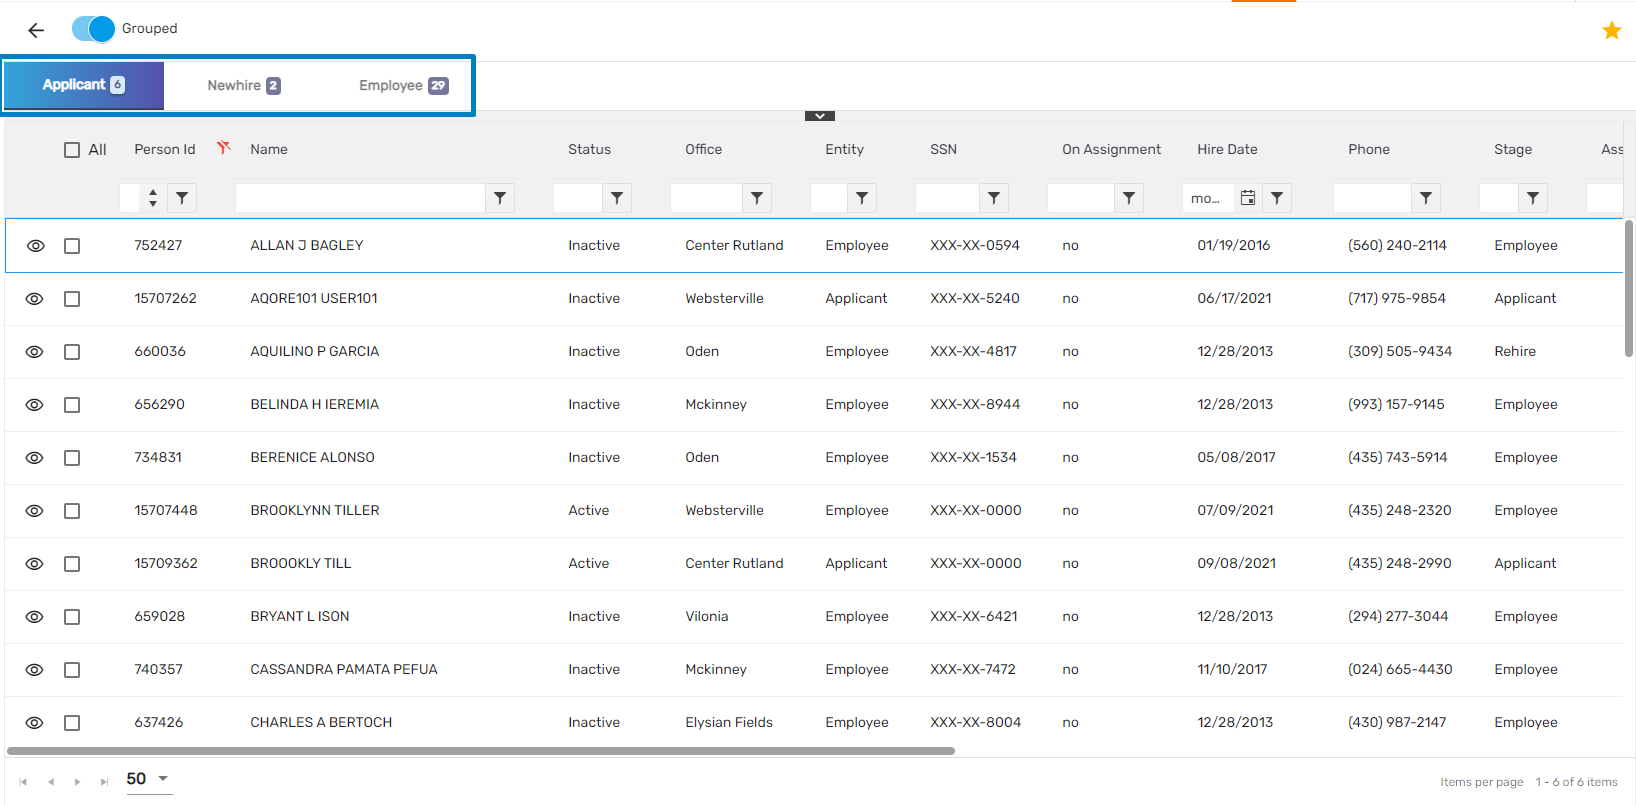
If the user selects the ‘Grouped’ toggle button, they can view all person as well as organization-related searches grouped together.
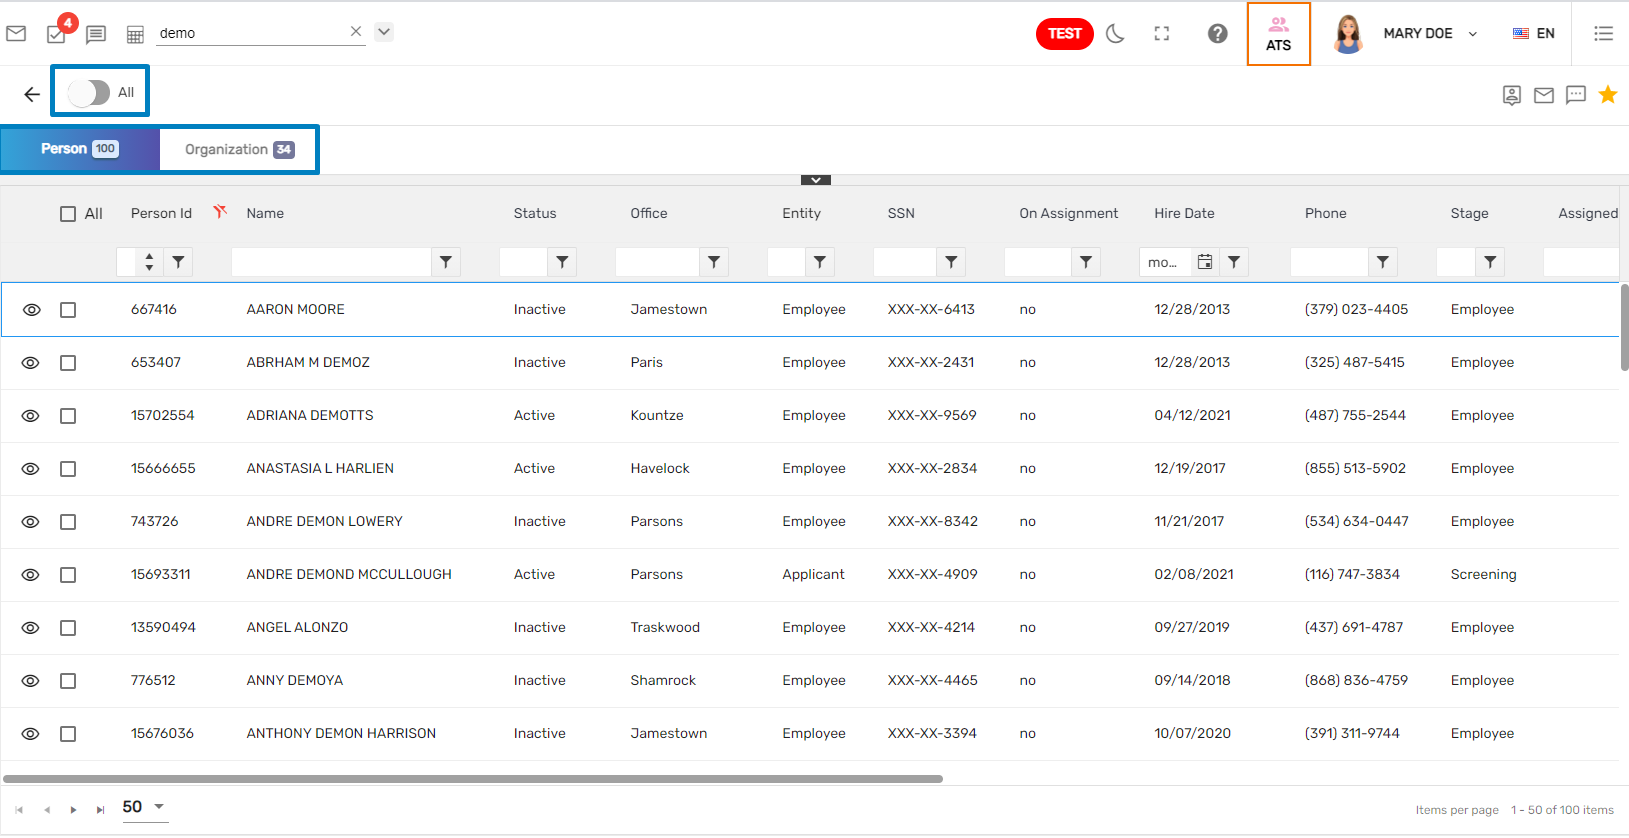
But if users select ‘All’ then they can view all the Application tabs in one screen as,
Allow Task to Assign Multiple
Users can now assign tasks numerous times if the Task Template’s 'IsMultiple' property is set to True.
Previously, users had to archive and then assign the same Task, however, this is no longer the case. If the Task has previously been completed in any of the entities, then it can be assigned again.
Note: Since there is no UI for updating 'IsMultiple' value, it will be completed from Aqore’s end.
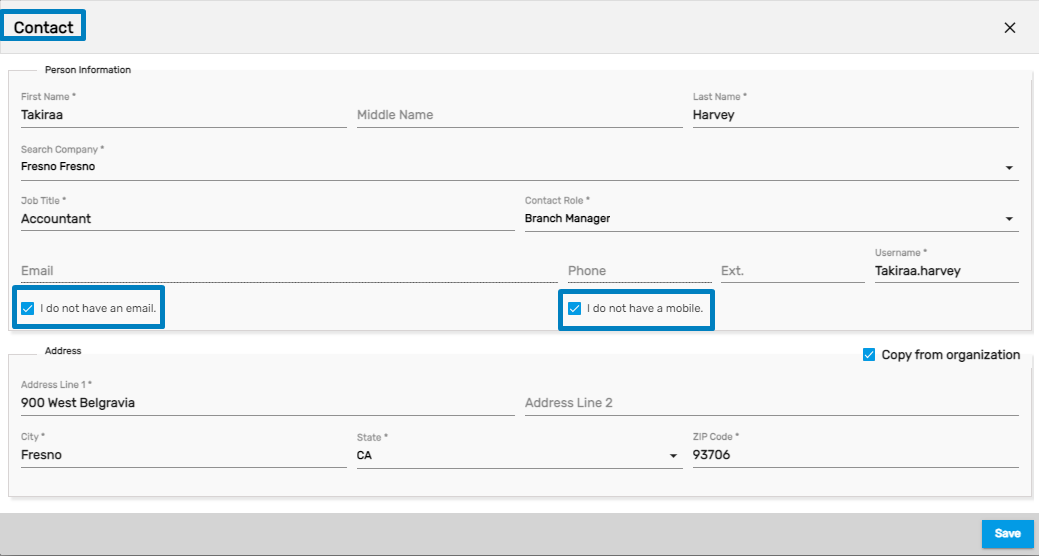
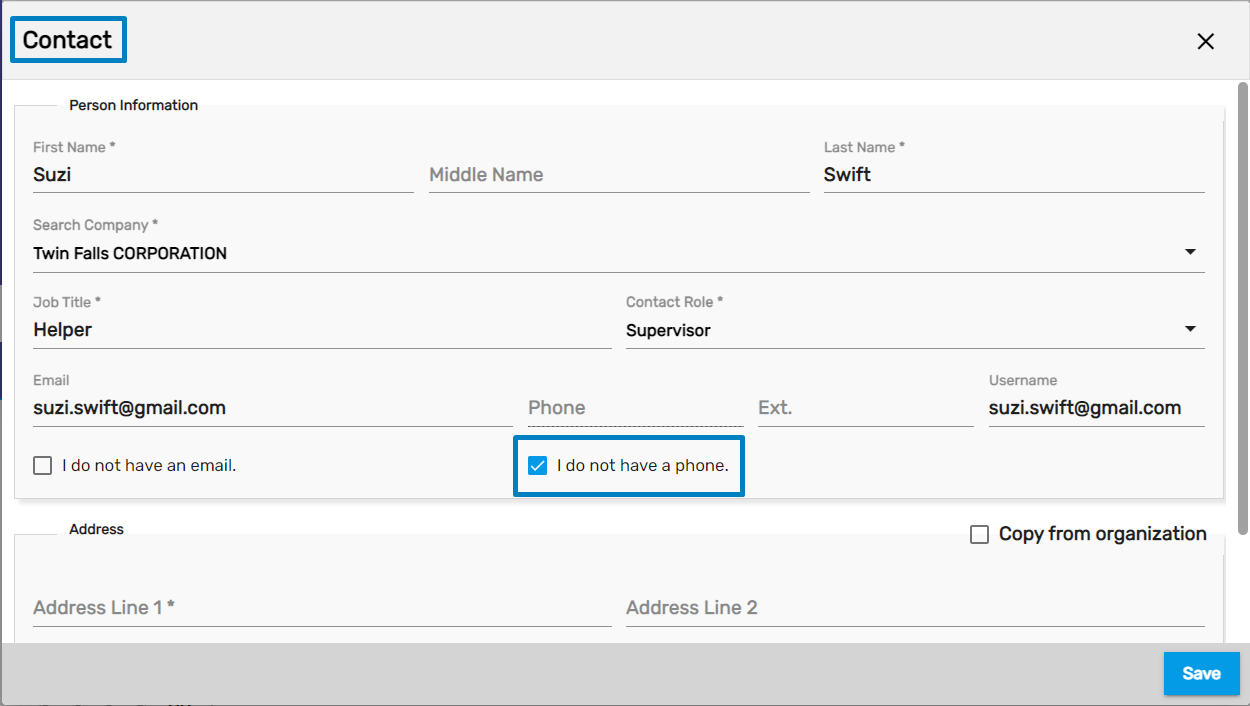
Contact Form Improved
Users need to select, ‘I do not have an email.’ and ‘I do not have a mobile.' options if they don’t have this information. If both the fields are checkmarked then the username field will populate where they can enter the user’s name for the contact.
A confirmation dialog box will appear as,
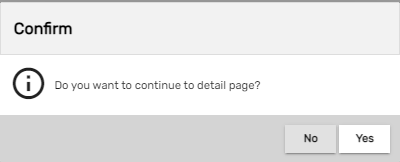
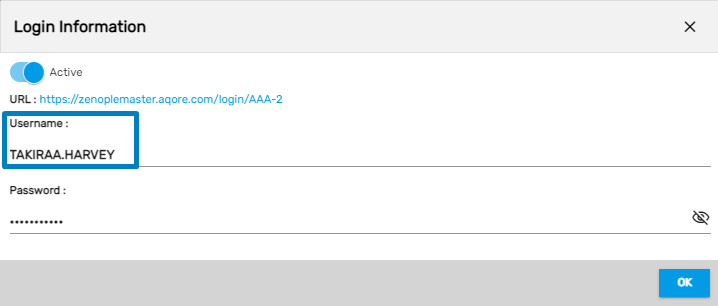
After clicking on 'Yes,' users will be redirected to the Contact Detail Page. Clicking on the Favorite icon, users can check their login info.
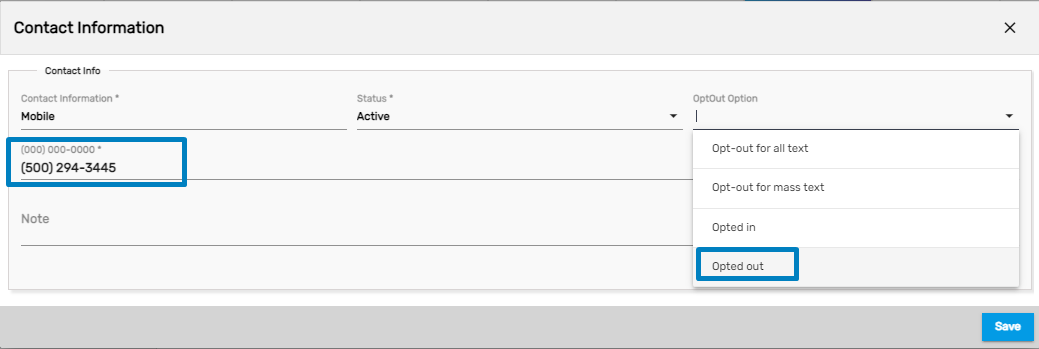
Opt-out the Same Phone Number Added
If the users have added the same phone number as mobile and other phones and they want to stop receiving the message, then they have that option as well. They can opt-out of that number.
If the same contact information is added in other contact information, when one opts out then another will get opted out as well.
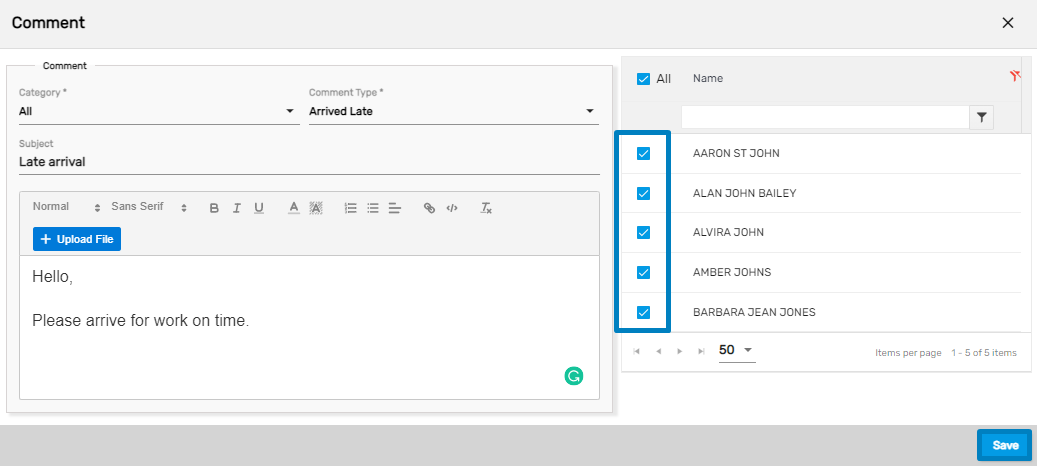
Global Search: Set Multiple Comments
Users can select multiple people and set comments at once searching from Global Search.
- Search a person from Global Search
- Select multiple people and go to the Favorite icon
- Click on Comment action
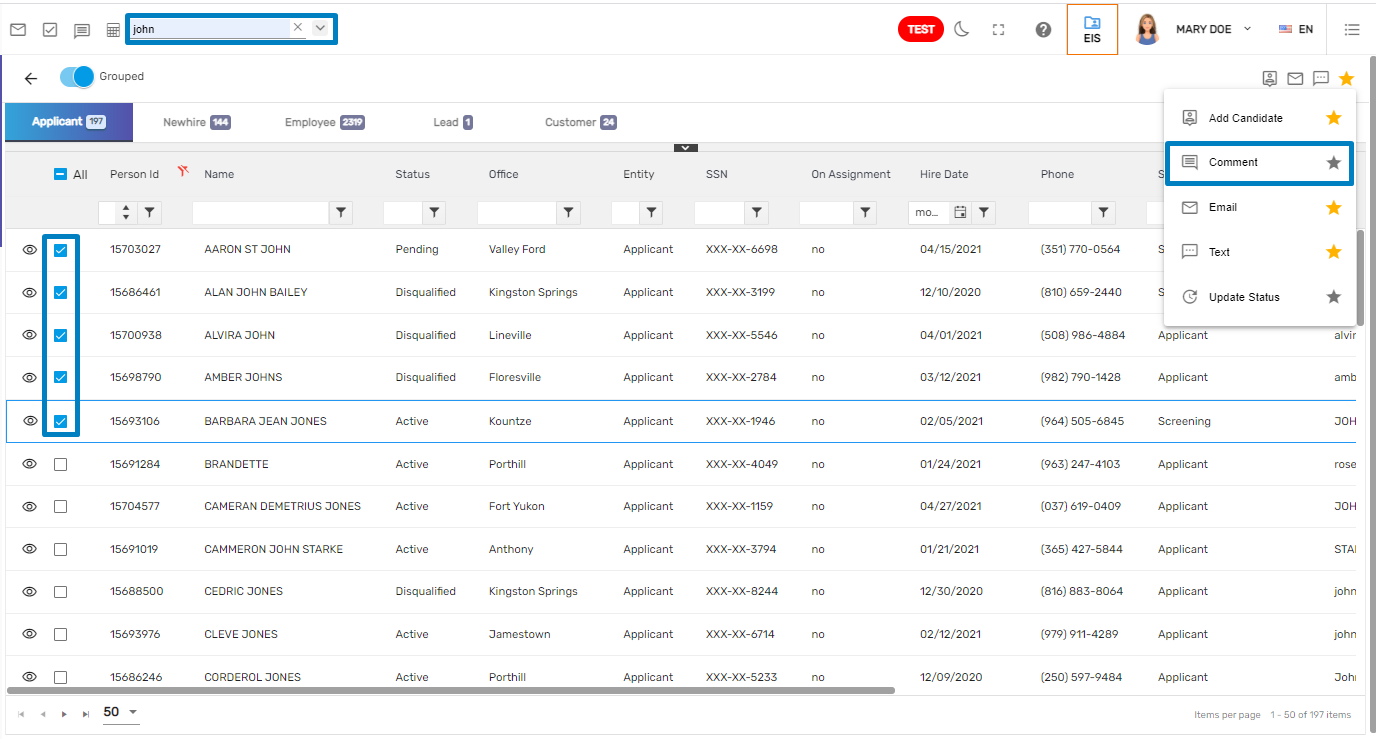
- Set comment and Save.
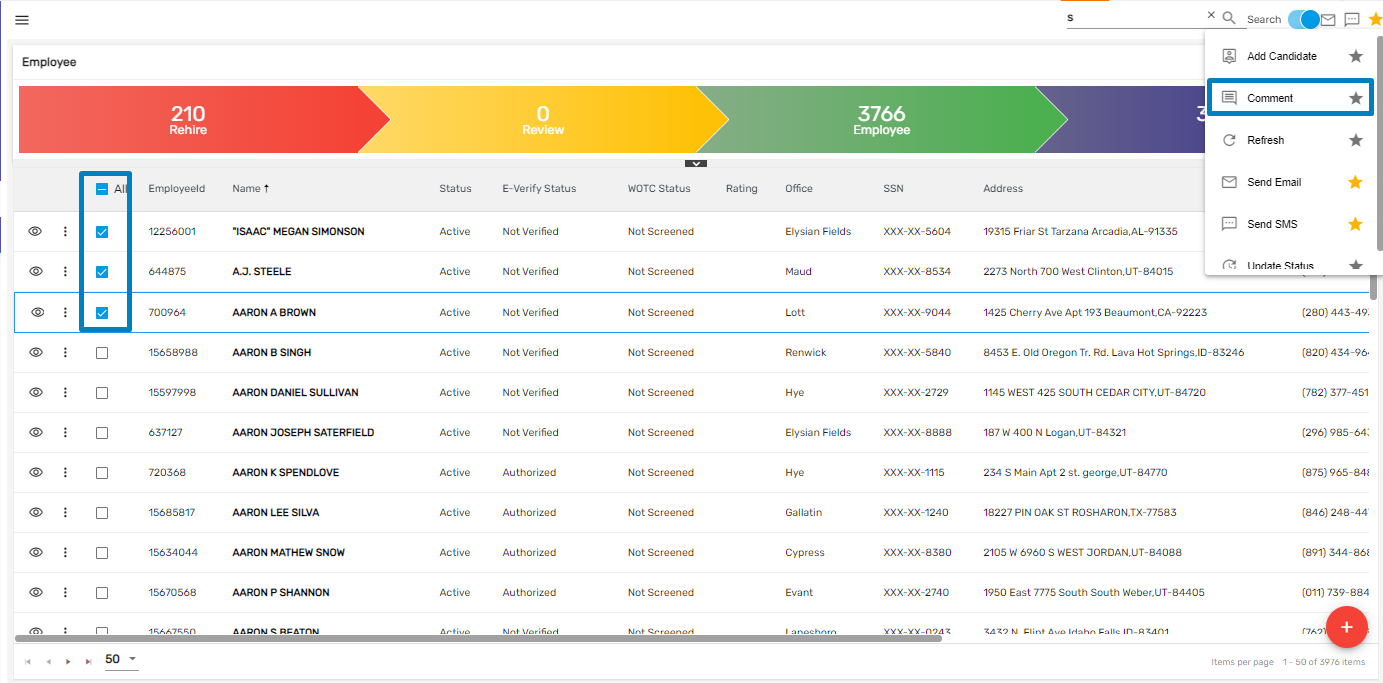
Comment Action Added on a Directory Page Favorite Icon
Users will be able to set comments selecting multiple people from directory pages.
- Select multiple people
- Go to the Favorite icon and click on the Comment
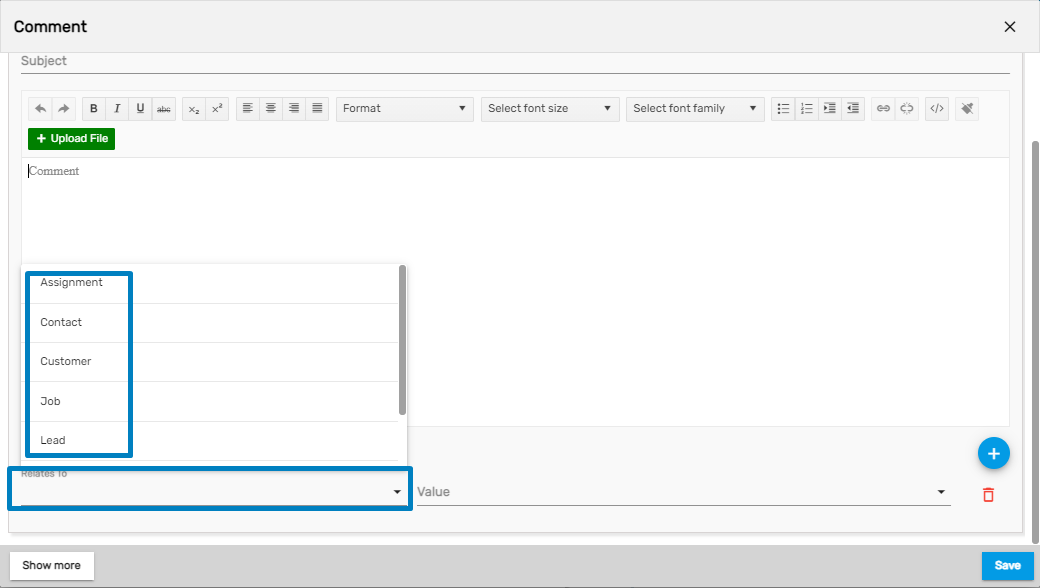
Tagging Entities More Specifically in Comment
Users will be able to see more entities in the 'Relates To' filed while tagging comments such as 'Assignment,' 'Contact,' 'Employee,' 'Job.'
Entity Field Added on the Global Search
Users can see the Entity field dropdown while searching from Global Search. Entity dropdowns include person and organization related searches including 'Applicant,' 'New Hire,' 'Employee,' 'Contact,' 'Lead,' 'Target,' 'New Customer,' 'Customer,' and 'Agency.' Users can multi-select the listed Entity as well.
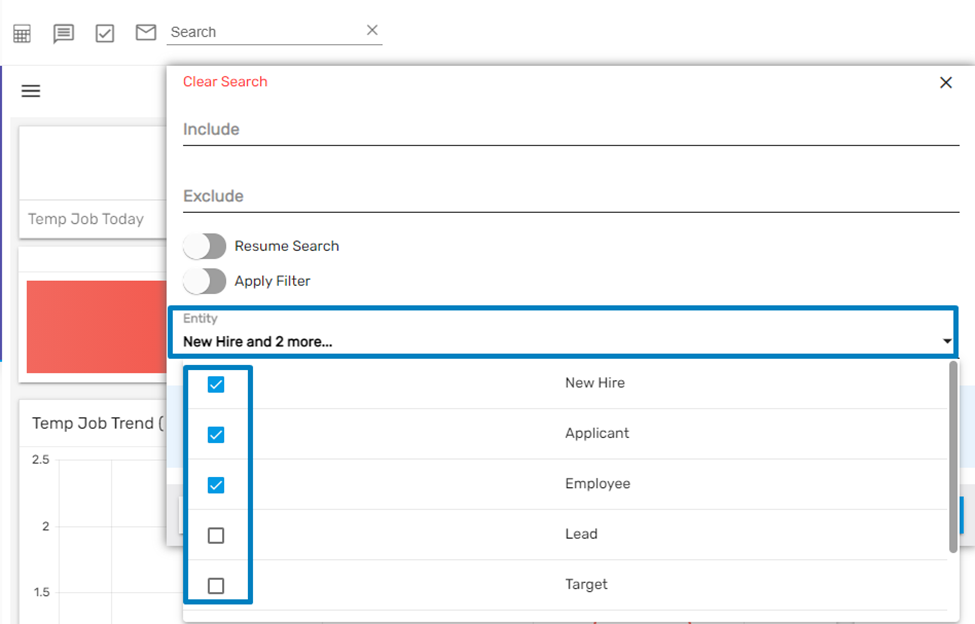
Users will see the search records segregated into different entities if the toggle button of 'Grouped' is turned on.
Actions in the Global Search will be displayed as per the selected Entity Tab.
Users can update the status according to the selected entity.
Navigations under the Favorite Action differ as per the entity selected. Moreover, the navigations under Applicant Entity of person-related searches will be displayed as,
The navigations in the Favorite Action under ‘Lead’ of person-related searches will be displayed as.
Additional Parameters Displayed As Per the Entity Selected
In Global Search, users will see the Additional Parameter according to the selected Entity. If the users select more than one entity then the additional parameters will be displayed likewise.
Improvement: Set Address As Primary by Default
Users will see the Address as Primary by default on Address side navigation under the Contact Info top navigation of Customer Detail.
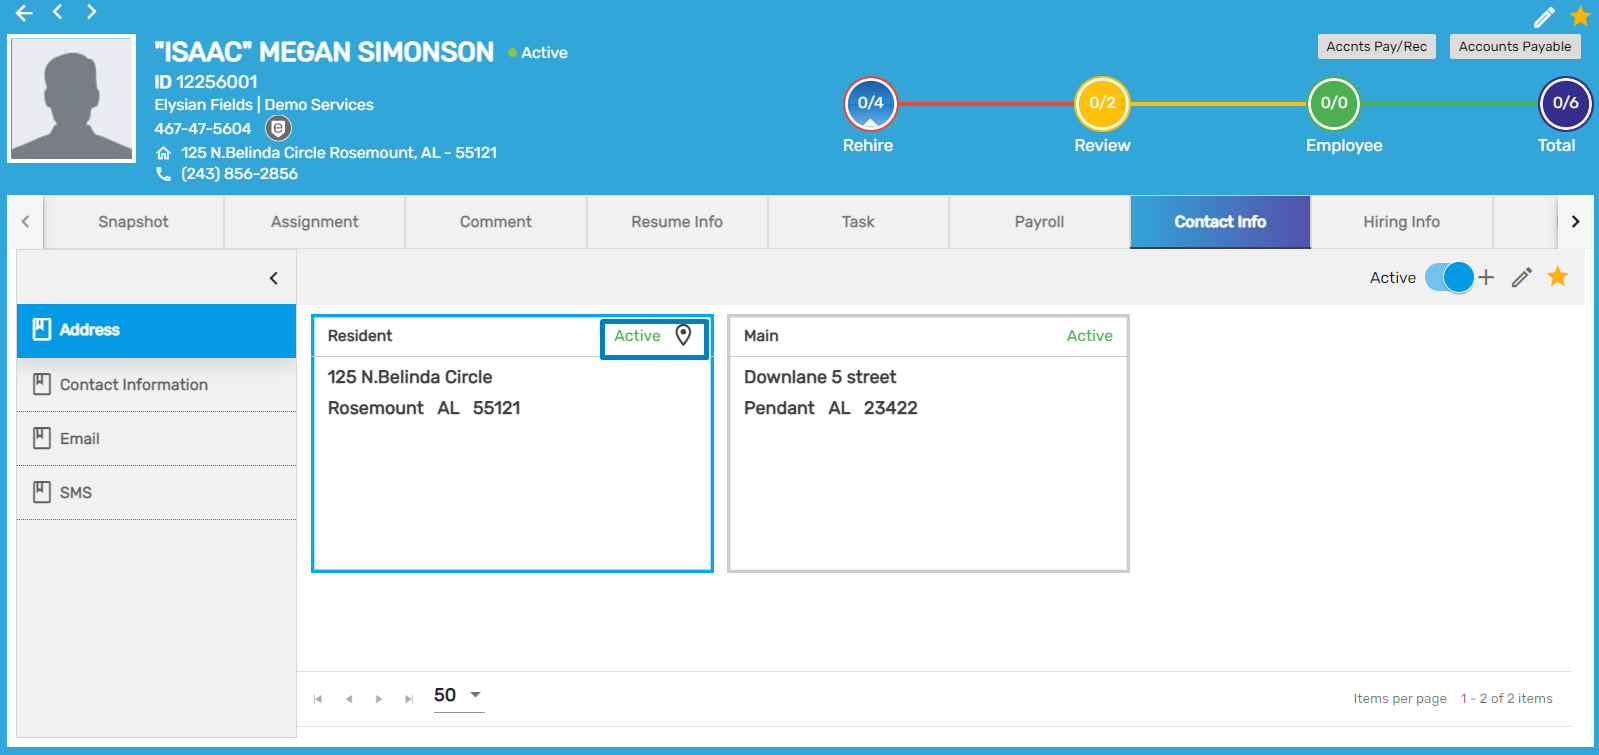
Additionally, the recently updated ‘Active’ address will remain as ‘Primary Address’ in absence of any other primary address, even if it is 'Inactive. ‘
.png )
Improvement: 'I Do Not Have A Mobile.' Option Renamed
‘I do not a have mobile.’ has been renamed as ‘I do not have a phone.' in the registration and contact form.
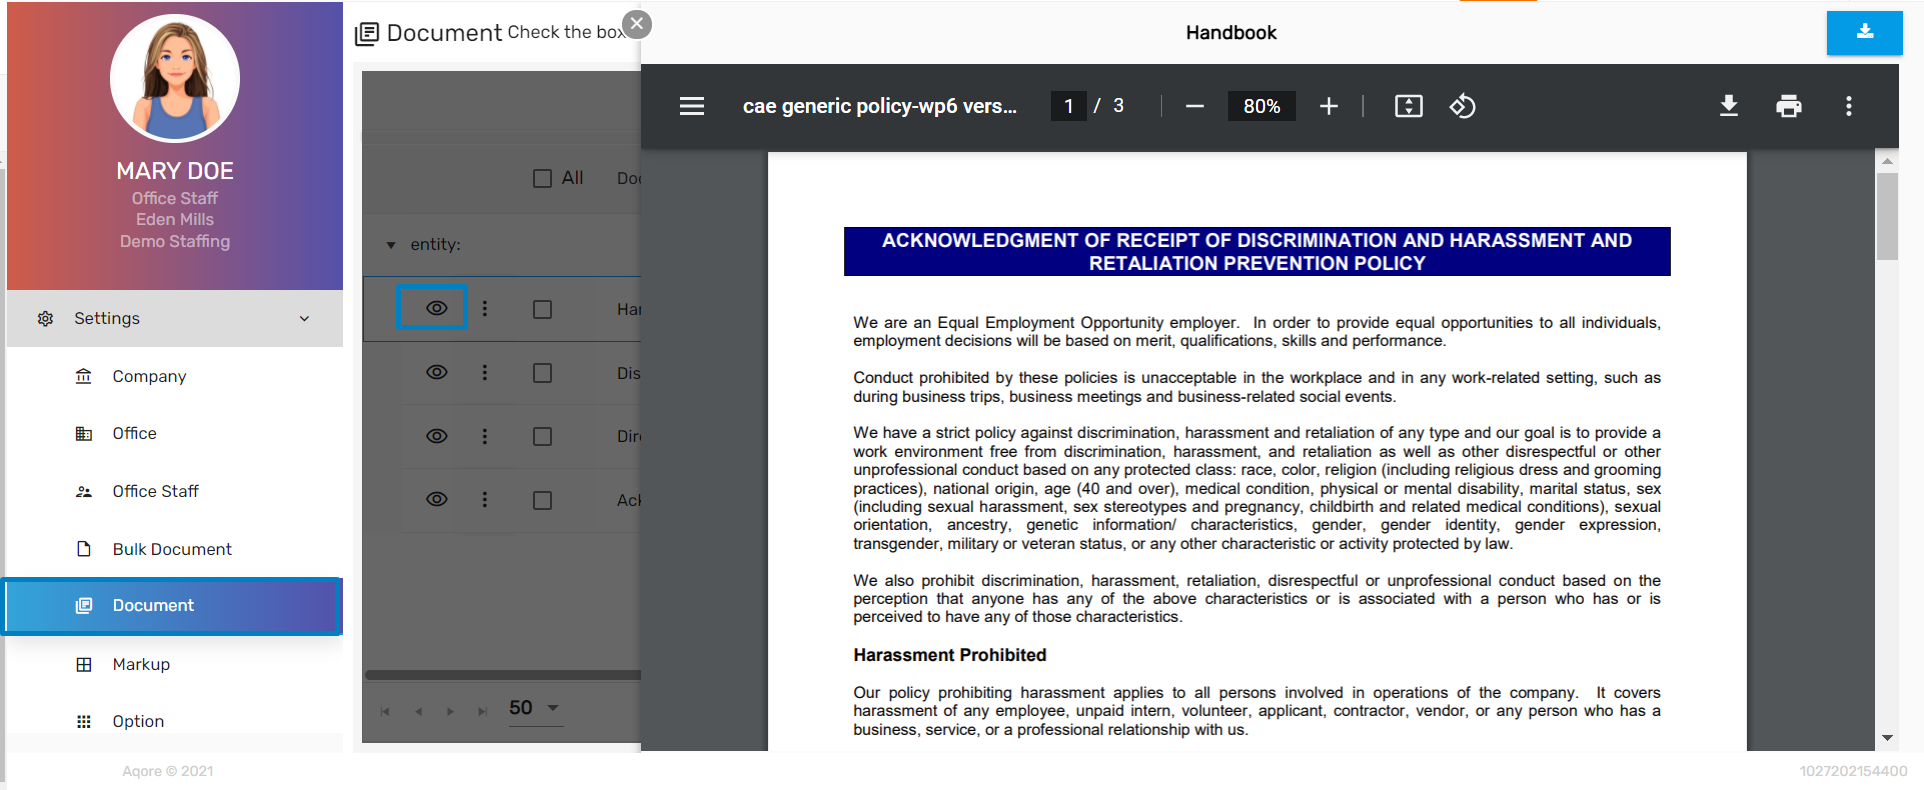
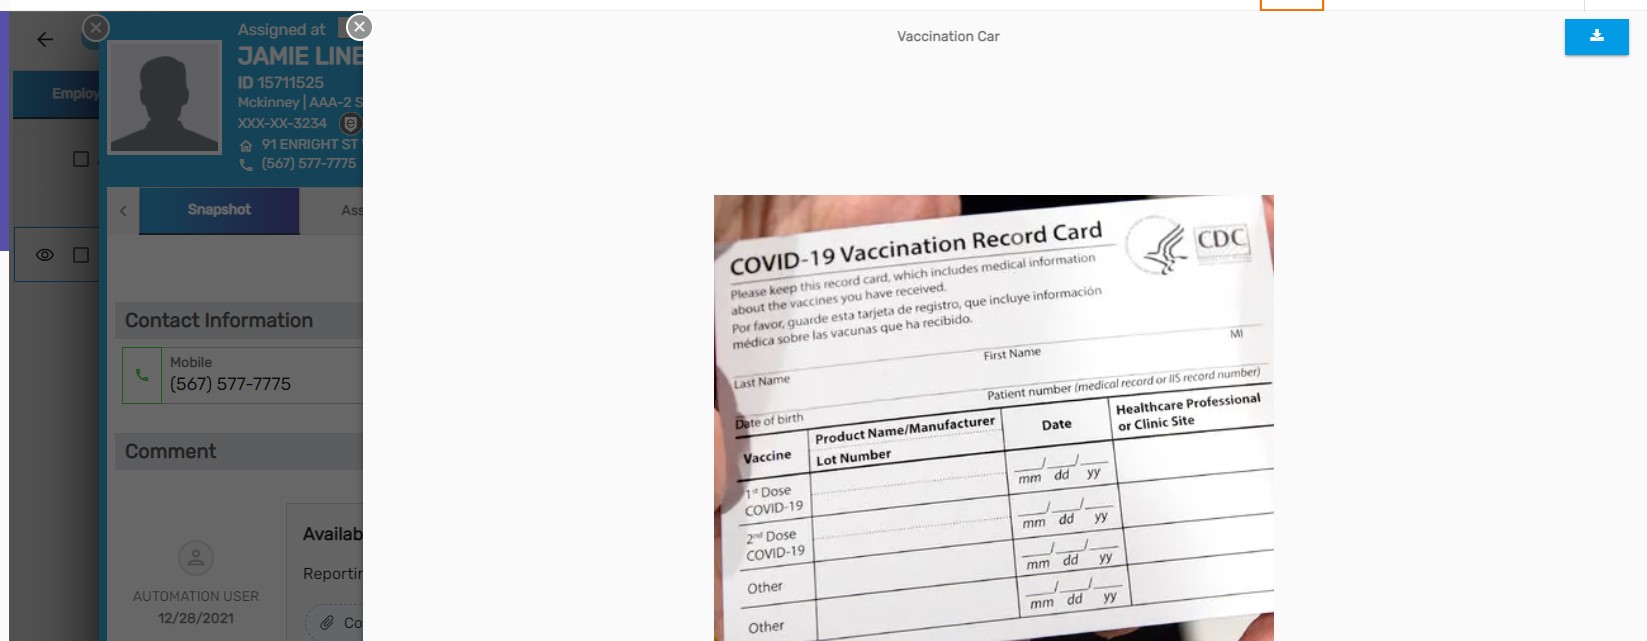
Eye View Added on Document
Users can view the document by clicking on the eye view icon. The document will open in the slider view.
Ext. Number Field Added on Contact Info Main Navigation
Users can see the Ext field while adding/ editing contacts. This has been added on LTS, SPM, NCO, CMS, ATM applications where users can add contact information.
Ext fields have been added on ATM add/ edit agency and APS agency add/ edit form.
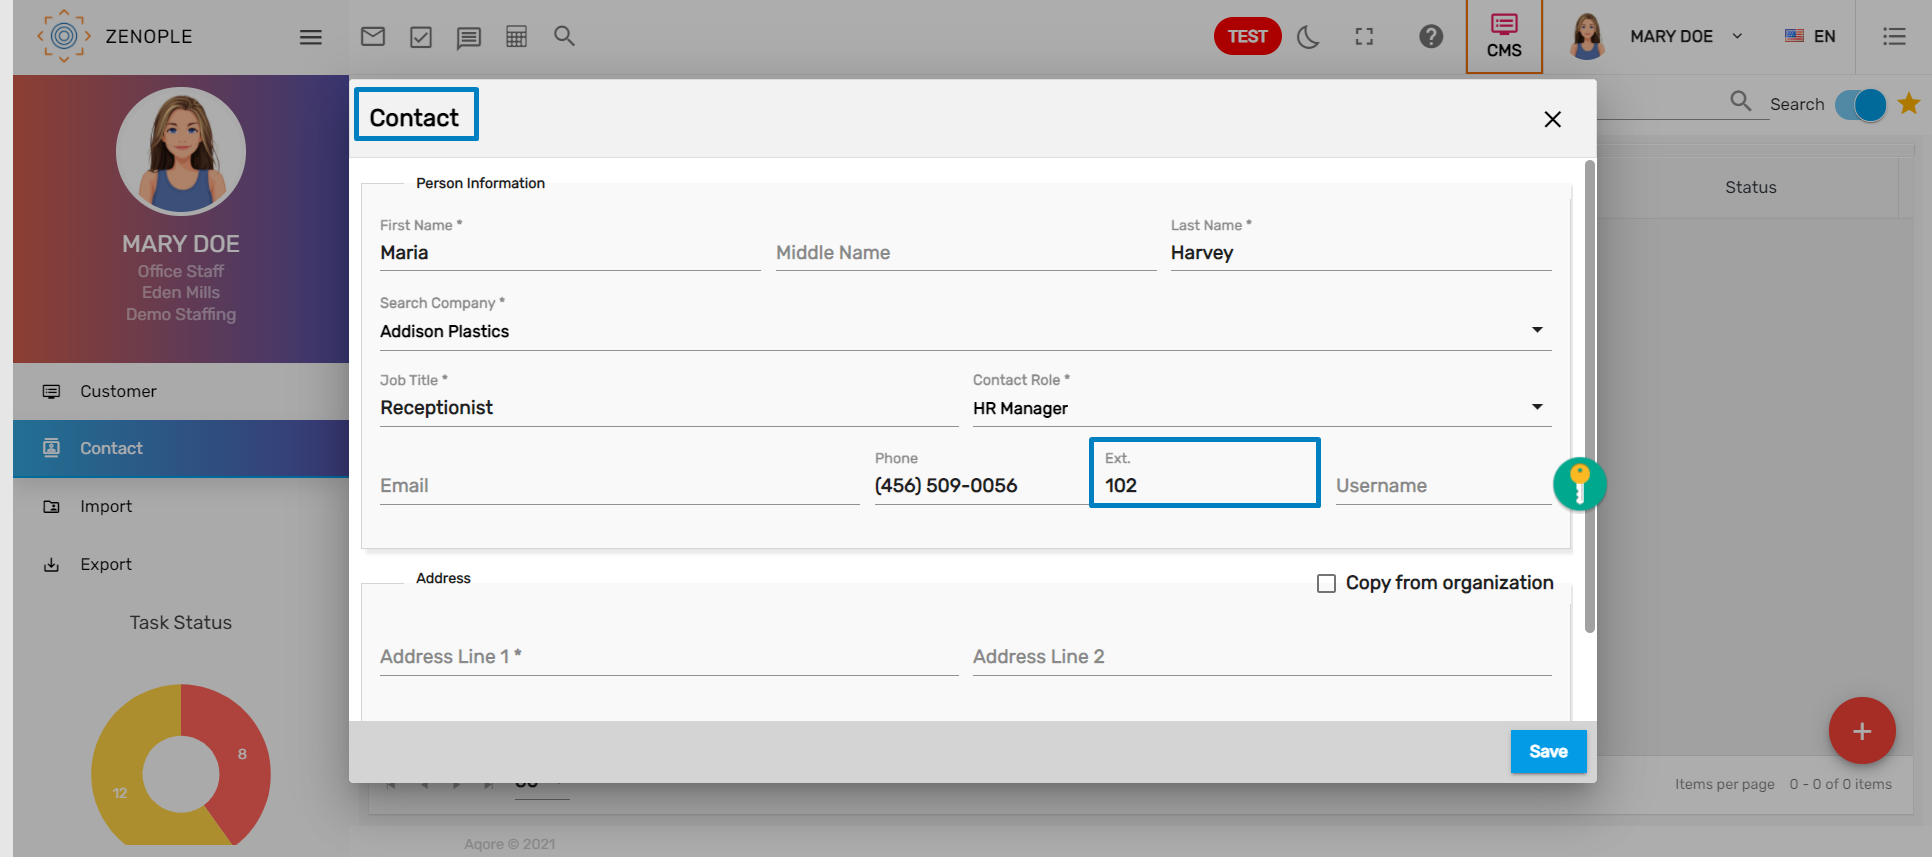
The added extension can be viewed from the application’s detail page.

If the users select Contact Information as phone, billing phone, cell phone, direct office phone, or mobile then the ‘Ext.’ field will get a popup.
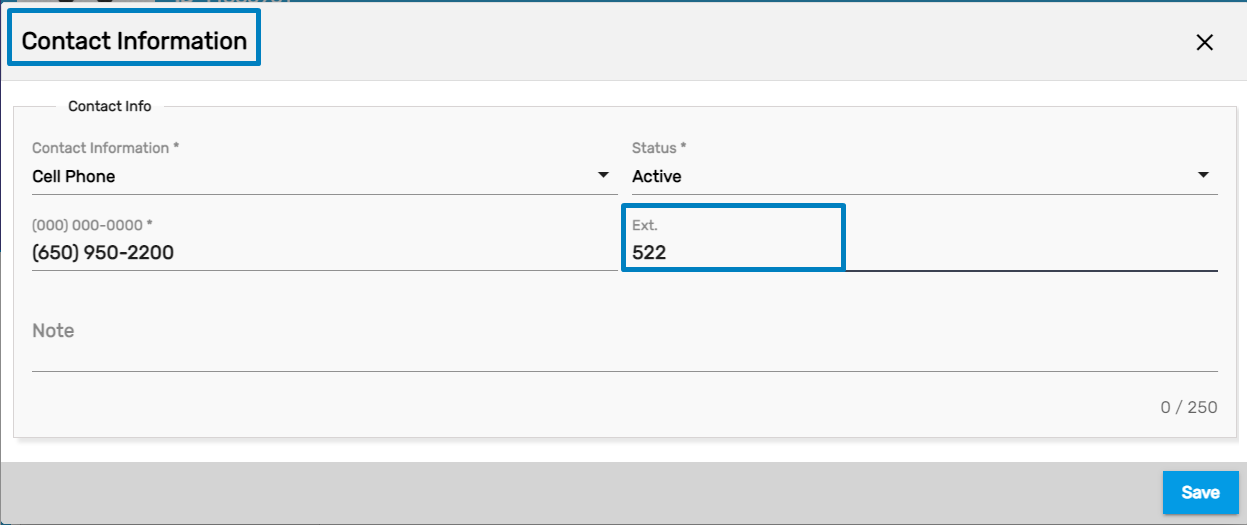
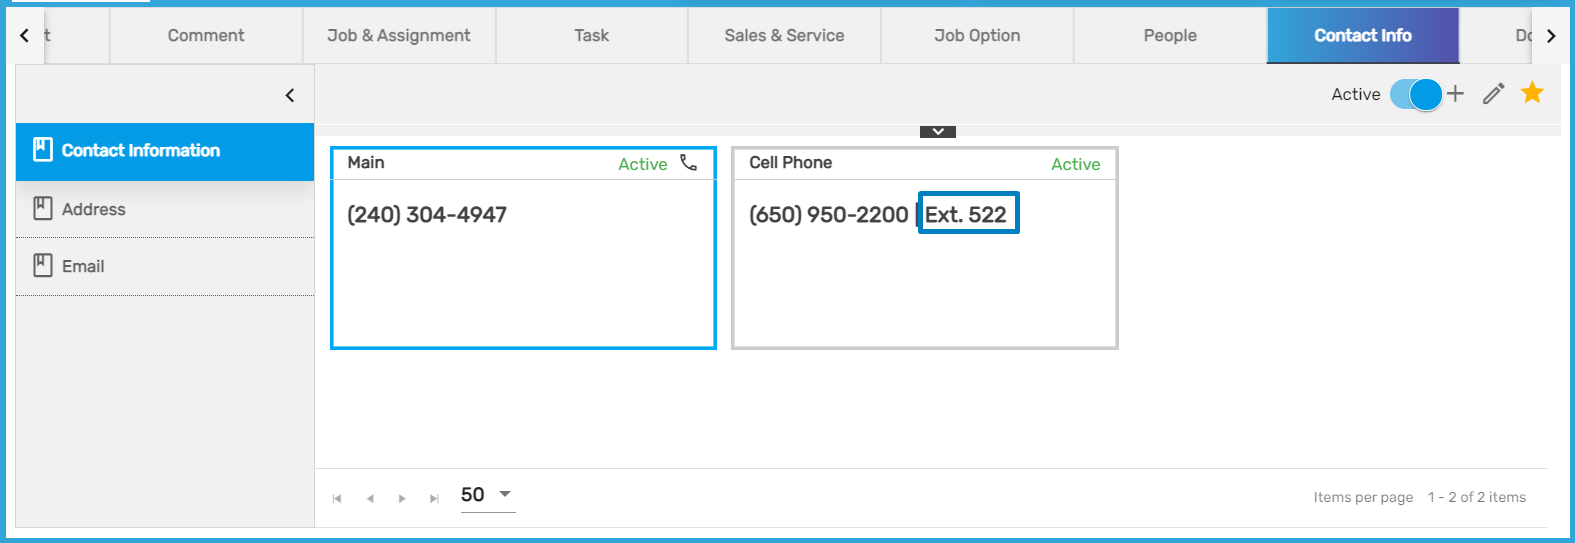
Added Ext. can be viewed as,
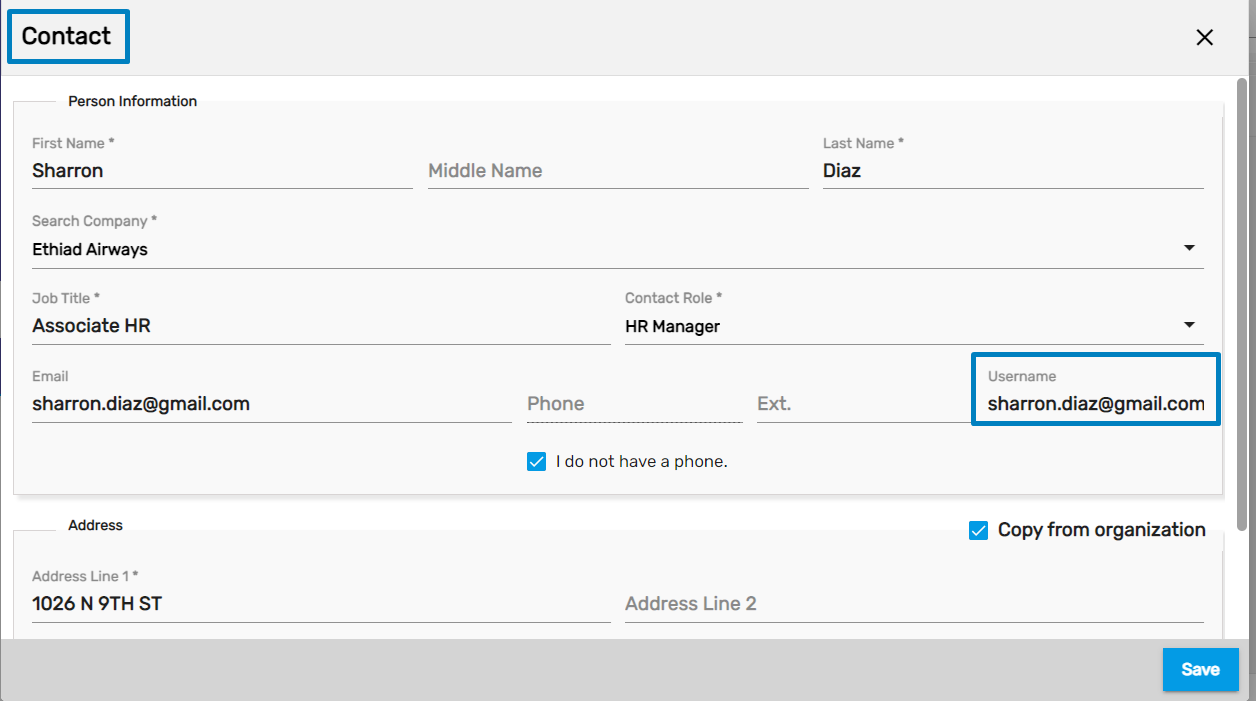
Username Pre-populates While Adding Contact
The username will get pre-populated while adding a contact. There are different cases:
- If a user selects the ‘I do not have a mobile.’ option then the username will be auto-populated as an email address. E.g.: sharron.diaz@gmail.com
- If a user selects the 'I do not have an email.' option then the phone number will be auto-populated as the username. E.g.: 654-324-0076
- Sometimes similar contact can be used by different users so the phone numbers will be displayed along with the contact’s first name and last name.
- If a user has entered neither email id nor phone number then the username will be displayed as the contact’s first name, last name, and today's date. E.g.: Sharrondiaz1201
Note: Users can update the username after it gets pre-populated.
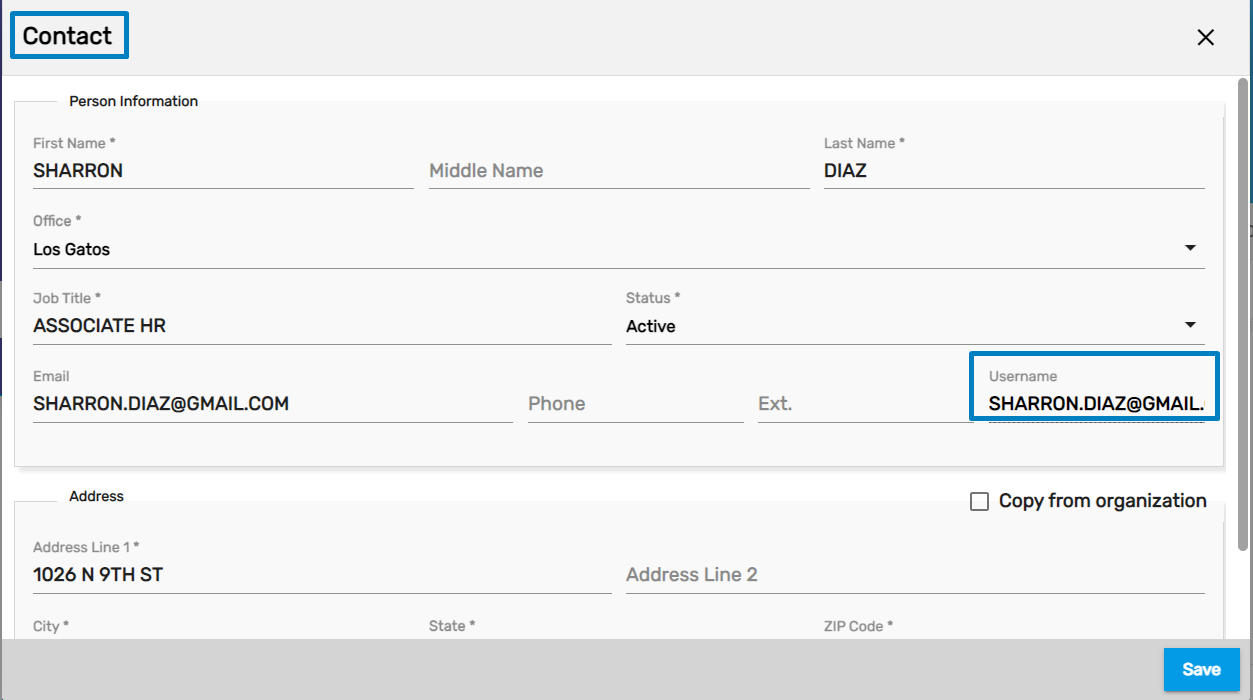
Username Prepopulates While Editing Contact
Users can view the username field while editing a Contact but the username cannot be edited.
Improvement: Display Blank Instead of N/A in Directory Column
Previously, when there was no value in the column, it used to display N/A. Now, users can view blank columns if there is no data.
Note: This is applied in all of the directories where there is no record.
Improvement: Managing Sequence of Directory Columns
Users can view columns in proper order which is associated with each other by default.
Scroll Button Added on Snapshot Navigation Grids
Users can scroll the components of the Snapshot list which contain more than 5 Comments, Contact Info, Assignments, etc. They can scroll the list without going on each navigation.
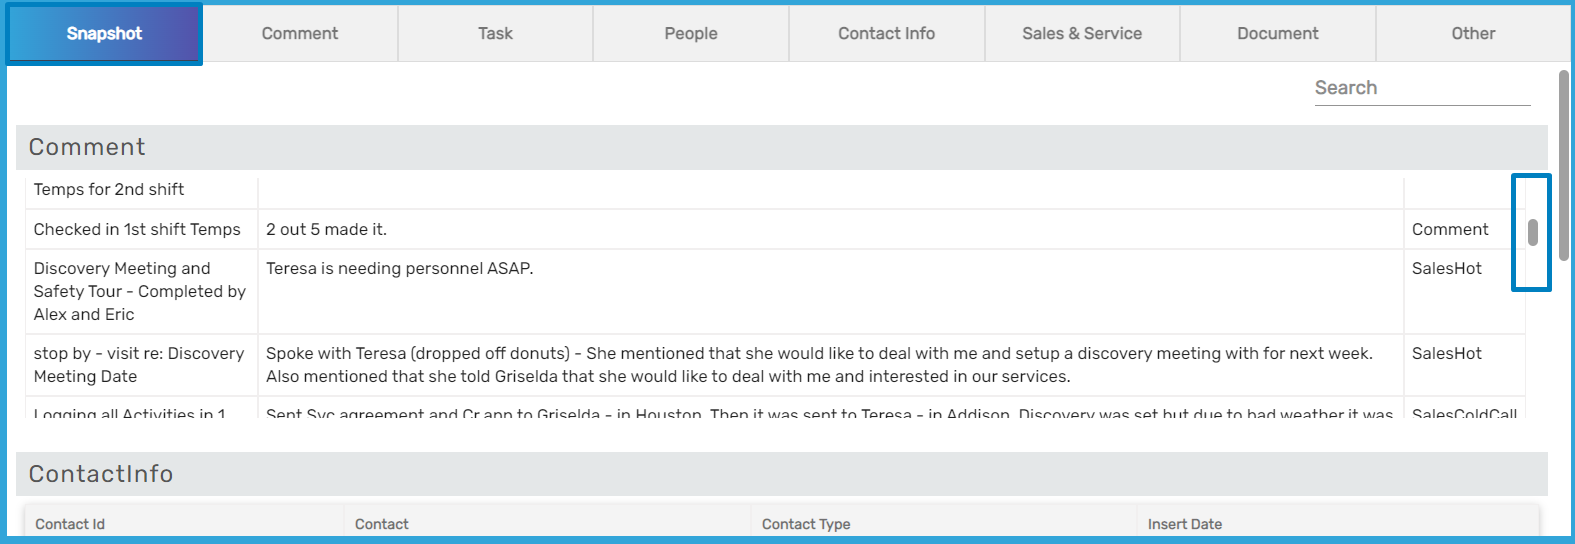
Snapshot View Improved
Various changes have been introduced in Snapshot view. Now, users can see comments in card view including Comment by, Comment Date, Comment Type, and Comment. The attached document will be seen on the slider view by clicking on it.
Additionally, the headers without content will not be seen in the Snapshot top navigation.

The uploaded attachment will be displayed as,
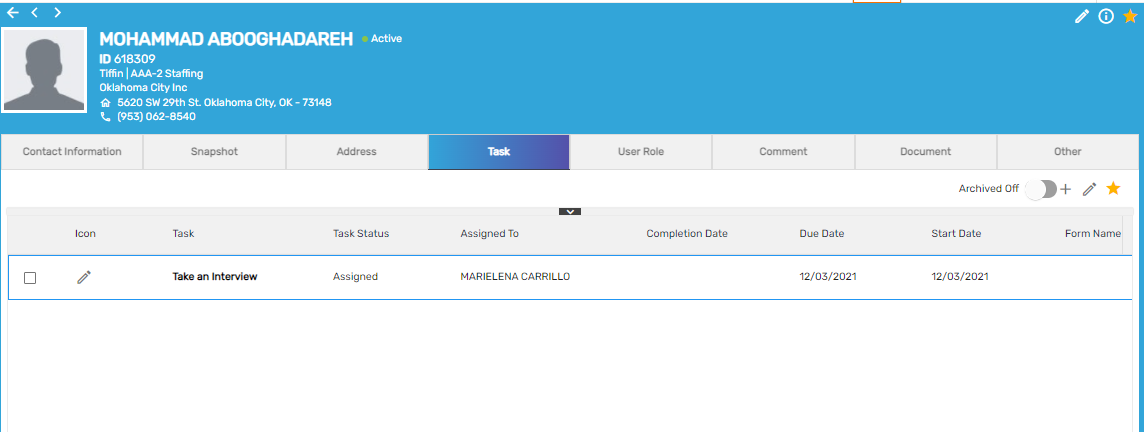
Task Navigation Added on Contact Portal
Contact Portal now includes Task navigation. Any generic tasks assigned to a Contact, whether via the Contact's Task navigation or while adding a Comment or Assigned from Customer’s Task navigation, will be seen in this navigation.
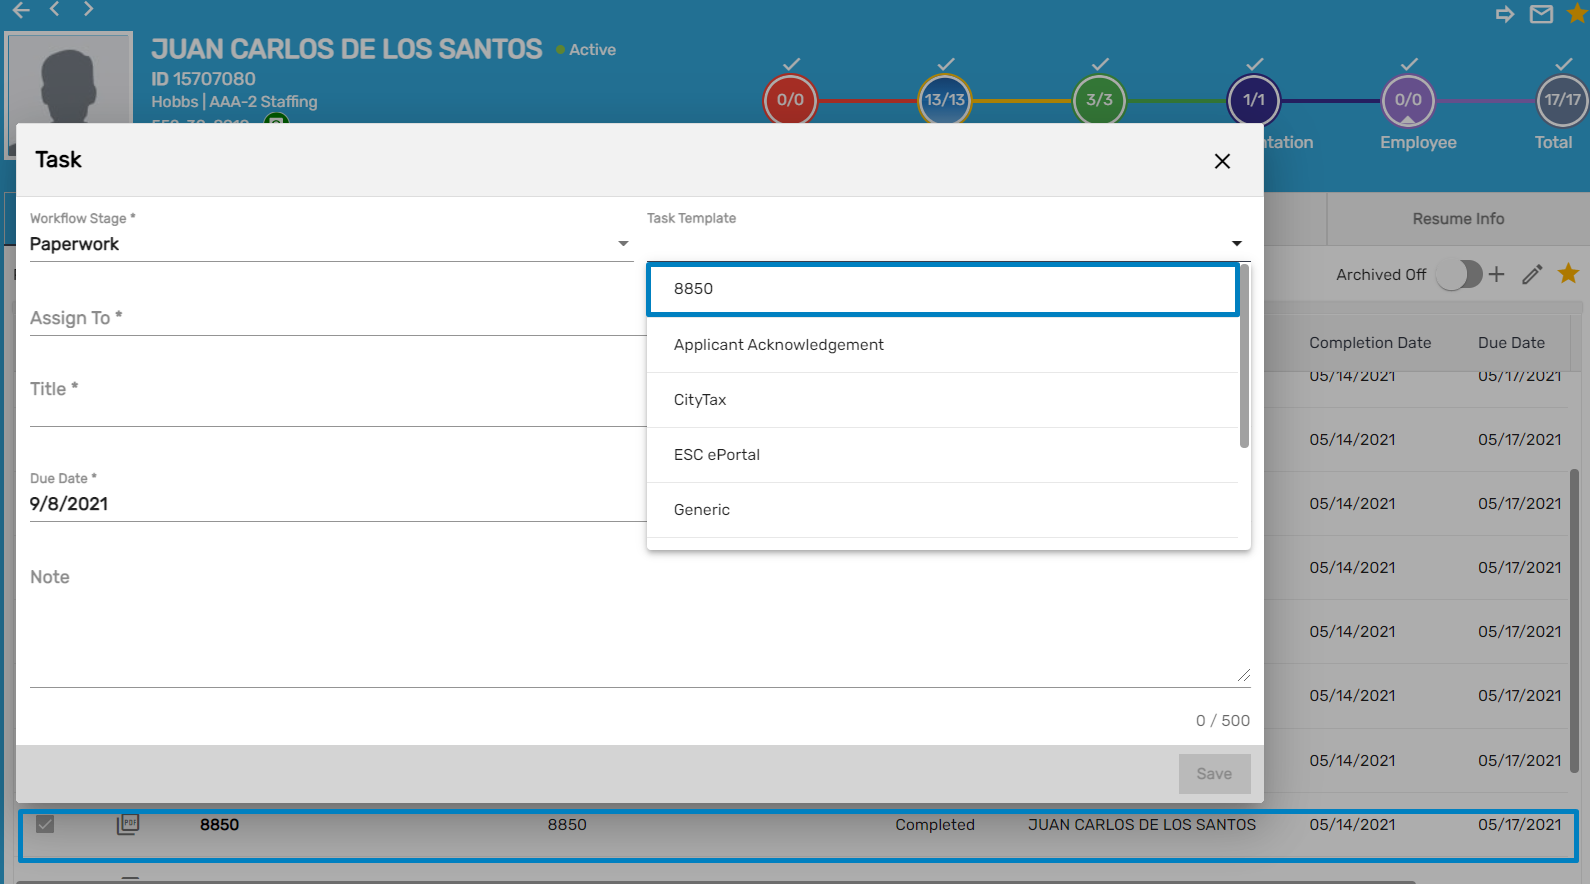
Click on the 'Add' icon under Favorite Action of the Task top navigation of the Contact Detail to add a task.
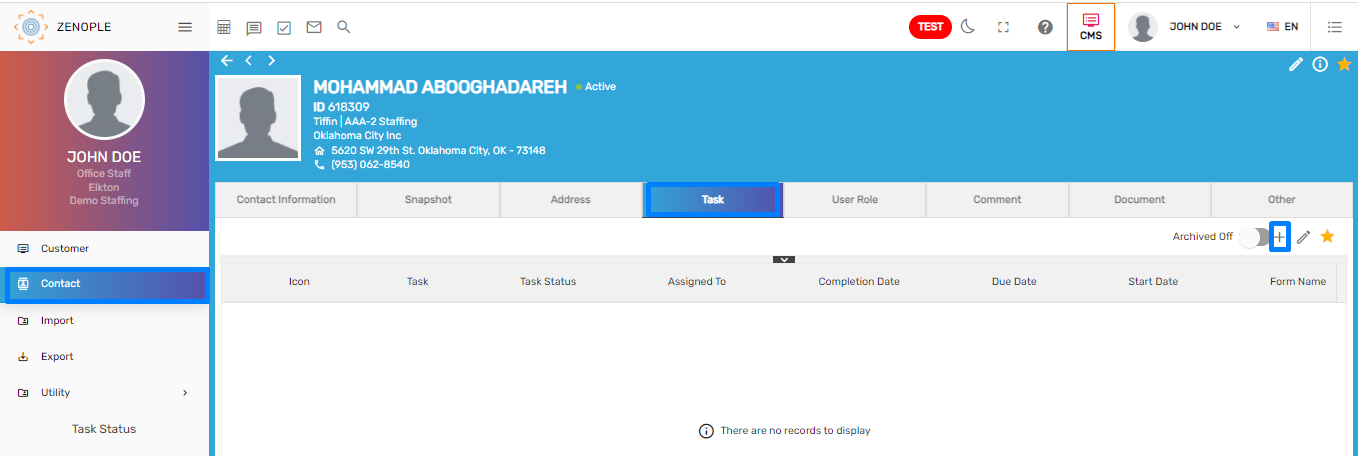
Task dialog box will be displayed as,
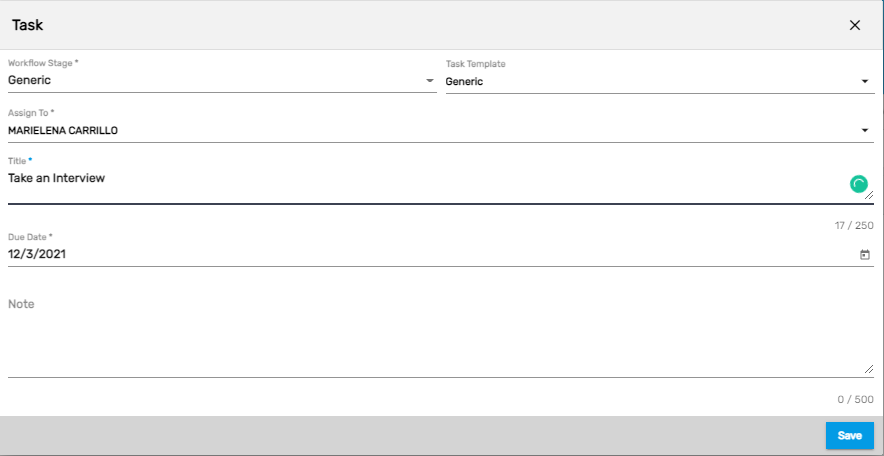
The added task will be displayed as,
When logged in as a Contact, the user will see the ‘I read and I agree.’ checkbox on the assigned task. Hence, the task can be submitted similar to other tasks.
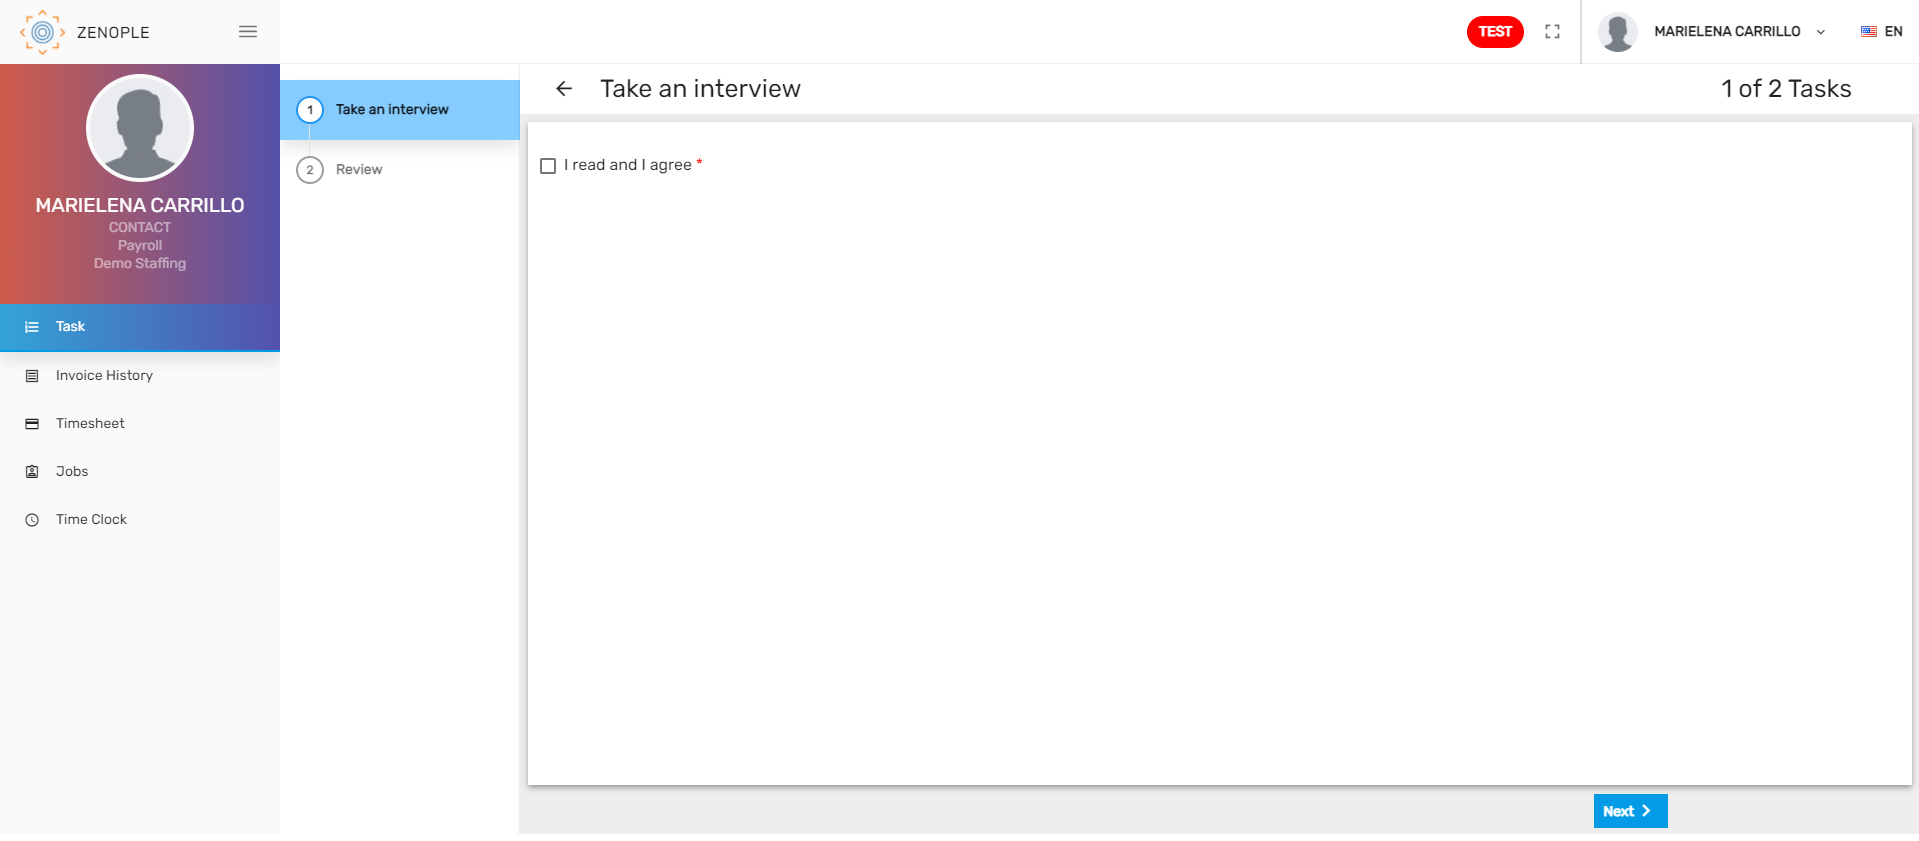
If no tasks are assigned to the Contact, the message ‘You do not have an assigned task.’ will be displayed.
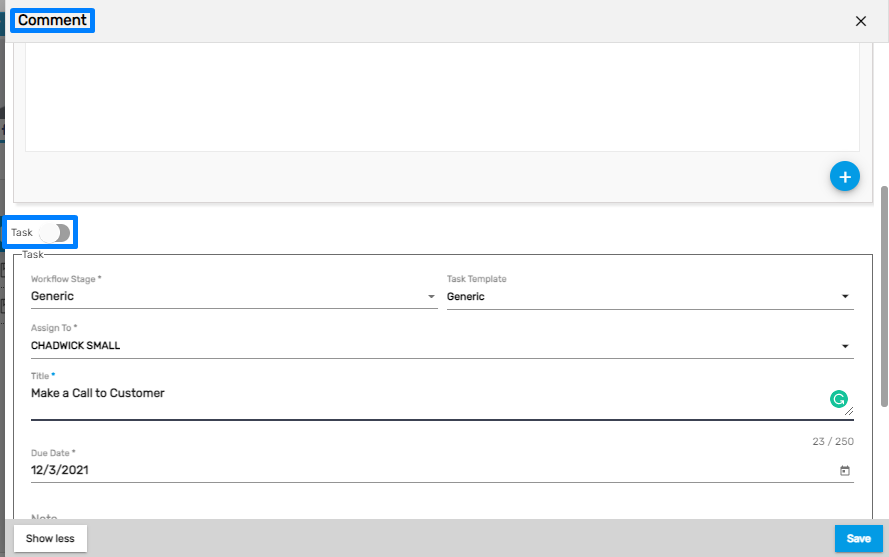
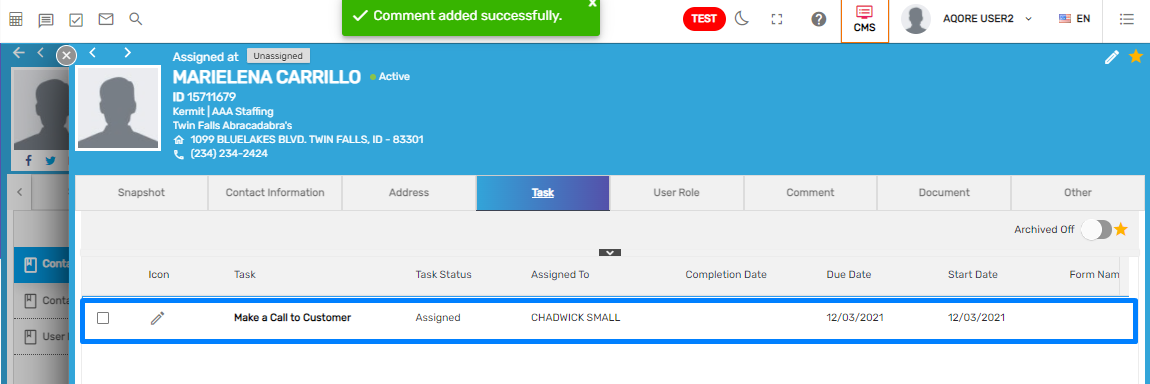
Added A Task in Contact Under Comment Navigation
Users can now assign a task to Contact while adding a comment, the added task will be shown in the Contact’s Task top navigation. Moreover, the Task assigned to a Contact can be completed from Task main navigation of the Contact Portal.
Improvement: Large Text Allowed in the Comment
Large texts of more than 1000 to 2000 words can now be entered in the comment section.
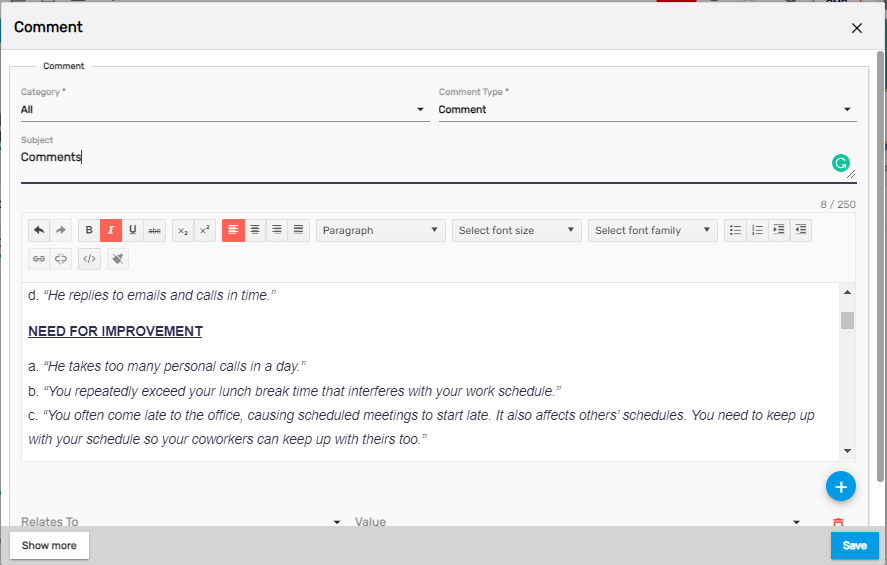
Users can add a comment even with a large image using the upload file option.
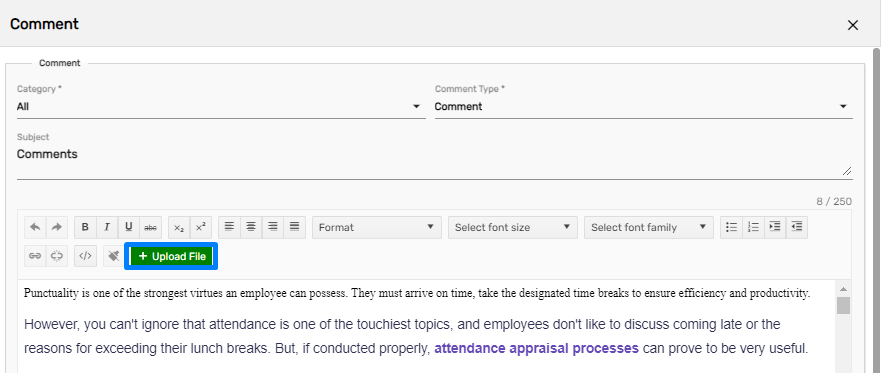
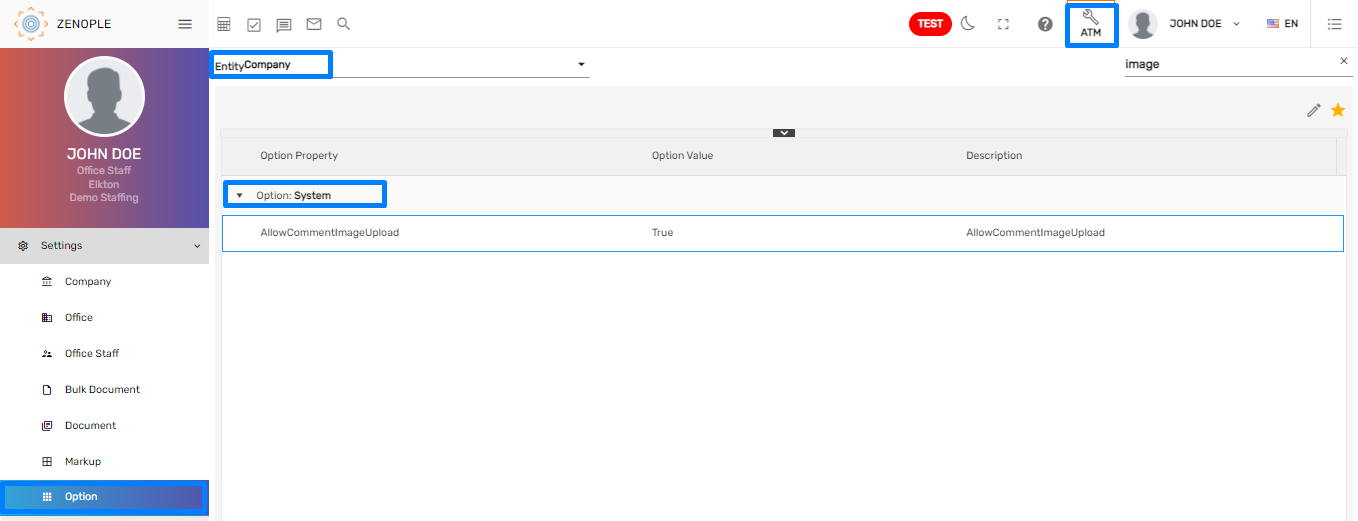
The ‘Upload File’ option will be controlled by Option property and can be set up at the organization level. Access can be given from the ATM application.
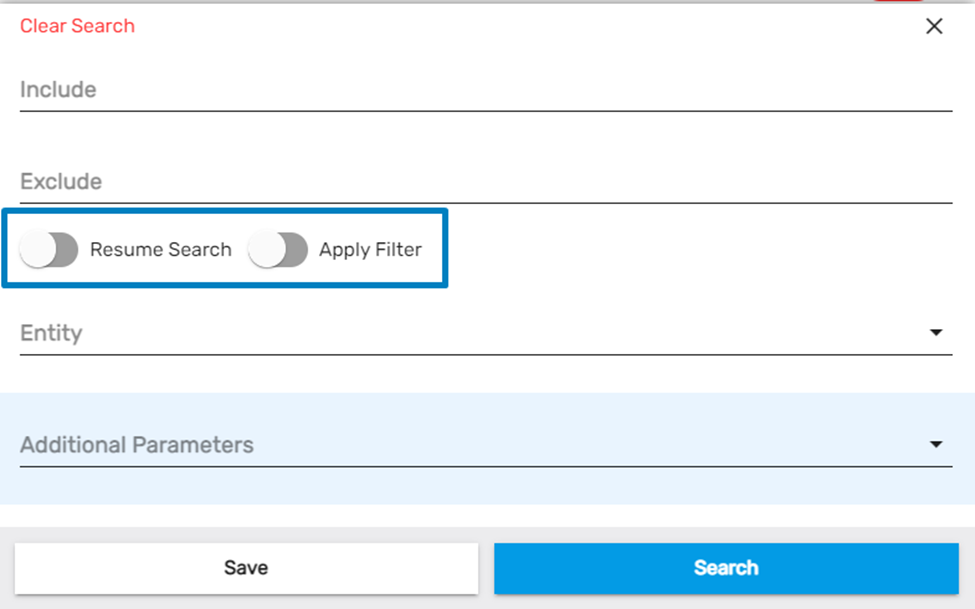
Global Search: Apply Filter Added
Users will be able to apply filters based on the toggle button in the Global Search. If the users select toggle on 'Apply Filter,’ then the information will be displayed as per the filter applied on the directory page.
For example: If the users select ‘Active’ status on the directory filter, then only active employee, new hire, or applicant will be shown in the Global Search.
Common Features in ATS/NHO/EIS/LTS/SPM/NCO/CMS
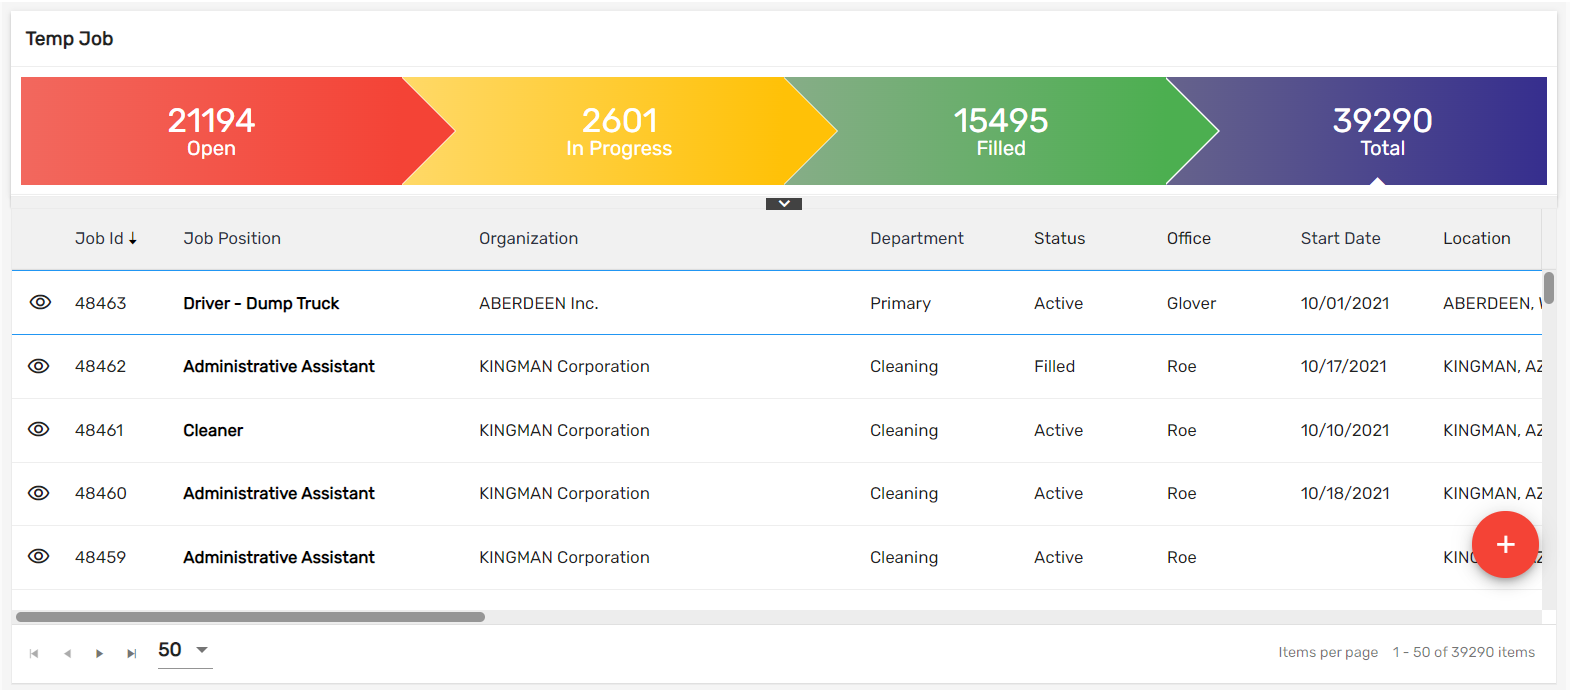
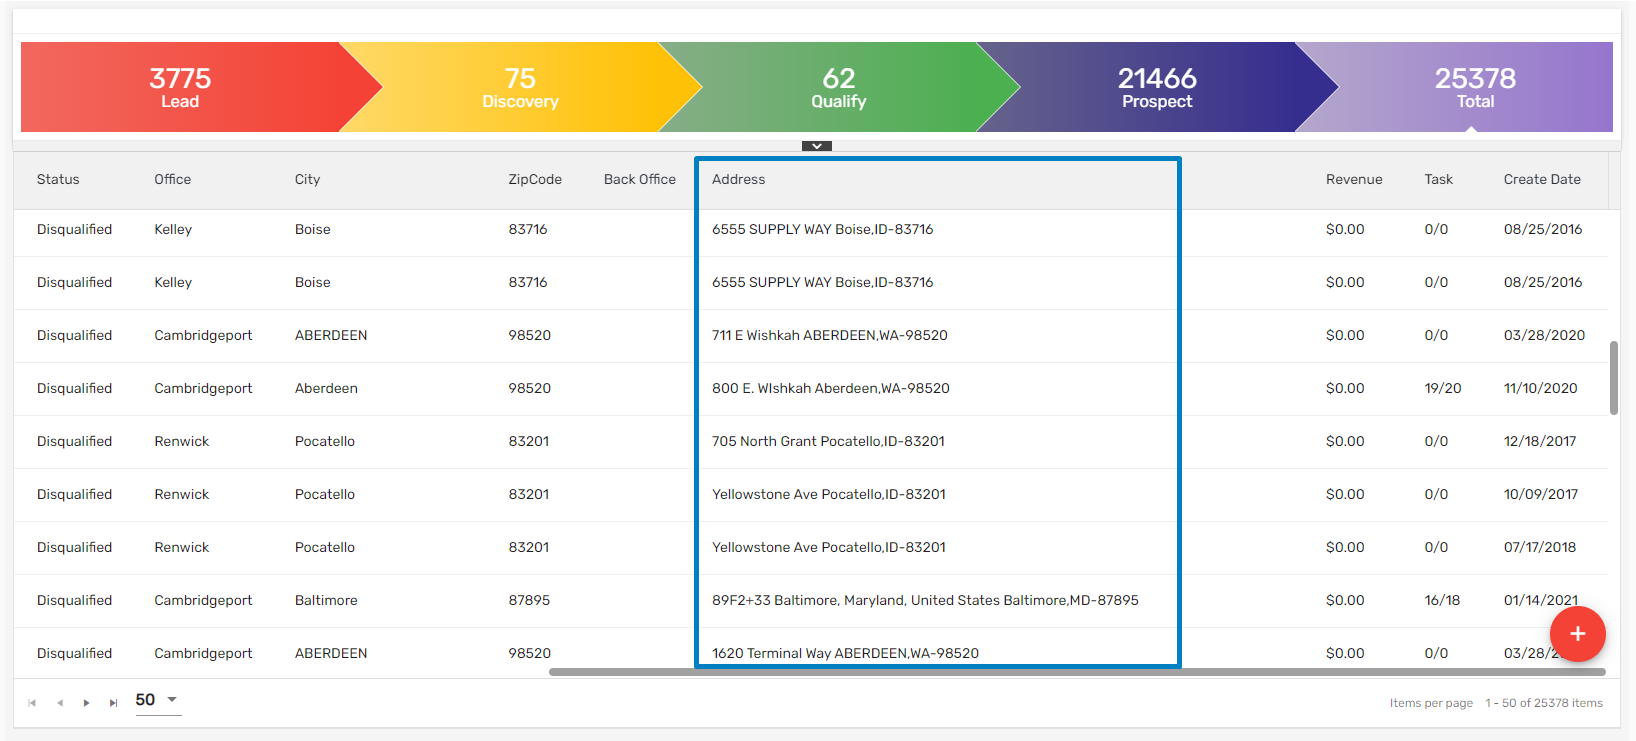
Address Column Added on LTS, SPM, CMS, NCO Directory Page
Users can view the added Address column on the Directory Pages of LTS, SPM, CMS, and NCO.
Common Features in ATS/NHO/EIS
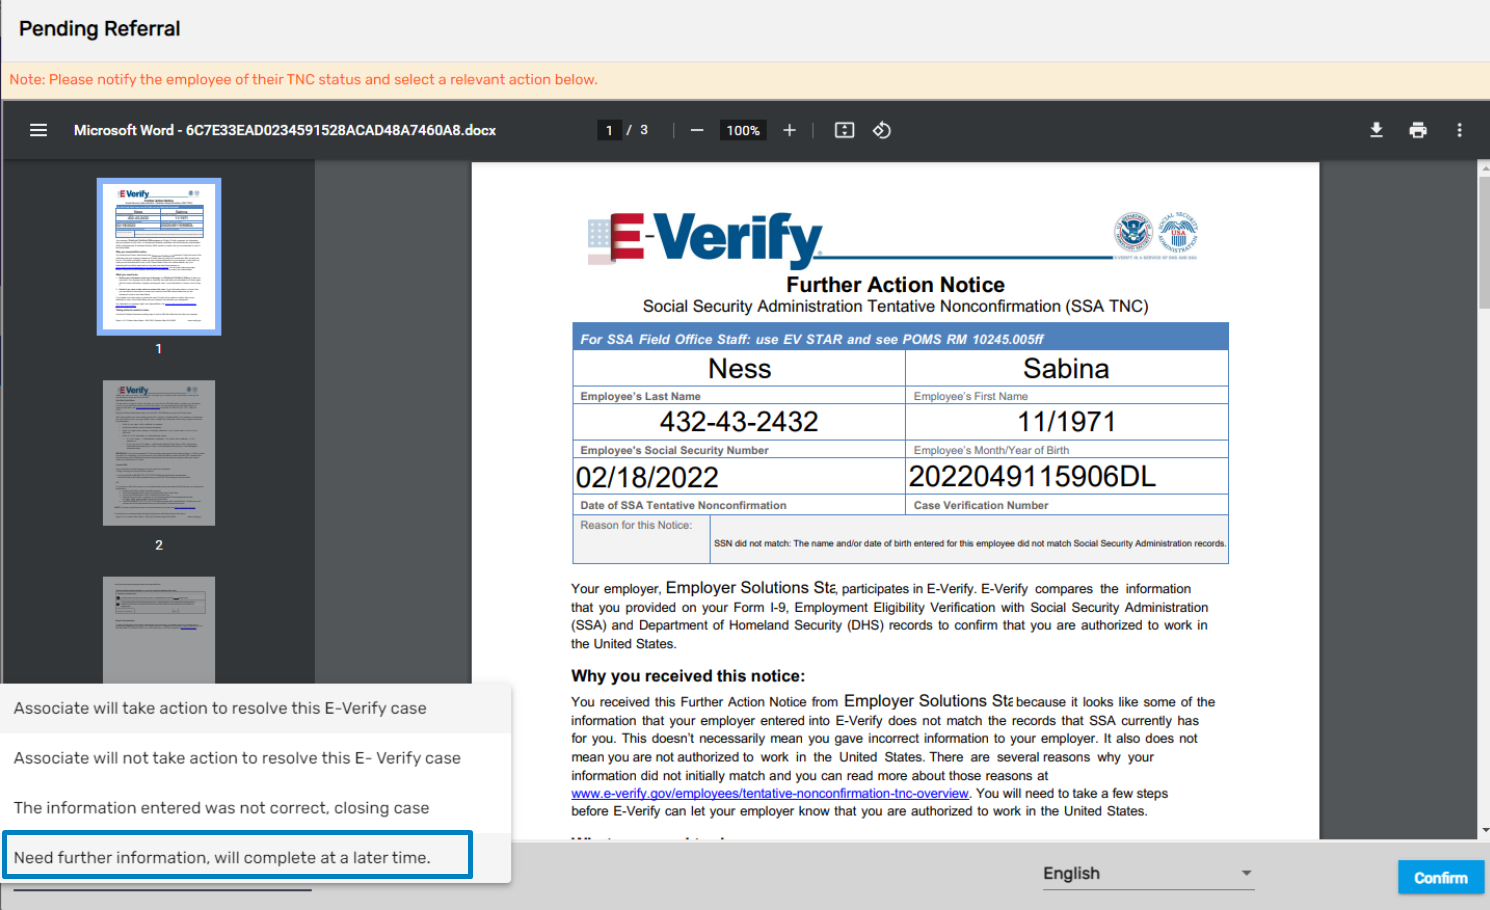
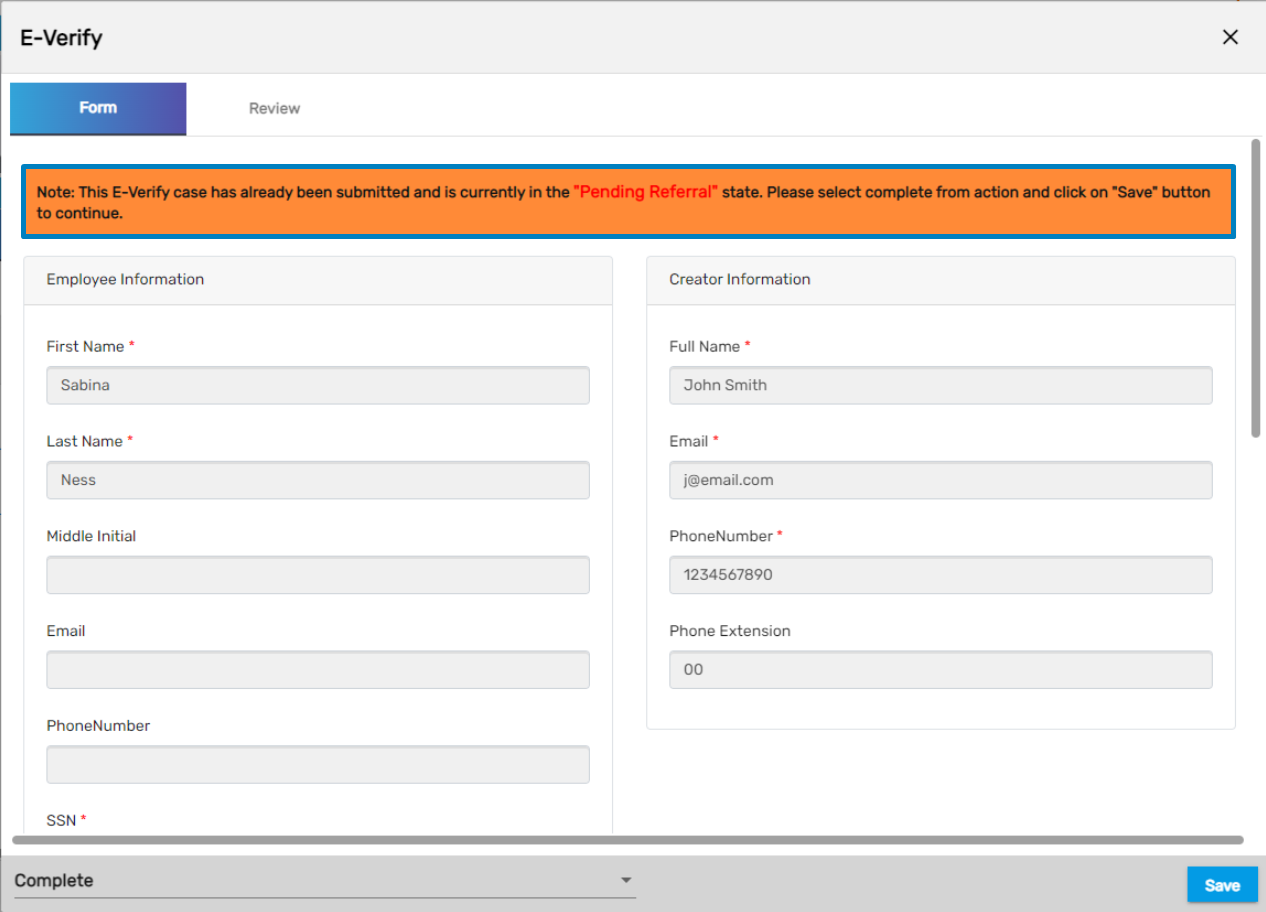
Improvement: E-Verify Status
When the E-Verify status is on the 'Pending Referral' or ' Photo Match' stage they could see the close action in the E-Verify dialog box which has been updated and added on the action dropdown list in order to remove confusion in users.
As the users confirm the action , they will see a confirmation dialog box as:

After confirmation, users can view the note as:
Also, action verbiage has been updated.
- Refer case change to: Associate will take action to resolve this E-Verify case
- No action change to: Associate will not take action to resolve this E- Verify case
- Close case to: The information entered was not correct, closing case
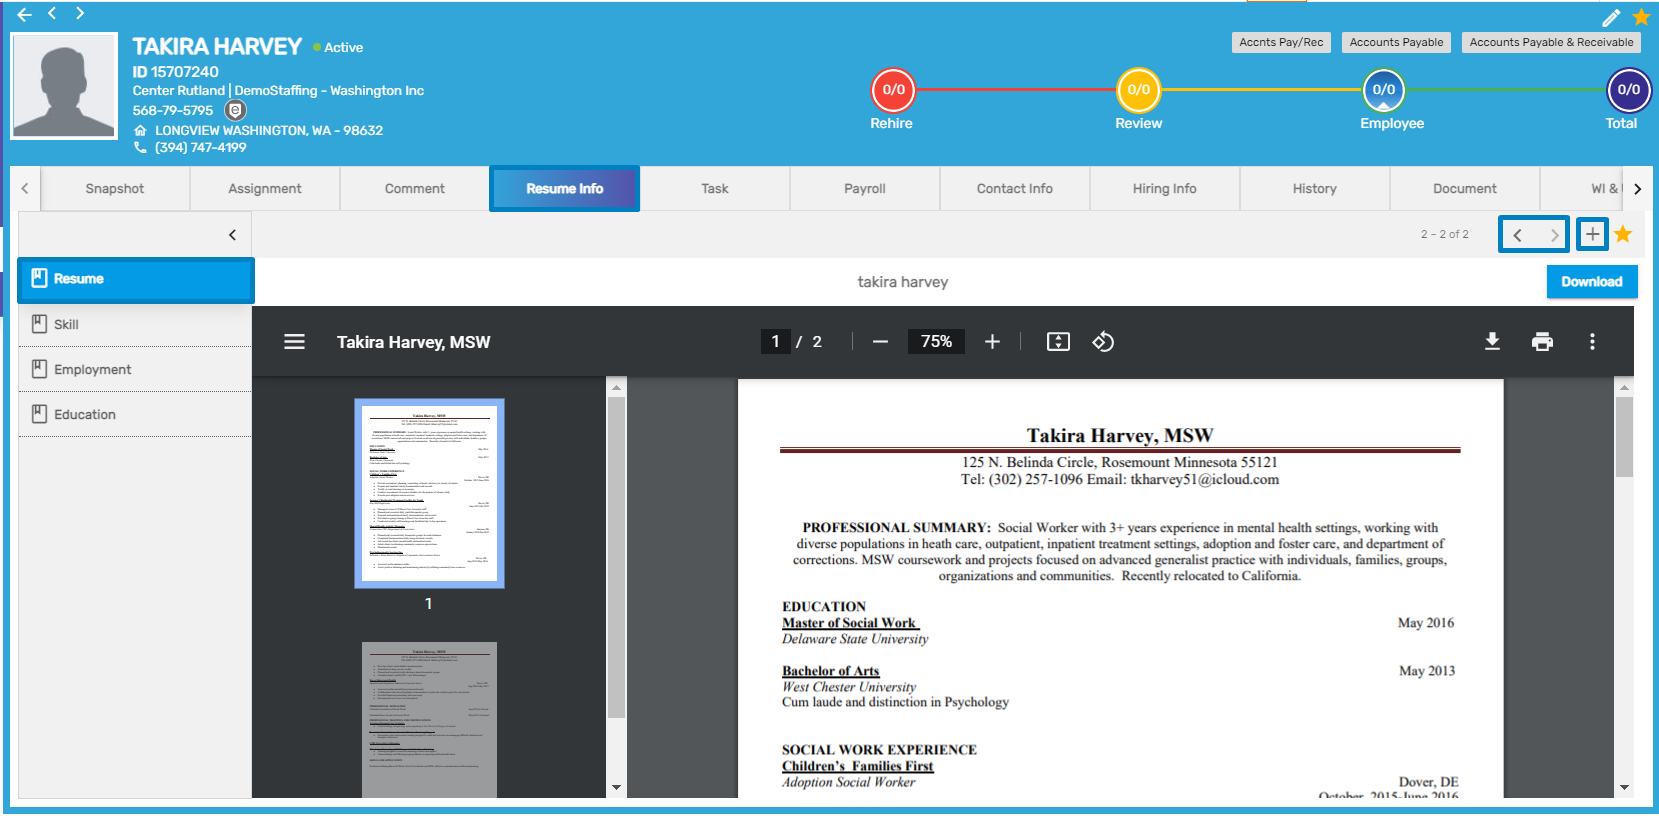
Improvement: Uploading Multiple Resumes
Users will be able to upload multiple resumes at a time. Users can download and view the uploaded resume as well.
- Go to Resume Info top navigation
- Click on the Resume side navigation
- Click on the ‘Add’ icon and upload the Resume
- Click on the Next or Previous icon to view the uploaded Resume
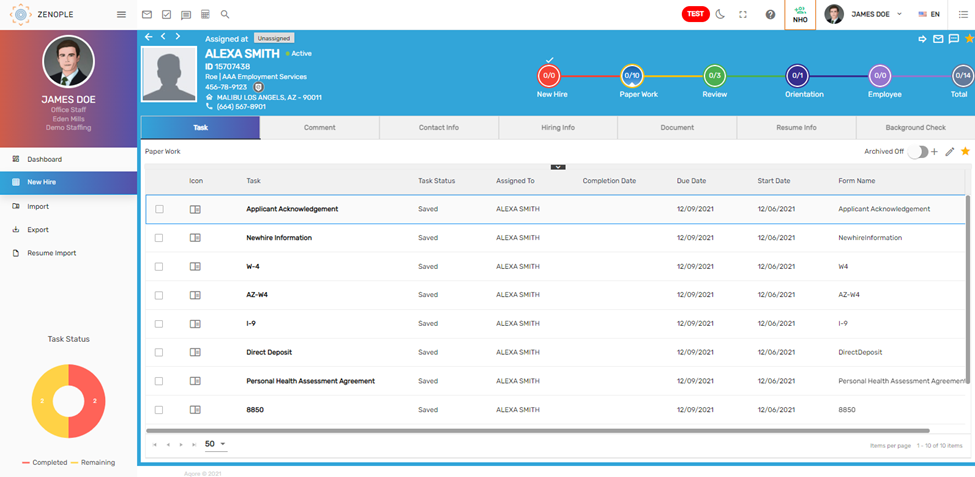
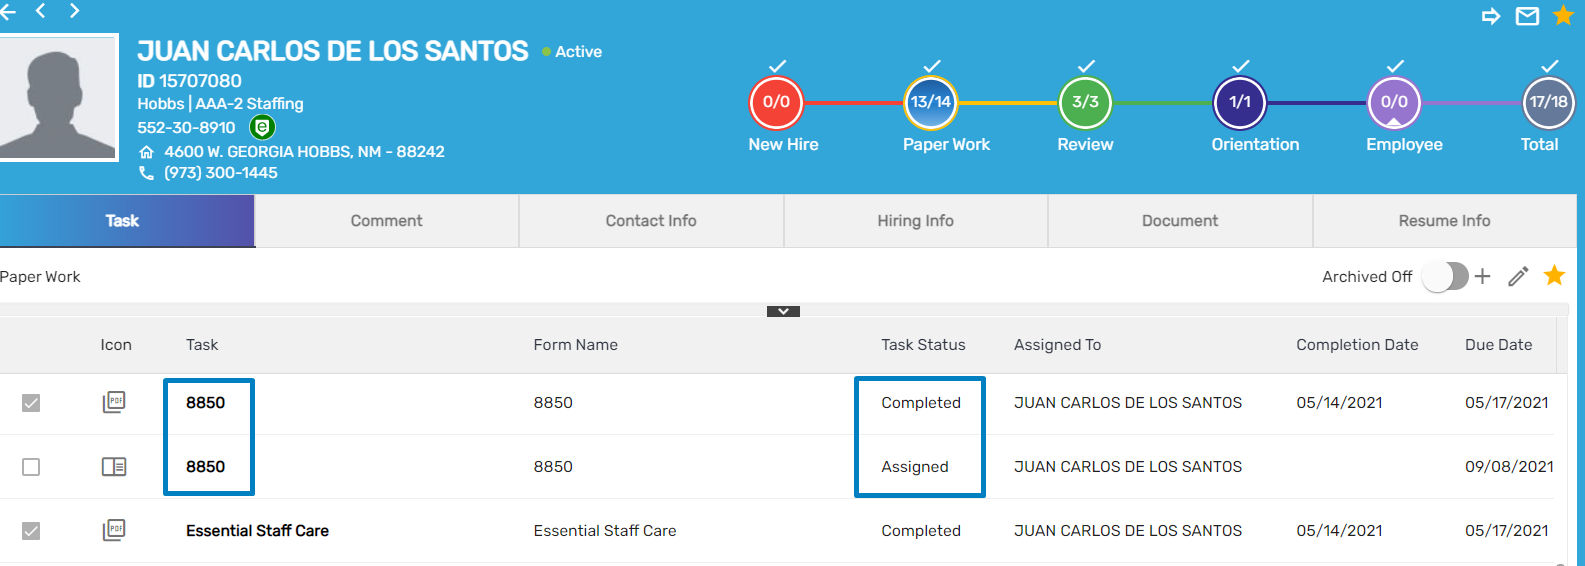
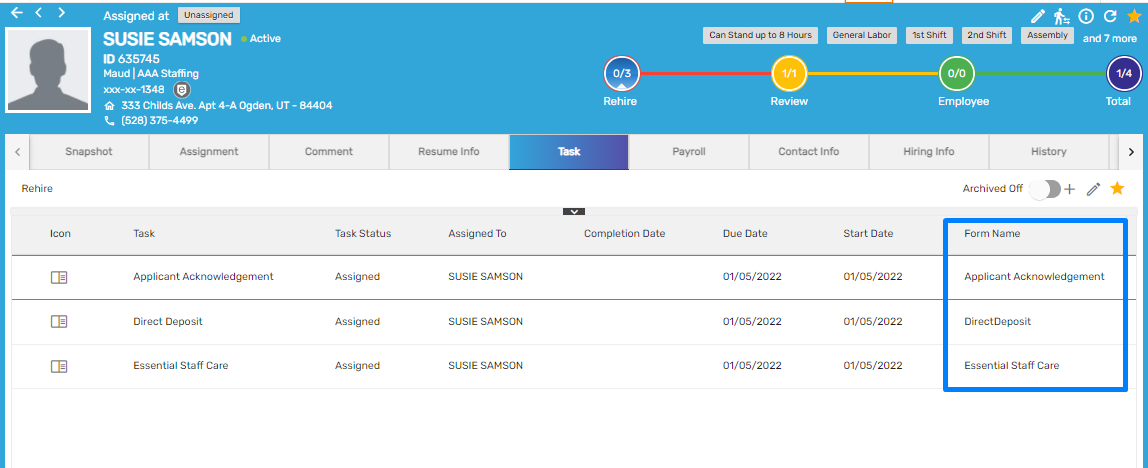
Form Name Column Added Under Task Navigation
Users can now view the new ‘Form Name’ column under Task navigation top navigation.
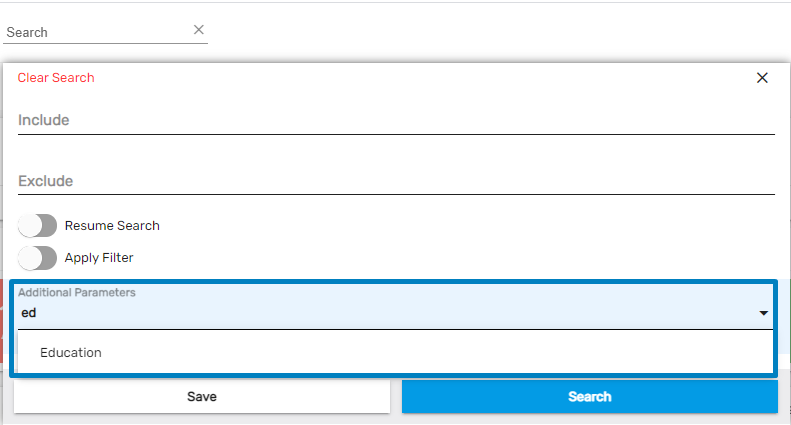
Search Feature Added for Additional Parameter in Advance and Global Search
Users can search the 'Additional Parameters' by typing a word. Users don’t have to scroll and look into the parameters in the list anymore. This feature has been added to 'Additional Parameters' of both Advance and Global Search.
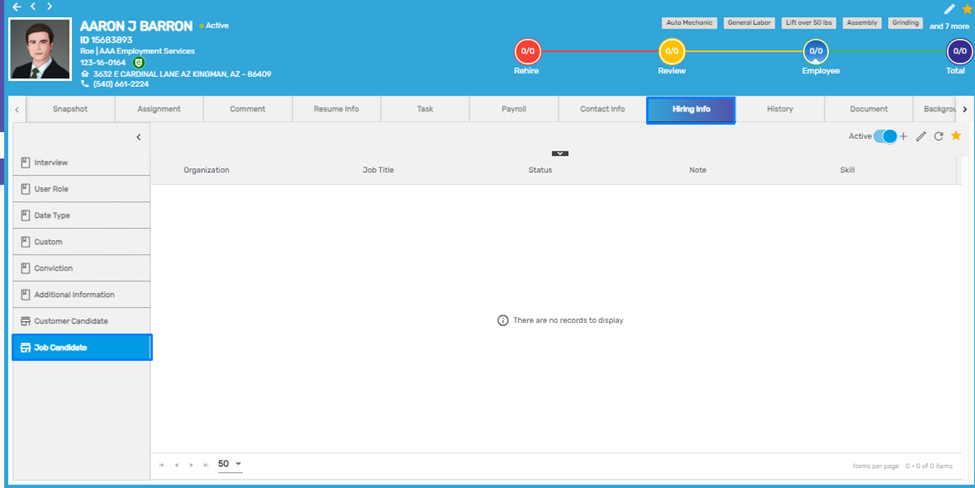
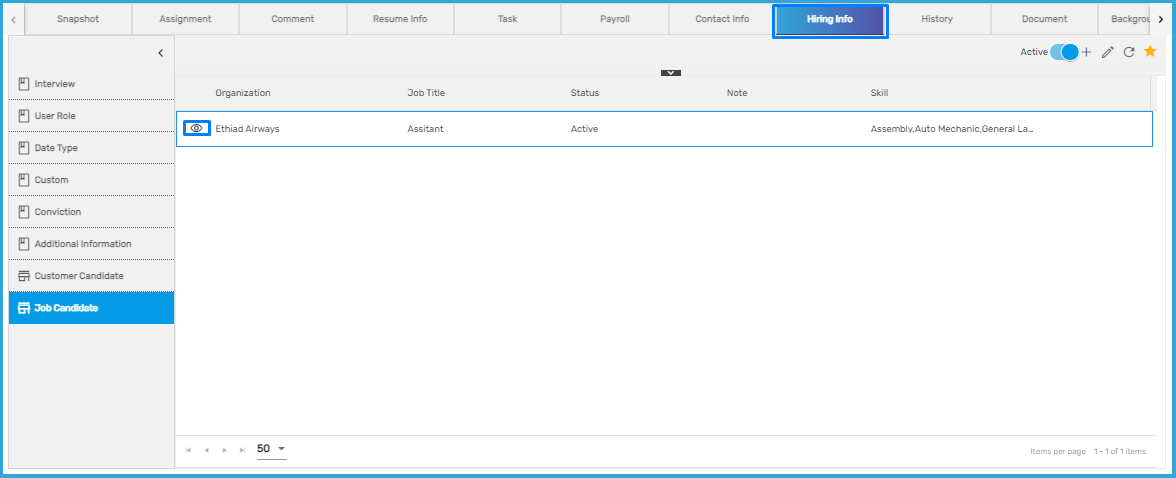
Job Candidate Side Navigation Added
Job Candidate side navigation has been added under 'Hiring Info' top navigation of Applicant/ New Hire/ Employee detail. It allows users to add applicants/ new hires/ employees as job candidates and edit them as well.
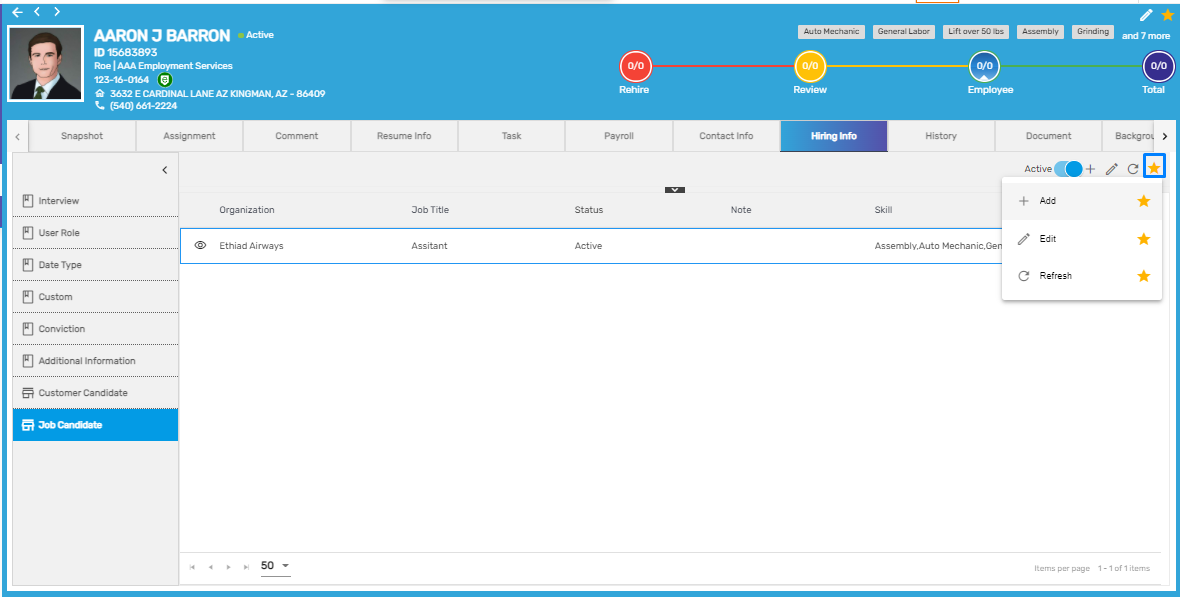
Favorite Actions
There are three actions under the Favorite Action of Job Candidate side navigation. They are:
- Add
- Edit
- Refresh
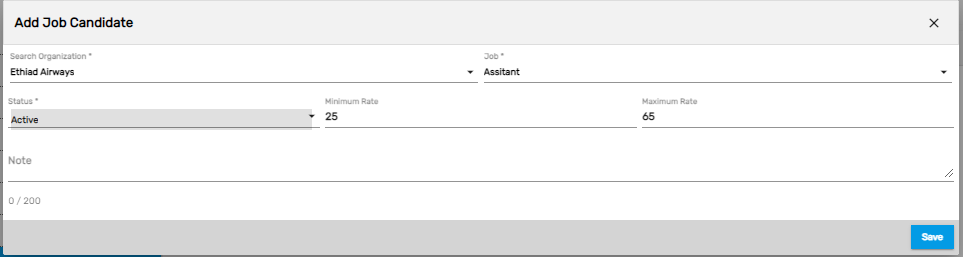
Add
It allows the users to add the applicant or new hire or employee as a job candidate under a specific customer for a specific job with the minimum and maximum rates preferred by the job candidate. This is similar to the Job Candidate that is added from the JCM application. The job candidates added from this navigation will be displayed in the directory of the JCM application as well as under the DHM Job Candidate workflow.
Edit
It allows users to edit the Job Candidate Details as required.
Refresh
It allows users to refresh the Job Candidate Details as required.
By default, active Job Candidate details are displayed. The 'Active'/ 'All' toggle button allows users to view the job candidates with status as active and all the job candidates when enabled respectively. The eye view icon allows users to redirect to the customer’s detail.
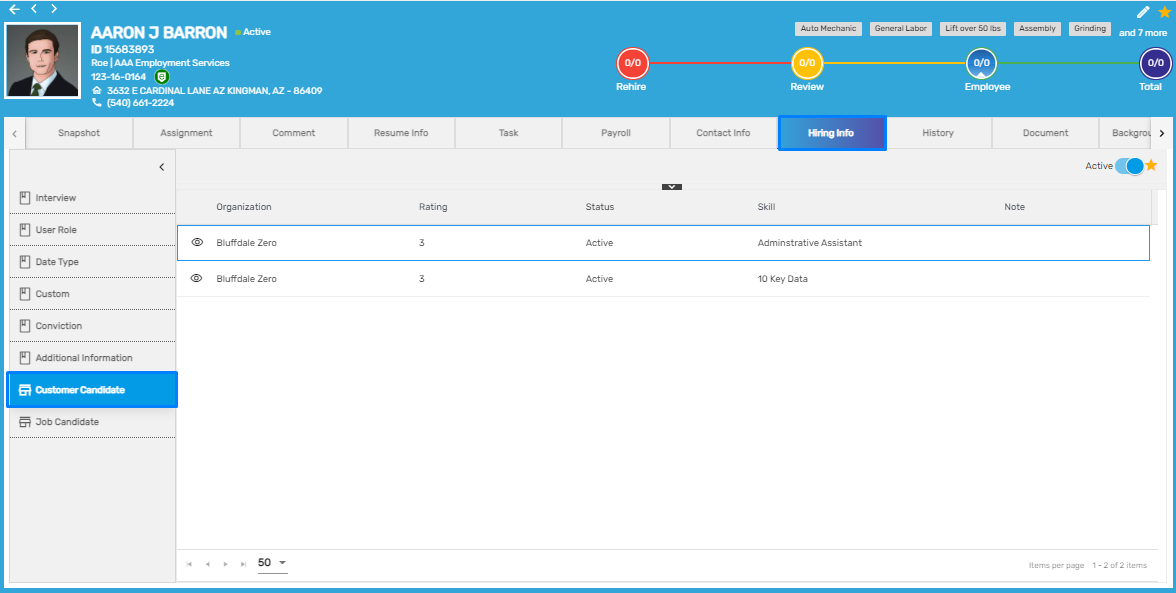
Customer Candidate Side Navigation Added
Customer Candidate side navigation has been added under Hiring Info top navigation of Applicant/ New Hire/ Employee detail. It allows users to add applicants or new hires or employees for Customer Candidates and edit them as well.
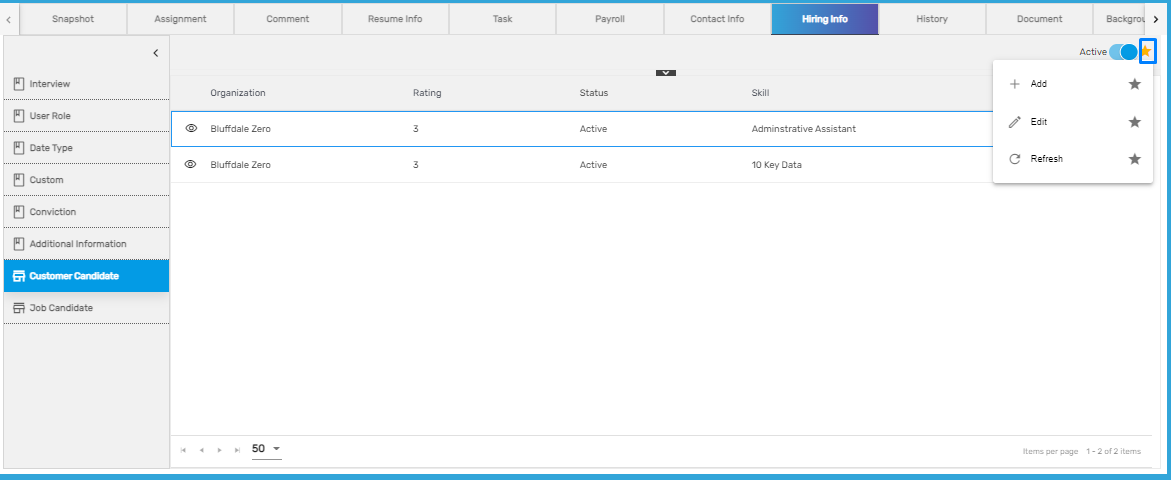
Favorite Actions
There are three actions under the Favorite Icon of the Customer Candidate side navigation. They are:
- Add
- Edit
- Refresh
Add
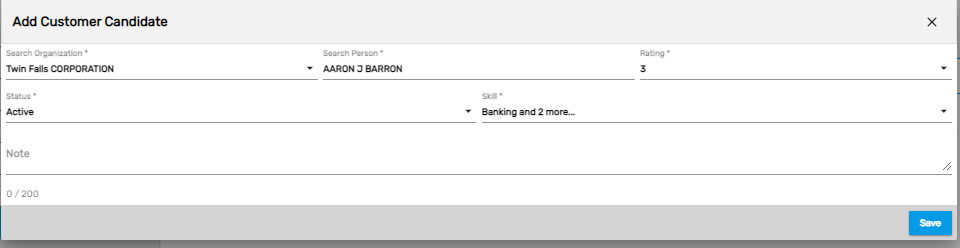
It allows users to add the applicant or new hire or employee as a Customer Candidate for a specific customer. Users can add ratings from 1 to 5 along with other details such as Skill and Status. This is similar to the candidate that is added from the Customer Detail under 'Job & Assignment.'
The job candidates added from this navigation will be displayed under the 'Customer Candidate' side navigation of the 'Job & Assignment' top navigation of the specific Customer Detail.
Edit
It allows users to edit the Customer Candidate Details as required.
Refresh
It allows users to refresh the Customer Candidate Details as required.
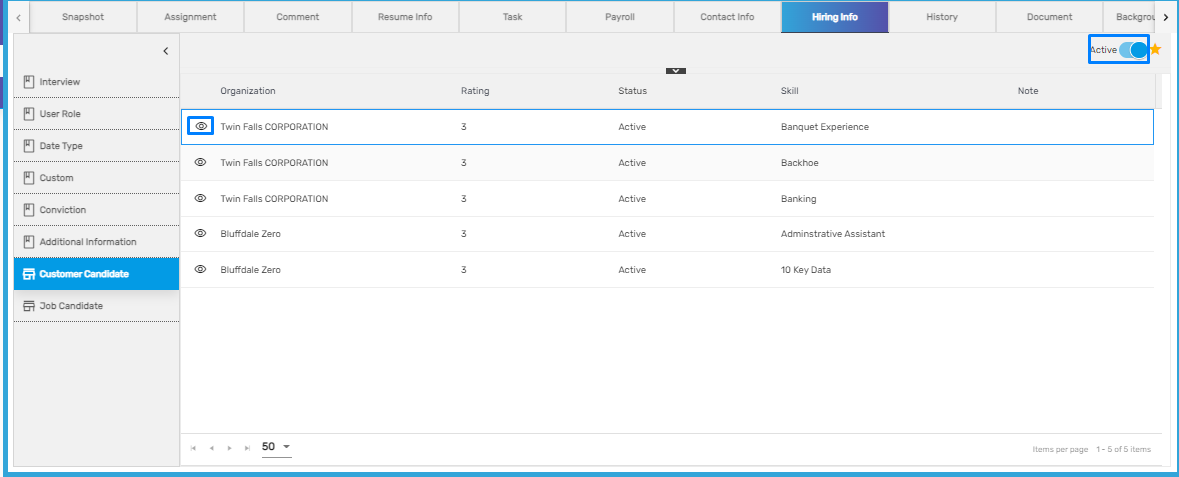
By default, 'Active' Customer Candidate Details are displayed. The 'Active'/ 'All' toggle button allows users to view the candidates with status as Active and All candidates when enabled respective toggle button.
The eye view icon allows users to redirect to the Customer’s detail.
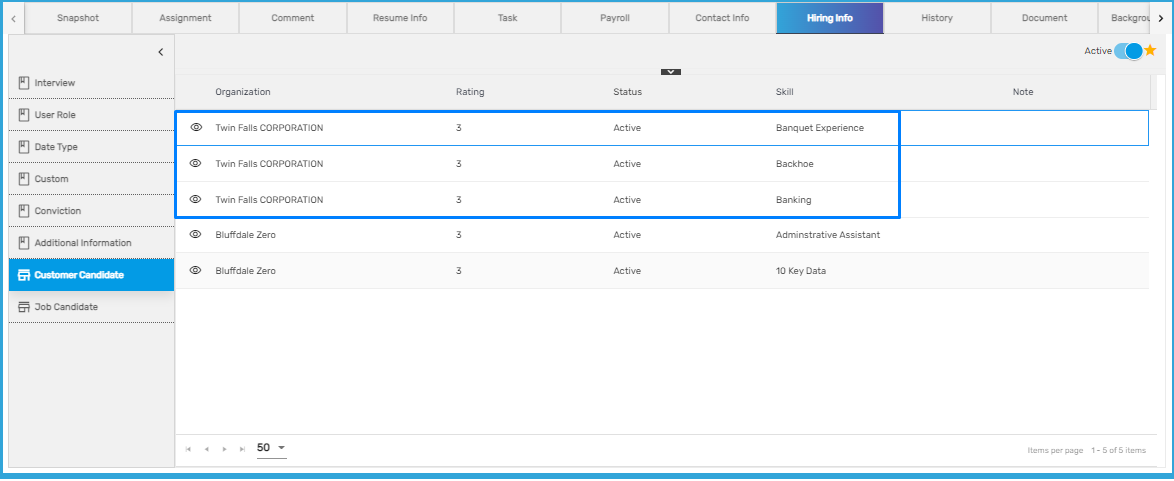
The employee added for the Customer Candidate will be displayed for each added skill.
Common Features in CMS/ NCO
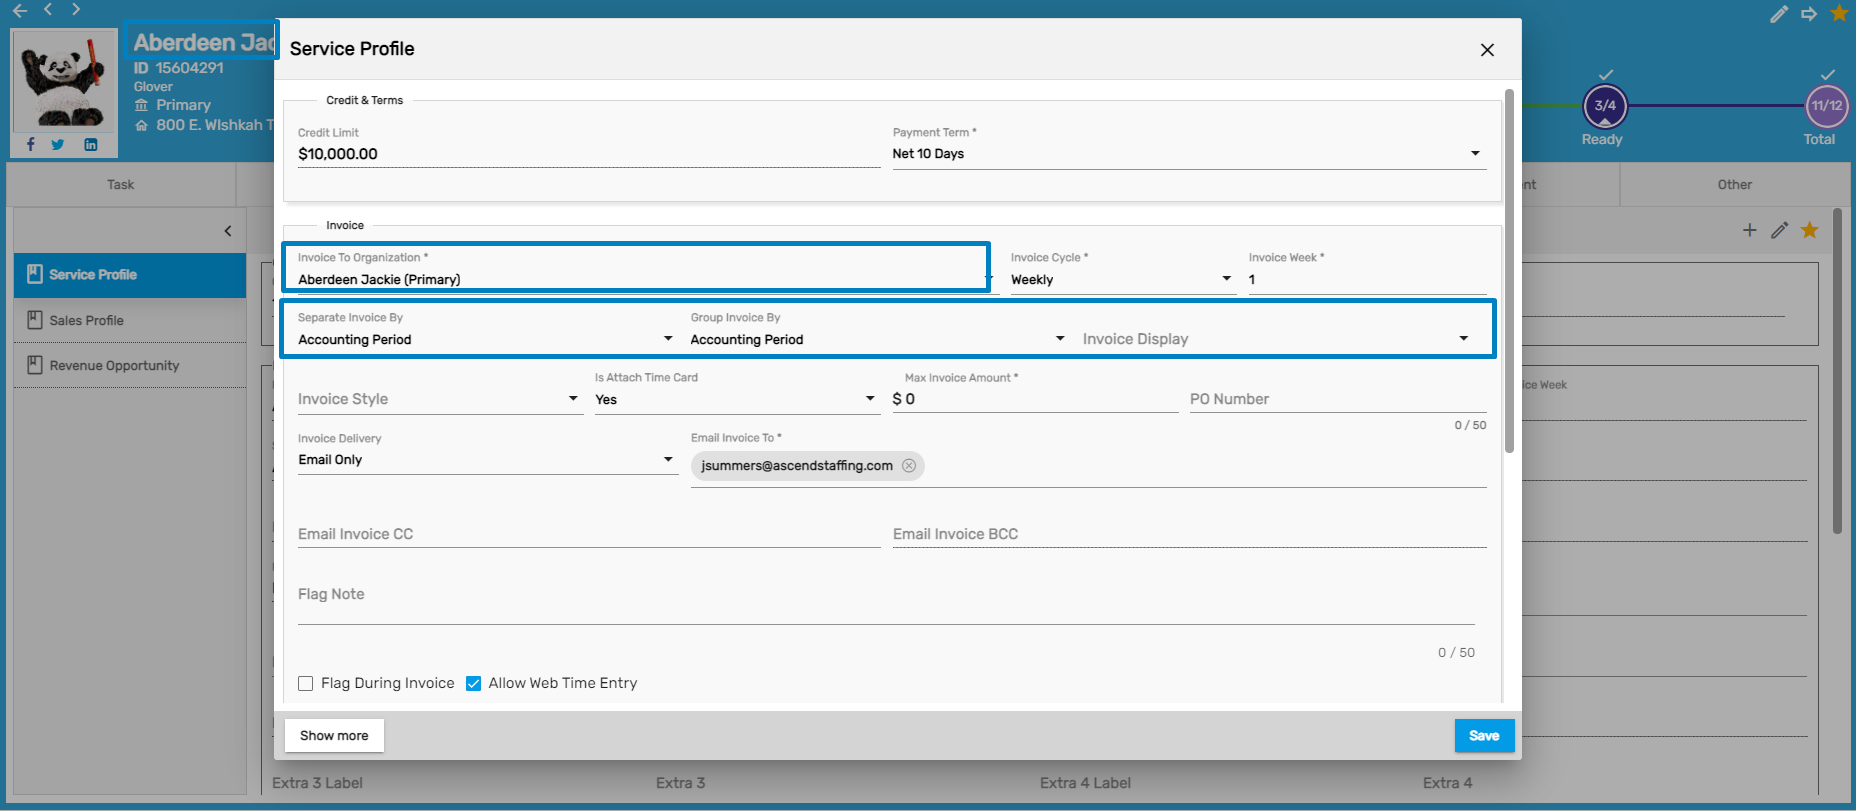
Hide Fields Related to Invoice If ‘Invoice to Organization’ Isn't Self
If the users have selected the ‘Invoice to Organization’ different than the organization they are in, then fields such as ‘Separate Invoice By,’ ‘Group Invoice By,’ and ‘Invoice Display’ will be hidden by default while adding or editing a Service Profile.
Users will find this feature under the Service Profile side navigation of 'Sales & Service' top navigation in CMS/ NCO application under the abovementioned condition.
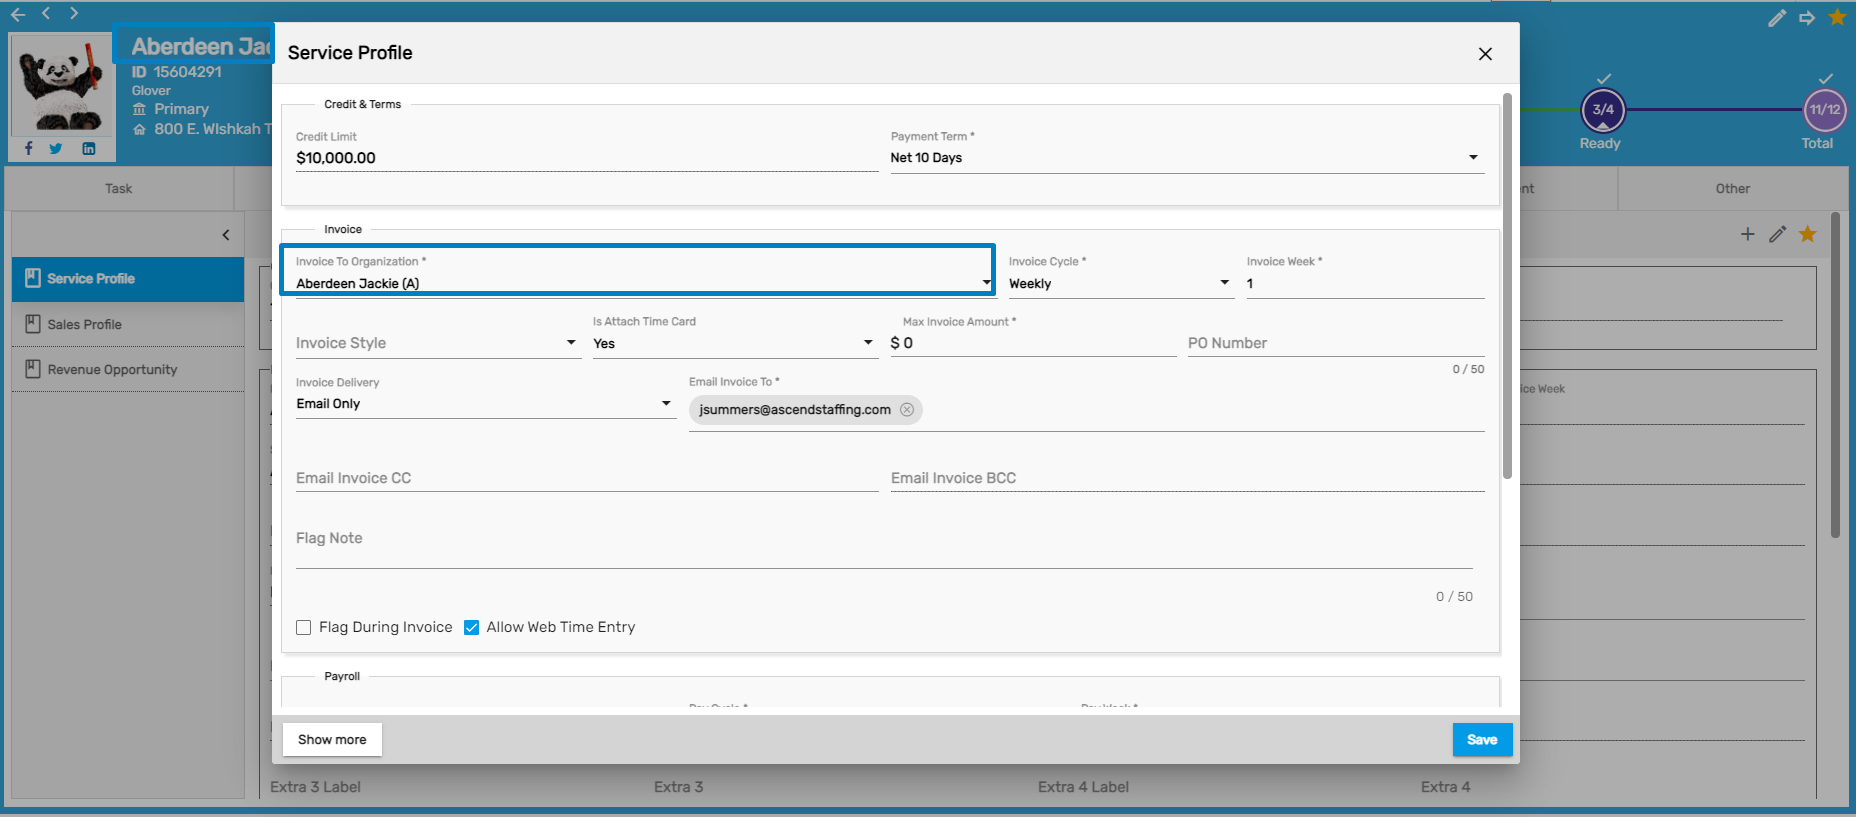
Whereas if the users have selected Primary in ‘Invoice to Organization’ then they will be able to see these fields.
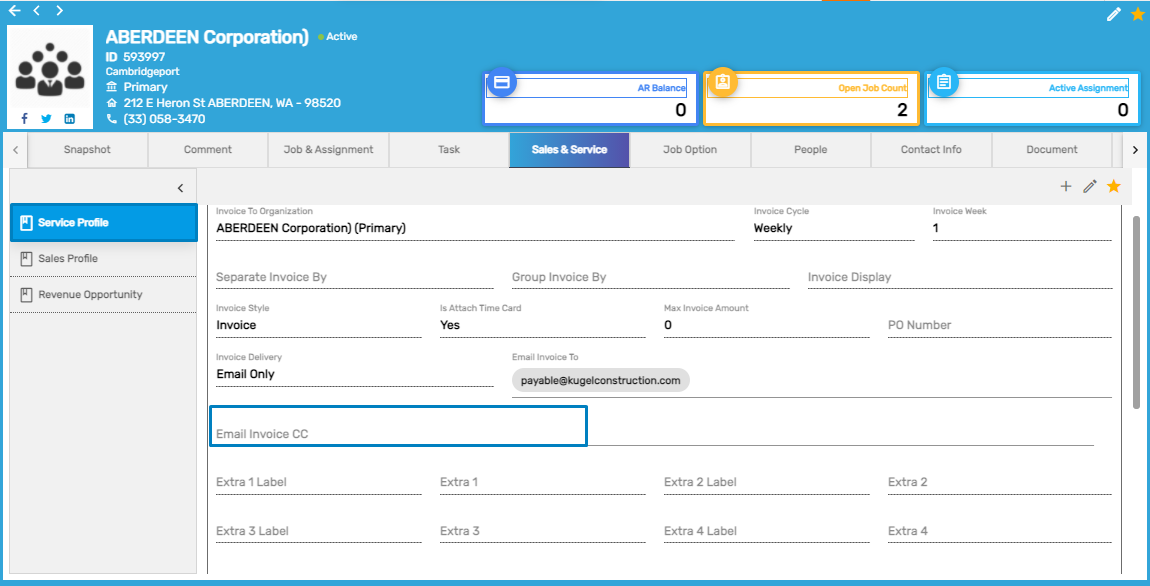
'Email Invoice CC’ Field Added in the Service Profile
‘Email Invoice CC’ field has been added to the Service Profile side navigation under Sales & Service top navigation of the Customer Detail. The user can send an email to the required address with the CC field in the invoice emails.
Common Features in LTS/ SPM/ CMS/ NCO
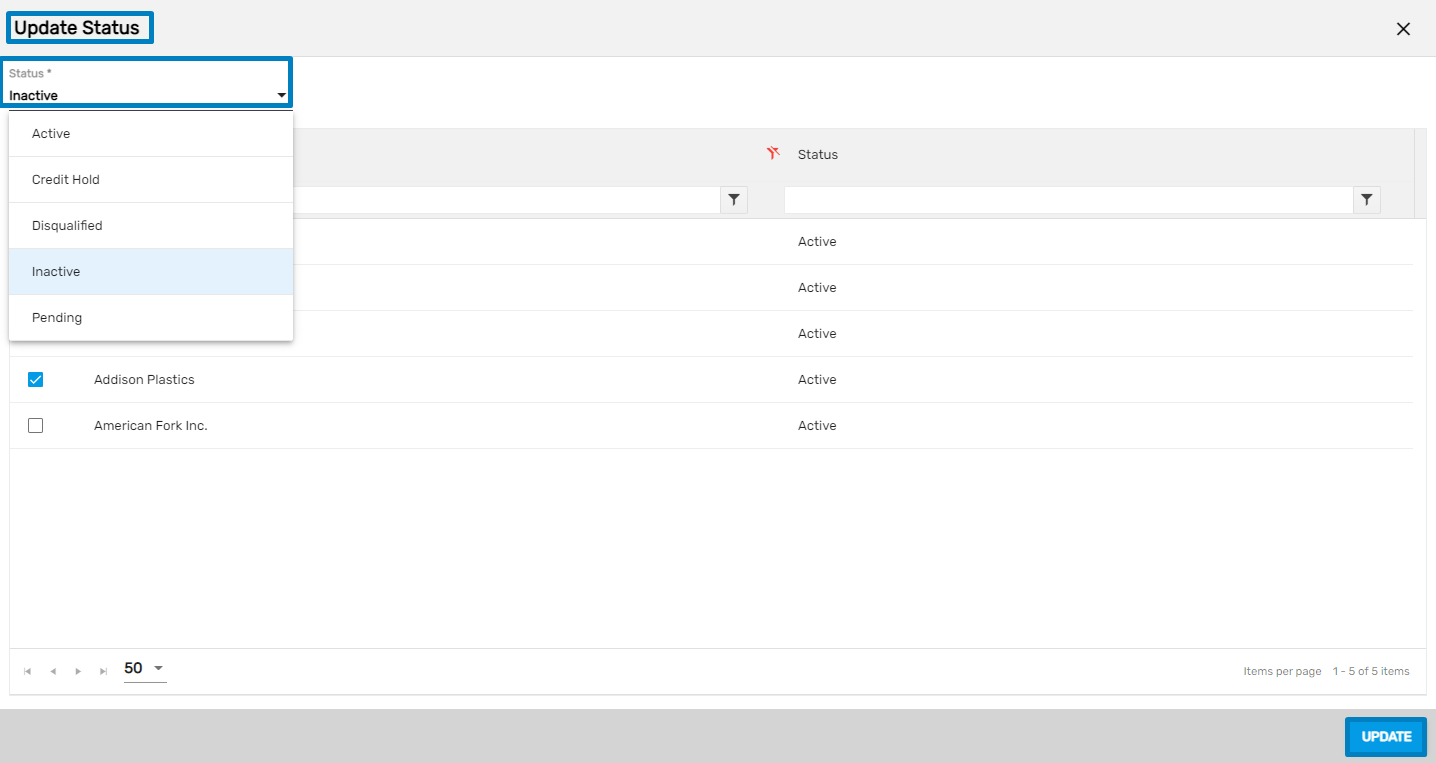
Bulk Action to Update Status on All Organization Related Application
Users can update bulk status all at once from the directory.
How to Use This Feature
- Select the customers and click on the Favorite Action
- Click on the 'Update Status'
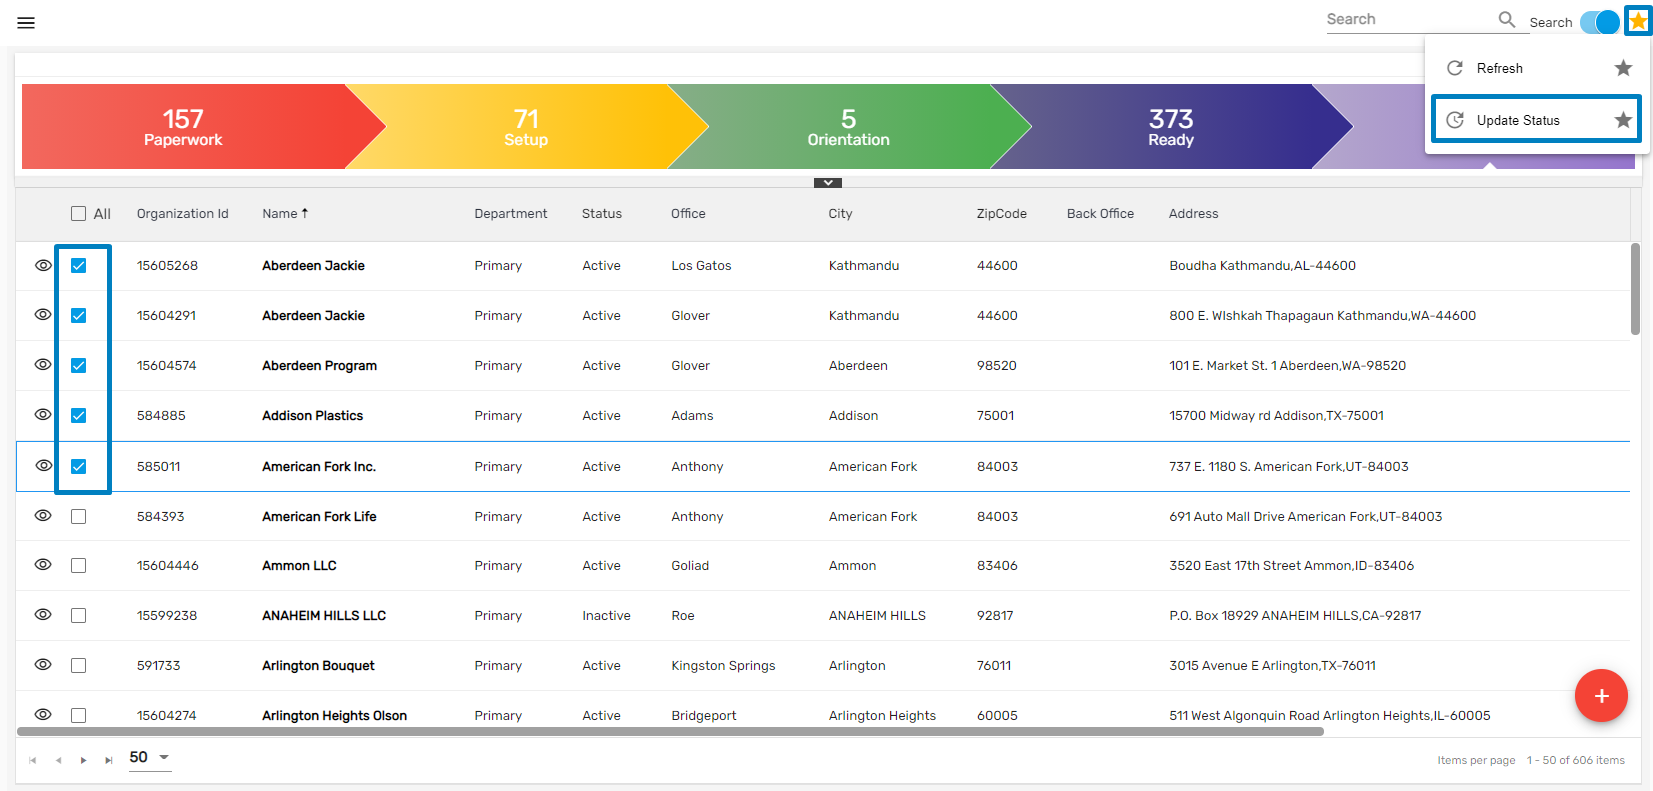
- Update Status dialog box will open
- Click on the Status dropdown and select status. Users can un-select the customer from Update Status as well.
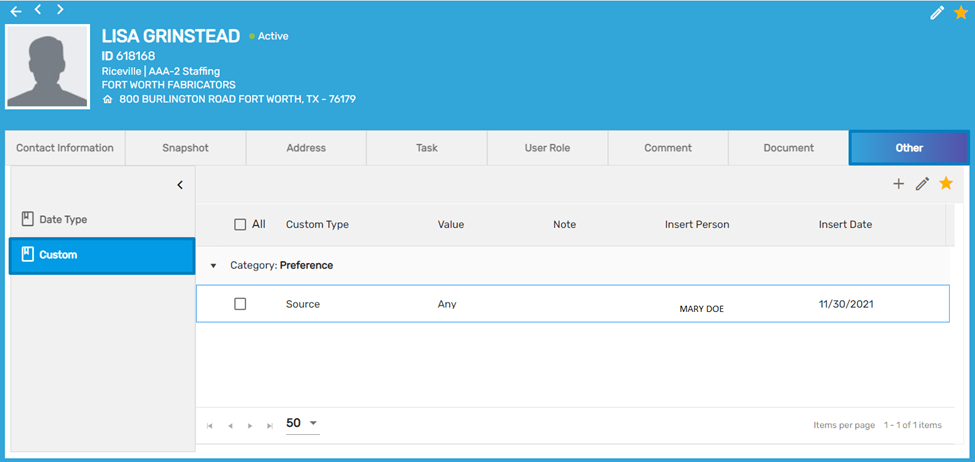
Custom Side Navigation Added on Contact Detail Page
Custom side navigation has been added under the ‘Other’ top navigation on the Contact Detail page. Users can add, edit, delete and refresh the Contact Detail.
Common Features in ATS/ NHO
Resume Import Main Navigation Added
Users can upload bulk resumes at once using Resume Import main navigation. The uploaded resume should be parsed as an applicant or new hire as per the resume imported from ATS or NHO application.
Once the applicant or new hire is created, it should be tagged as a job candidate.
How to Use This Feature
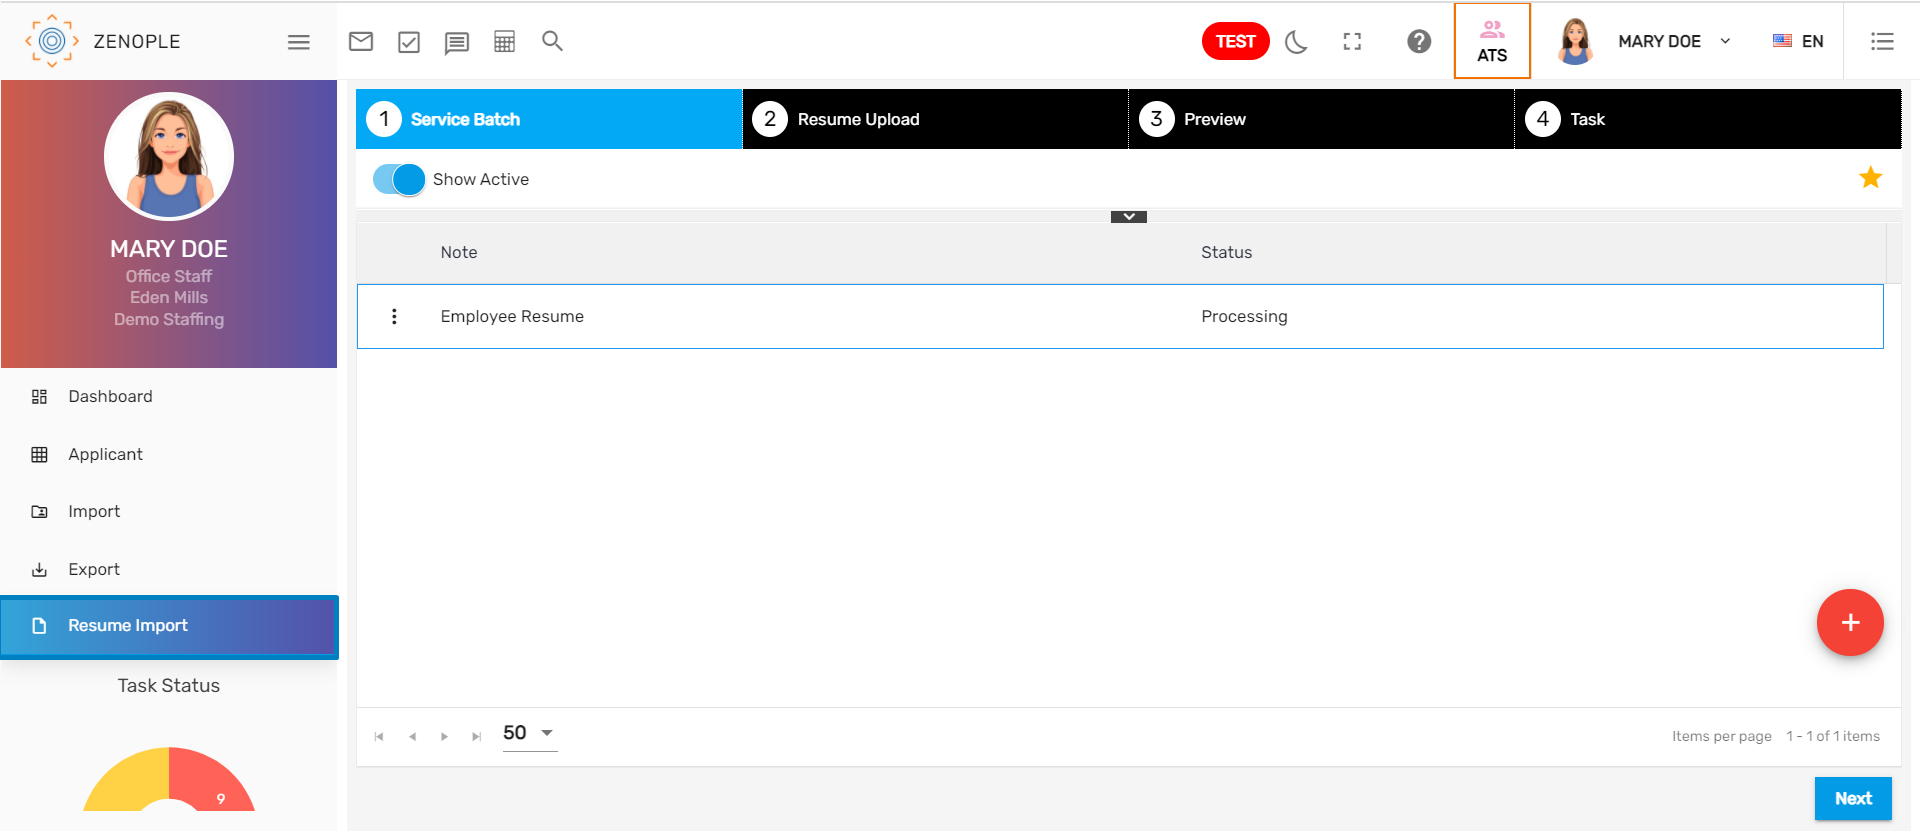
Step 1: Create Service Batch
- Go to ATS/ NHO application
- Click on Bulk Resume main navigation
- Add Service Batch

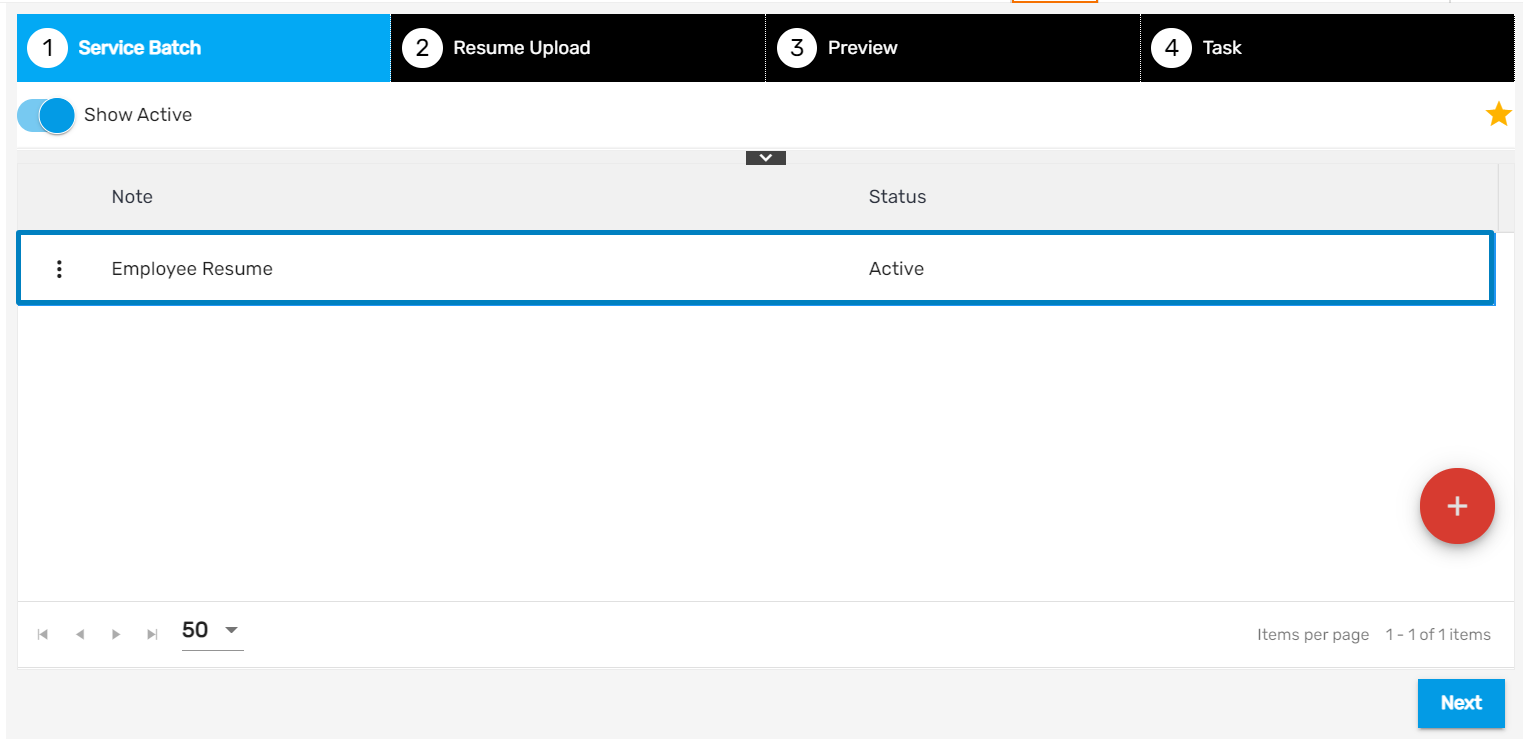
Added Service Batch will be displayed as,
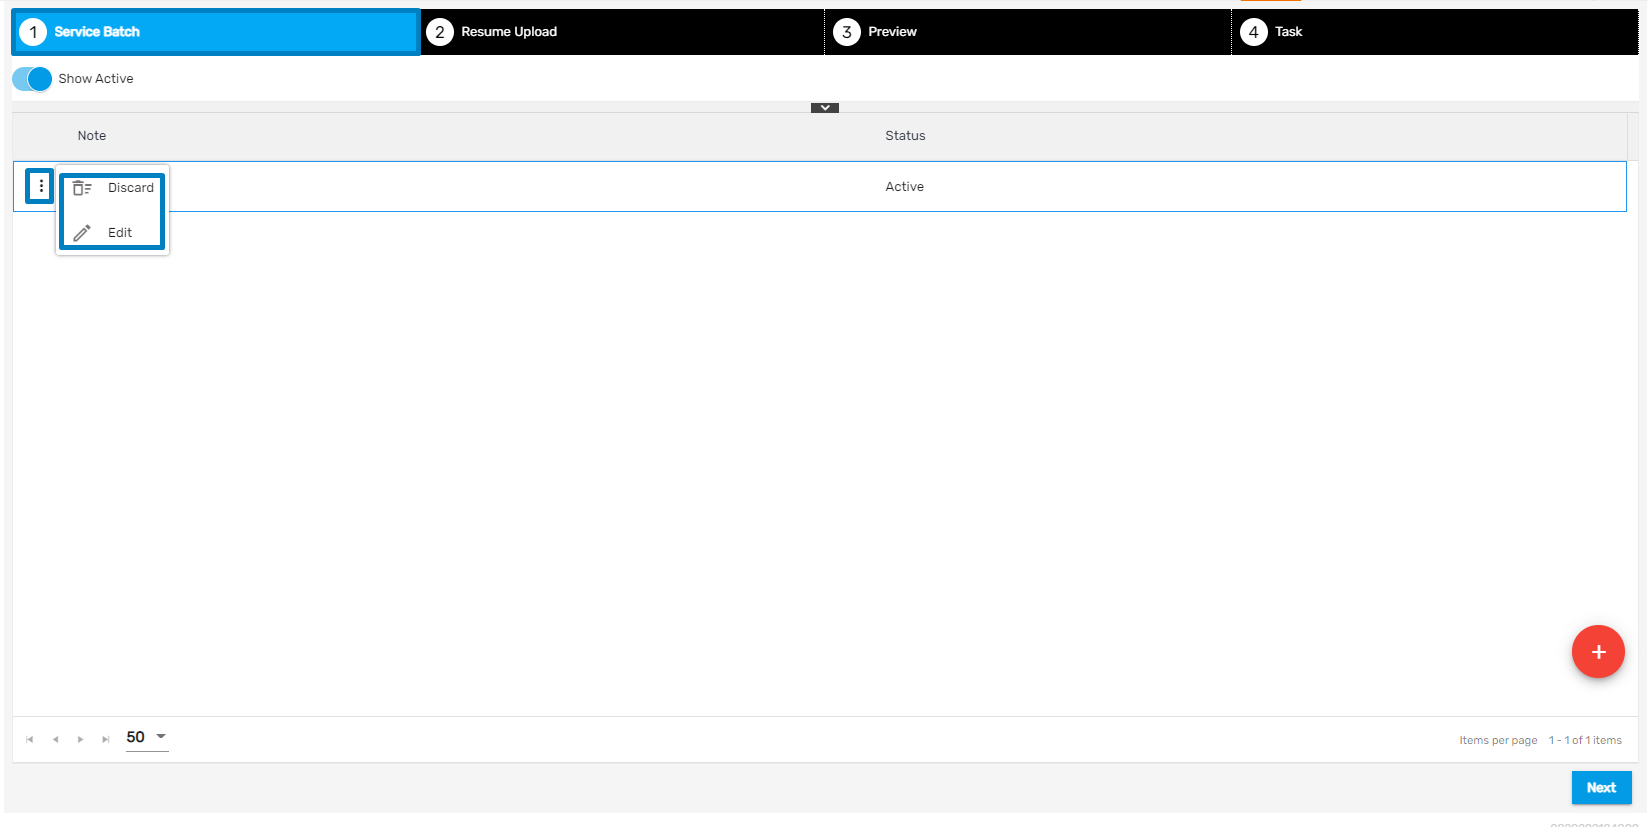
Users can ‘Discard’ and ‘Edit’added Service Batch by clicking on the vertical ellipsis button.
Show Active/ All Toggle Button
'Show Active' allows users to view all the Active service batches while 'Show All' allows users to view all service batches with 'Active,' 'Pending,' or 'Processing' statuses.

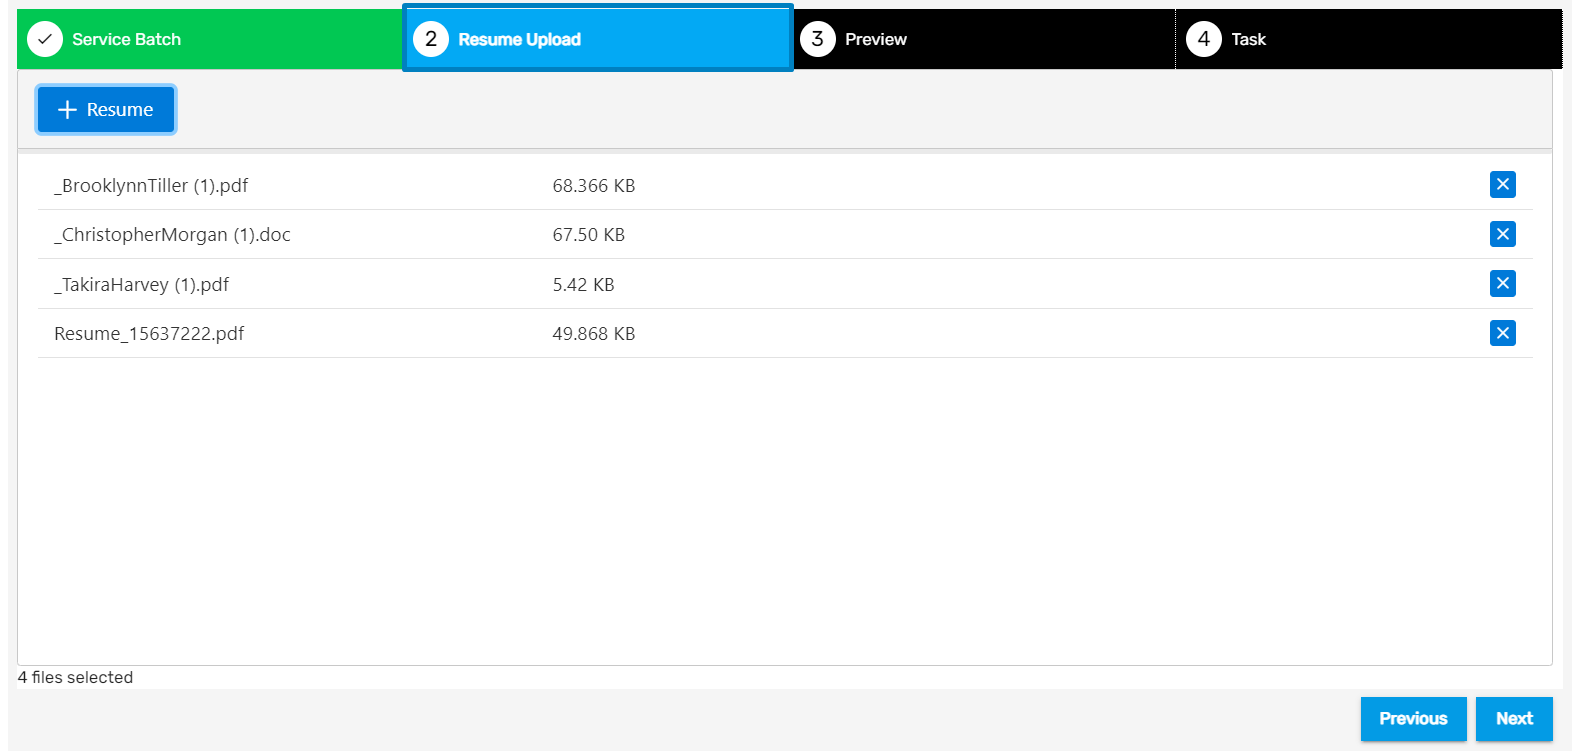
Step 2: Resume Upload
Clicking on the Next button redirects the user to ‘Resume Upload’
- Click on the 'Resume’ button
- Upload the Resume. Moreover, users can delete the uploaded Resume by clicking on the Cross icon.
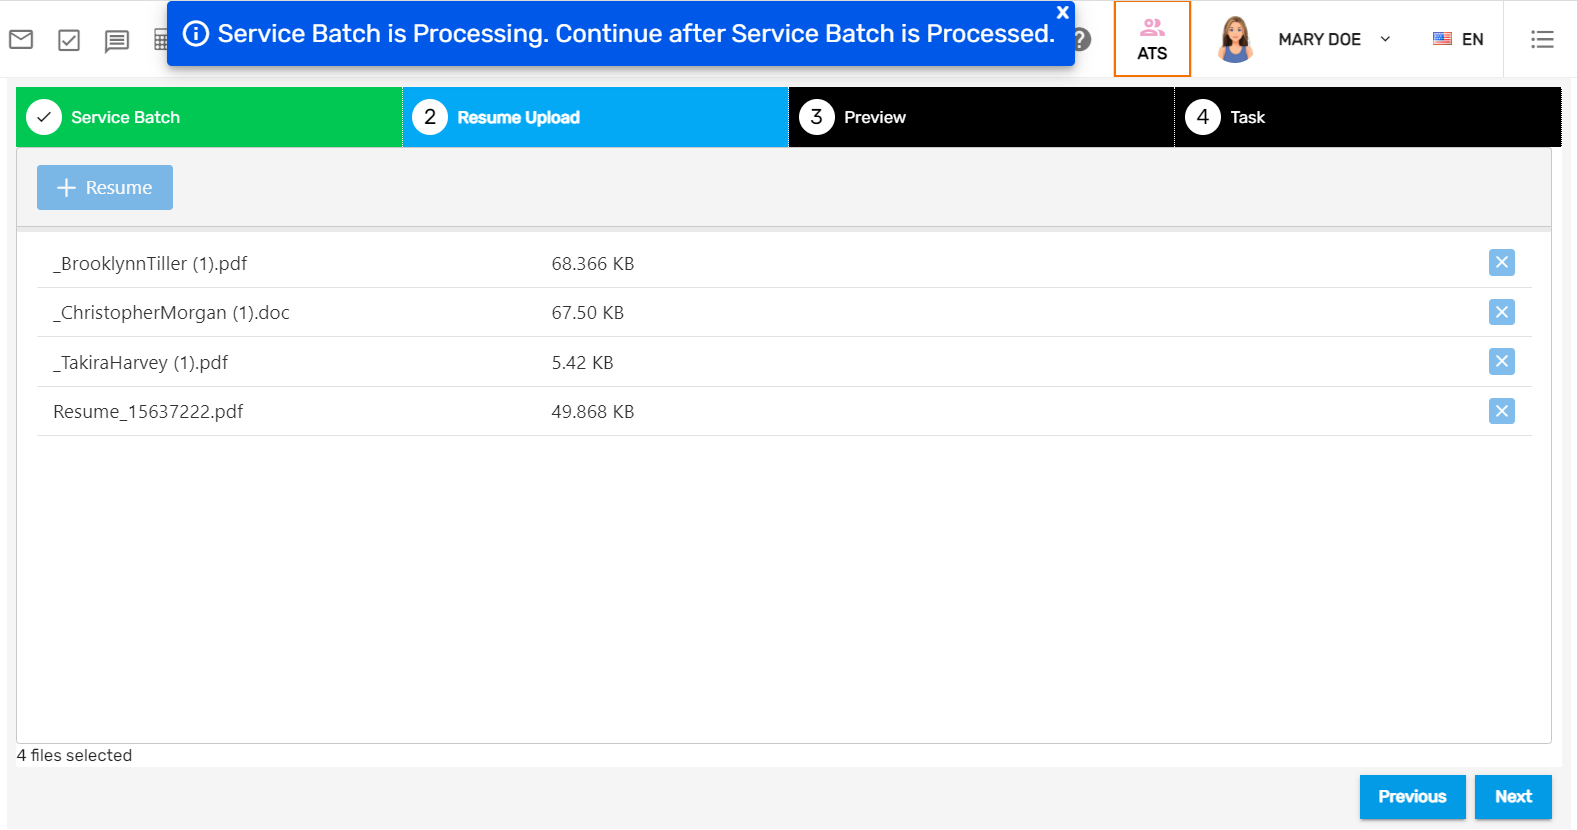
- After clicking on the ‘Next' button, users will receive a toast message saying, ‘Service batch is processing. Continue after service batch is processed.’ This message pops up because the resume is being parsed in the background.
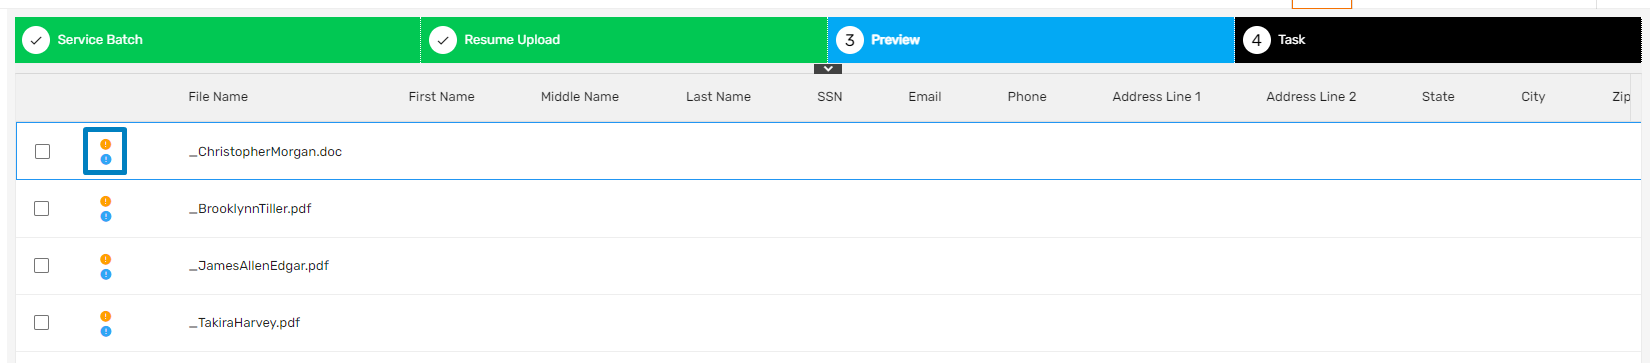
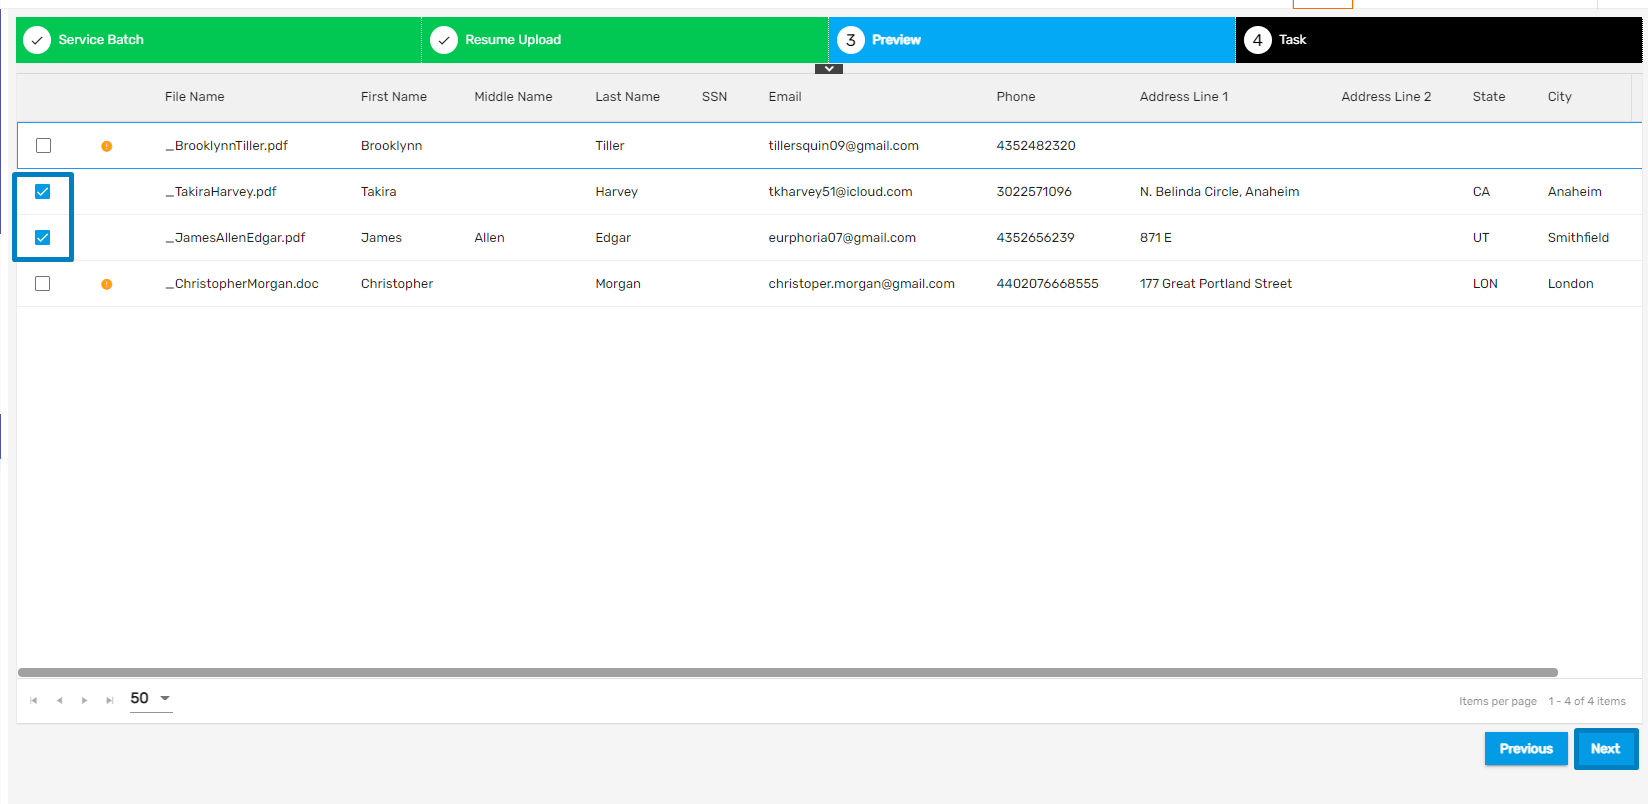
Step 3: Preview
- If the resume fails to be parsed or if data is invalid, then users will see the two dots in blue and yellow. A yellow dot means ‘Data is invalid’ and is a warning exception whereas a blue dot means ‘Resume couldn’t be parsed’ and an exception.
- After reviewing data, select the Resume you want to parse and click ‘Next.’
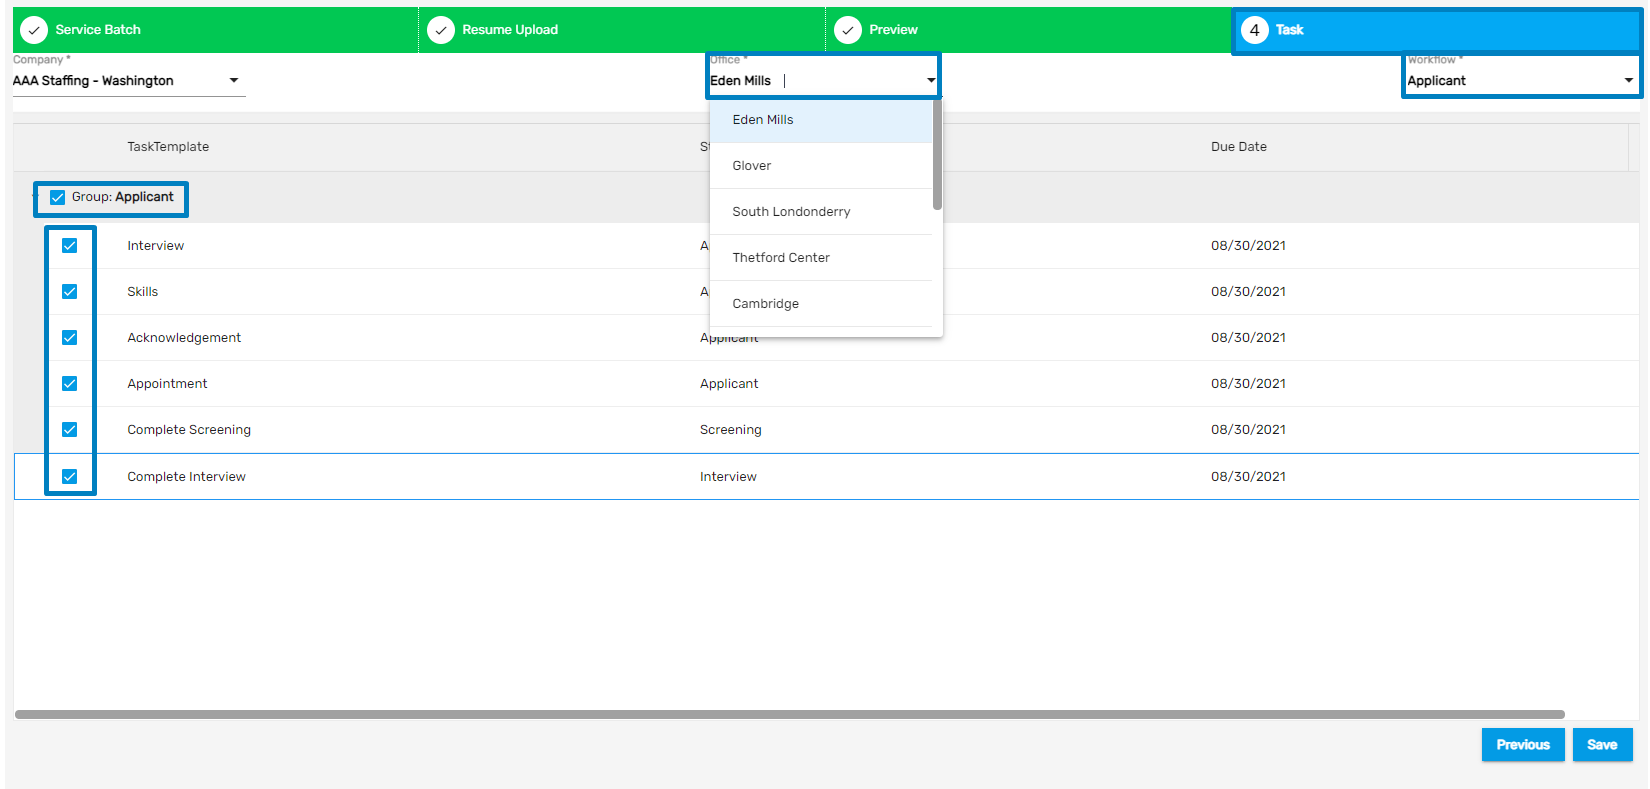
Step 4: Task
Users can select the Company, Office, and Workflow. The tasklist is displayed as per the selected office.
Users can select the Task they want to assign to the applicant and click Save
After the users save the information, a task will be assigned to a particular employee
Note: If the users want to add an employee as an Applicant then they must upload bulk resumes from the ATS application whereas if they want to add the employee as a new hire then resumes must be uploaded from the NHO application.
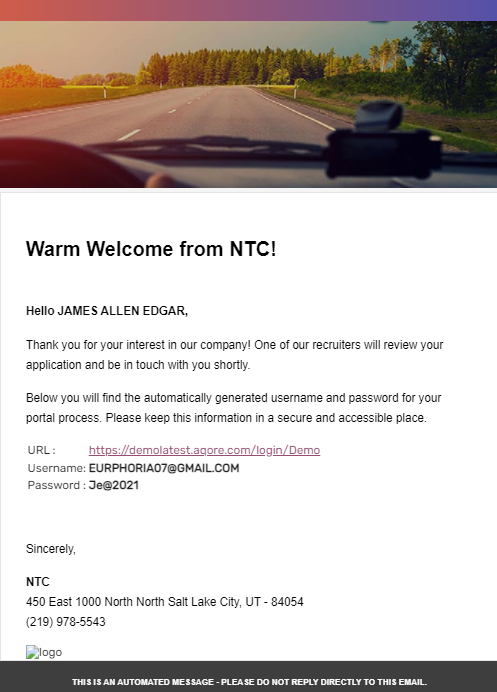
After clicking on Save, an employee will receive an email for further process.
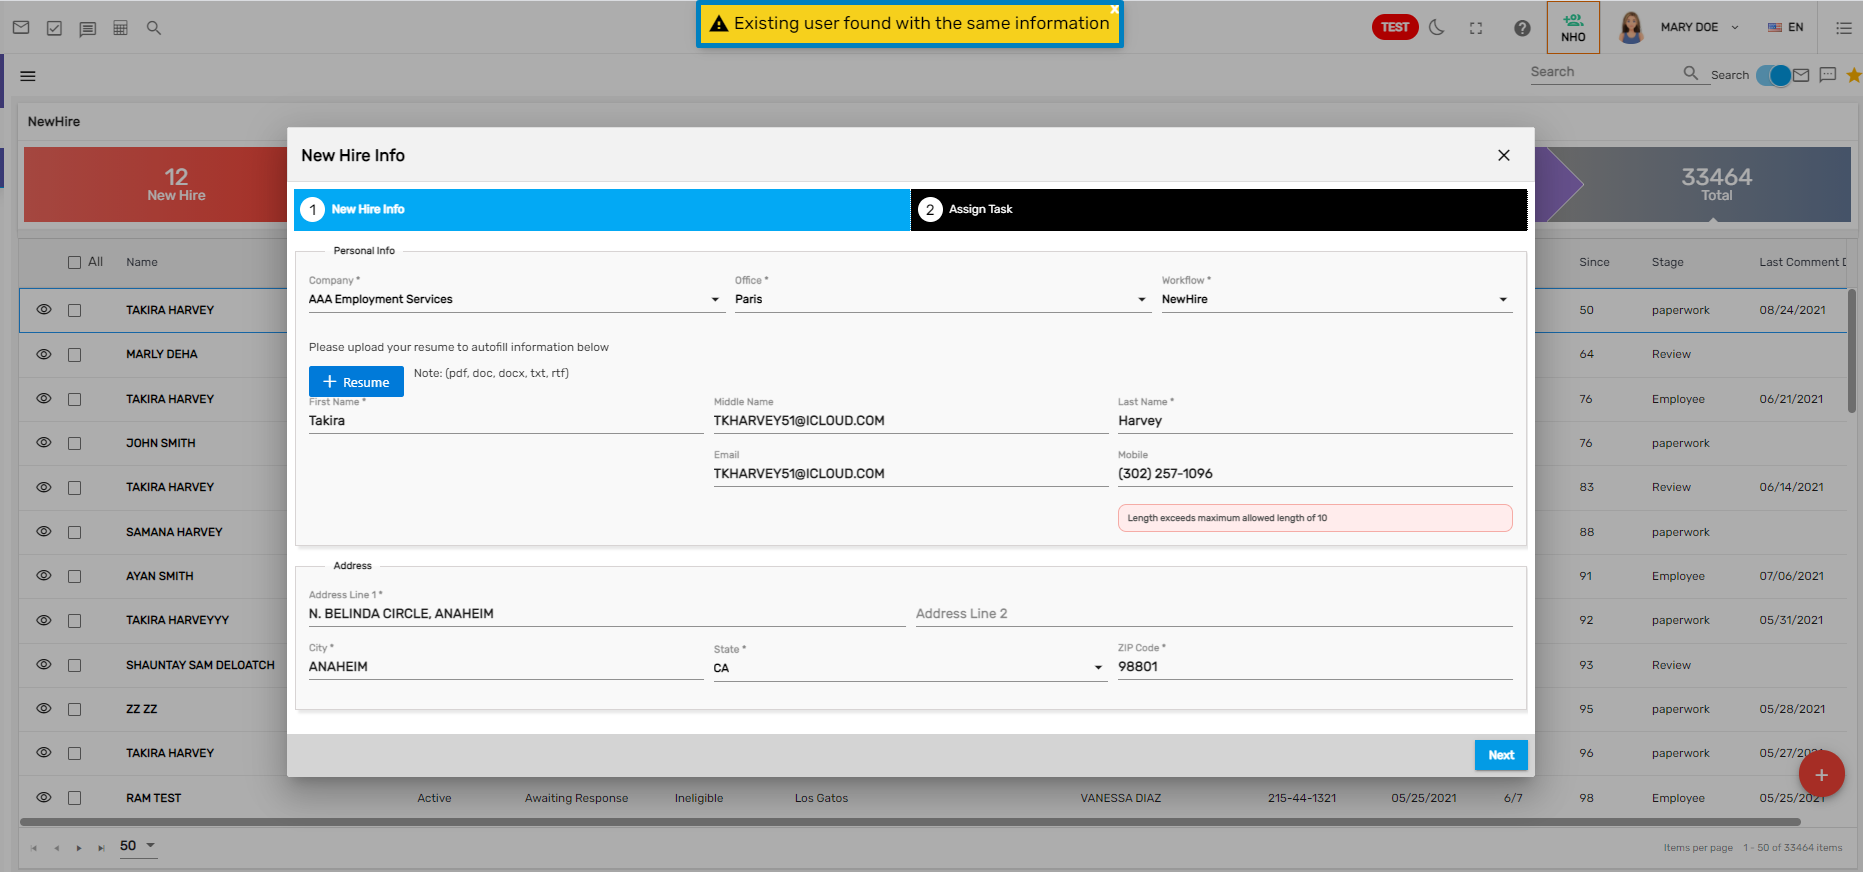
Duplicate Users Check in Absence of SSN Added
If the user tries to add an employee with the existing user’s information, it will display a toast message as 'Existing user found with the same information.' This will minimize the duplication of applicants.
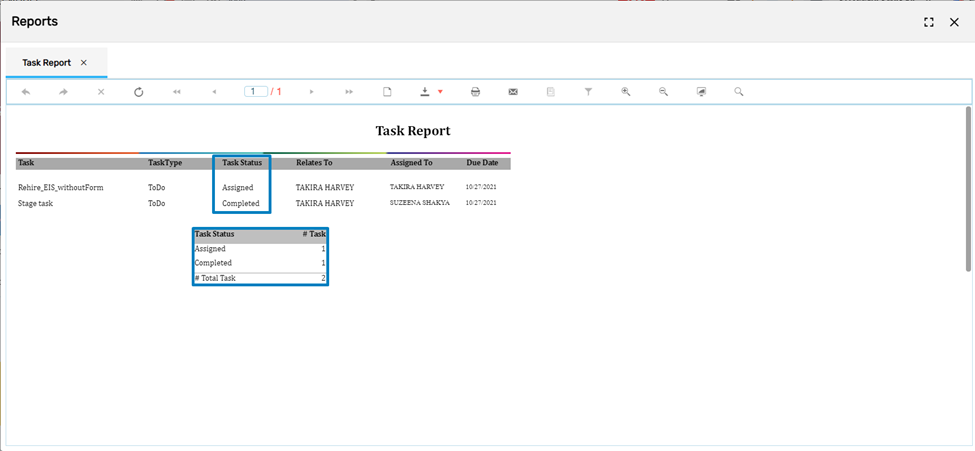
Task Status Added on Task Report
Users can now view the status of the task on ‘Task Report.’ They can view the report as,
Contact Navigation
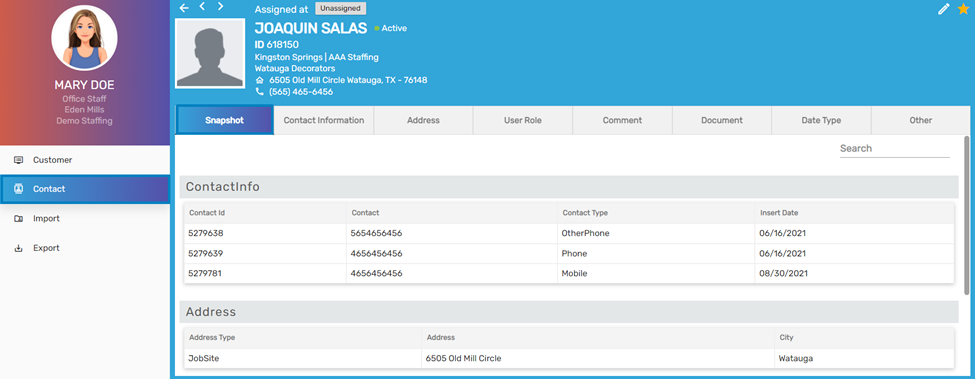
Snapshot Navigation Added
Snapshot top navigation has been added under Contact Detail of Contact main navigation. The users can view the summarized information of various navigations including 'Comment,' 'Contact Info,' 'User Role,' 'Address,' 'Comment,' and 'Date Type' under the Snapshot top navigation.
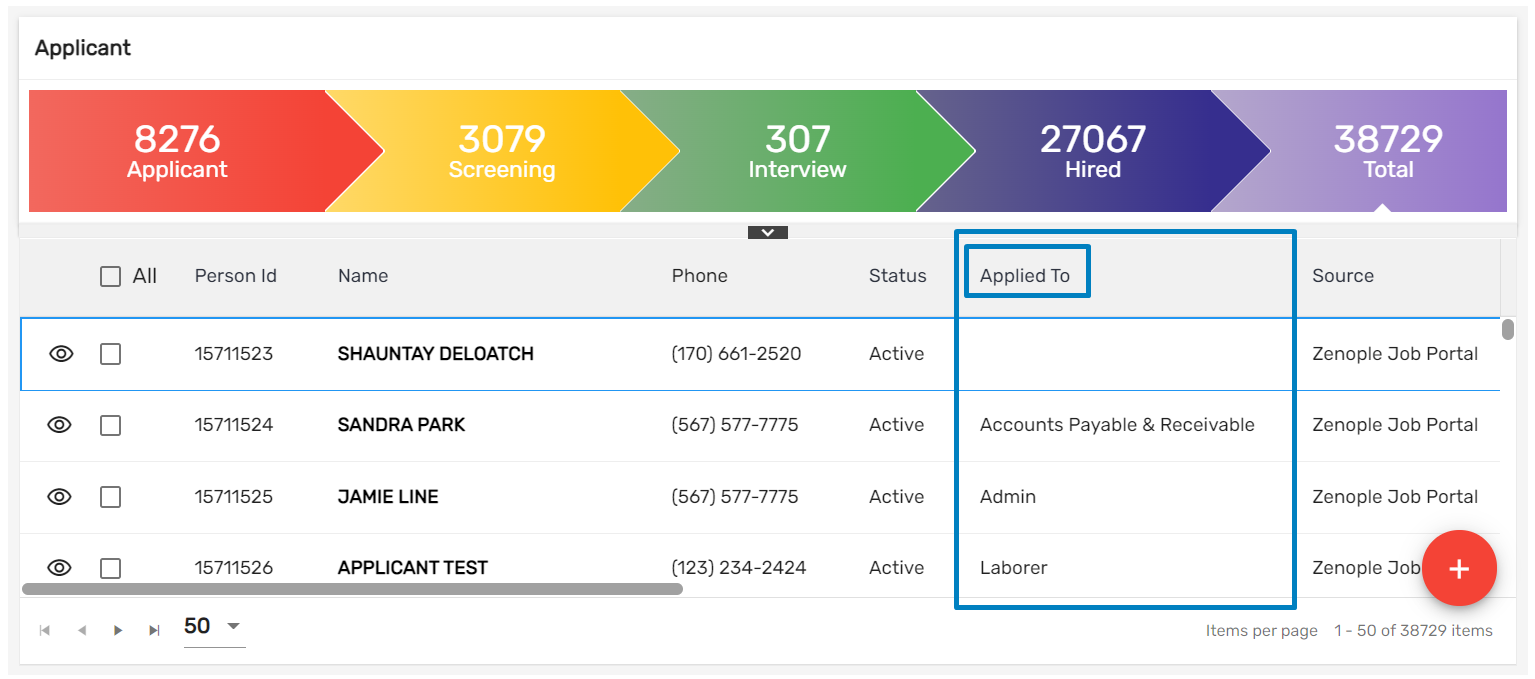
Improvement: Latest Job Displayed in 'Applied To' Column
Users can now view the job candidates applying for the job recently in the ‘Applied To’ column in the Applicant and New Hire directory pages. Previously, users could see those job candidates who applied for the job at first.
Common Feature in ATS/ NHO/ EIS/ LTS/ SPM/ NCO/ CMS/ WIM/ UMS/ AMS/ TJM
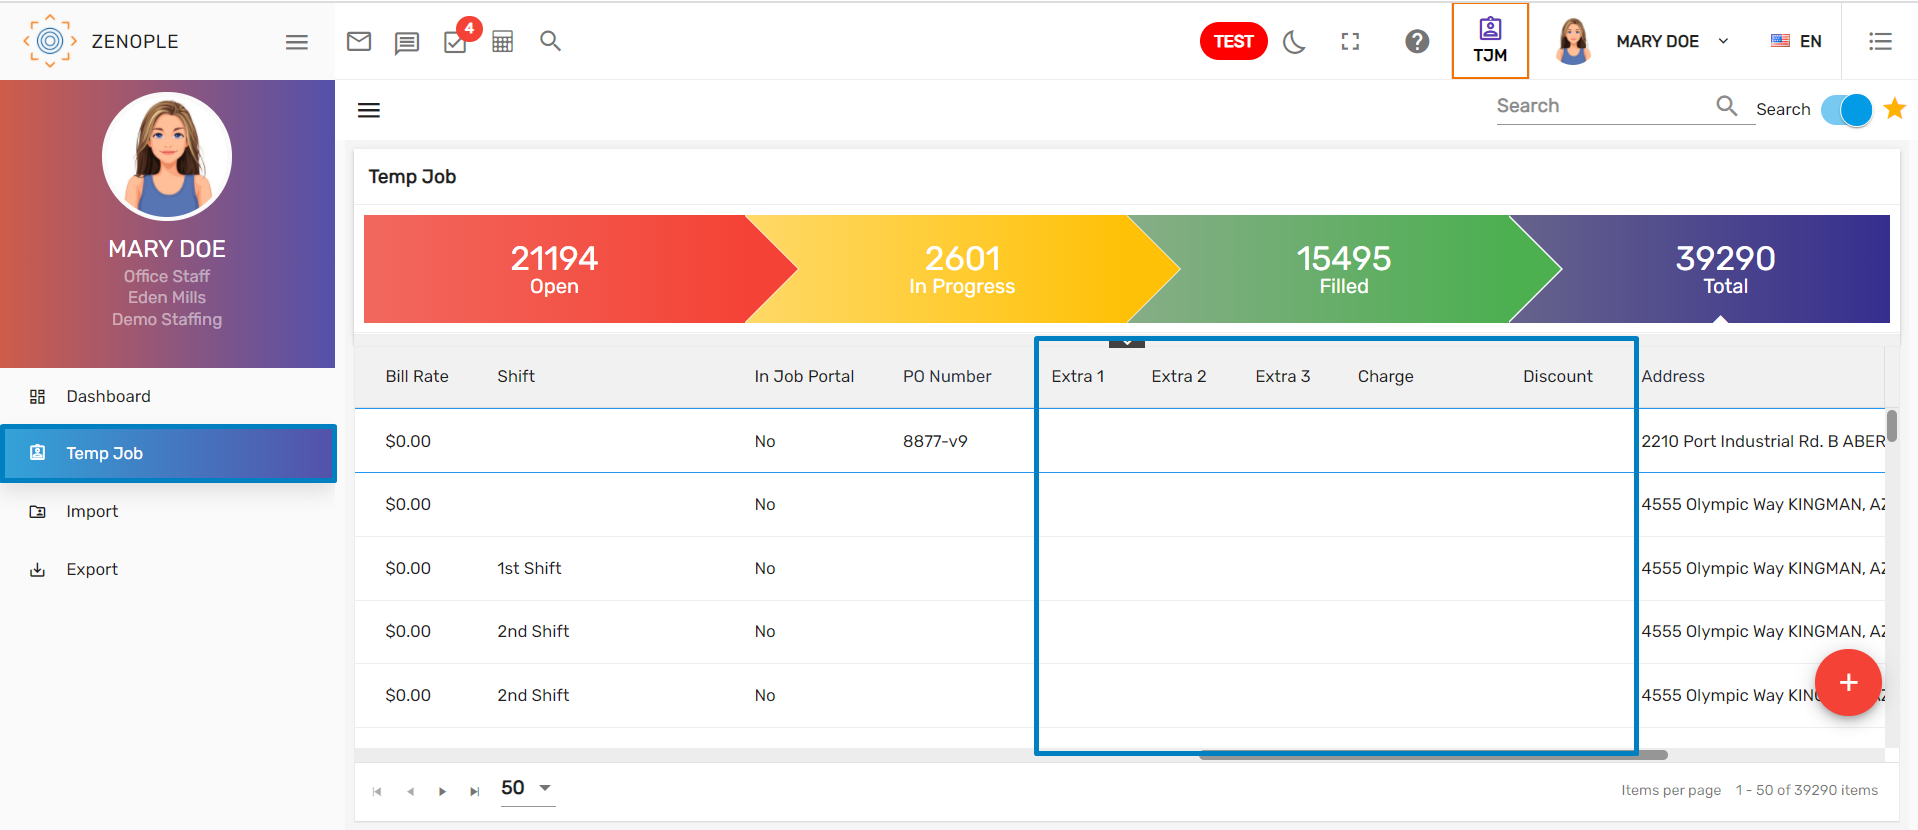
Improvement: Column Order
'Form Name’ column has been moved beside the ‘Start Date’ column to avoid confusion as ‘Form Name’ and ‘Task’ templates have similar names.