Overview
Direct Hire Job navigation allows users to view and add all the candidates and directly hire for the job. It allows users to redirect to the detail page of direct hire job candidates and consists of various navigations. It also has a list of direct hire job candidates on a directory page allowing users to use filters for the entire list of direct hire job candidates available.
Direct Hire Job Directory
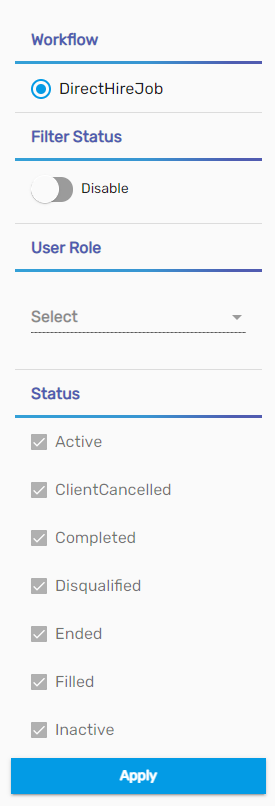
Search
Users can filter the directory page by various options they can search such as filter status, user role, and status.
Favorite Action
There are four different actions under the favorite action of the Direct Hire Job Directory. They are:
- Comment
- Copy Job
- Refresh
- Update Status
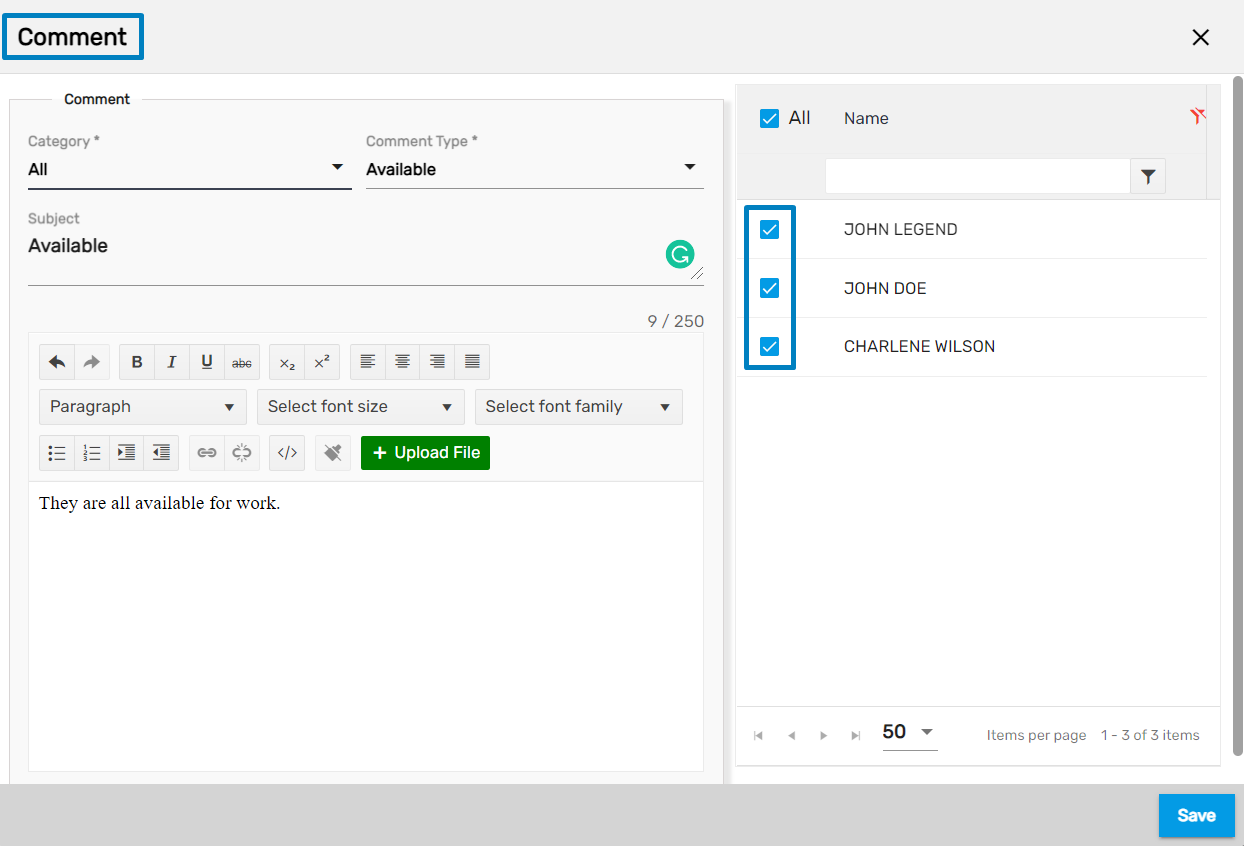
1. Comment
It allows users to add and update multiple comments associated with direct hired under various categories.
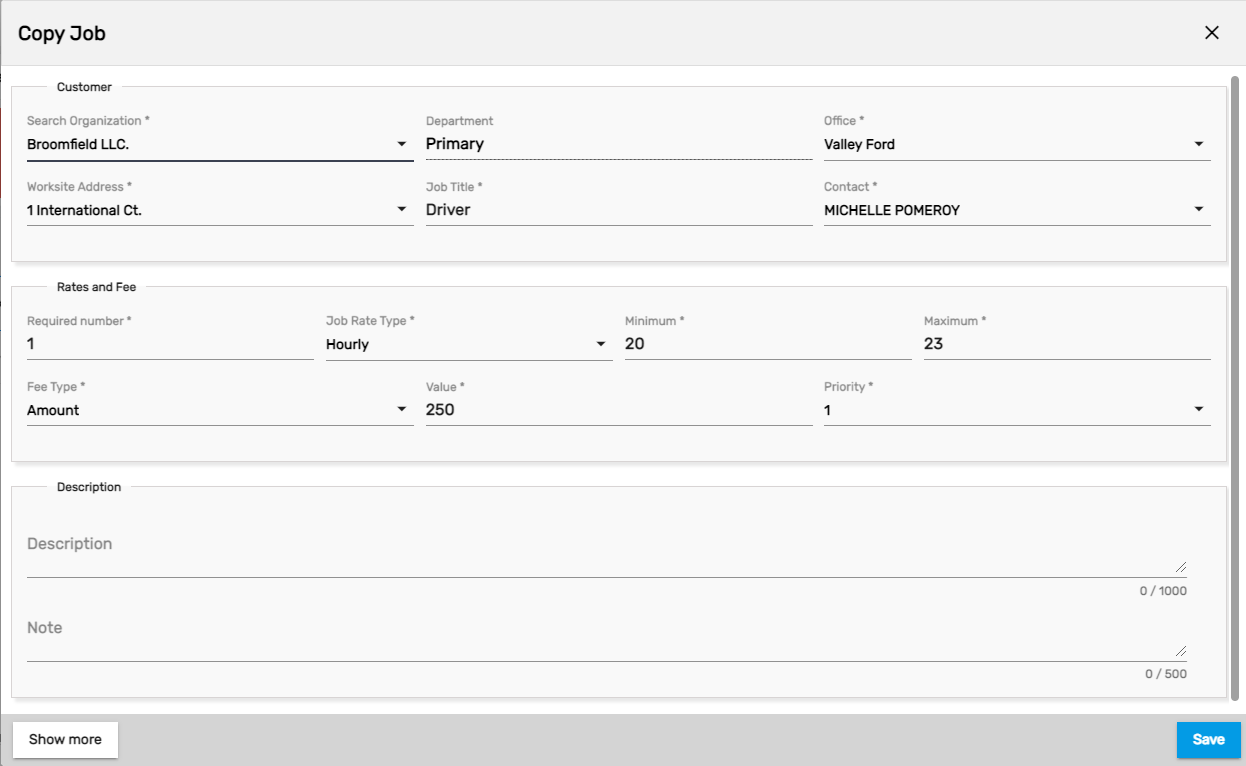
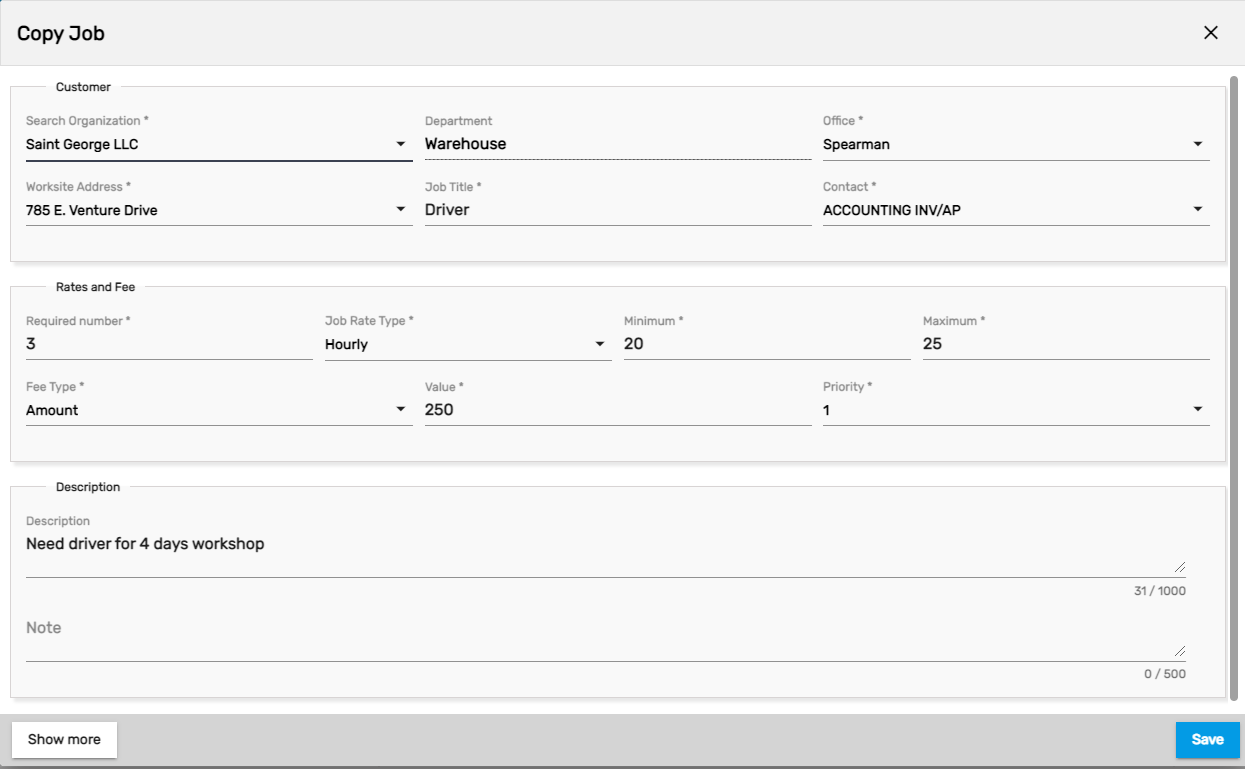
2. Copy Job
Users can copy the job created under a customer to multiple offices using the 'Copy Job' action. They can change the details as per their requirements.
3. Refresh
It refreshes the Direct Hire Job Directory and users can use this action to reload the records.
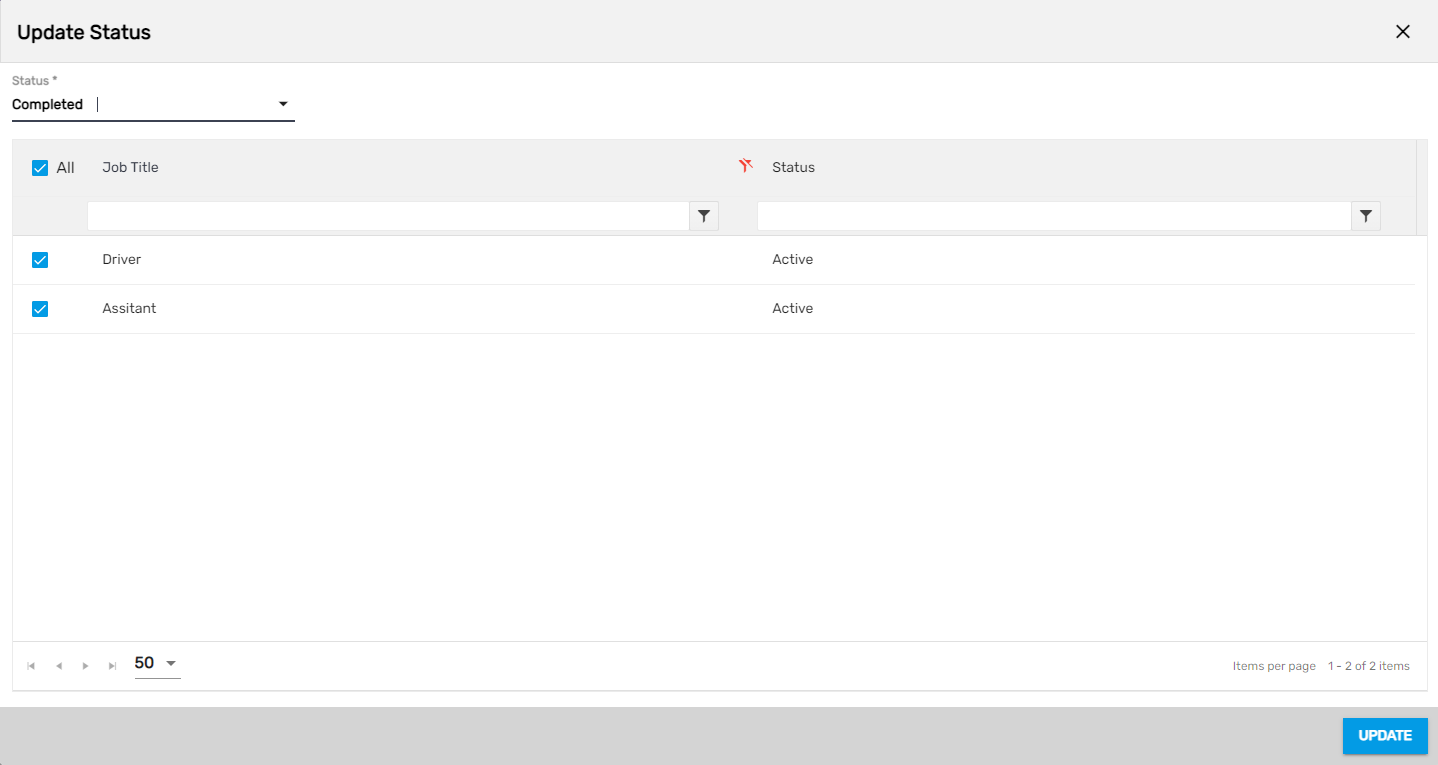
4. Update Status
Users can select multiple jobs at once and update statuses in bulk using this action.
Search/ Recent Toggle Button
When the 'Search' toggle button is set 'On,' it will list all the direct hire job records and allow users to search all the records from the directory. The toggle button turned 'Off,' means the 'Recent' records and it will display the recently searched and visited direct hire job records which are 7 days before today's date. By default, the toggle button will be set 'On.'

Add Job
This action allows users to add new jobs. Users need to search an 'Organization,' select an 'Office,' add the 'Job Title,' 'Worksite Address,' 'Contact' number, and all the required information before saving the job.
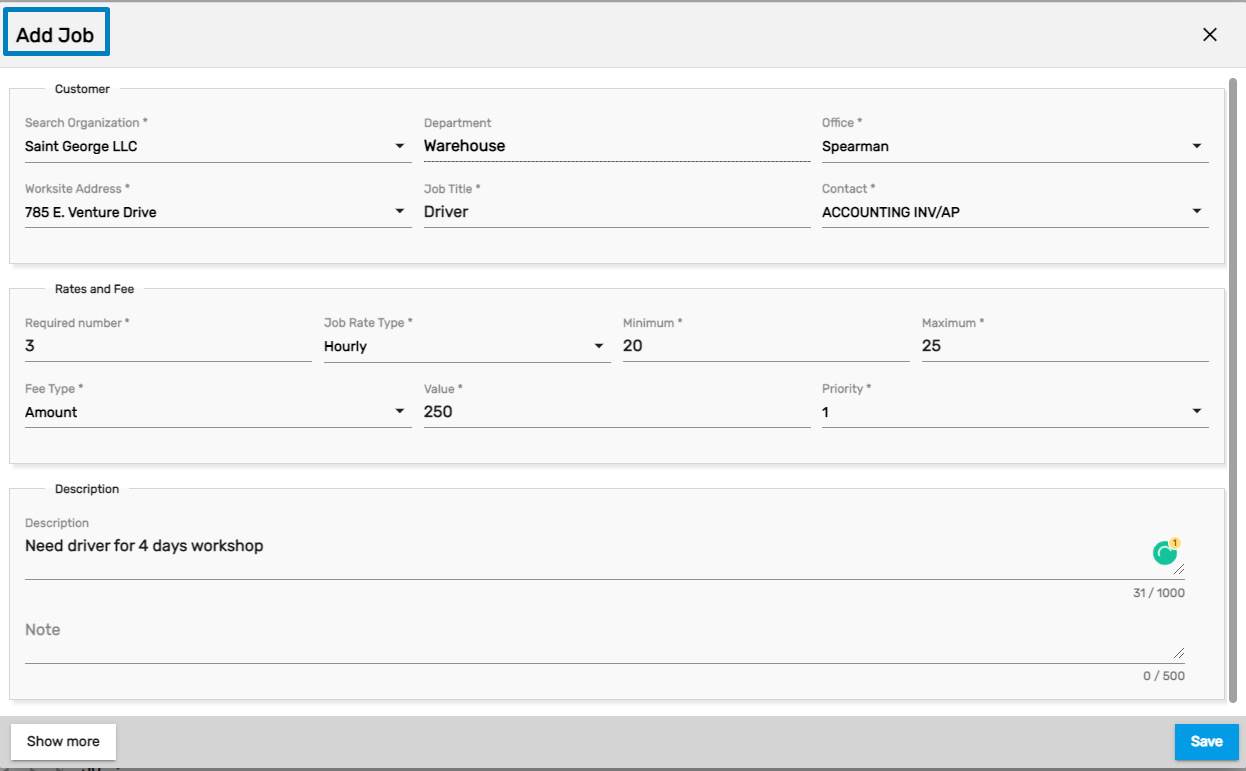
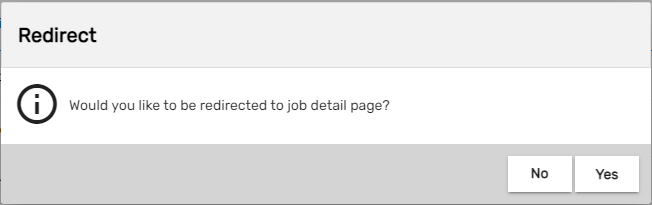
After saving the record, a dialog box asking whether to redirect to the Job Detail Page will appear.
Direct Hire Job Detail
Users can redirect to the detailed page by clicking on an existing job or after adding a new job from the list of direct hire jobs. The detailed page consists of:
- Job Detail (Job title, organization, worksite address, department, office, etc.)
- Workflow
- Favorite Action
- Navigation
Favorite Action
There are 4 different actions in the Favorite Action of the job detail. They are:
- Copy Job
- Discard
- Edit
- Refresh
1. Copy Job
Users can copy the job created under a customer to multiple offices. They can change the details as per their requirements.
2. Discard
The ‘Discard’ action allows users to discard a particular job.
3. Edit
This action allows users to update the details of the job. Clicking on the 'Edit' action in the Favorite Action and updating the details will edit the job details.
4. Refresh
This action refreshes the Direct Hire Job Detail page and users can use the action to reload the records.
Navigation
The direct hire job detail consists of the following top navigations. They are:
- Snapshot
- Talent
- Comment
- Skill
- Interview
- Other
- People
- Job Posting
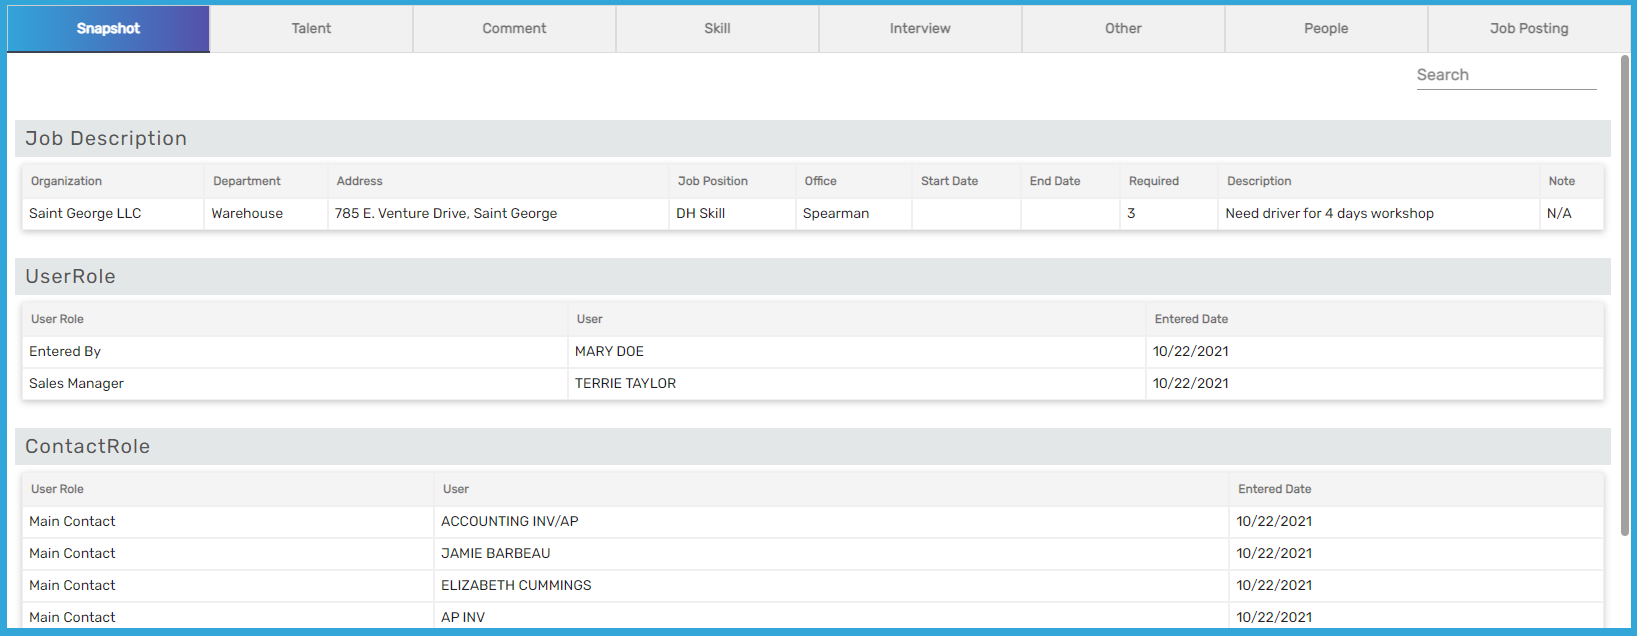
Snapshot
It displays the summarized description of the job profile. Users will be able to view all the information in a summarized form added through other navigations available in the profile.
Talent
Users can add talent/ candidates from this navigation for direct hire of the employees.
Favorite Action
There are 12 different actions under the Favorite Action of Talent top navigation. They are:
- Add
- Auto Match
- Comment
- Edit
- Import Resume
- Move to Next Stage
- Move to Previous Stage
- Placement
- Refresh
- Send Email
- Send SMS
- Update Status
1. Add
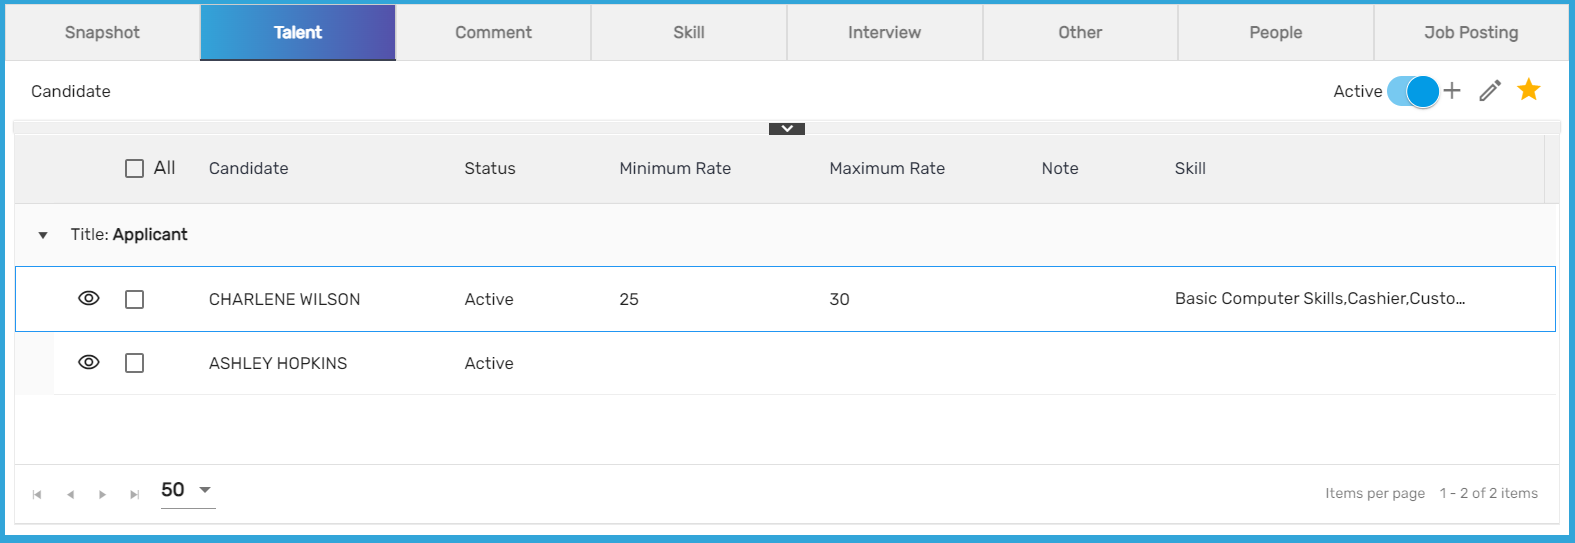
Users can add job candidates by clicking on Add action. Users can search for a person and add as a candidate for the job.
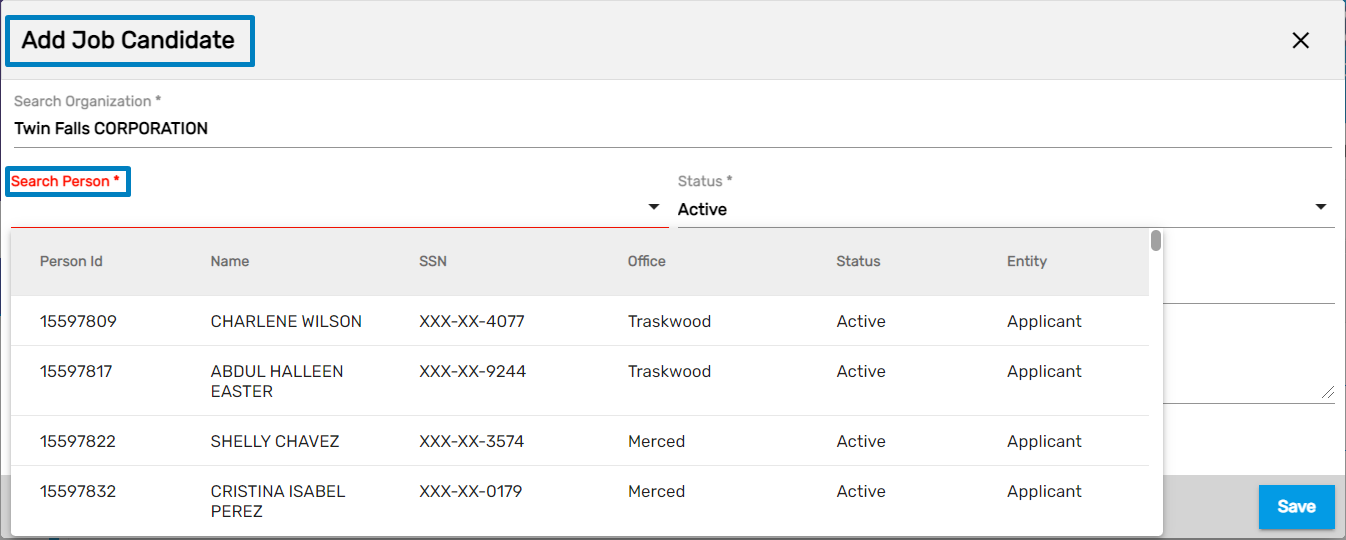
Added applicants can be viewed as:
2. Auto Match
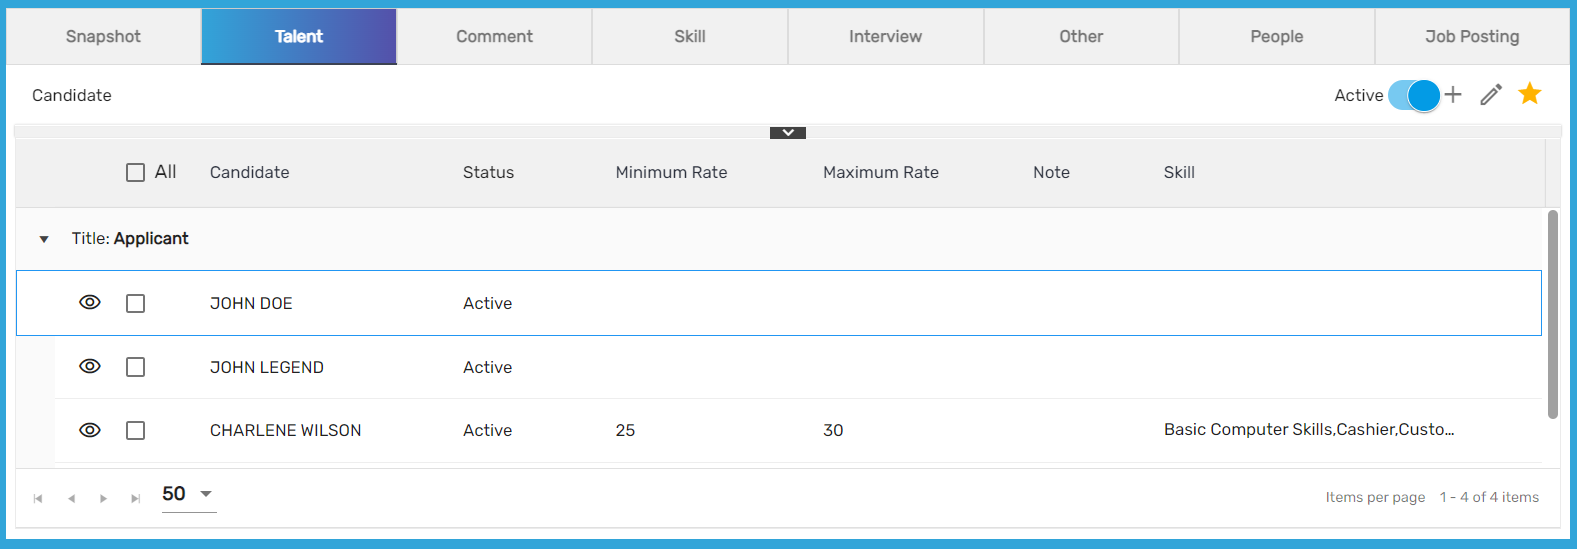
Users can match and add candidates under Talent top navigation by using Auto Match action. Users can search candidates applying different conditions.
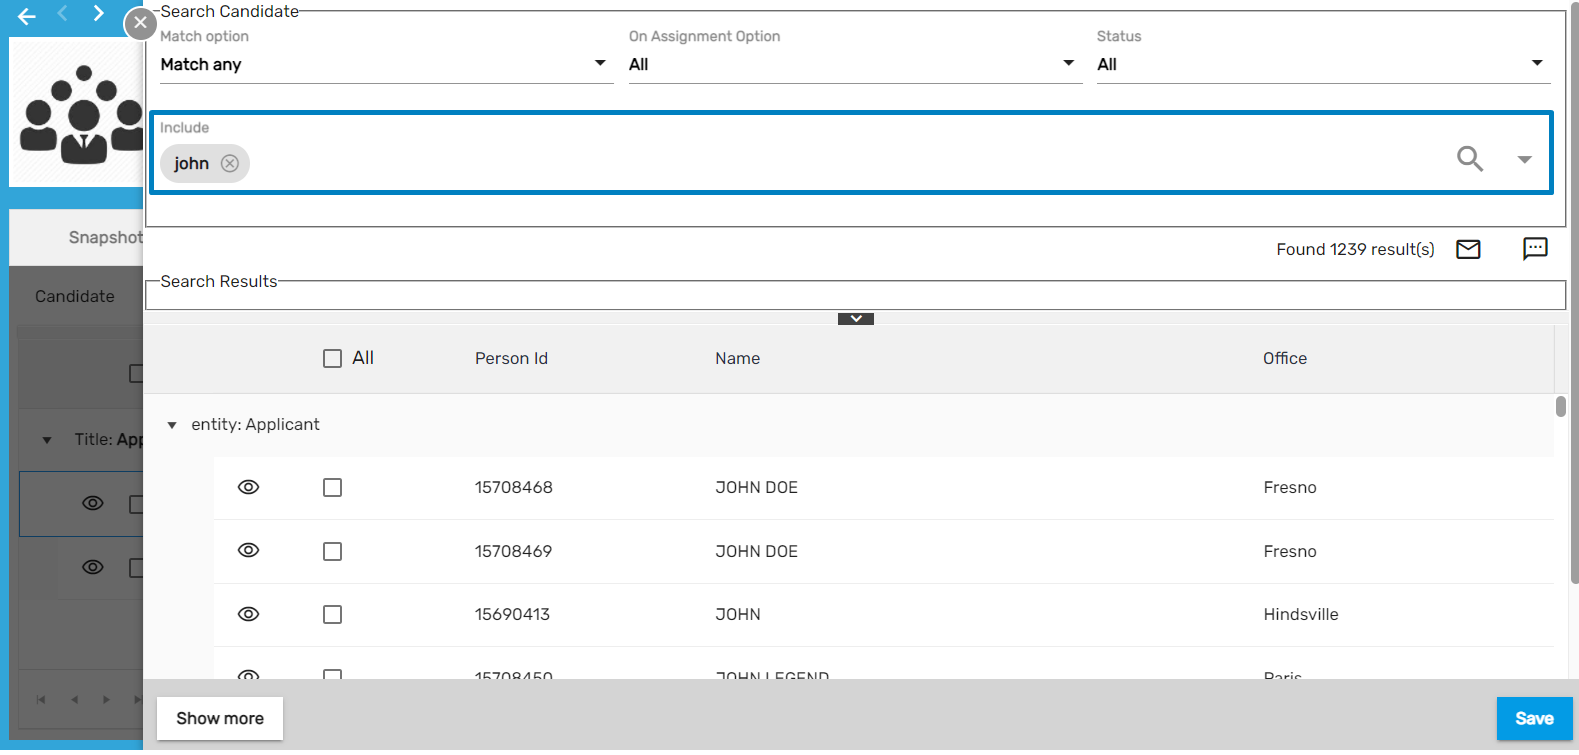
Selected and saved candidates will be displayed in Talent top navigation as:
3. Comment
Users can select multiple candidates and add comments at once. The process of adding comments is similar in all the applications. Added comments can be viewed by clicking on the Candidate Detail page or clicking on the eye view icon.
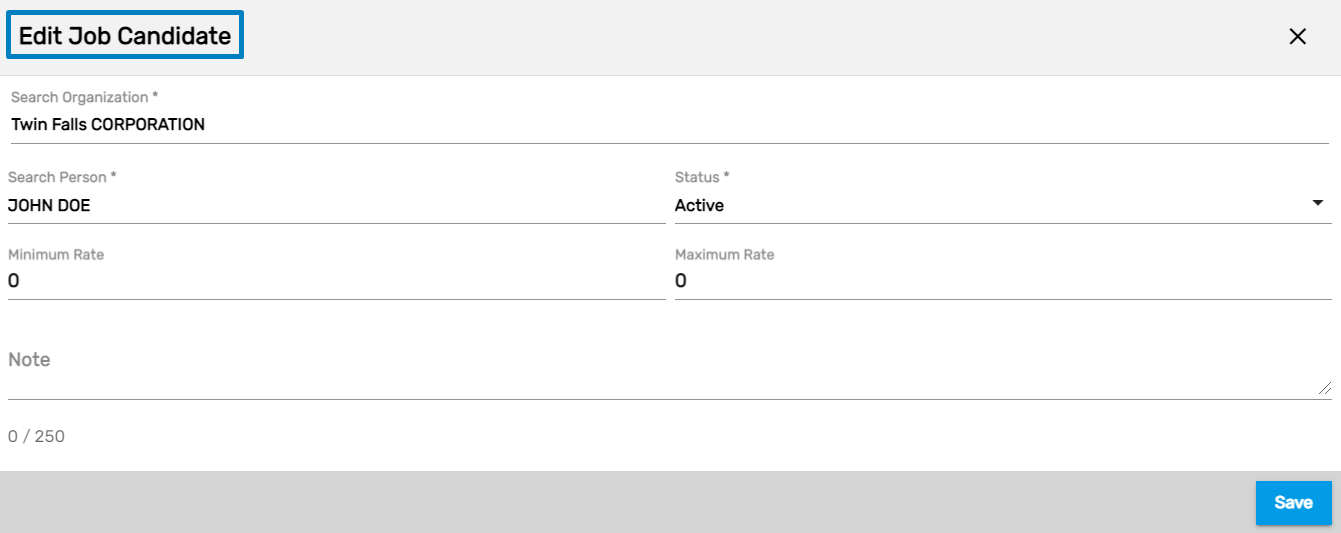
4. Edit
Clicking on the Edit action users can edit the selected job candidate. Users can update the 'Status' of the candidate and update the 'Minimum Rate' and 'Maximum Rate' of the candidate under an organization.
5. Import Resume
Users can import multiple candidates at once by clicking on the Import Resume action.
How to use Import Resume
- Click on ‘Import Resume’
- Service Batch will be created in the background and users can upload resumes accordingly.
- Users can remove the resume that they have uploaded by clicking on the ‘Discard’ action.
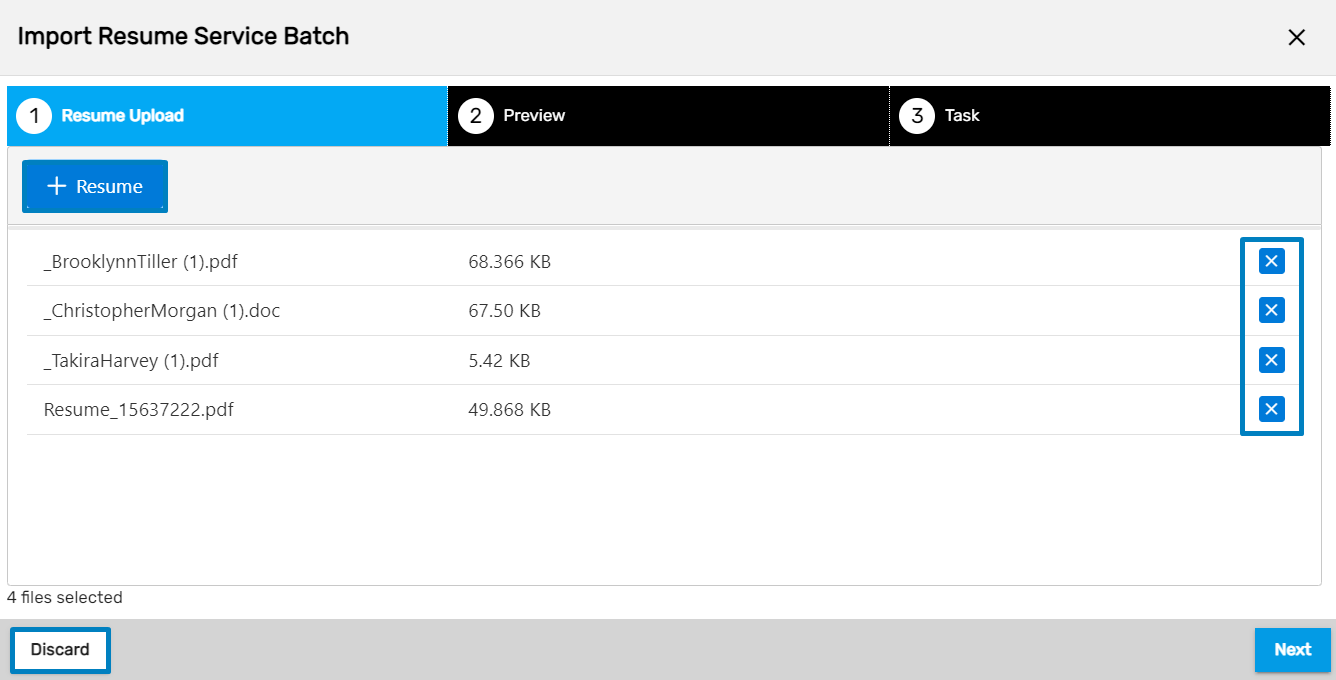
- After uploading the resume/s, click on Next
- Users might get exceptions if the data is invalid and resumes cannot be parsed.
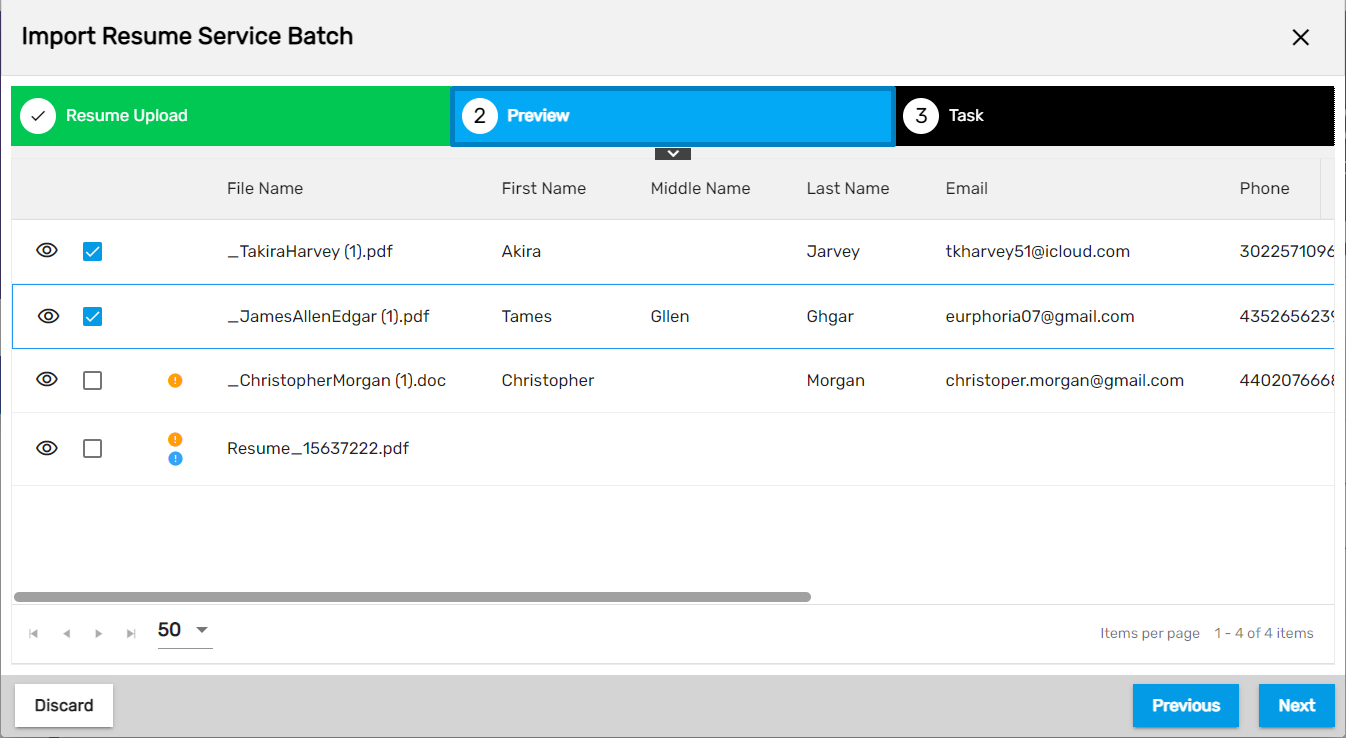
- After the resume/s are parsed from the Preview stage, then these will be moved to the Task stage where candidates are assigned different tasks related to the workflow. Users can unselect the task as per their requirements.
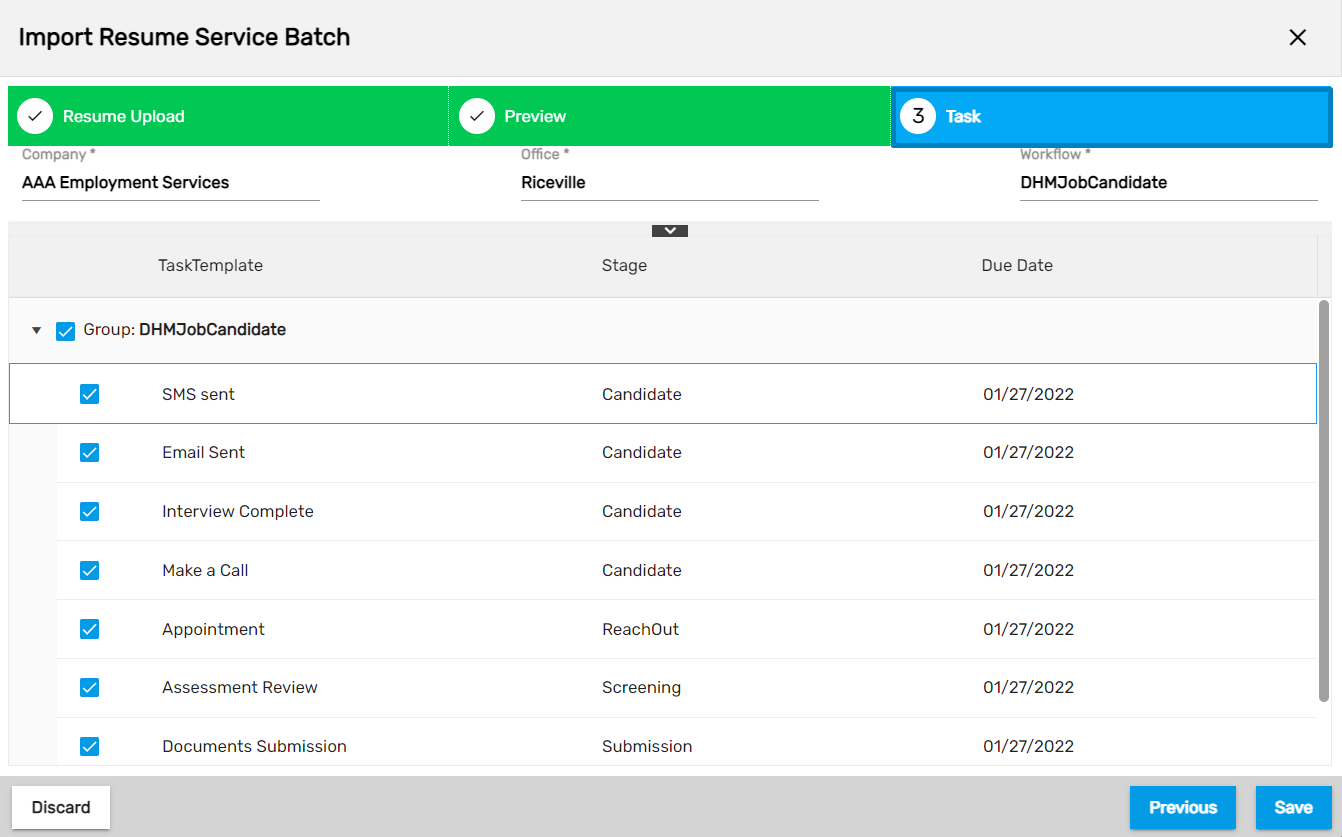
- Lastly, click on Save and the imported job candidates can be viewed from Talent navigation.
6. Move to Next Stage
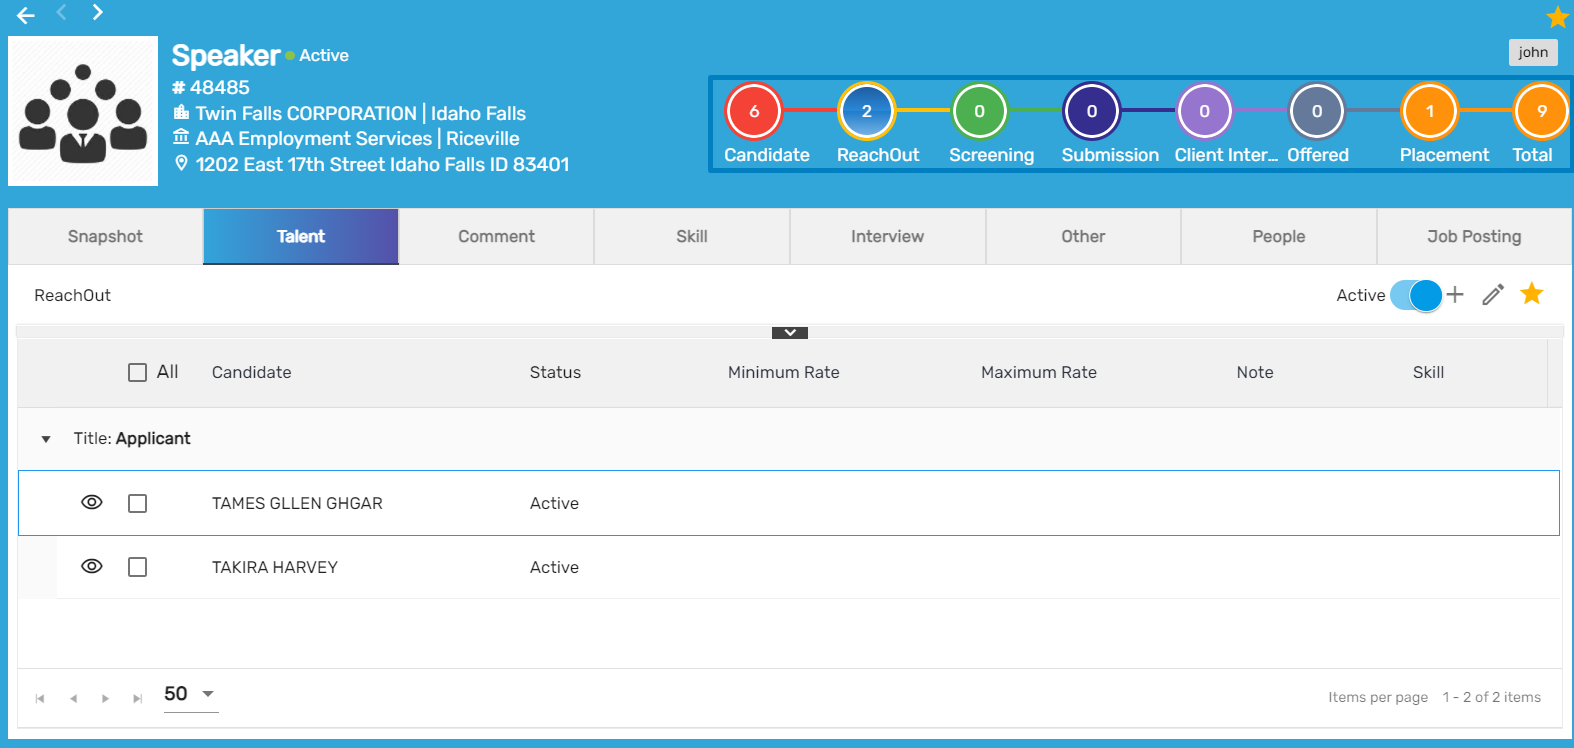
This action allows users to move to the next stage. If the users have created multiple candidates, then they will be in the 'Candidate' stage. When the users click on this action, they will be moved to the next stage i.e., ‘Reach Out.' While moving from one stage to another the users will be asked if they want to add a Task or not.
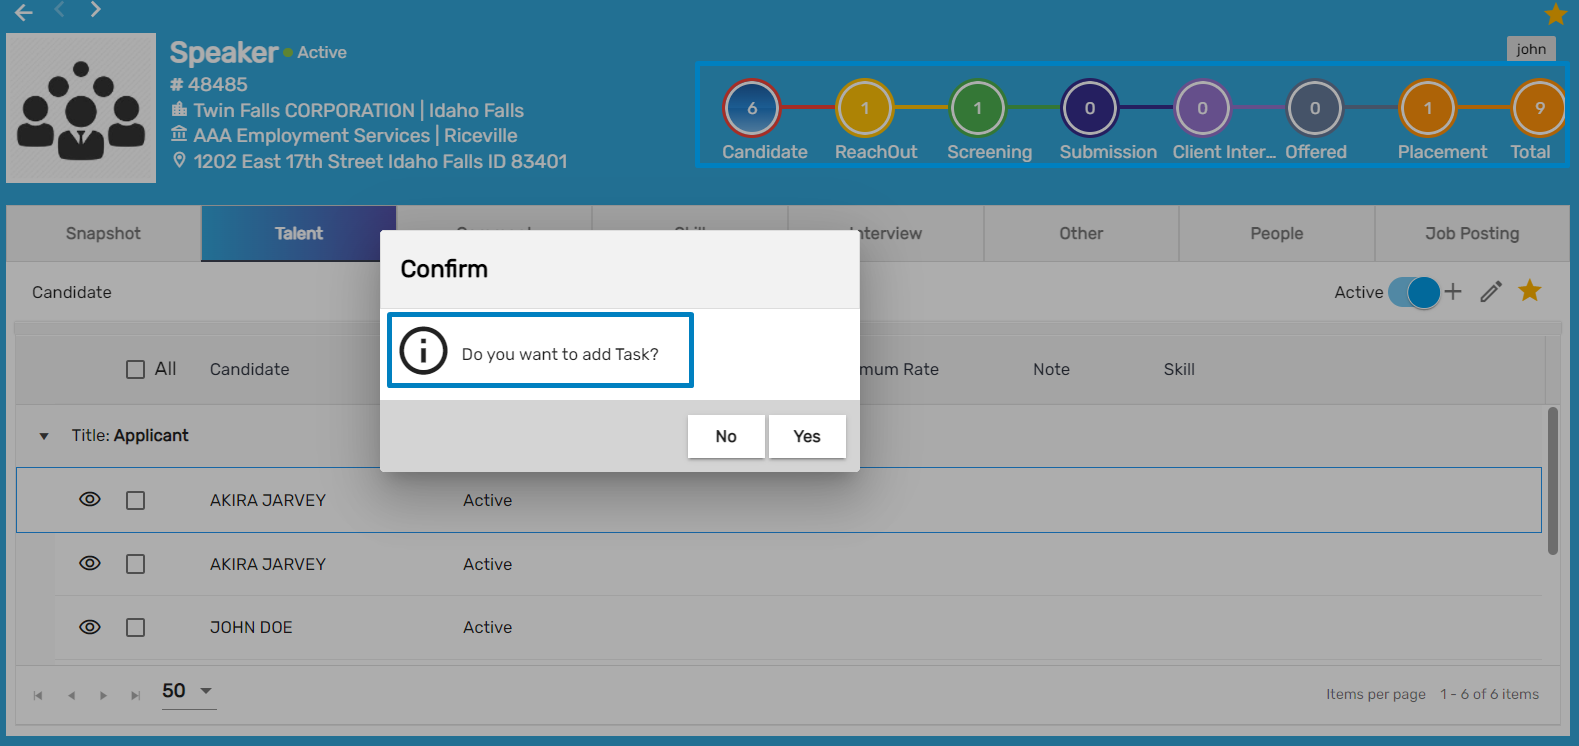
Clicking on ‘Yes’ will redirect users to the Task dialog box. Users need to select the required Task and click Save.
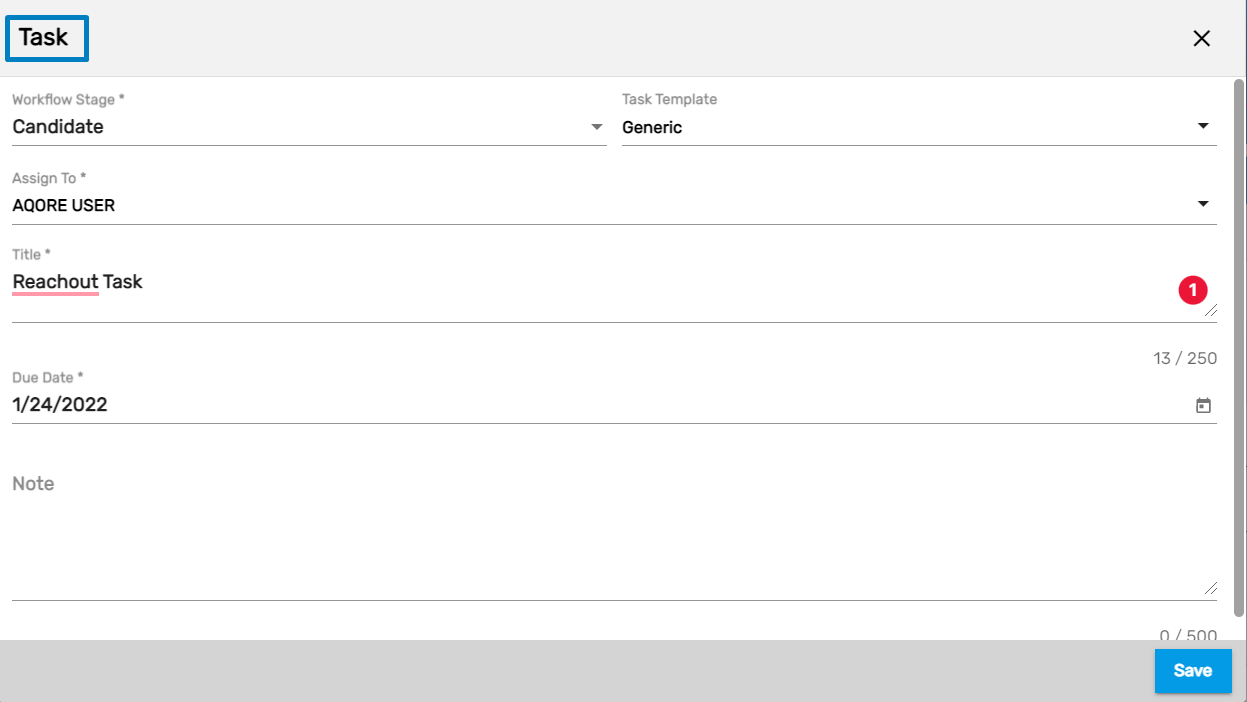
Candidates can view the assigned task in their portal similar to other tasks.
7. Move to Previous Stage
Clicking on the ‘Move to Previous Stage’ action will move the candidate a step back to the previous stage. Users can see the change in the workflow when they move the candidate from one stage to another.
8. Placement
Clicking on the Placement action, users can view the Placement form and they can directly set the employee on the Placement stage.
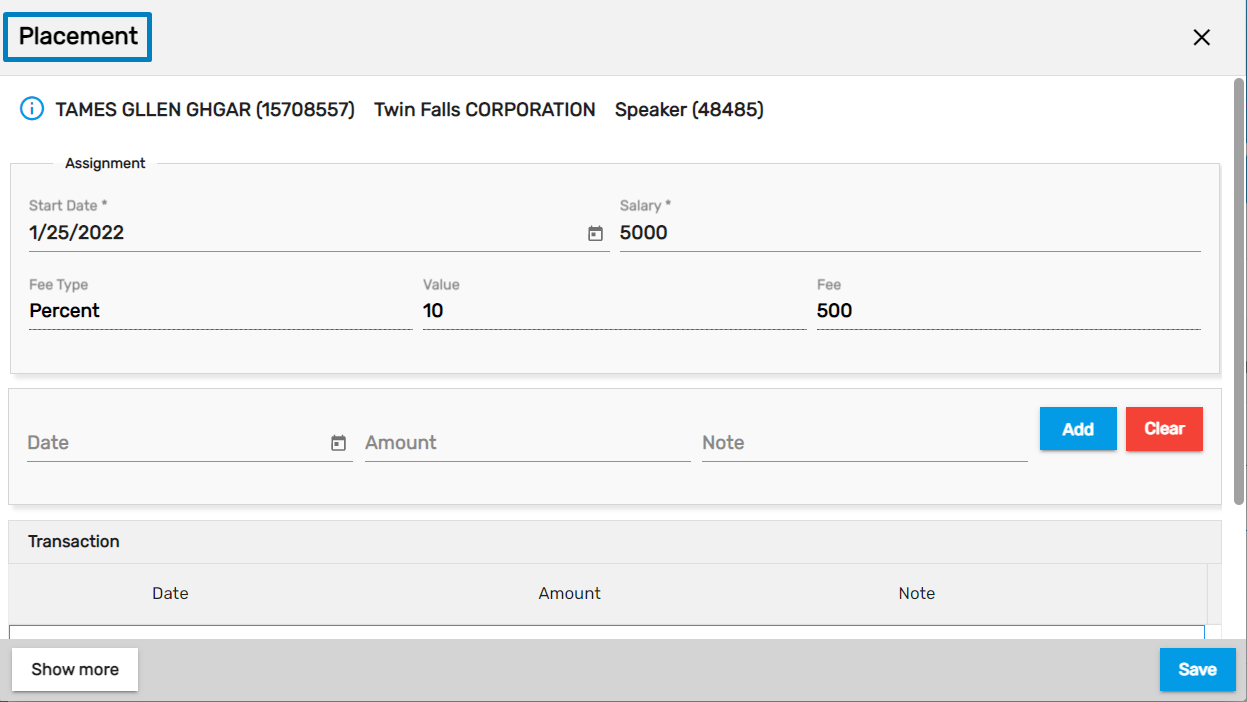
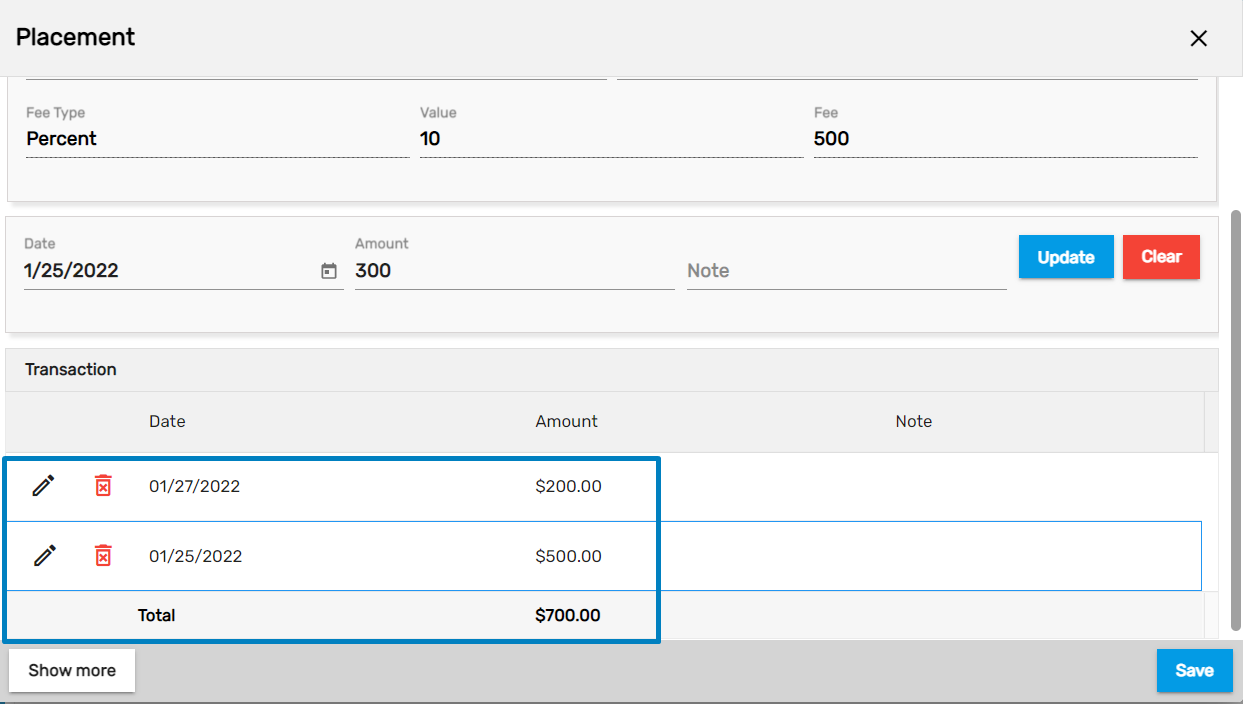
Based on the salary added, users can take a commission from the organization they have to send candidates for employment. The transaction can be created based on the 'Fee Type' selected. Fee Type can be in percent or amount. As the transaction is added, an invoice is generated to the organization.
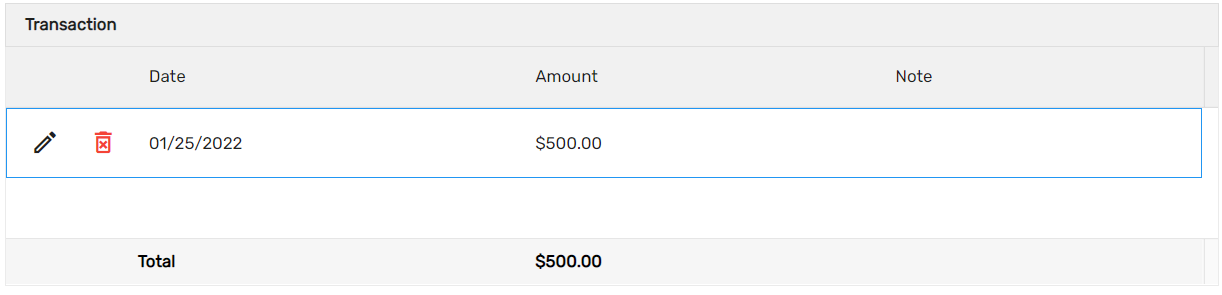
Users can send invoices multiple times by adding different dates and amounts. They can delete and edit the added transaction.
9. Refresh
This action refreshes the Talent directory and users can use the action to reload the records.
10. Send Email
This action allows users to send emails to multiple Talent at once similar to other applications.
11. Send SMS
This action allows users to send SMS to multiple Talent at once similar to other applications.
12. Update Status
This action allows users to update the status for multiple Talent at once similar to other applications.
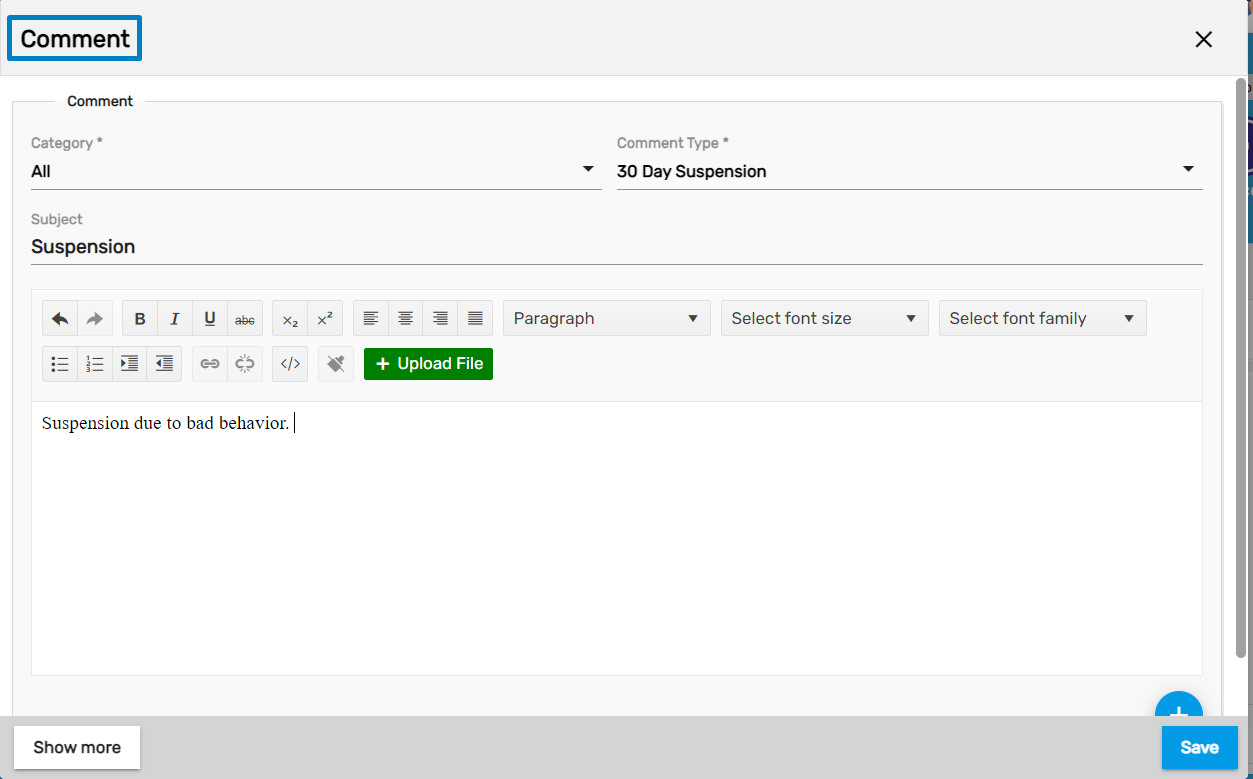
Comment
The Comment top navigation allows users to add new comments in the job, edit the existing comment details and view the comment report. The process of adding comments is similar in all the applications.
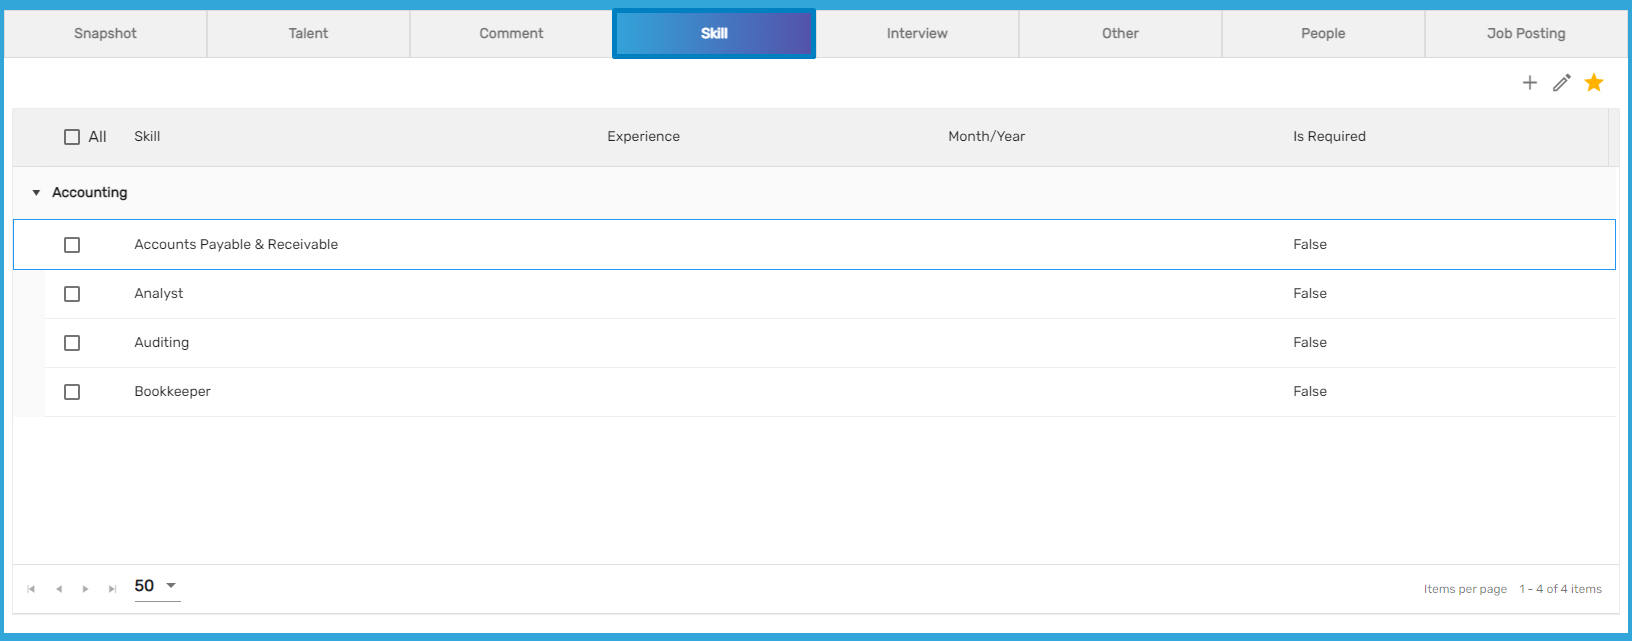
Skill
The top navigation, 'Skill' displays the skills defined for the job. Users can filter and add candidates as per the defined skill.
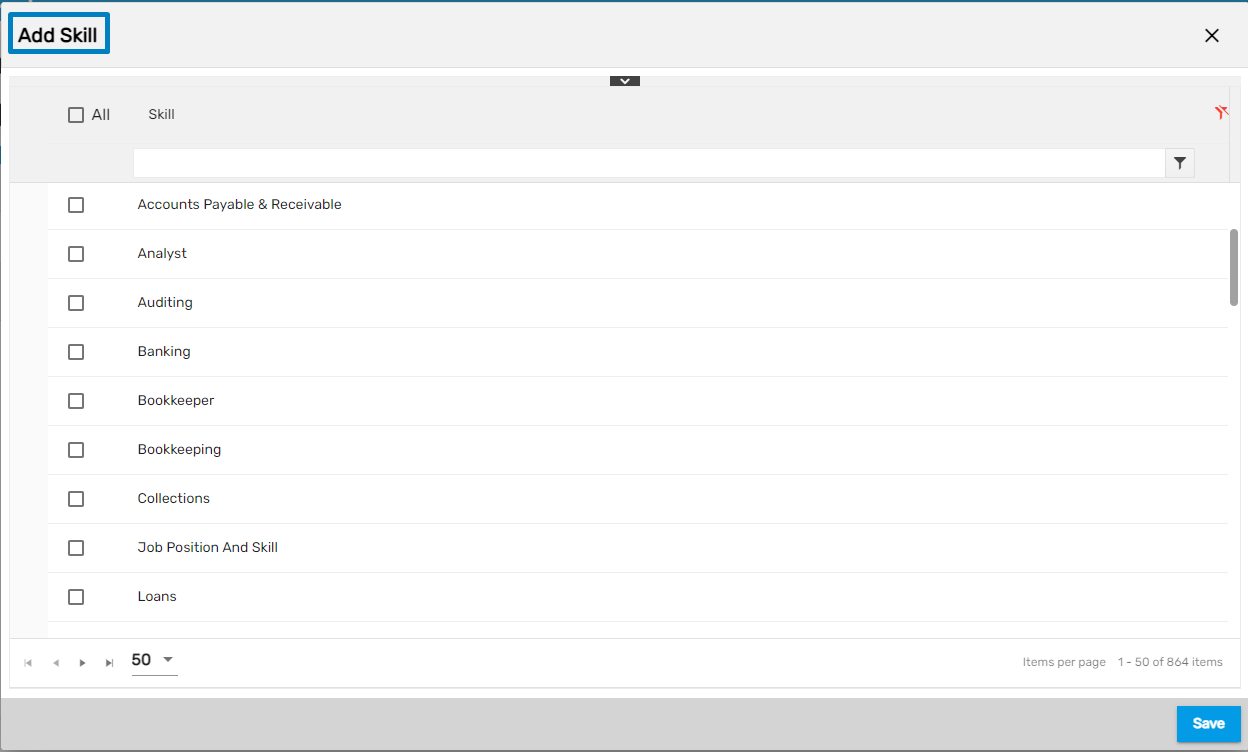
Added skills will be displayed as:
Other
The top navigation consists of two side navigations. They are:
- Custom
- Job Specification
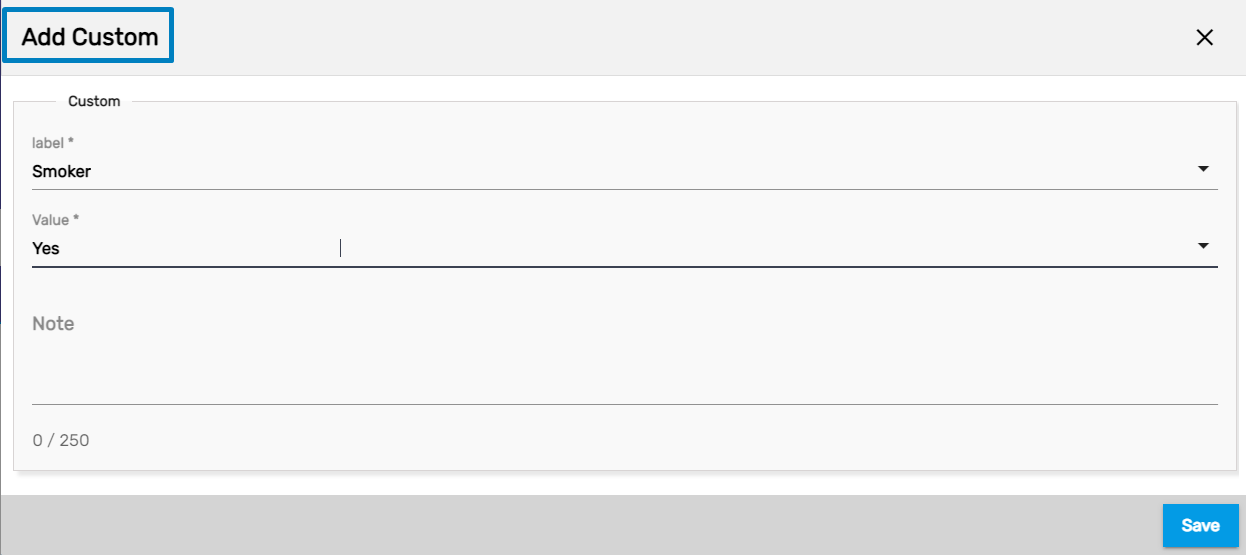
1. Custom
Custom side navigation allows the users to add extra information related to the job. Users can add the custom Label, their Value, and Note.
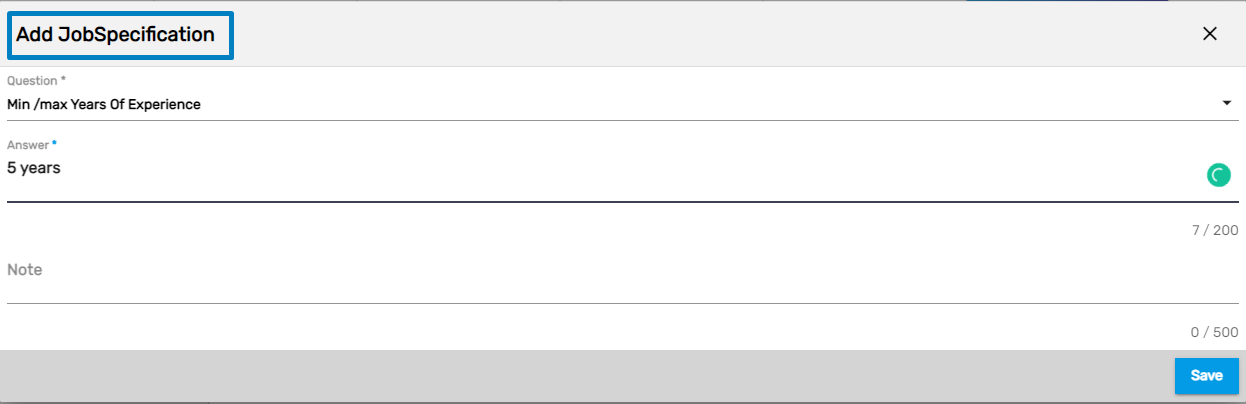
2. Job Specification
Job Specification side navigation allows the users to add extra information related to the job. Users can select the questions and answer them for reference purposes. Users can add or edit the job specifications.
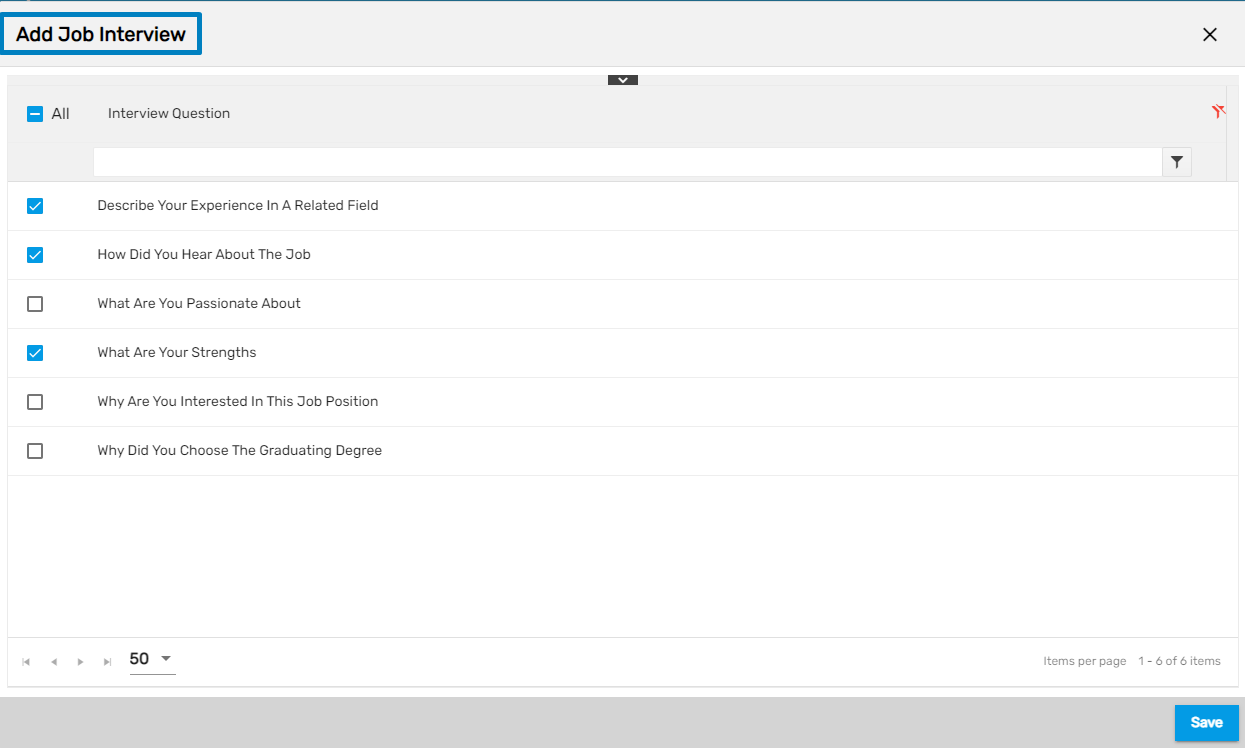
Interview
Interview top navigation allows the user to add, edit or delete various interview-related questions. Users can select and add the questions to the job interview of the candidates.
People
The People top navigation consists of three side navigations. They are:
- Contact
- Contact Role
- User Role
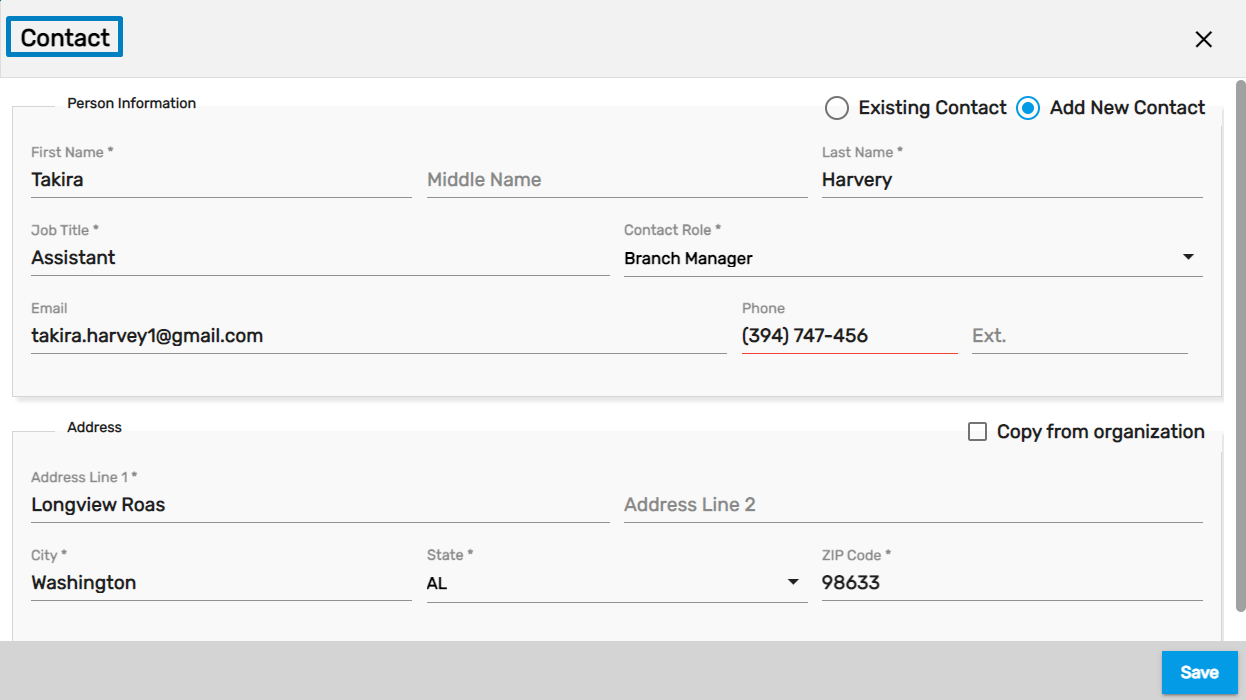
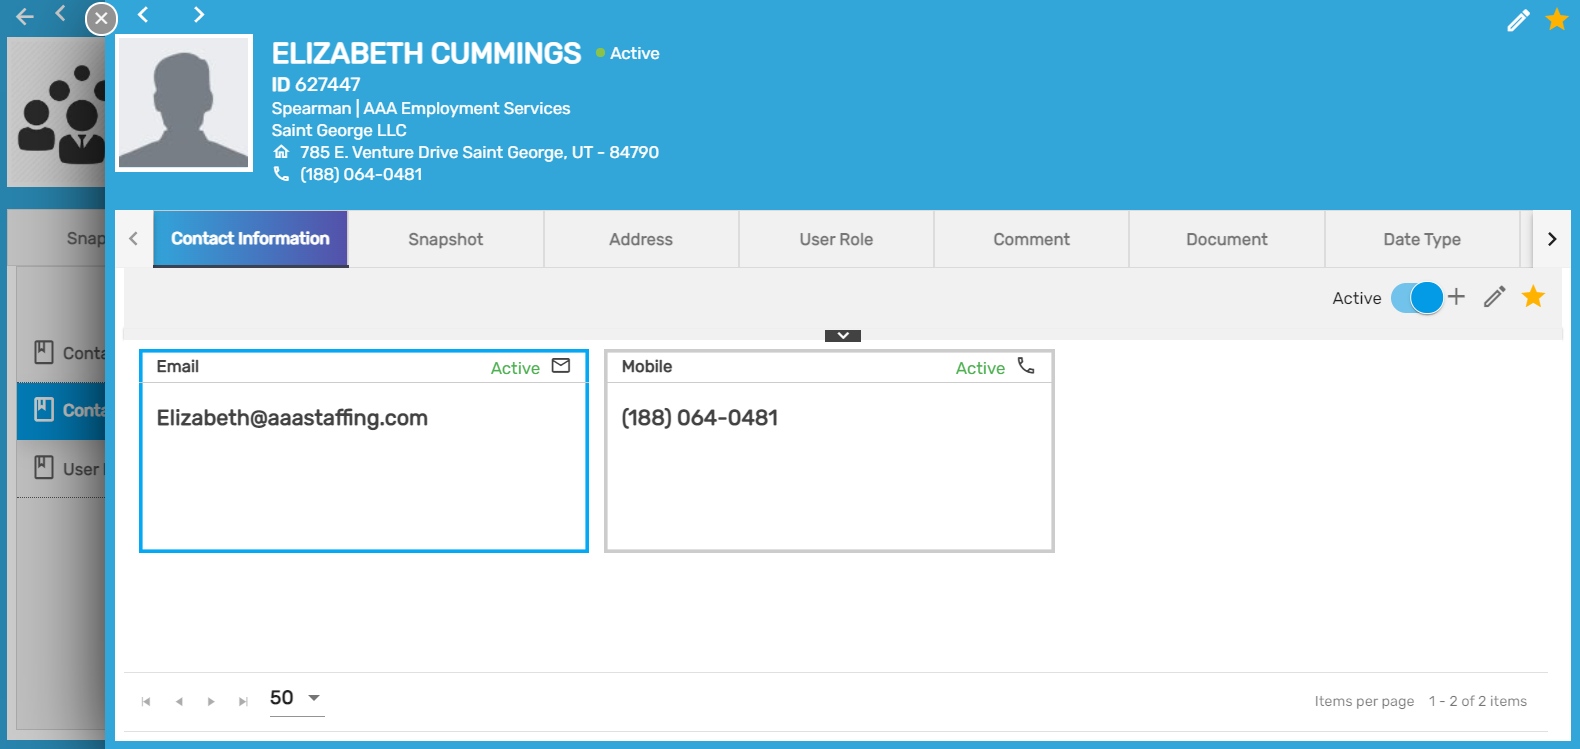
1. Contact
The Contact side navigation shows the contact records. It allows users to view the Login Info of the contact, add and edit the contact details. The toggle button shows the 'Active' or 'All' contacts of the contact list.
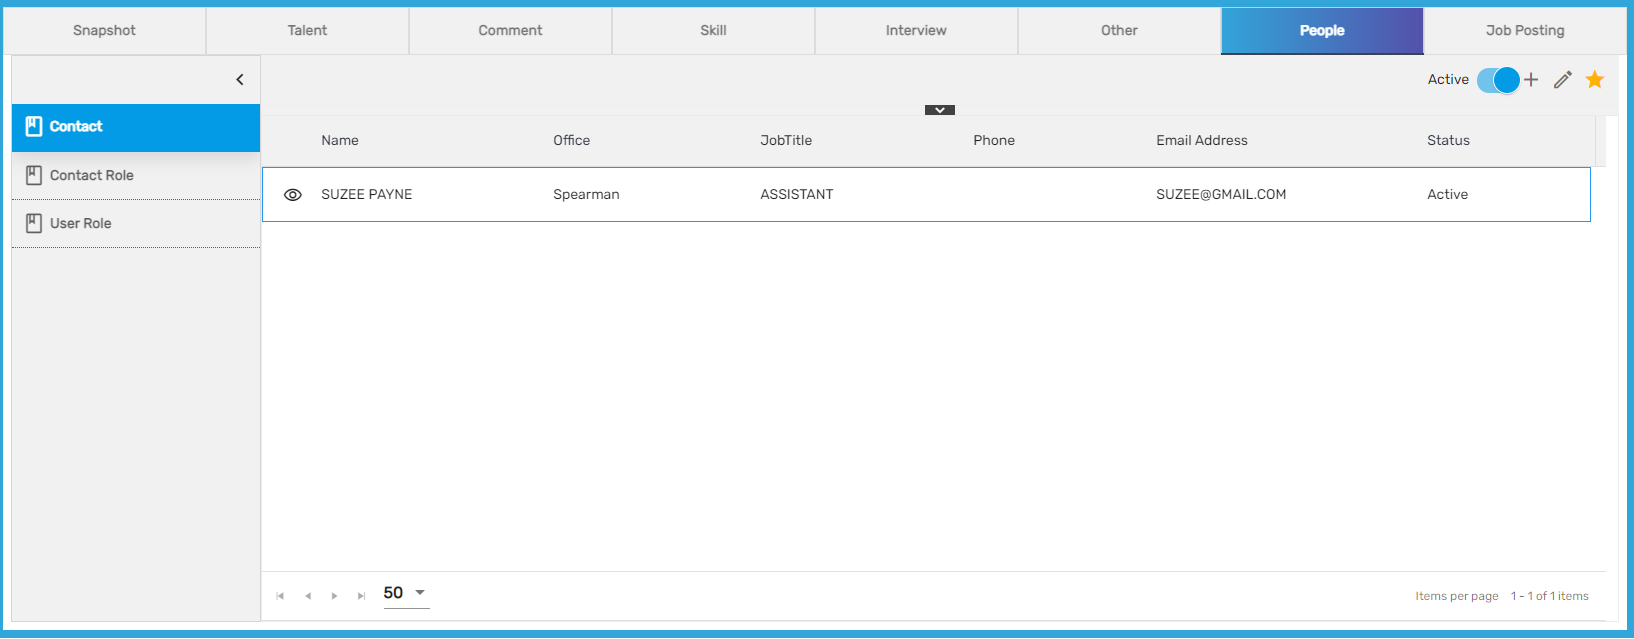
Users can view the detailed information of the contact by clicking on the eye view icon from the contact detail.
The users can add the contact from the existing contact list (contact list from the contact records) or can add a new contact for the temp job. They can select the options of either 'Existing Contact' or 'Add New Contact.'
2. Contact Role
The Contact Role side navigation shows the role for the contact. The roles might be an HR manager, main contact, supervisor, branch manager, invoice attn to., marketing main, order by, other, payroll contact, report to, time approval, web portal user.
It allows the user to add and edit contact roles. The users are only allowed to add the roles for the contact. Multiple roles can be assigned to the same contact but multiple contacts for the same role are not allowed to added.
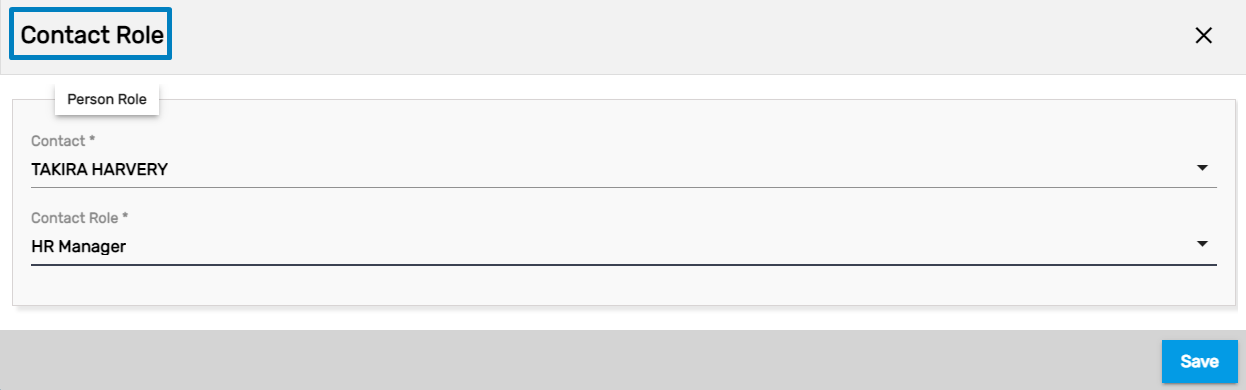
Added Contact Role will be displayed as:
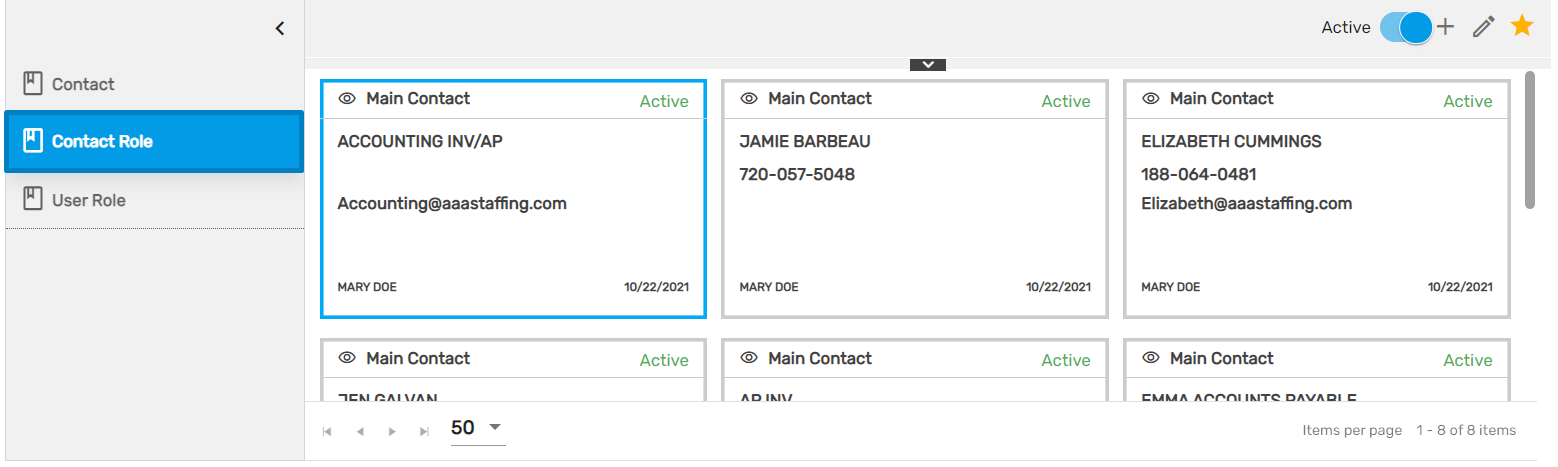
Users can redirect to the Contact Detail by clicking on the eye view icon.
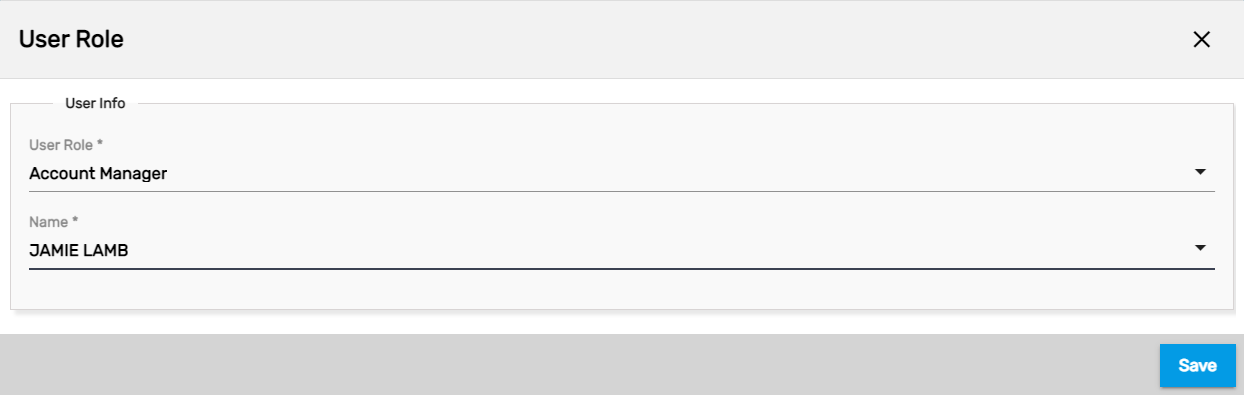
3. User Role
The User Role side navigation shows who is directly involved with the job like the user who added the job (Entered By), account manager, sales manager, and the staffing representative. It allows users to add and edit user roles of the temp job. Users can't add multiple users for the same role.
Added User Role will be displayed as:
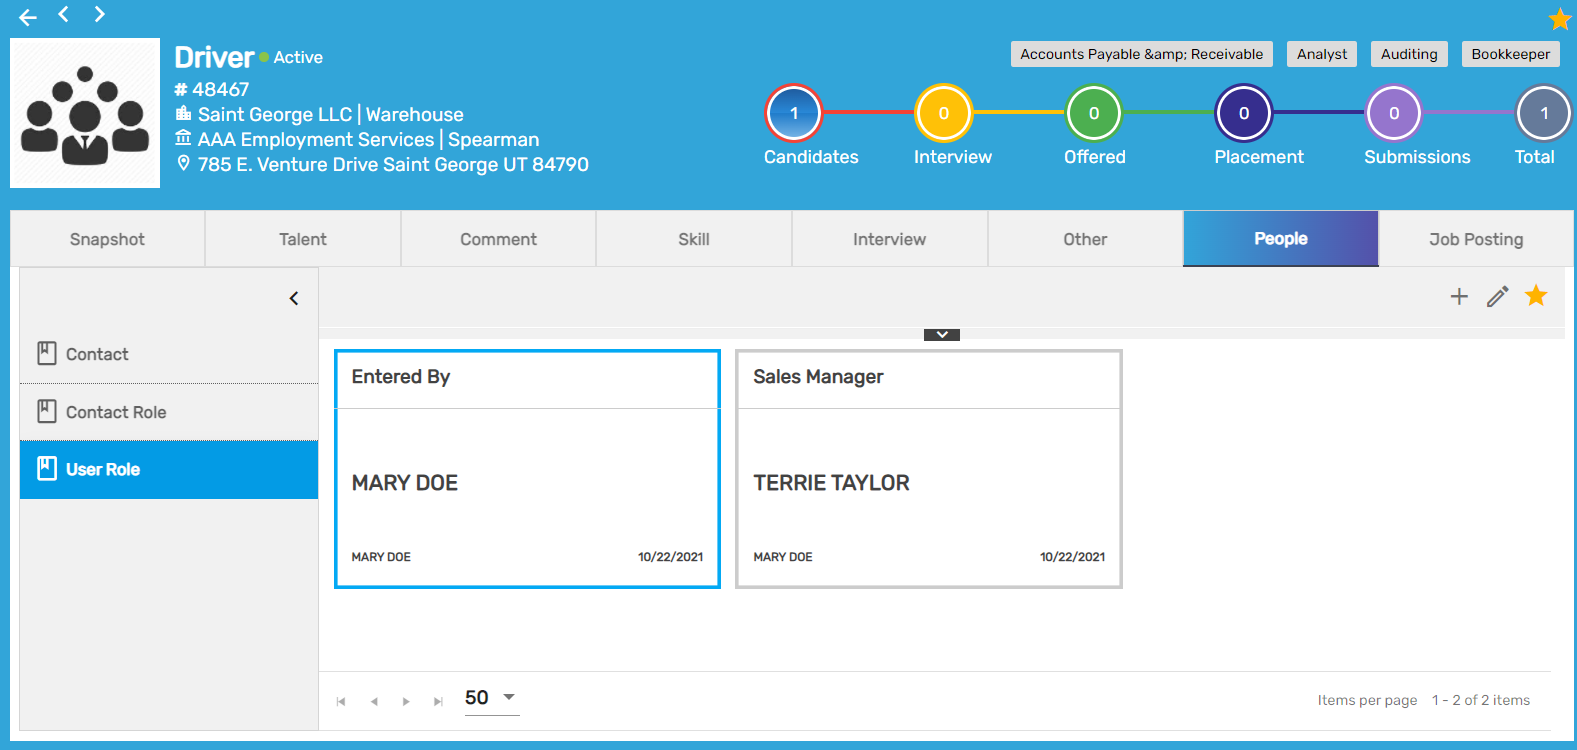
The standard user roles are entered by, account manager, sales manager, and staffing representative but these roles can be customized as per the organization's requirement.
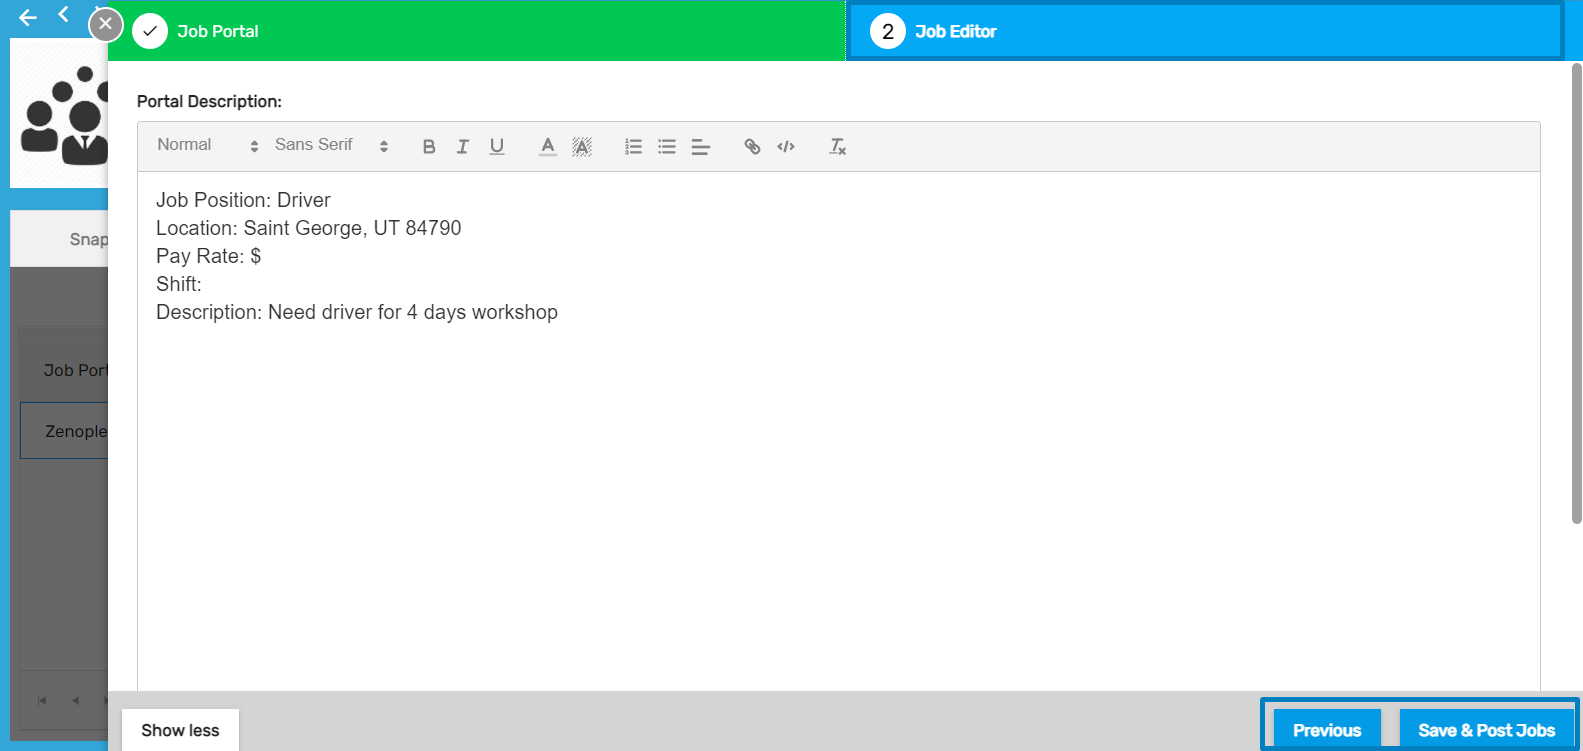
Job Posting
Job Posting top navigation displays the records of the job posted under different job portals. It allows users to save and post jobs from different job portals. The job portal can be customized as per requirements. The job can be posted from the 'Zenople Job Portal' as well. The job posted to the Zenople portal will be listed on the 'Job Portal' of Zenople. It makes users easy to post jobs so that job seekers can visit the job portal and apply for the job from the portal.
Go to the Favorite Action and click on the Settings action. Users will see a list of job portals, select the required job portal from the list and click on Next.
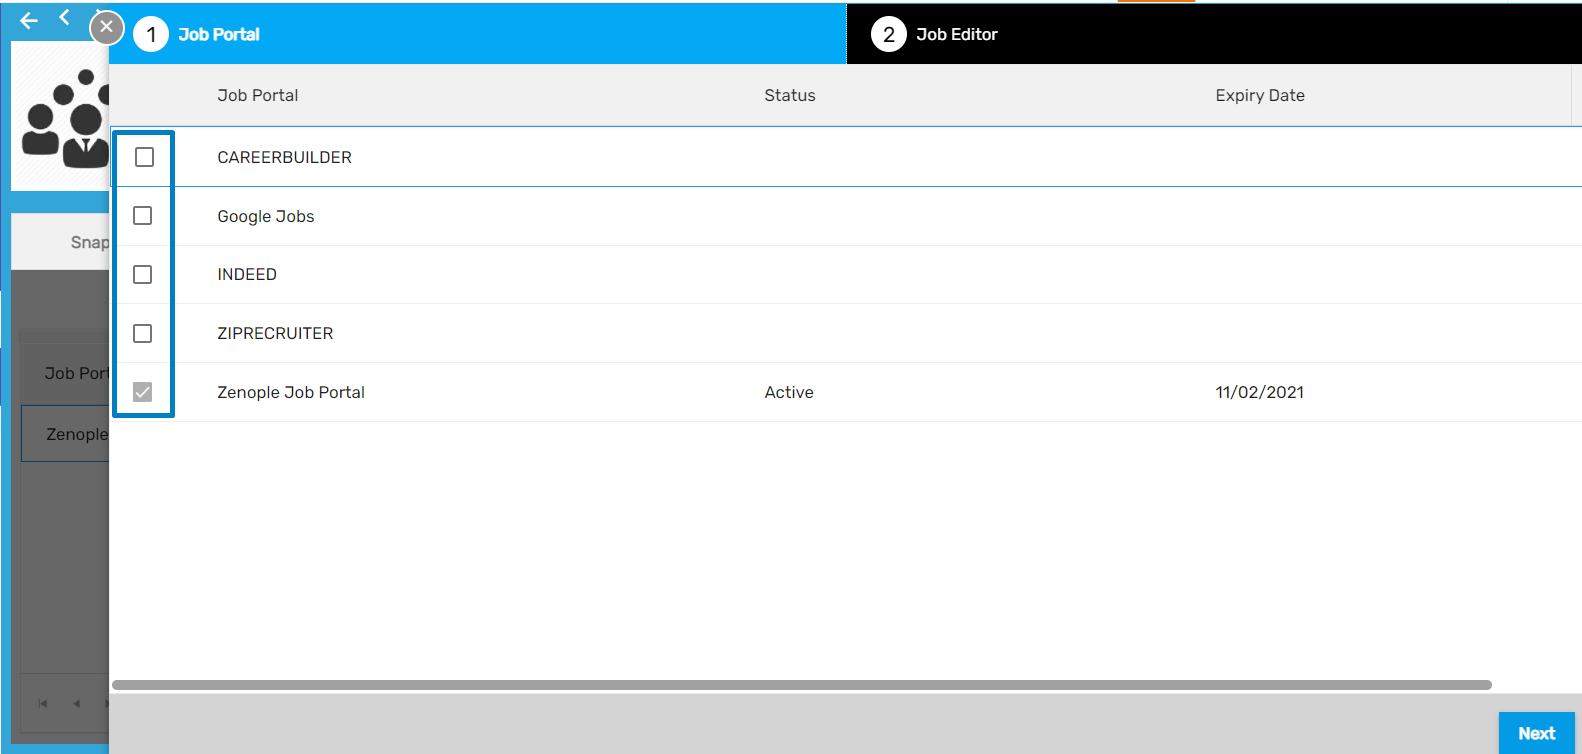
Users can add the job description which will appear on the Job Portal.