Overview
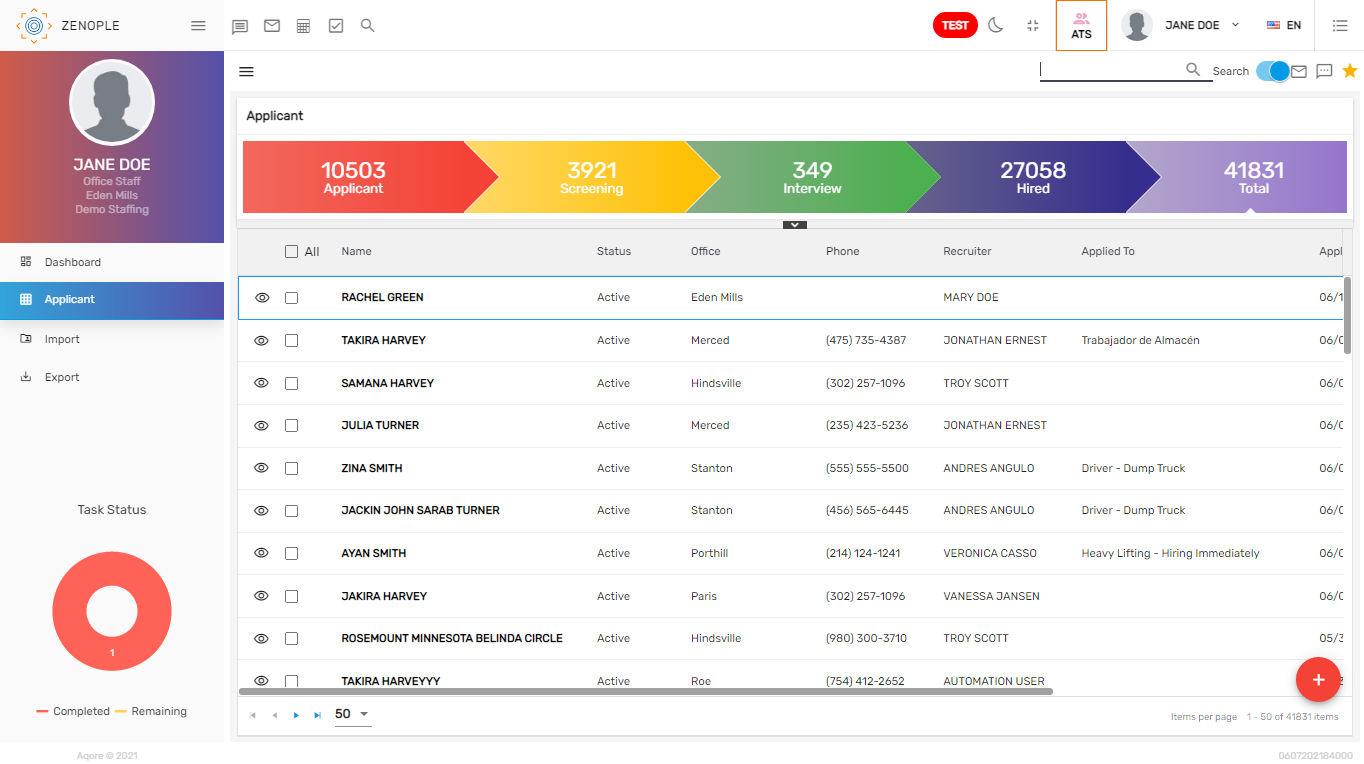
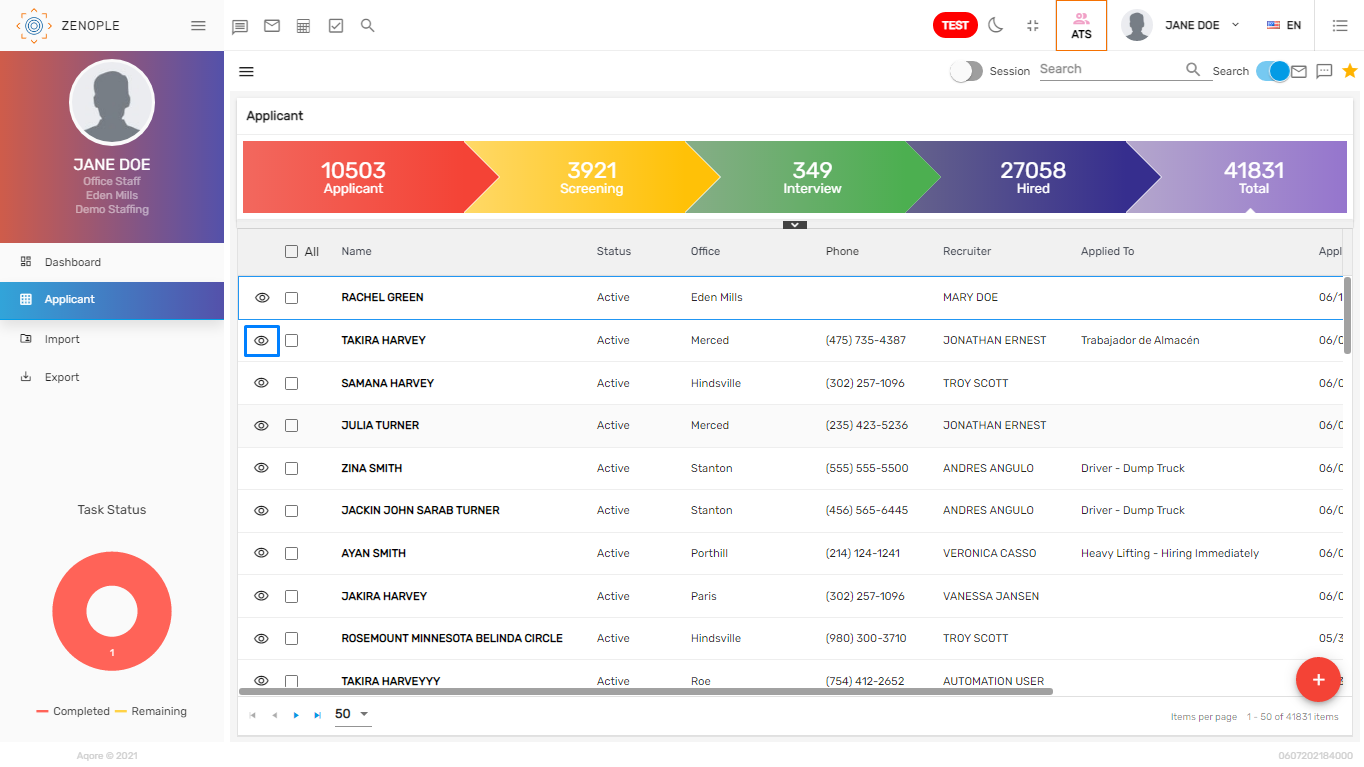
Applicant main navigation consists of detailed information about applicants and includes details like the applicant’s full name, status, contact number, office, recruiter, job applied to, apply date, no. of the task, stages, etc. It shows the list of applicants in a directory form. Applicants who applied for a job to an organization are created and displayed in ATS. Other than the online applicants, the user can also add applicants from the applicant main navigation. This feature can be customized as per the organization’s requirements
Users can search the applicant and navigate further to the applicant detail. The list of searched applicants and their details will be listed on the applicant detail.
There are five stages in the ATS workflow.
- Applicant
This is the first stage of the applicant workflow. In this stage of ATS, the applicant who is yet to complete the tasks or has completed all the tasks but is yet to be reviewed by the user is displayed.
- Screening
Users move the applicant to the 'Screening' stage once they verify the application forms/tasks of the applicants. In this stage, users perform the “Complete Screening” task.
- Interview
Applicants finishing the 'Screening' stage are moved here for an interview. This stage features the 'Complete Interview' task to be completed by the user.
- Hired
The applicants who are hired after the interview phase are displayed in this stage.
- Total
In this stage, you will see the sum of all the applicant's records in different stages.
Note: Tasks under different stages can be customized as per requirement.
Applicant Directory
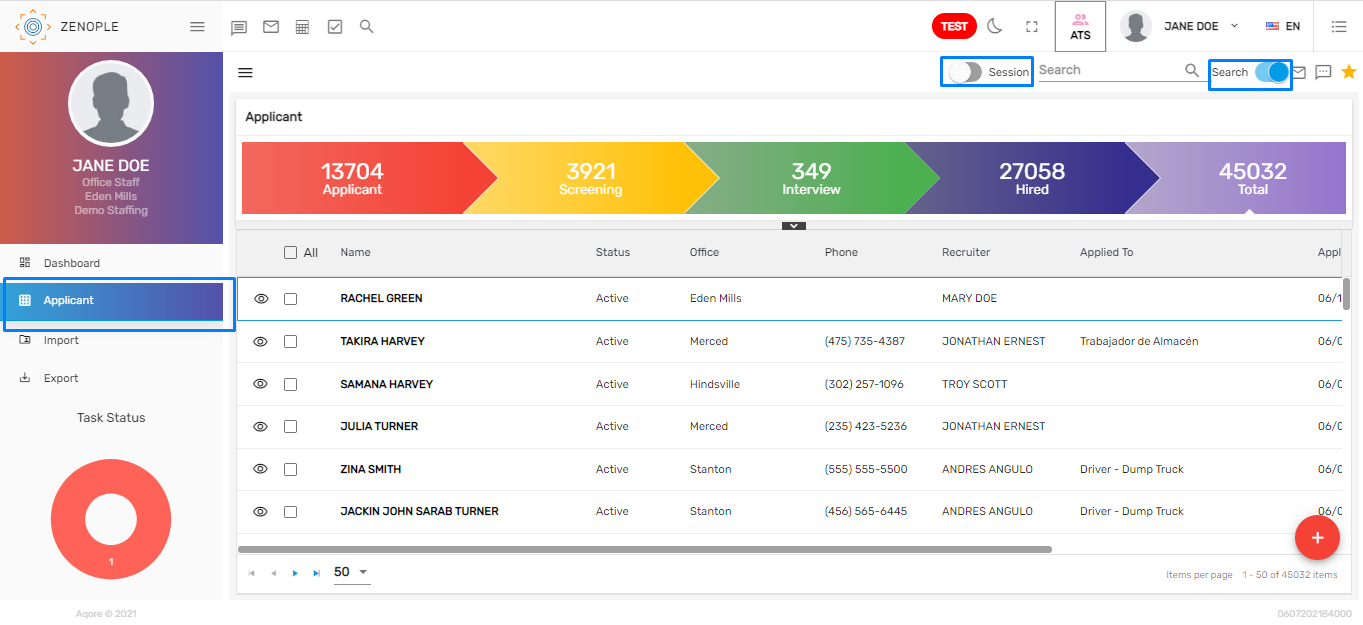
The applicant directory contains favorite actions, advanced filter, add applicant feature, search /recent toggle button, applicant detail with favorite actions and navigations.
Users can search for the applicant from the 'Search/Recent' toggle button, 'Session' toggle button, following which the list of applicants is displayed. The filter helps to filter the required applicant records. Users can also add applicants and redirect to the applicant detail from the applicant directory. The other functions that users can perform are adding the applicant as a candidate, sending SMS, and sending an email.
The 'Search' toggle button allows the user to search for all the applicants or only the recently searched applicant's records. The 'Session' toggle button allows the user to view the applicant details added in the current session.
When a user searches for an applicant from the search bar, the search result will be listed. This page includes the main information of the applicant including the name, status, office, phone, recruiter name, applied to, apply date, task, since stage, and last comment date.
Add Applicant
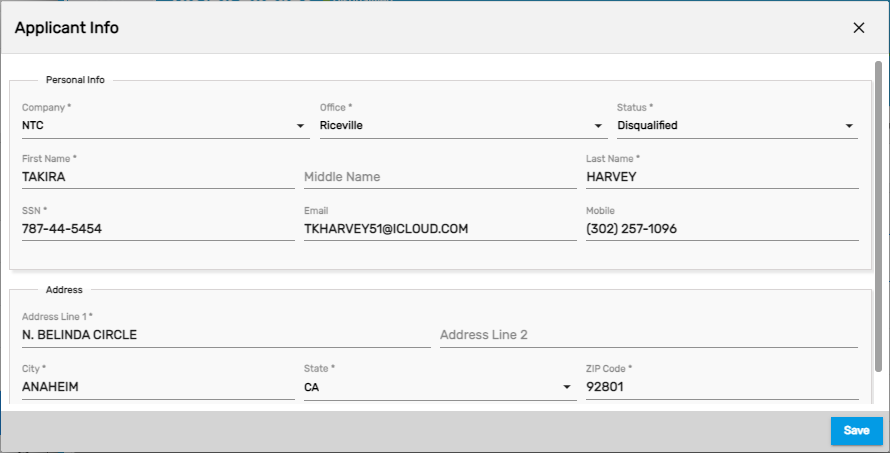
'Add' button allows the user to add applicants from ATS. Users can simply add applicants by clicking on the 'Add' icon and filling up the applicant's detailed information.

A form to add the applicant will open with the details of the applicant to be filled. While adding the applicant, the resume of the applicant can also be uploaded.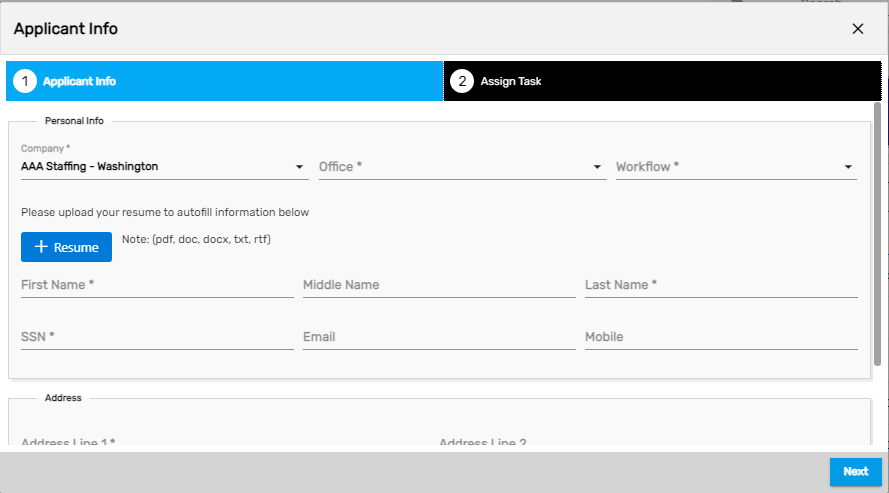
The task can be assigned to the applicant from the 'Applicant Info' form.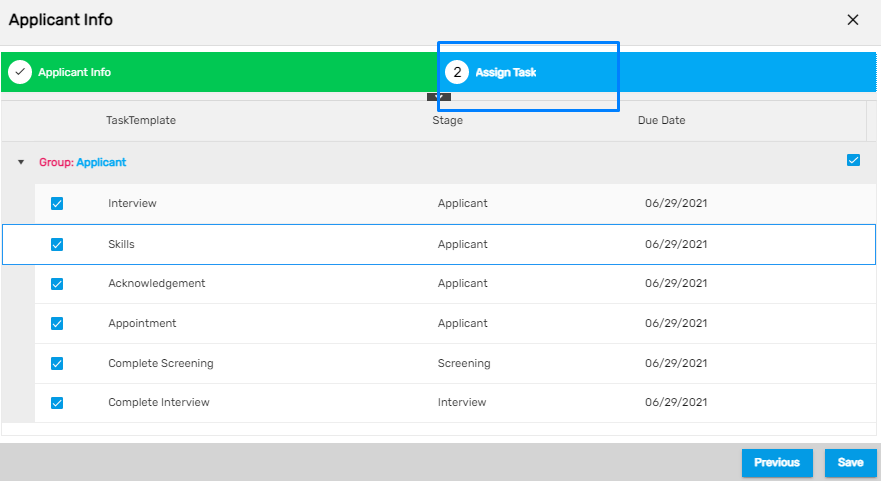 The newly added applicant will be listed on the applicant directory.
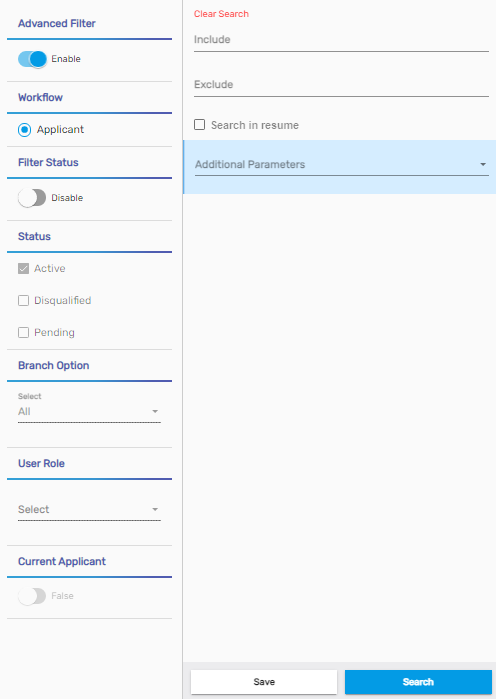
Filter
The filter in the applicant directory allows the user to filter the applicant records by selecting various options. This filter feature can be used from the hamburger icon. It saves a lot of time while filtering the applicant records. According to the selected options, the filtered records will display throughout the 'ATS' application. 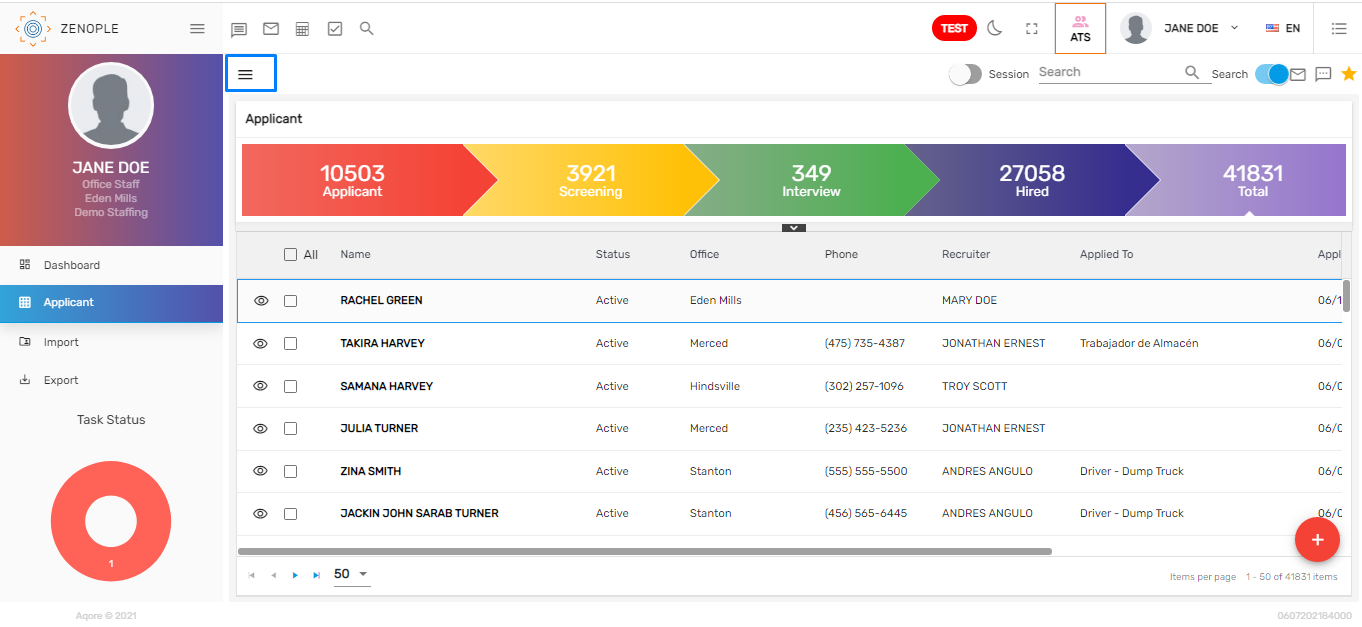
Search/ Recent Toggle Button
When the toggle button is set 'On', the 'Search' toggle button allows searching the applicant from the applicant directory, whereas in case it is set 'Of', the 'Recent toggle button displays the recently searched and visited applicant records till 7 days before today's date. by default, the toggle button will be set 'On'.
Session Toggle Button
'Session' button allows searching the applicant records added in the current session from the applicant directory. By default, the toggle button will be set 'Of'.
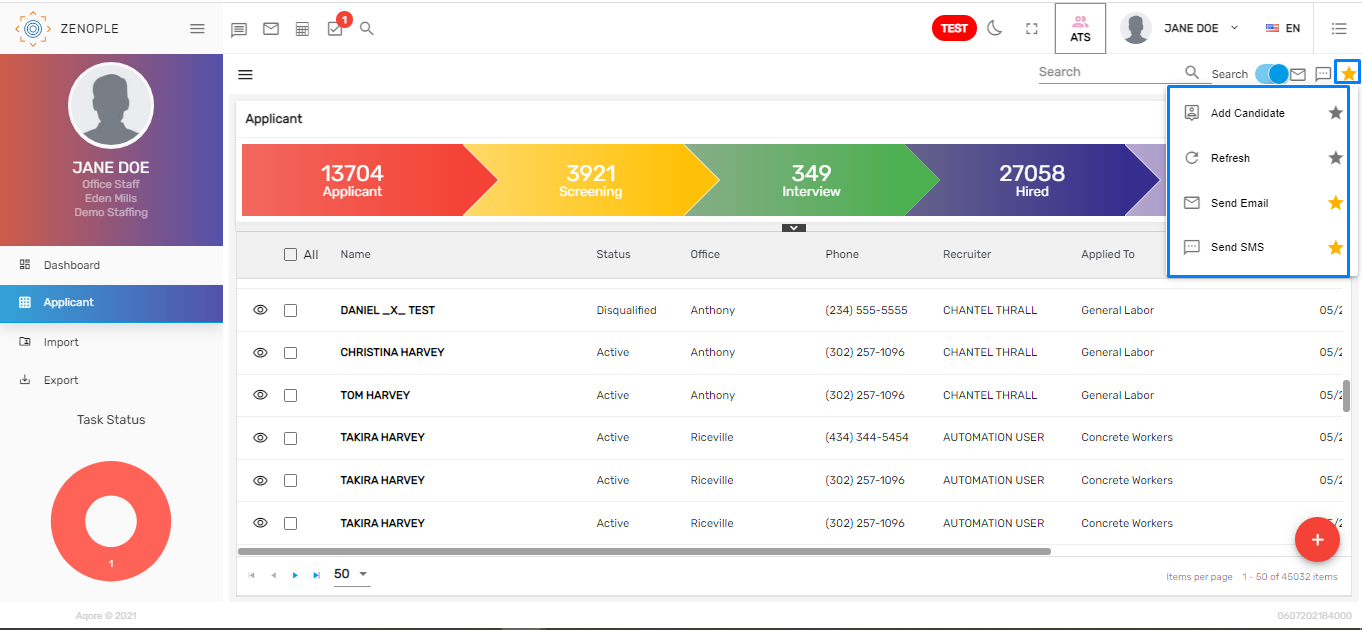
Favorite Action
The actions under the star icon are the 'Favorite' actions. The applicant detail includes various favorite icons with unique functions for each. They are,
- Add candidate
- Refresh
- Send Email
- Send SMS
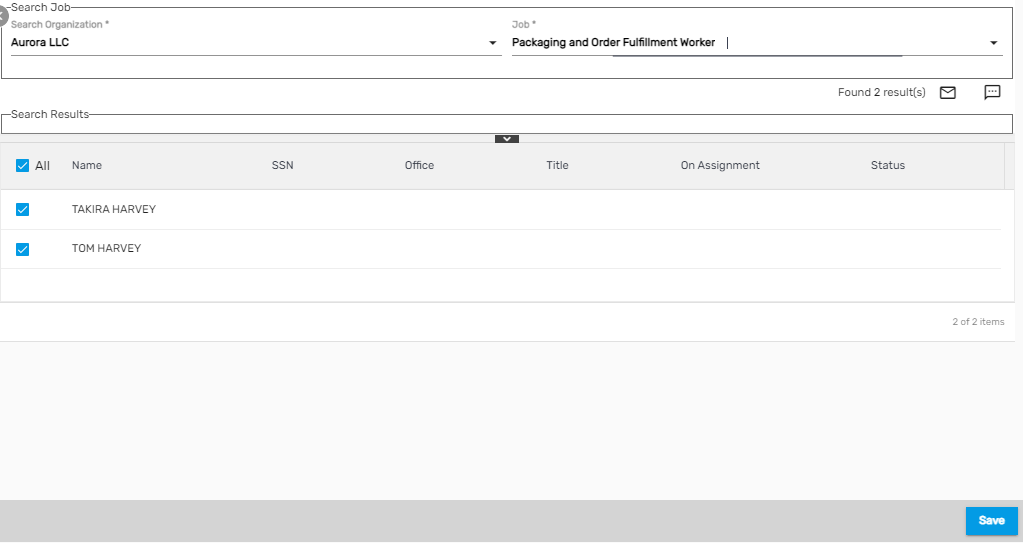
1. Add Candidate
This action allows the user to add certain candidates for the job.
Select the applicants and click on 'Add Candidate' under the favorite icon. Search and select the organization and job from the dropdown and click on 'Save' to add the applicant as a candidate.
2. Refresh
This action refreshes the applicant directory and users can use the action to reload the record. Similar refresh actions are found in the top and side navigation, which is used to refresh the records.
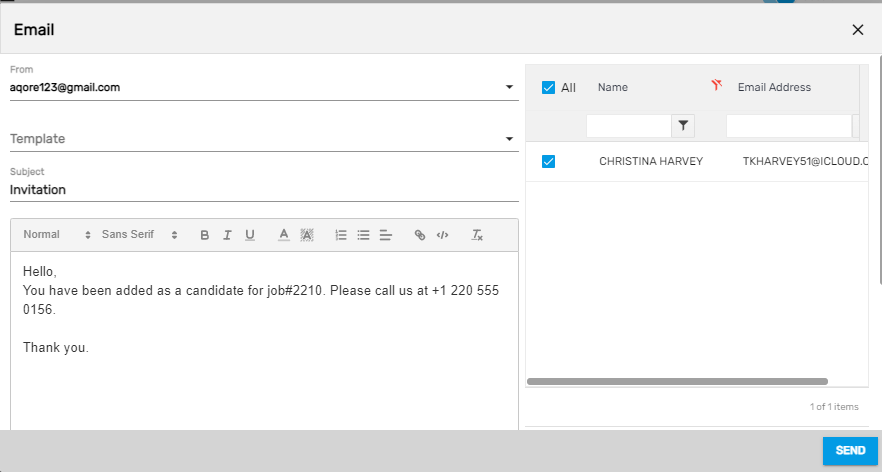
3. Send Email
This action allows the user to send emails to the applicants.
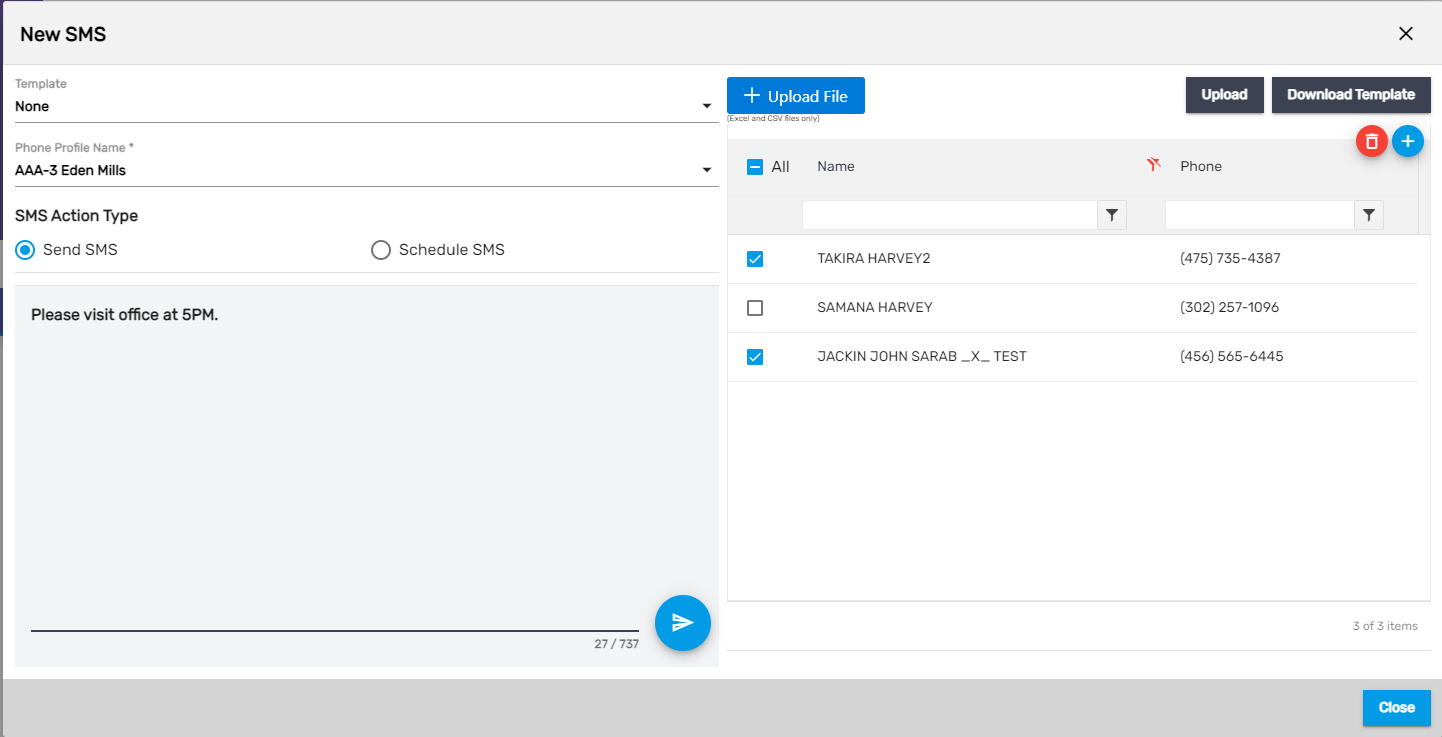
4. Send SMS
This action allows the user to send messages to a single or multiple applicants.
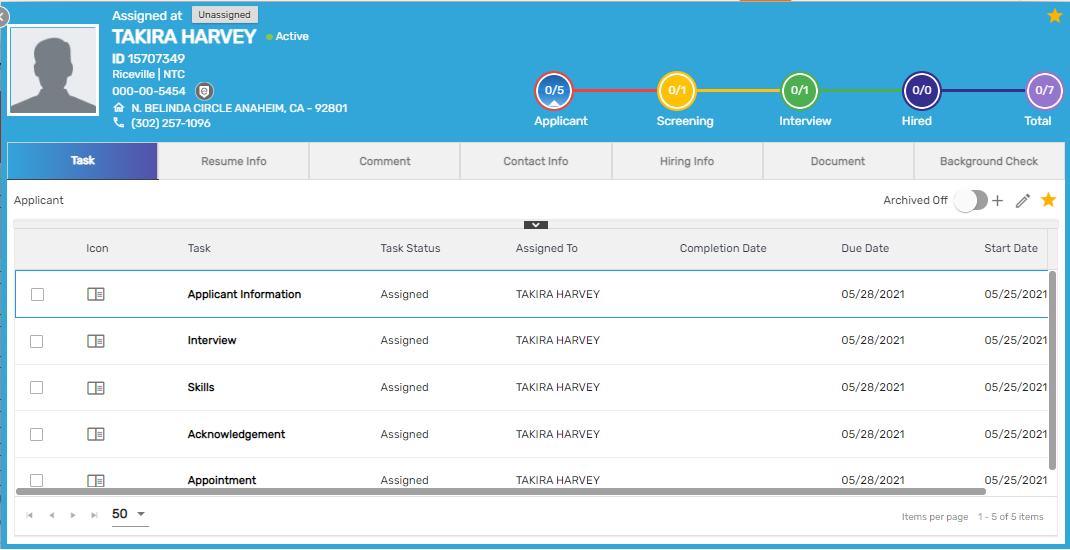
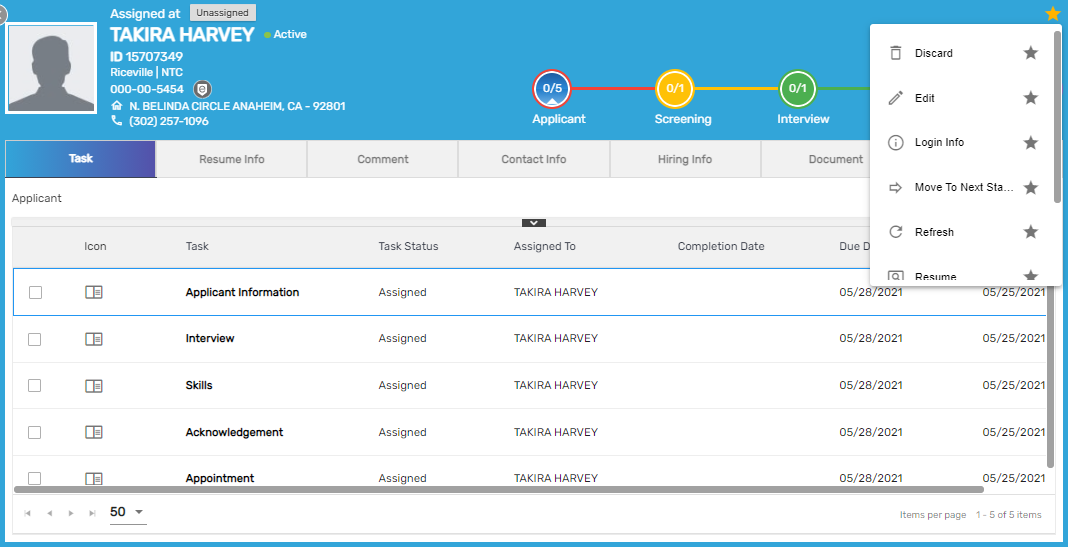
Applicant Detail
The entire applicant's detailed information is under the 'Applicant Detail'. Users can redirect to the 'Applicant Detail', by searching applicants from the search bar. When the 'Search' toggle button is turned off, it will filter the recently searched and viewed applicant's records. By clicking on the applicant's name, or the eye view redirects the user to the applicant detail.
The Applicant Detail features,
- The applicant's detail like- the ID, the office and company under which he/she is associated, the SSN, and the full address
- Favorite action
- Navigations
Applicant Detail
Favorite Action
The applicant detail consists of the following favorite actions. They are,
- Discard
- Edit
- Login info
- Move to Next stage
- Refresh
- Resume
- Send Email
- Send SMS
1. Discard
Applicants who fail to fulfill certain requirements are rejected, using the 'Discard' action, and their status will be updated to 'Disqualified'.
You can change the status of the applicant by editing the status from the 'Edit' action.

2. Edit
This action allows the user to update the details of the applicant.
Clicking the 'Edit' action under the 'Favorite' icon and updating the details will edit the contact details.
3. Login Info
This action consists of the login credentials of the applicant.
If the user has access to the credential change option, they can update the applicant’s username and password. To update the password for the applicant, the user can turn on the 'Edit' toggle button, edit the details and click 'Save' to save the changes.
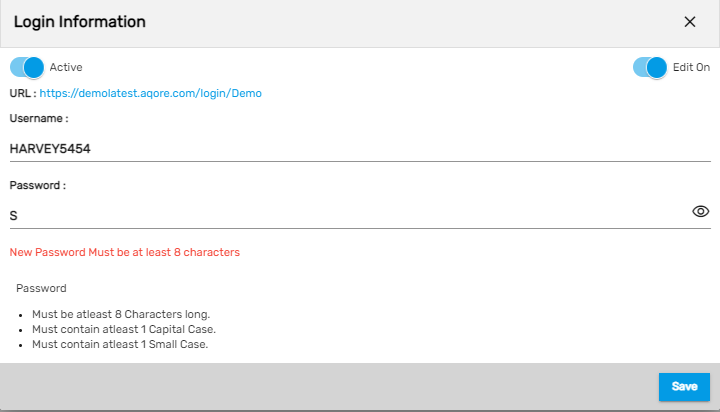
To disable the login of the applicant, the user can turn off the 'Active' toggle button.
4. Move to Next stage
This action allows the user to move the applicant to further stages. The applicant and user have a list of tasks assigned to them, when these tasks are completed, this action comes into the picture.
Using this action the users can move the applicant to the next stage from the current stage.
5. Refresh
This action refreshes the applicant detail and users can use the action to reload the records on the page. Similar refresh actions are found in the top and side navigation which is used to refresh the records on the grid.
6. Resume
This action generates the resume report of an applicant as per the applicant’s details. It includes basic information like skill, employment, education, and interview. Each applicant's data will be displayed in the report on a separate page.
7. Send Email
This action allows the user to send an email to the applicant.
8. Send SMS
This action allows the user to send SMS to the applicant.
Navigation
The Applicant Detail consists of the following navigations,
- Task
- Resume Info
- Comment
- Contact Info
- Hiring Info
- Document
- Background Check
Task
This top navigation contains the standard tasks under the stages of ATS which are to be completed by the applicants and the users. It allows the user to add and edit multiple generic tasks related to the applicant. Users can create a task under different stages and assign it to the employee. The tasks can be assigned to the users as well. Users can add or, edit a task for different workflow stages and task templates. Click on each stage to see the tasks associated with each stage.
These tasks can be customized as per the client's requirements.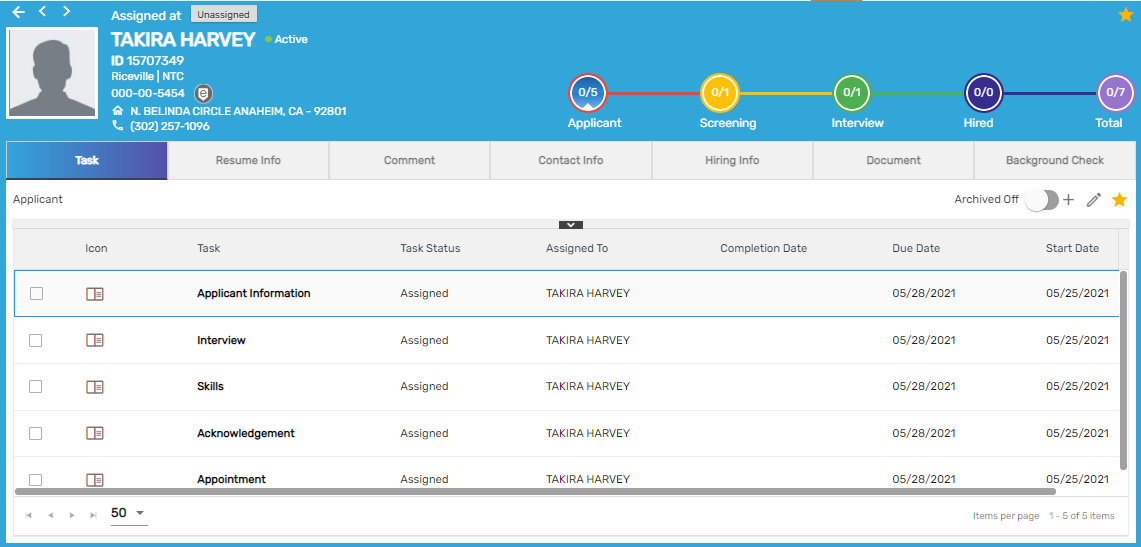
Tasks assigned to the applicants should be completed by logging into the applicant portal. After the applicant completes the tasks, the task’s status is changed to 'Completed'.
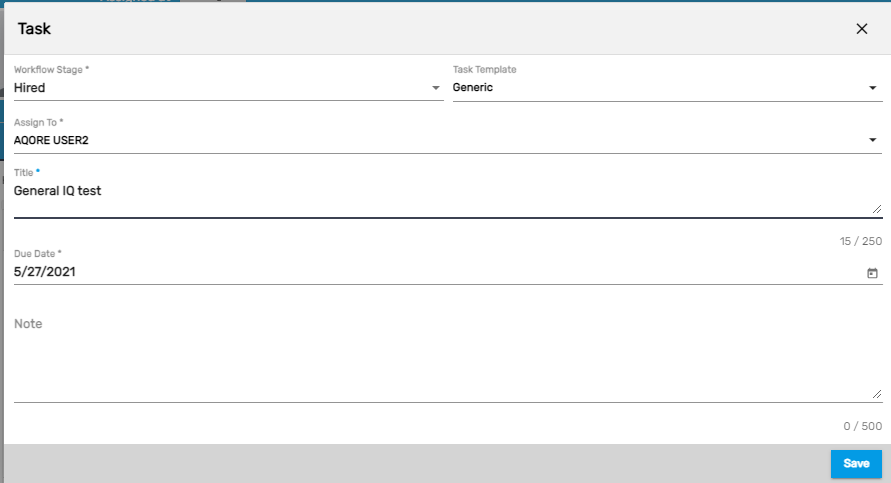
Users can add tasks as per the requirement, clicking on the particular stage and clicking on the 'Add' icon will add a task under the stage selected.
Fill up the details to create a task and click 'Save' to add the task.
Clicking on the 'Edit' action and updating the task details will edit the task.
While editing the task,
- it can be completed
- it can be archived.
- it can be forwarded to another user
The process to complete the applicant's task by user
The user has to complete tasks assigned to him/her to be able to move the applicant to further stages. The task's are,
- Complete Screening
- Interview
1. Complete Screening
After completing all tasks in the applicant stage, an applicant is moved to the 'Screening' stage by using 'Move to Next Stage' action.
Once the applicant is in the 'Screening Stage', the user has to complete the task under this stage to move the applicant to the 'Interview' stage.
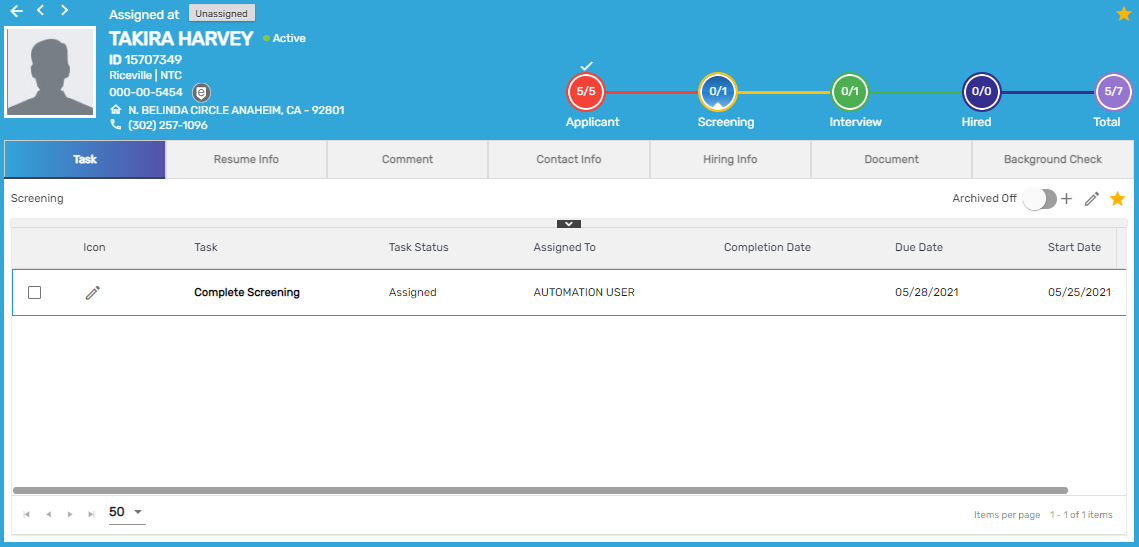
Open the task under the screening stage and update the status to complete, by selecting 'Complete' from the dropdown to save the completed screening task.
2. Interview
After completing the task in the 'Screening' stage, the user will move the applicant from 'Screening' to the 'Interview' stage by clicking on 'Move to the Next Stage' action. Upon completing the tasks by the user in the 'Interview' Stage, the applicant is moved to the 'Hired' stage.
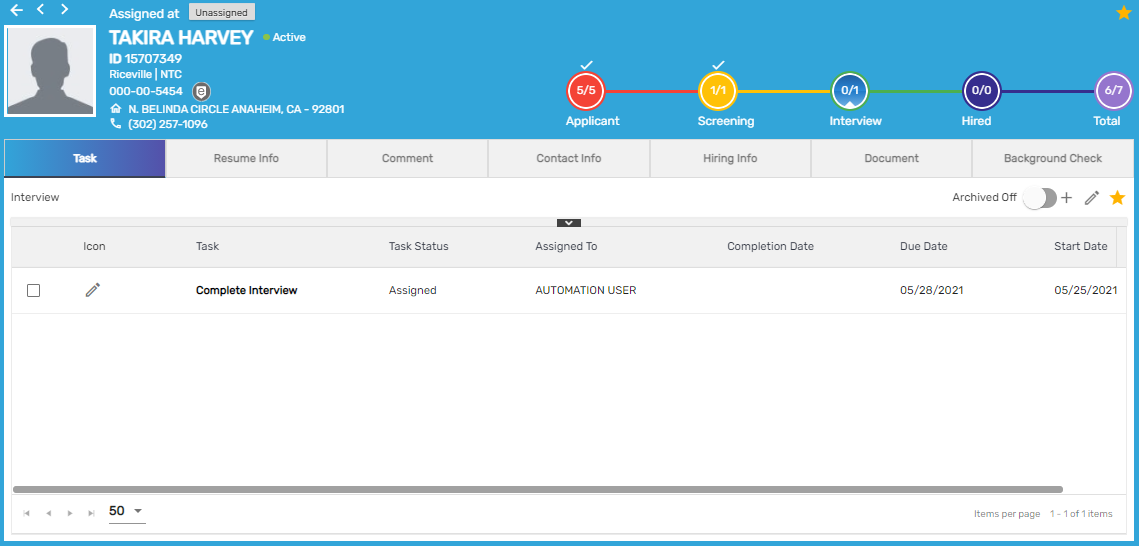
Open the 'Complete Interview' task and complete the task in the same way as that of the 'Screening' task.
After finishing all the tasks the user moves the applicant to the final stage of ATS. Moreover, an applicant at the last stage of ATS will have accomplished all the tasks under every stage of the ATS workflow.
Resume Info
There is four side navigation under resume info.
- Resume
- Skill
- Employment
- Education
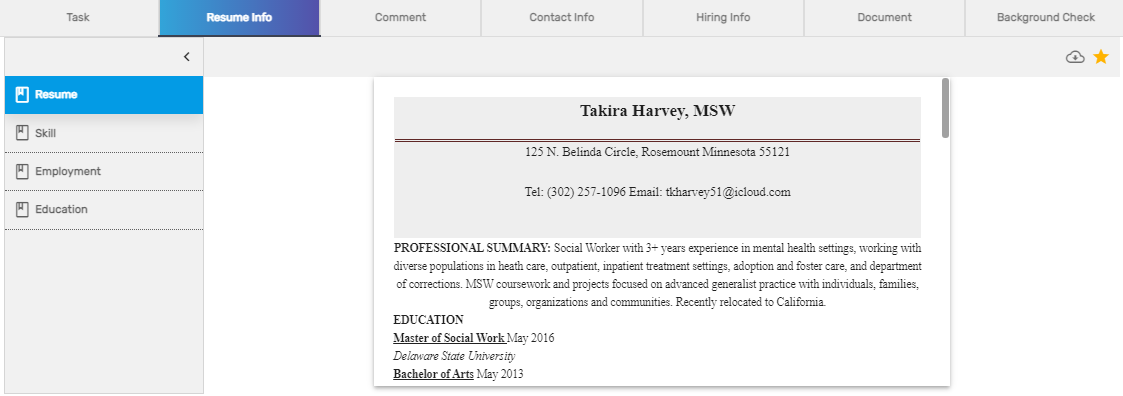
1. Resume
This side navigation shows the resume uploaded by the applicant during the registration phase. Users can download the uploaded resume of the applicant by clicking on the download action.
2. Skill
This side navigation allows users to add/edit/delete various skills related to the applicant. The skills added will be displayed in the applicant’s profile. While adding the skill, users can search for the skill they want to enter and save to add.
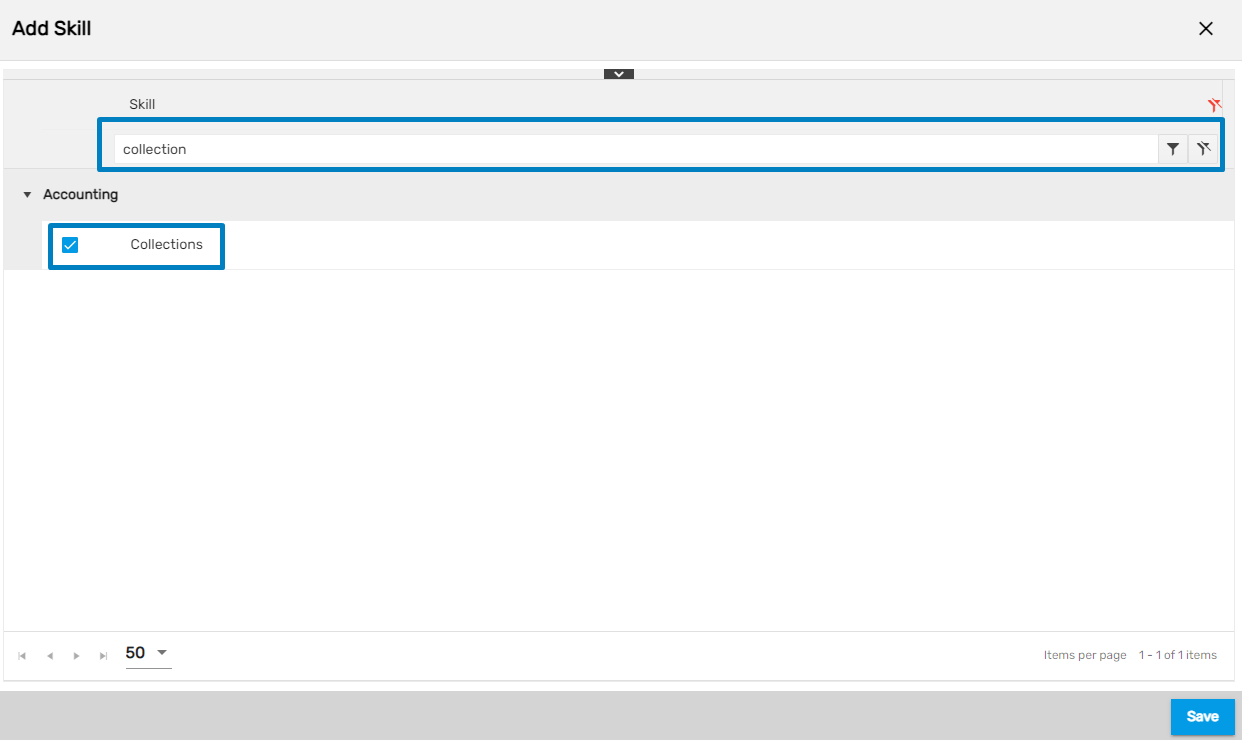
On clicking the 'Add' icon add skill wizard opens. Filter the required skills, select the skills and click n Save' to make changes.
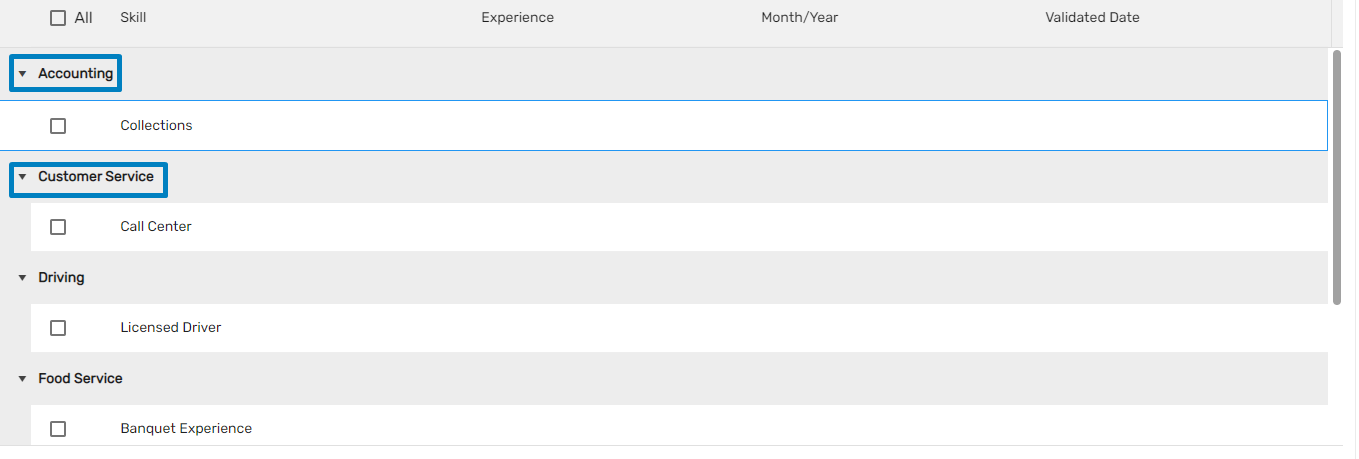
 Saved skills will be displayed as per the skill categories. Users can edit/delete the added skills.
Edit Skill
By editing the skill, the applicant's skill can be validated/certified. Also, the skill experience on the basis of month/year can be added.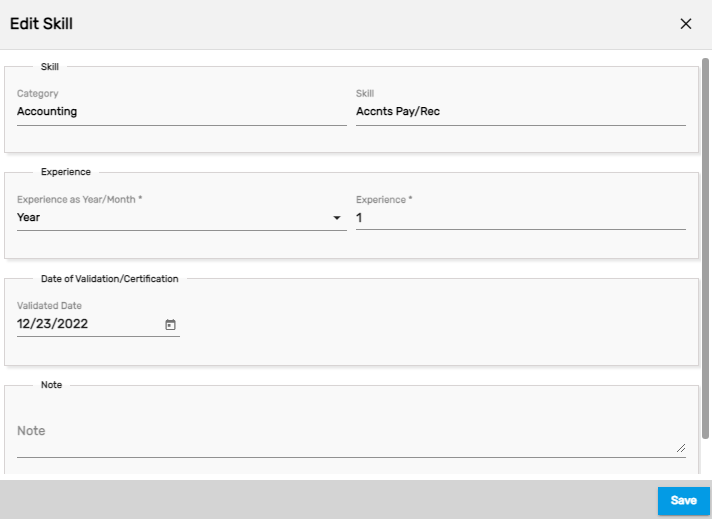
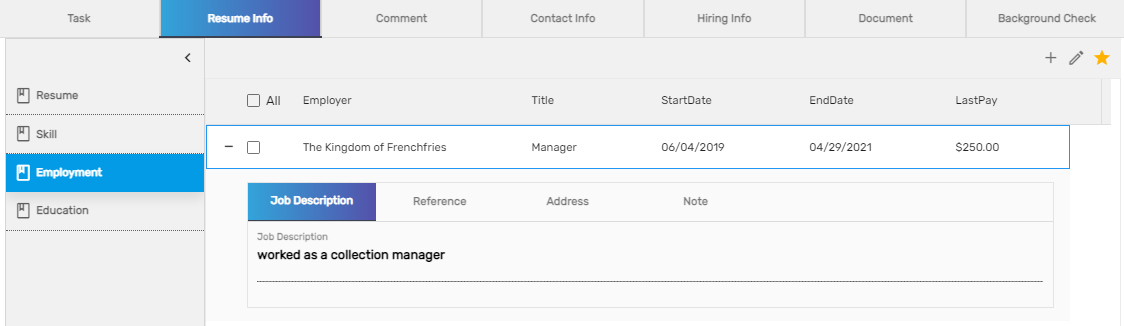
3. Employment
This side navigation allows the users to add and edit previous employment related information of the applicant such as employer name, title, last pay amount, etc.
It allows users to add/edit/delete the employment history of the applicant. Users can update the employment history of the applicant. This navigation displays the previous employment history of the applicant.
3. Education
This side navigation displays the education details of the applicant. It allows the user to add, edit, and delete the education details. The education details consist of the applicant's degree, specialization, the beginning and end of the course, the institution, and the city and state of the institute.

Comment
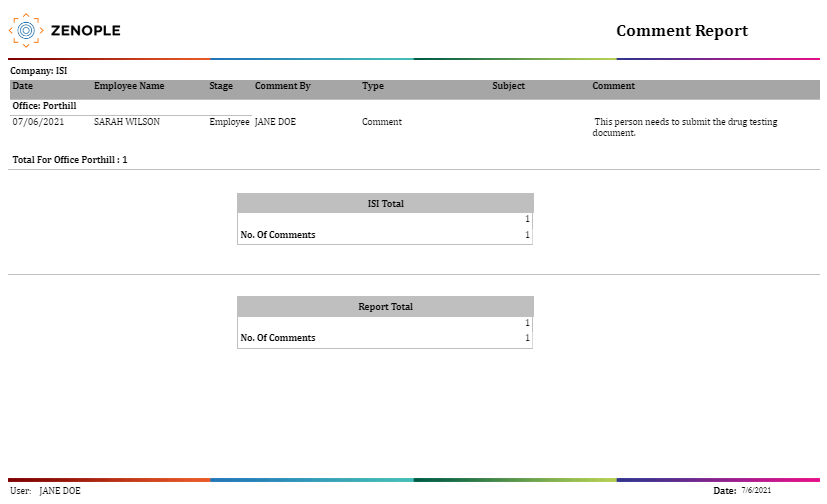
This top navigation shows all the comments of the applicant for different comment types under different categories. The comment type and comment category can be defined on the basis of the client’s requirements. It allows users to write multiple comments associated with the applicant and also update them. Users can view, add, edit the comments of applicants under various categories and types.

The view action will allow the users to view the comment report. This report shows all the comments that are added by a user for the applicant.
Contact Info
This navigation consists of four side navigations under it.
- Contact Information
- Address
- SMS
1. Contact Information
This side navigation shows the contact information of the applicant like email, Facebook, Linked In, mobile, and other phones. It allows users to add and edit contact information, and the user can also set the contact information as the primary contact information.
You need to have primary contact information while only one data under the same contact information type can be set as the primary contact information. The primary contact information value will be updated on the details of the applicant.
The process of adding and editing the contact information is similar in all the applications.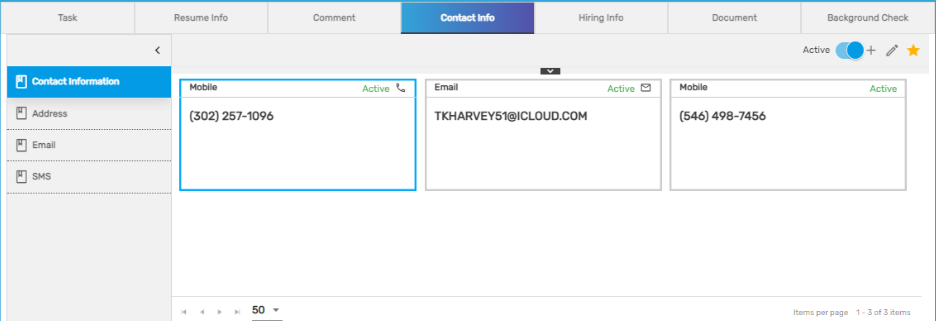
In case of multiple phone numbers, select one of the phone numbers to primary by clicking on the 'Set as primary' action.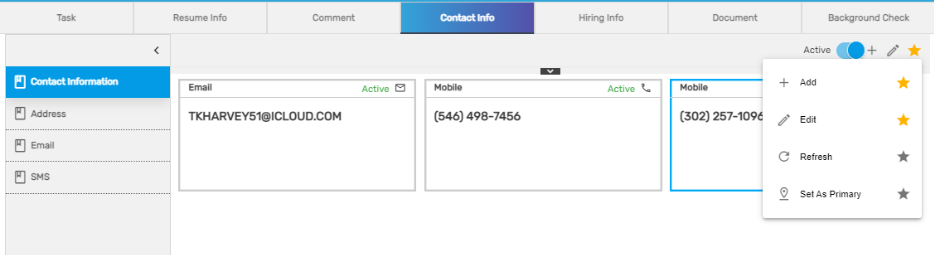 The primary contact number will be displayed in the header section of the applicant’s profile.
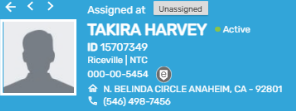
2. Address
This side navigation shows the full address of the applicant with different address types. The users can 'Add', and 'Edit' the address details of the applicant and also set an address as a primary address. The resident and previous address of the applicant can also be added. 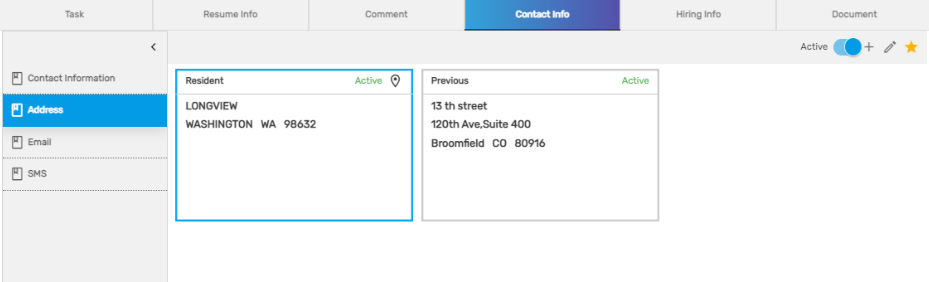 The address navigation has an 'Active' toggle button. By disabling the toggle button the user can view all addresses. Enabling the toggle button will allow users to view only the active addresses of the applicant.
In case of multiple addresses, select one of the addresses to primary by clicking on 'Set As Primary'.
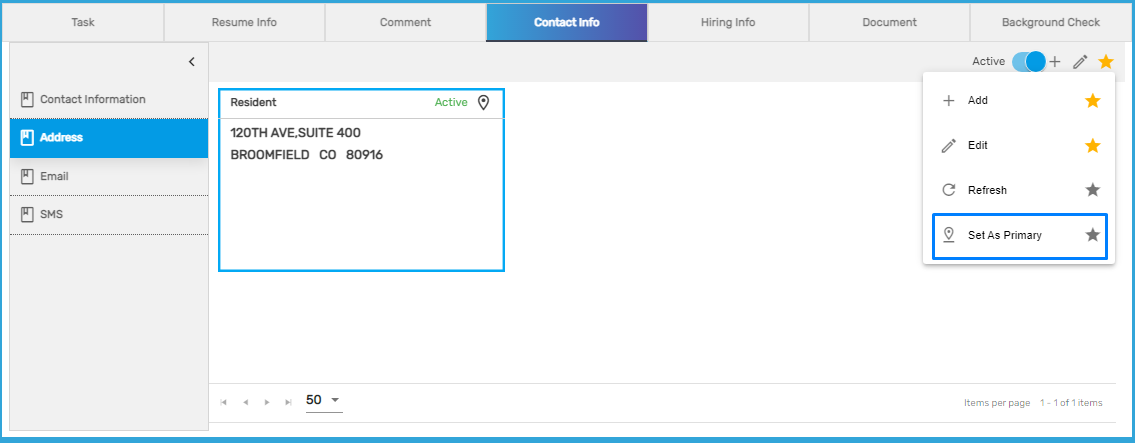
- The primary address will be displayed in the header section of the applicant’s profile.
- There are two standard types of addresses (Resident and Previous). It does not allow the user to add the same type of address multiple times.
3. Email
This side navigation allows the user to send an email to the applicant. All the emails sent to the applicant are displayed here. The user is allowed to send an email, forward the email, and reply to an email.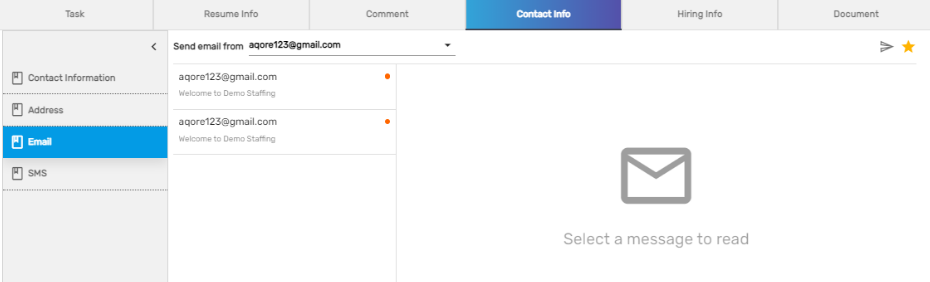
The email sent from different IDs can be filtered and viewed using the filter option 'Send email from'.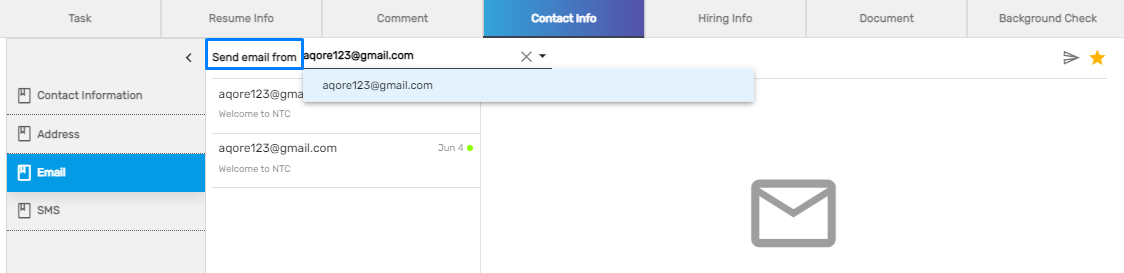
On clicking the email, it will show the email details.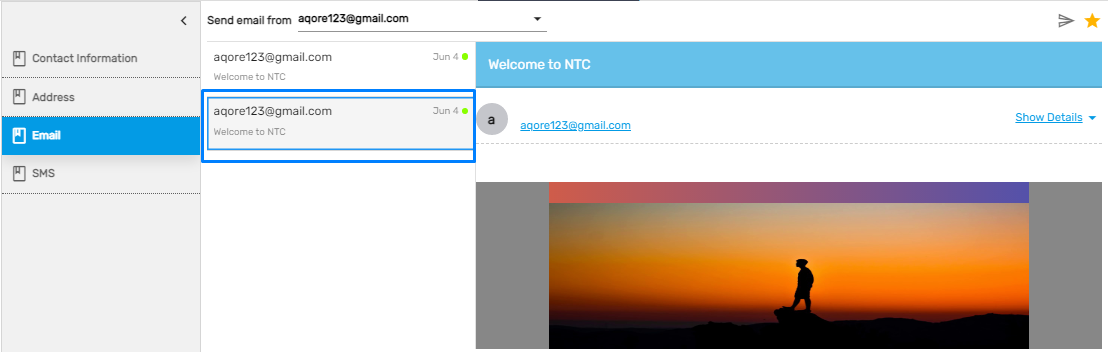
4. SMS
This side navigation includes the history of messages sent to the applicant. This navigation has two SMS action types. The one sends SMS and the other can schedule SMS. Users can either send SMS or schedule SMS by selecting the scheduled date for the applicant.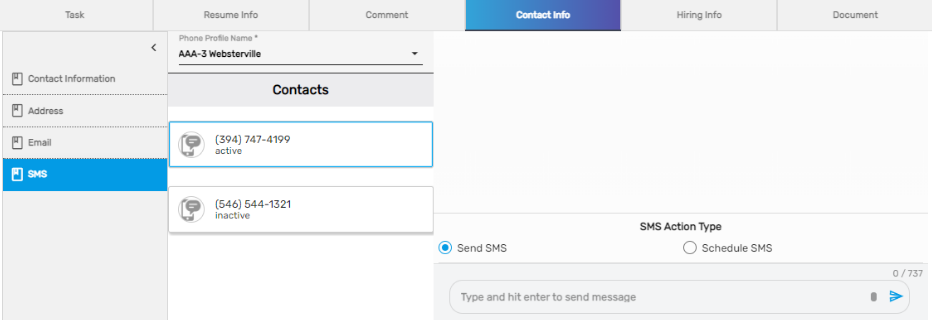 Choose the profile name. This profile will be used to send/receive SMS. Users can also select the phone number through which the SMS will be sent.
  Select the contact number from where the SMS needs to be sent, type the message, and send. The SMS will be sent to the selected profile/contact number.
Hiring Info
This top navigation consists of details related to the interview, user role, date types, additional information related to desired pay rate, shifts, and conviction. It allows the user to add and update these details. It consists of five side navigations under it. They are:
- Interview
- User Role
- Date Type
- Additional Information
- Conviction
1. Interview
The interview details filled by the applicant are listed under this side navigation. This allows the user to add and edit multiple interview details related to the applicant.
It allows the user to add and update multiple interview details related to transportation, past jobs, referral sources, current health condition, desired pay rates, and so on. These details are displayed on the interview along with the added date, who added the detail, category, and the interview questions with related options.
Users can select the interview questions and relatable answers to add the interview question of the applicant.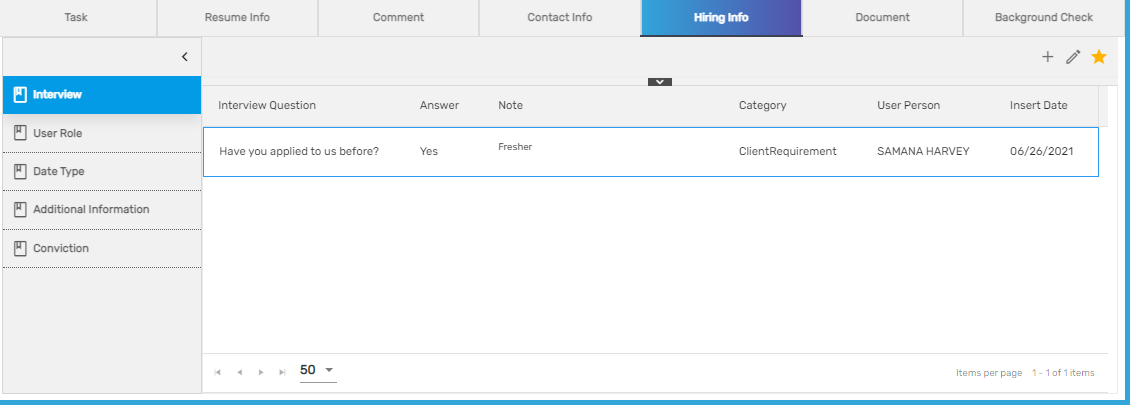 The 'Edit' icon will allow the user to update all the details of the interview questions, the values, and the notes as required.
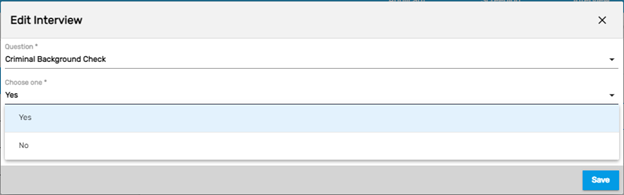
2. User Role
This side navigation shows the users who are directly involved with the applicant like Entered by, Recruiter, Hiring Manager, Interviewed by. This allows the user to add and edit multiple user role details of the applicant. The standard user roles are Entered by, Recruiter, Hiring Manager, and Interviewed by.
It allows the user to 'Add', and 'Edit' these user role details and assign the roles to the associated user for the applicant as 'Hiring Manager', 'Interviewed by' and 'Recruiter'.
These details are displayed in the 'User Role' side navigation with the user who added the user role and the date on which the role was assigned to the user. Users are not allowed to add the same user role twice.
3. Date Type
This side navigation allows the users to 'Add' and 'Edit' various date type details related to the applicant. The user is also able to delete the date type. The standard date types are I9, I9 Expiry Date, Initiate Rehire Date, Insurance Effective Date, Rehire Date, SRA Hire Date, and Termed Date.
These dates are important records for every applicant. The user cannot add multiple dates for the same date type. The user can edit the details in case of updating the dates.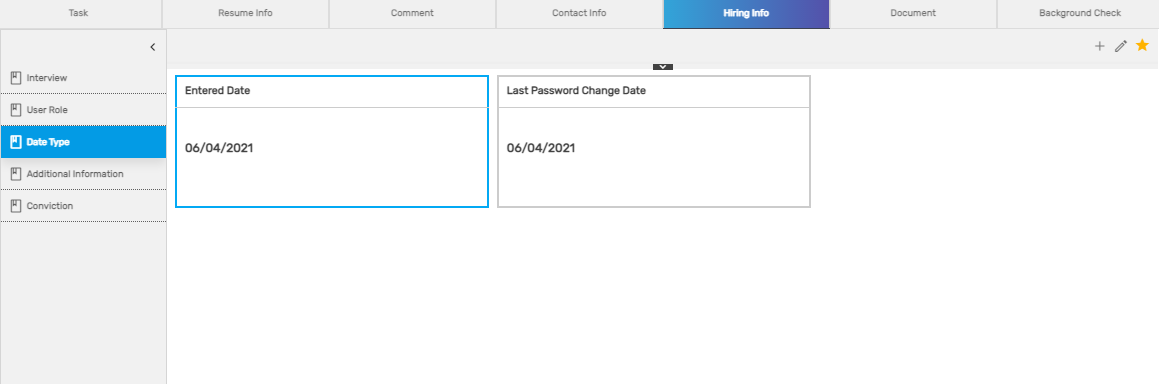
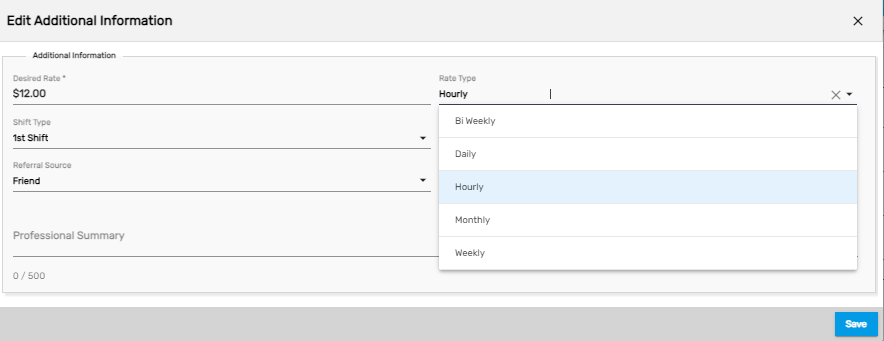
4. Additional Information
This side navigation allows the user to 'Add' and 'Edit' additional information related to the applicant followed by the interview for example the desired rate for the job, desired shift for work, referral source, eligibility ratings for the applicant.
Additional information can be updated by using the 'Edit' action. Certain field dropdown values can be customized to meet the need of the client.
5. Conviction
This side navigation allows the user to add and edit various conviction details related to the applicant such as drug tests, non voilent, sexual, violent convictions. The conviction type is a felony and a misdemeanor.
Clicking on the 'Add' icon, multiple conviction information can be added.
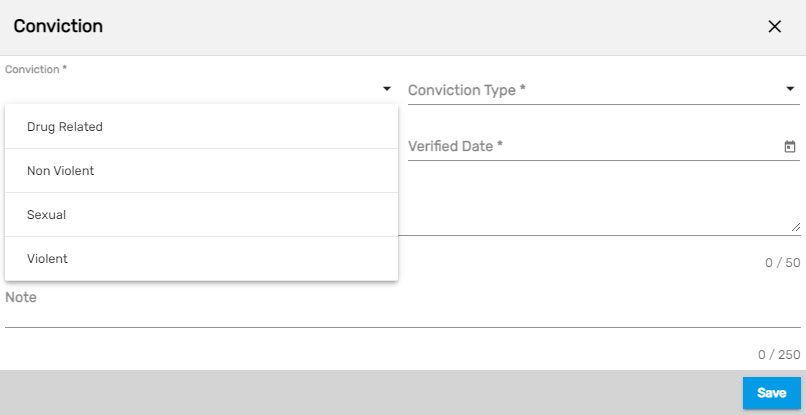
Enter the conviction details of the applicant and save them. The added conviction will be listed on the conviction profile.

To edit the conviction detail, select the conviction and click on the "Edit" icon. The conviction and conviction types appear which can be added and withdrawn based on the needs of the client.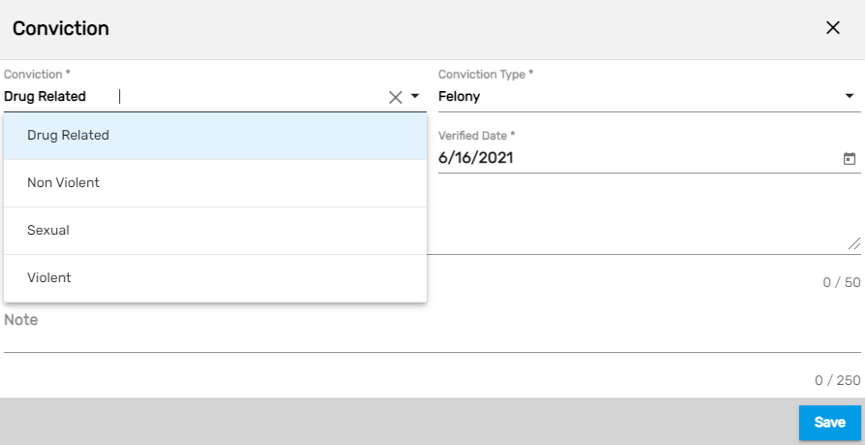
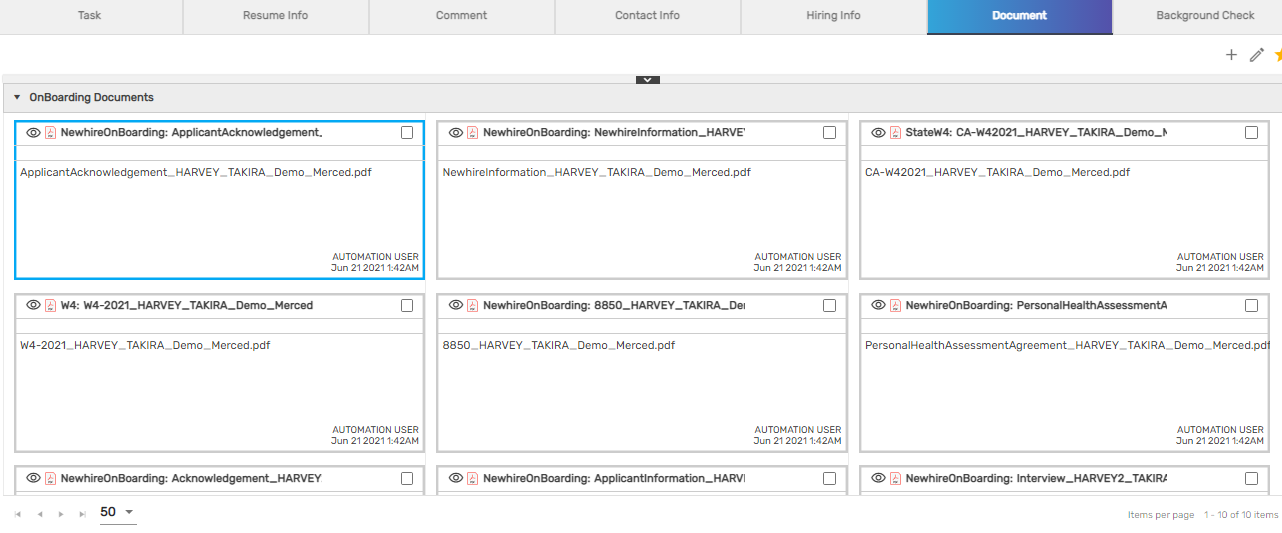
Document
This top navigation shows the applicant’s documents like the Direct Deposit, I9, W2, W4, or any other related documents. It allows the user to view and download the document. Users can also add and edit the contact’s document. The document will display in the applicant's profile. The document may be an image, word file, excel, pdf, etc. Users have access to view the document and by clicking on the eye view they can see the document. Click on the download button to download the document.
To view, download, add and edit the document, the process is similar in all the applications.
Background Check
The top navigation background check is often a step taken by employers to help ensure a sound hiring decision and protect the employer from a number of potential risks.
To add a 'Background Check' form, The user needs to select one of the locations you have access to, and then the list of packages is fetched based on the selected location.
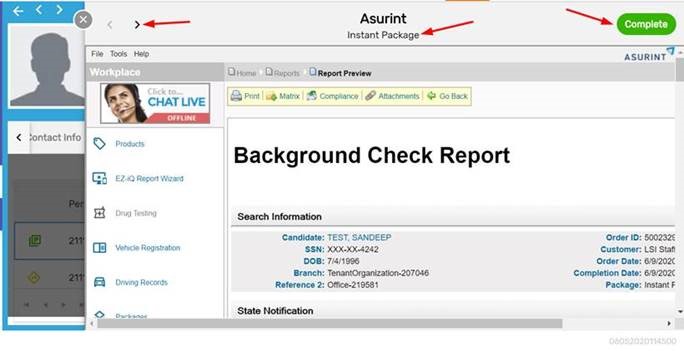
The user can select multiple packages and order at once. Although we have allowed users to select multiple packages, different orders are placed for each package. Asurint doesn’t allow for multiple packages to be placed under a single order request. Therefore, this is simply for convenience.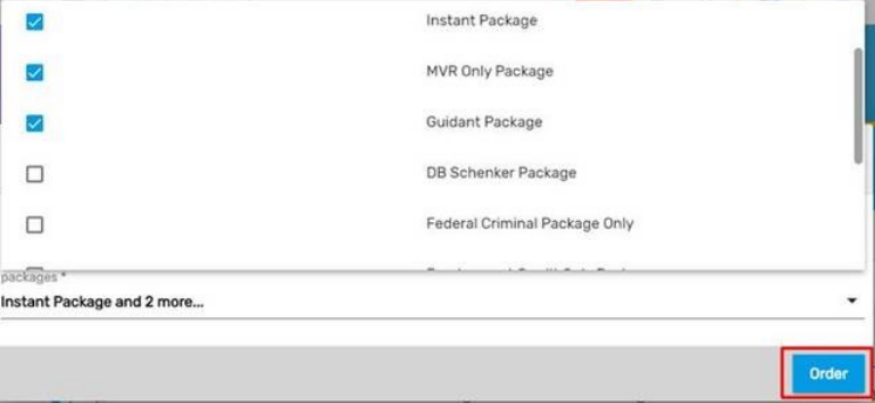 Once the orders are placed, users will see a sidebar with a report and 'Complete' or 'Pending' status is returned. And since multiple packages were ordered in this case, a couple of buttons will appear to navigate to the previous or next order.
 The user will see Asurint’s portal to complete the rest of the order. Some data must be missing if the “Redirect” status is returned.
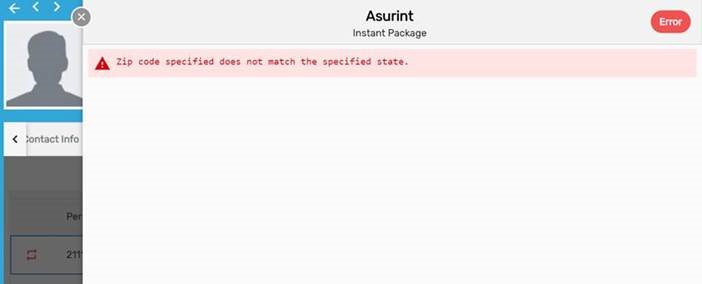
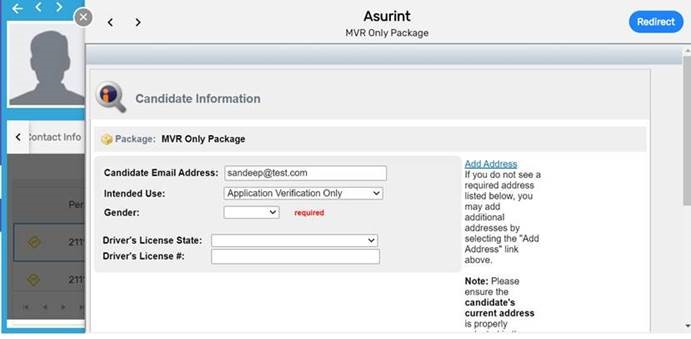 There are also cases where the user will see an exception message. In such cases, the user has to go to the related page to fix the validation error. In this case, the user will have to go to the address page to fix the Zip code.
 The user can click on the icons to take action based on the current status of the order. The status gets updated when the user takes necessary action and closes the sidebar, or in case of pending status, the grid will refresh whenever Asurint sends a complete status.