Overview
Customer navigation allows you to redirect to the detail page of customers and consists of various navigations and features that are essential for customer information. It also has a list of customers on a directory page allowing users to use filters for the entire list of customers available.
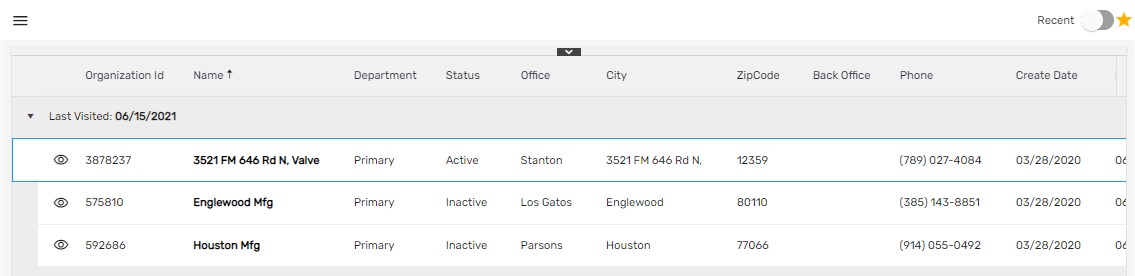
Customer Directory
The list of customers is displayed when users search for the customer from the search box. This page includes all the customers with the organization id, department, status, office, city, zip code, contact number, and created date. When you search for the customer from the search box, the customer directory displays the records accordingly. Users can also filter the records of the directory page from the column filter or sort the records in 'acs' or 'dsc' order.
.png)
[
Filter
The filter allows users to filter records based on various options in the customer directory such as workflow, various status, departments, and user roles. Using this filter will display the filtered records based on the selected options. This filter feature can be used from the hamburger icon.
.png)
Filter Parameter
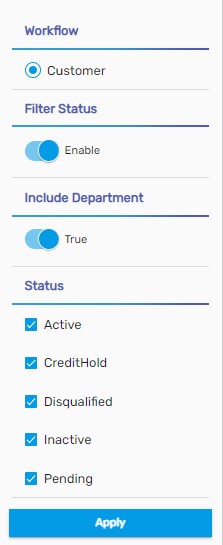
Search/ Recent Toggle Button
'Search' toggle button allows you to search the customer from the search box in the customer directory whereas the 'Recent' toggle button displays the most recent searched and visited records within 7 Days. By default, the search toggle is enabled.
Customer Detail
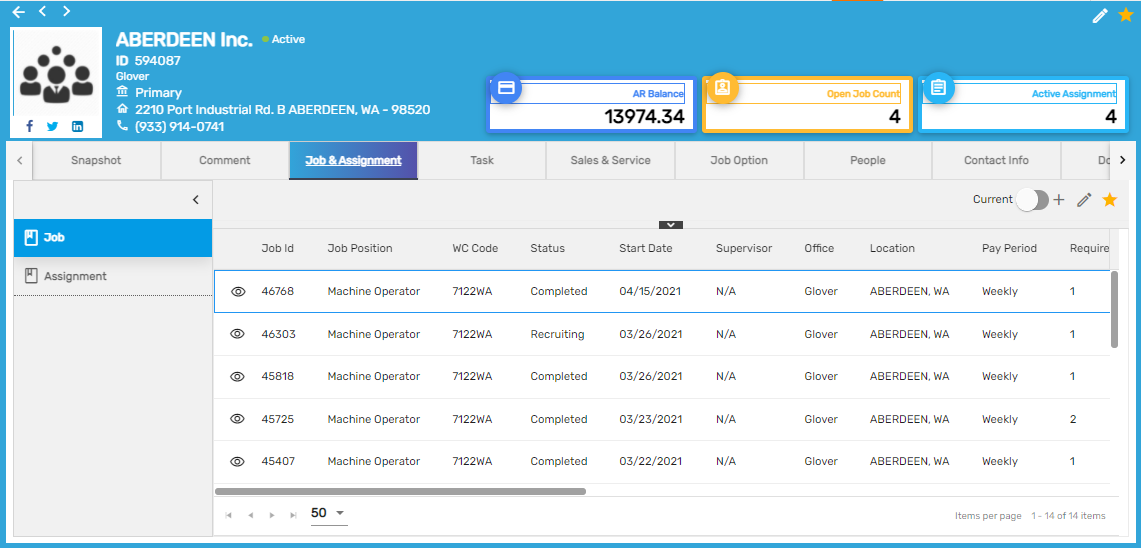
When users click on the eye view icon of the customer in the customer directory, it will redirect users to the customer detail. It consists of detailed information of the customer such as customer ID, primary address, contact info, 'AR Balance', 'Open Job Count', 'Active Assignments', and various other information in related navigations.
.jpg)
Customer Detail
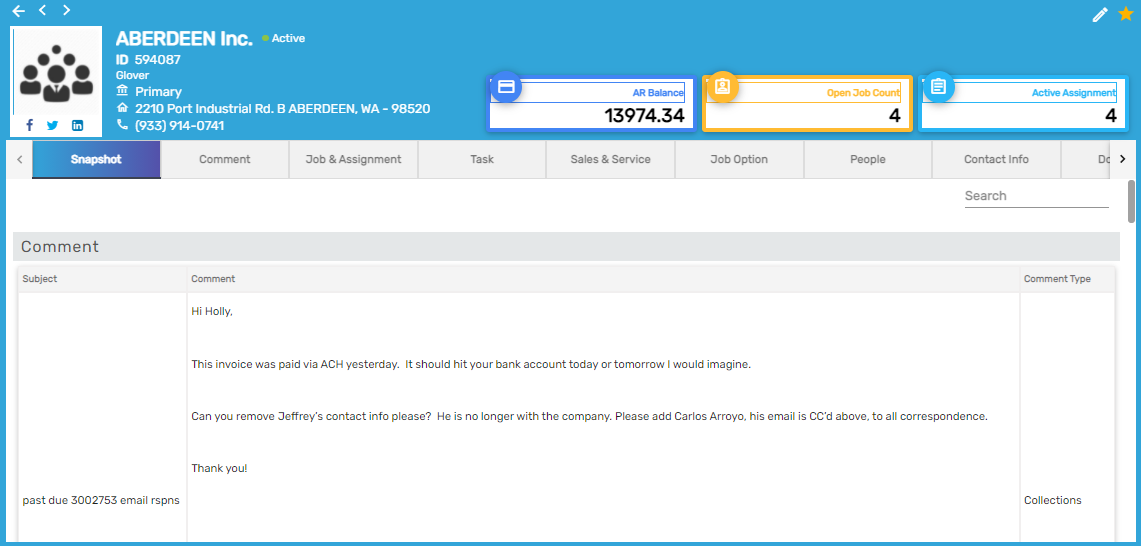
1. AR Balance
This is the total amount to be received from the customer to the company. It is calculated from ARS(Account Receivable system) application and is displayed accordingly.
2.Open Job Count
It displays the total number of open jobs counts currently offered by the company. This is managed from TJM (Temp Job management) application.
3. Active Assignment
It displays the total number of active assignments currently of the customer. This is managed from AMS (Assignment management System) application.
Favorite Action
The 'Favorite' icon of the Customer detail has various actions under them. They are :
- Add Department
- Discard
- Edit
- Refresh
- View Department
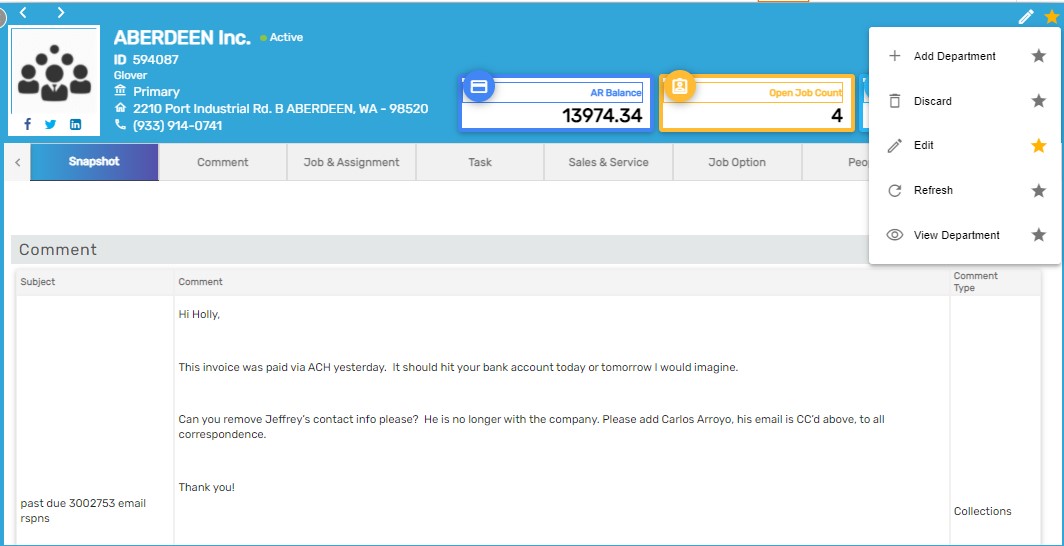
1. Add Department
It allows users to 'Add' various departments for the same company as they may have multiple departments.
2. Discard
It allows users to terminate the company as the customer. Users can change the 'Terminated' status of the customer from the edit icon.
3. Edit
It allows users to edit the customer information such as 'Office', 'Department', 'Status', 'Address', 'Zip code', 'Contact info' and 'Website'.
4. Refresh
It allows users to refresh the 'Detail' if in case of any edited records not reflected.
5. View Department
It allows users to view all the departments of the customer in case of multiple departments.
Navigation
There are twelve top navigations in the Customer detail. They are:
- Snapshot
- Comment
- Job & Assignment
- Task
- Sales & Service
- Job Option
- People
- Contact Info
- Document
- Other
- History
- Web clock
Snapshot
It displays the summarized description of the customer’s profile. Users will be able to view all the information in a summarized view added through other navigations available in the profile.
Comment
It allows users to write and update multiple comments associated with customers under various categories. These comments are displayed in the customer's profile with the name of the commenter and the date on which the comment was added. Users can view the comment report from the favorite icon.
.png)
This report shows comments inserted for the corresponding customer which is displayed in their profile.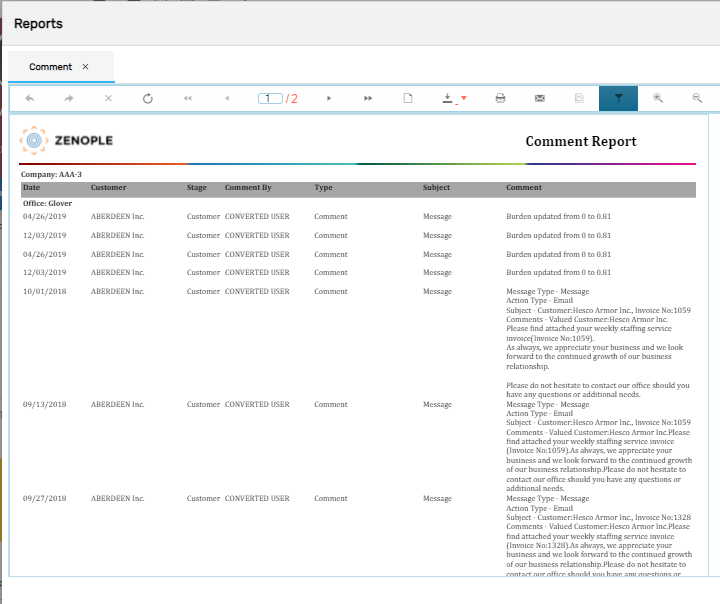
Job & Assignment
It consists of two navigations under it. They are
- Job
- Assignment
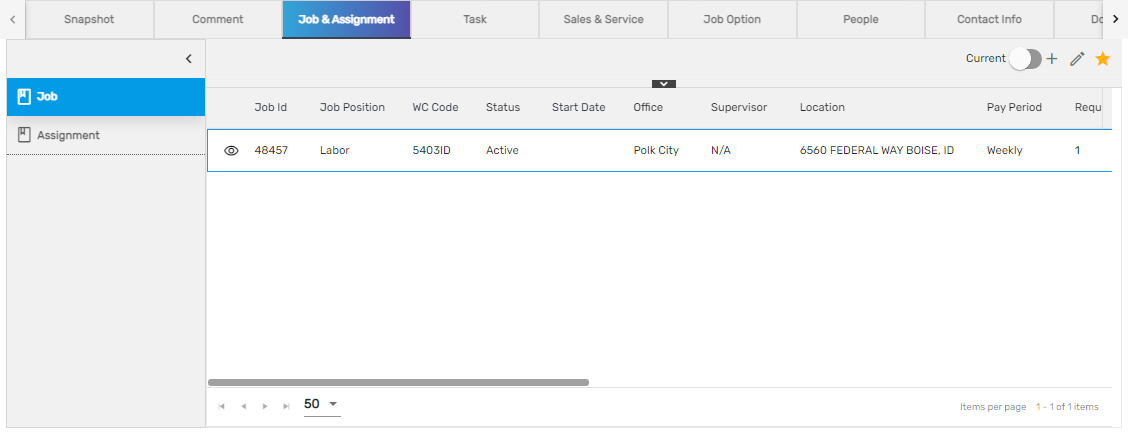
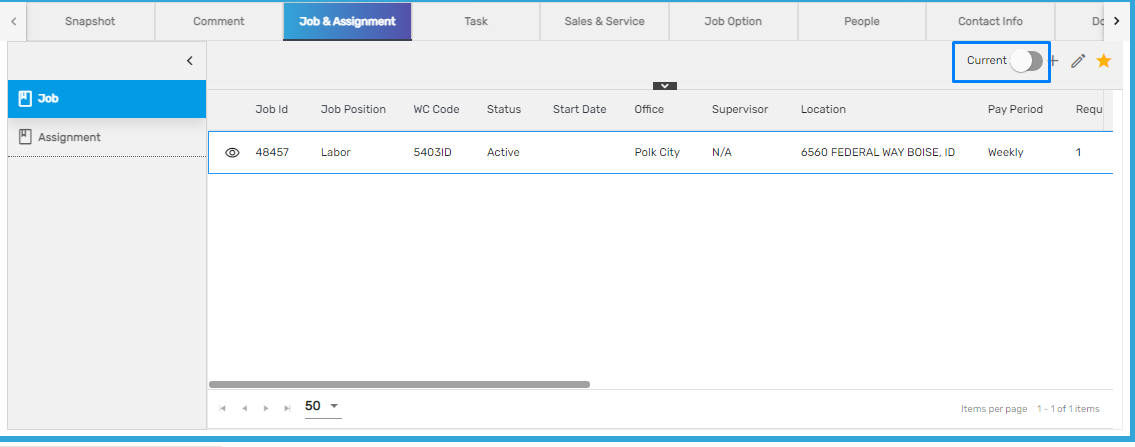
1. Job
The 'Job' side navigation allows users to add 'Job Positions' and other additional details and information related to 'Pay rate', 'Bill rate', 'Shifts', 'Start date' and 'End date' etc.
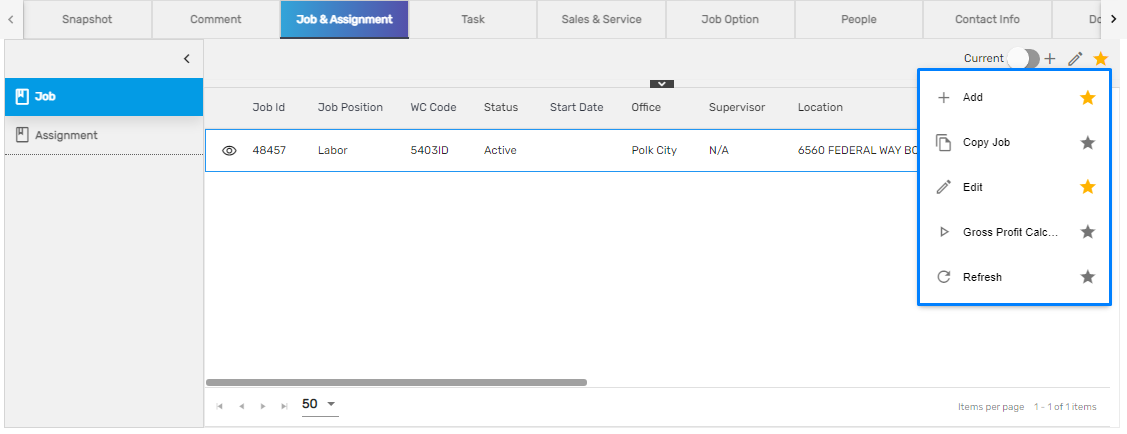
There are multiple actions under Job side navigation. They are,
- Add
- Copy Job
- Edit
- Gross Profit Calculator
- Refresh
The 'All/Current' toggle button allows users to view all the jobs having status active, filled, and completed or only the current job with status filled and active.
2. Assignment
'Assignment' side navigation allows users to 'Add' and 'Edit' assignments details such as 'Start date', 'End date', 'Employee for the assignment', 'Assignment types' and so on, for the job created from the Job side navigation. Users must create a job for that job to be reflected in the selection dropdown .following which the user can add an assignment for the job.
While editing the job assignment from Assignment side navigation, users can edit the bill rates by setting the default value for the option property 'AllowEditBillRates' as 'True'. This property must be set up from the ATM application under the 'Person' entity of the Option main navigation.
- Users need to click on the Option main navigation of ATM and Select 'AllowEditBillRates' option property under Person Entity
- Select the option property 'AllowEditBillRates'
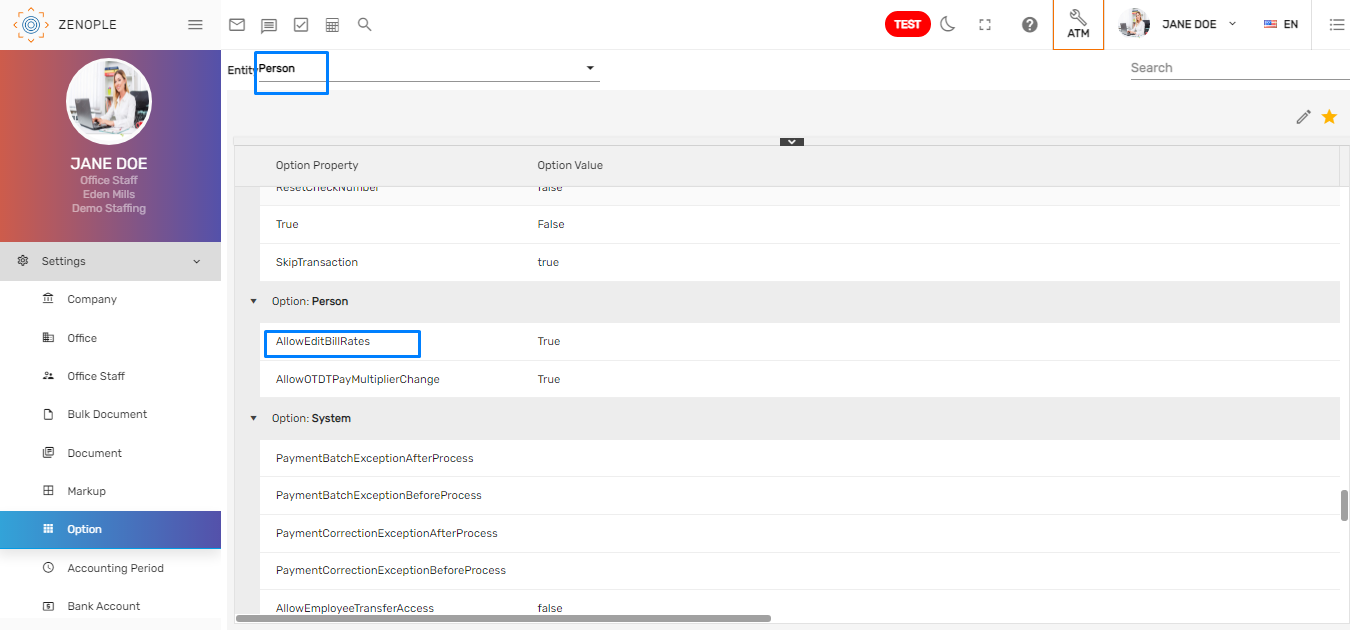
- While editing, choosing the default value as 'True' and selecting the users to whom the access needs to be provided will allow the users to edit the bill rates
.png)
- Now, the users will be able to edit the Bill Rates of the Assignment.
.png)
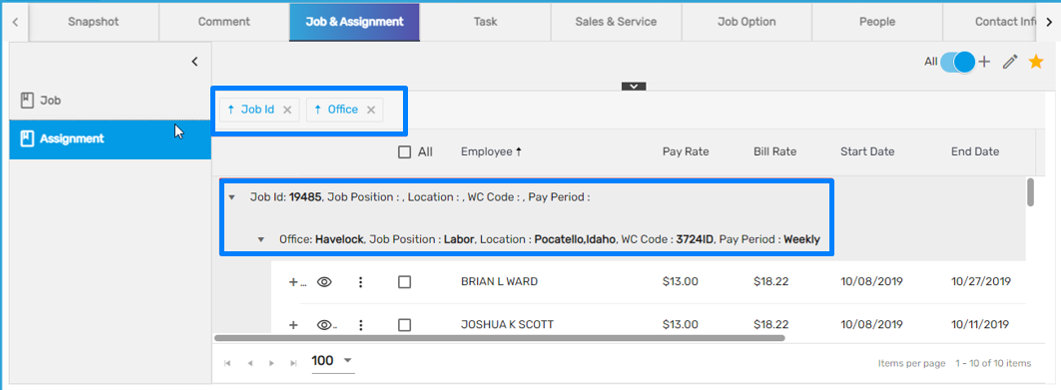
There is a 'Grouping On' toggle button. This button will be visible only when clicking on the shutter icon. Users can group the records depending on the requirements. By default, the Job ID is displayed as a group. Users can drag and drop other columns for grouping as well. To remove grouping, users can simply click on the cross icon and close the selected grouping.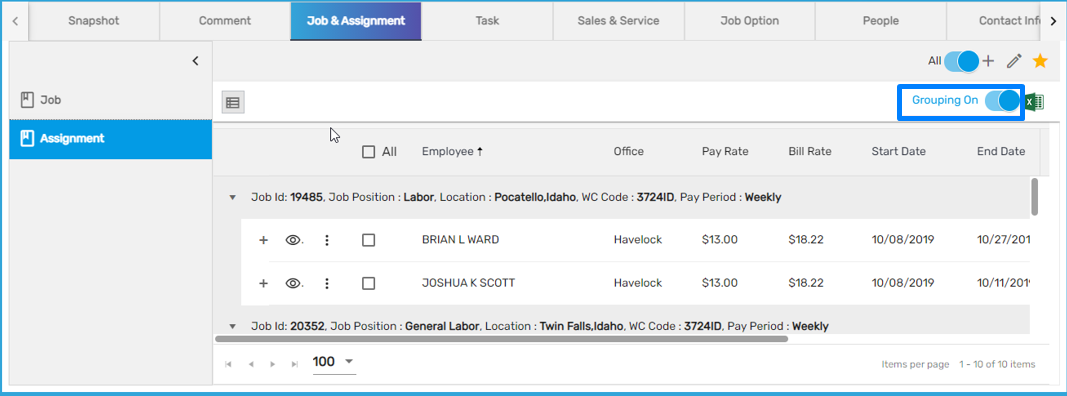
Note: The toggle button in both the navigation allows users to view current job/assignments or overall. By default, current jobs and assignments are displayed. Users can enable or disable the toggle button as required.
Task
It allows users to add and edit multiple generic tasks related to the customer. Users can assign the 'Task', enter 'Due date' for the task, 'Titles', etc. If users need to reassign the task, users can open, archive the task and assign the task again to another user. Once assigned, the user who is ought to complete the task cannot be edited however, the user can forward the task to some other user. 'Task' has a toggle button for viewing 'Archived' tasks. By default, the archived tasks are hidden. Users can enable the toggle button to view the archived tasks.
Sales & Service
'Sales & Service' has three side navigations. They are :
- Service Profile
- Sales Profile
- Revenue Opportunity

1. Service Profile
The Service profile is the most important navigation for the customer as it allows users to add and edit various details related to 'Credit terms', 'Invoicing', and 'Payroll'. Service Profile defines the different parameters for a customer which are required during payroll and invoicing. This profile cannot be added multiple times. The various fields that must be added are as follows:
i) Credit terms
- Credit Limit: 'Credit Limit' is the maximum amount of credit the company extends. An exception is displayed if the credit limit is crossed during time entry.
- Payment Term: 'Payment Term' determines the due date of an invoice. If the payment term is set to ‘Net 15 Days’ and the invoice date is 4/1/2021 then the invoice will have a due date of 4/16/2020. The payment term is added according to the customer's requirement.
ii) Invoice
- Invoice to Organization: The company to whom the invoice is sent, the company may have multiple departments.
- Invoice Cycle: The time cycle on which the invoice is generated is the 'Invoice Cycle'. It can be monthly, weekly, biweekly etc.
- Invoice Week: Timely week of the invoice is 'Invoice Week'. If the invoice cycle is monthly then the week in which the invoice is generated is the Invoice week.
- Separate Invoice by: Users are able to separate invoices by departments, person, shifts, pay period, supervisor, worksite, transaction batch, worksite, and various other options.
- Group Invoice by: Users are able to group invoices by various options as in the “separate invoice by” dropdown. It is how an invoice is grouped in the invoice report.
- Invoice display: Users are able to display invoices by various options such as in the group by and separate by fields.
- Invoice style: It is the format or template of the invoice.
- Attach Timecard: It is a dropdown option to attach the timesheet of the employees.
- Max Invoice Amount: The maximum limit of the invoice is the 'Max Invoice Amount'.
- PO Number: Purchase order number.
- Invoice Delivery: Dropdown option to choose ways to deliver invoice such as email or print etc.
- Email Invoice to It is the Email address for the invoices to be sent.
- Allow Web Time Entry: This allows the employees under this organization to use web time entry. Disabling this will not allow the employee to do web time entry.
iii) Payroll
- Pay Period: The recurring length of time over which the employee timesheet is recorded and paid accordingly is the pay period.
- Pay Cycle: It is the time cycle on which the employee is paid. It may be weekly, bi-weekly, monthly, etc.
- Pay Week: It means the Timely week of the pay. If the pay cycle is monthly then the week of a month on which the employees are to be is 'Pay Week'.
- Pay Period End Date: The last day of the pay period is the 'Pay Period End Date'.
- Over-Time Plan: It is a plan for overtime pay. For example: Selecting Over 40 plans for weekly time entry and daily over 8 for daily time entry.
- Mileage Rate: It refers to the travel allowance charge taken from the customer for transporting their employees to the worksite.
- Transaction Template: This template is important for the Timesheet entry.
- If 4 entry is selected, it refers to Clock In-Break In-Break Out-Clock Out.
- If 2 entry is selected, it refers to Clock In-Clock Out.
Note: To be able to enter daily time, make sure to select daily transactions templates.
The extra fields and PO number field on the customer's Service Profile can be directly updated for jobs and transactions while editing the customer's service profile.
- Edit the service profile
- Update the PO box number, extra fields as required, and Save it
.png)
- While saving, the users will be asked to update the jobs as well according to the updates on the Service Profile
- Click on 'Yes' to update accordingly
.png)
- Users can select the job on which the changes are to be reflected
.png)
- Clicking on the 'Yes' button will make the changes for an open existing transaction as well.
.png)
- The changes will be reflected in the Job & Assignment top navigation of the particular customer.
.png)
To edit the 'Email Invoice To' on Service Profile, users need to set the default value as 'True' for the option property 'AllowEditServiceProfileEmailInvoiceTo'. This option property can be set up from the ATM application.
- Users need to go to the ATM application
- Click on Option main navigation under Settings
- Choose 'Person' as Entity from the dropdown
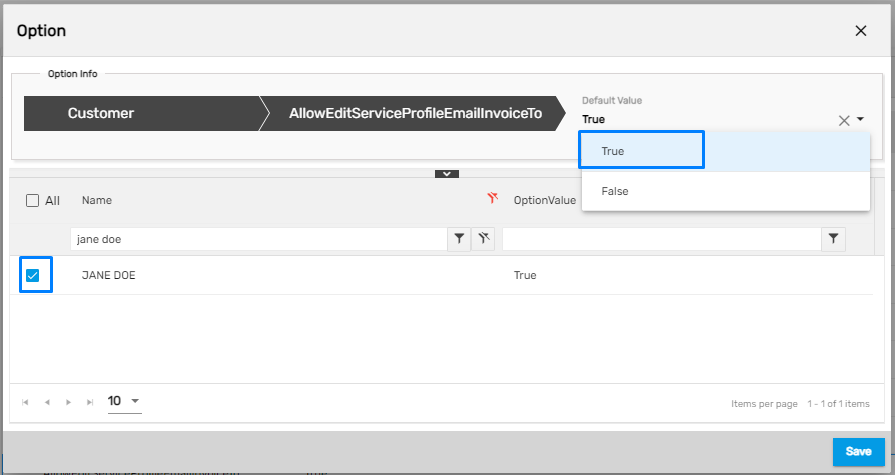
- Select the option property 'AllowEditServiceProfileEmailInvoiceTo' under option 'Customer'and click on the 'Edit' icon to set the property
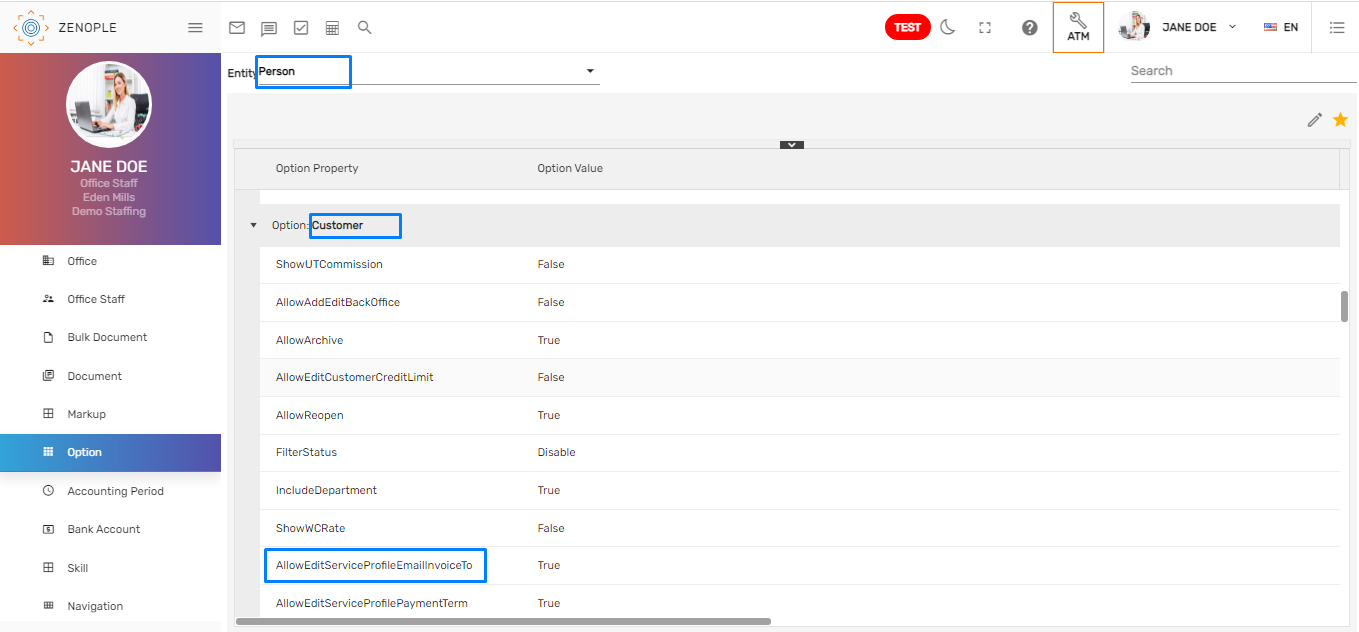
- Choose the default value as 'True' which determines the access for editing 'Email Invoice To' in the Service Profile and 'False' for the opposite
- Checkmarks the users to whom the setup is to be applied and save
- After setting up the option value to 'True,' the user will be able to edit the 'Email Invoice To' field on the service profile
.png)
2. Sales Profile
It allows users to add and edit various sales-related information such as 'Sales level', 'Organization type', 'Competition details', and 'Notes'.
3. Revenue Opportunity
It allows users to add and edit various information related to 'Estimated Revenue Amounts', 'Revenue period', and so on.
Job Option
It consists of six side navigations related to the job. They are :
- WC Code
- Markup
- Shift
- Job Position
- Discount
- Charge
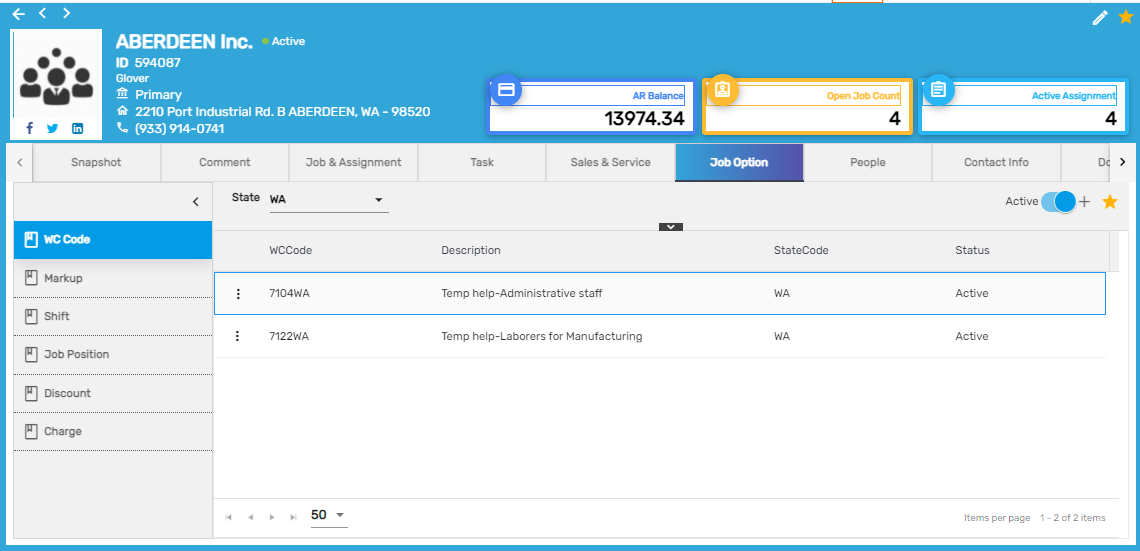
1. WC Code
'WC Codes' are codes that the insurance companies use to identify specific categories of work. Every organization has a different 'WC Code' depending on the nature of its work. 'WC Code' allows users to add and edit such information. 'Active/All' toggle button allows user to view either active or all the WC codes as required. By default, Active WC codes are displayed.
2. Markup
The company charges its customers based on the markup. It is the difference amount between the pay rate and bill rate. Mark up can be expressed in a fixed amount or a percentage. It is very important to enter the mark-up rate as it plays a vital role while billing. 'Mark up' allows users to add and edit markup details. Multiple markups can be added as well. 'Active/All' toggle button allows user to view either active or all the markups as required. By default, Active markups are displayed.
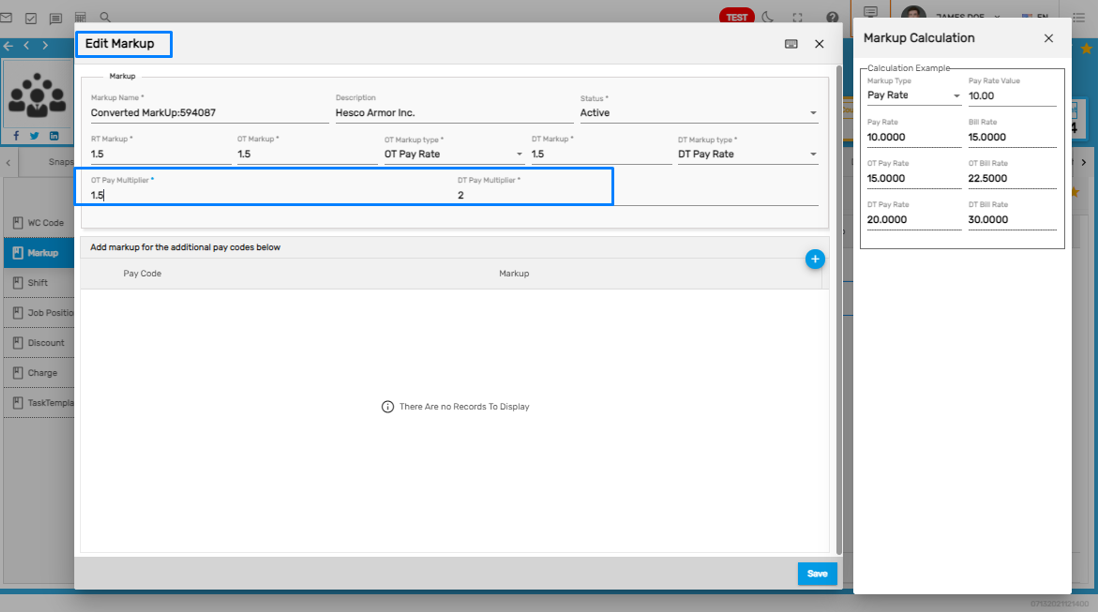
While editing the markup, user either has the access to edit the OT/DT multiplier or not. The access is controlled by the default value set in the ATM option property 'AllowOTDTPayMultiplierChange'.
- Choose 'AllowOTDTMutltiplierChange' from the option property
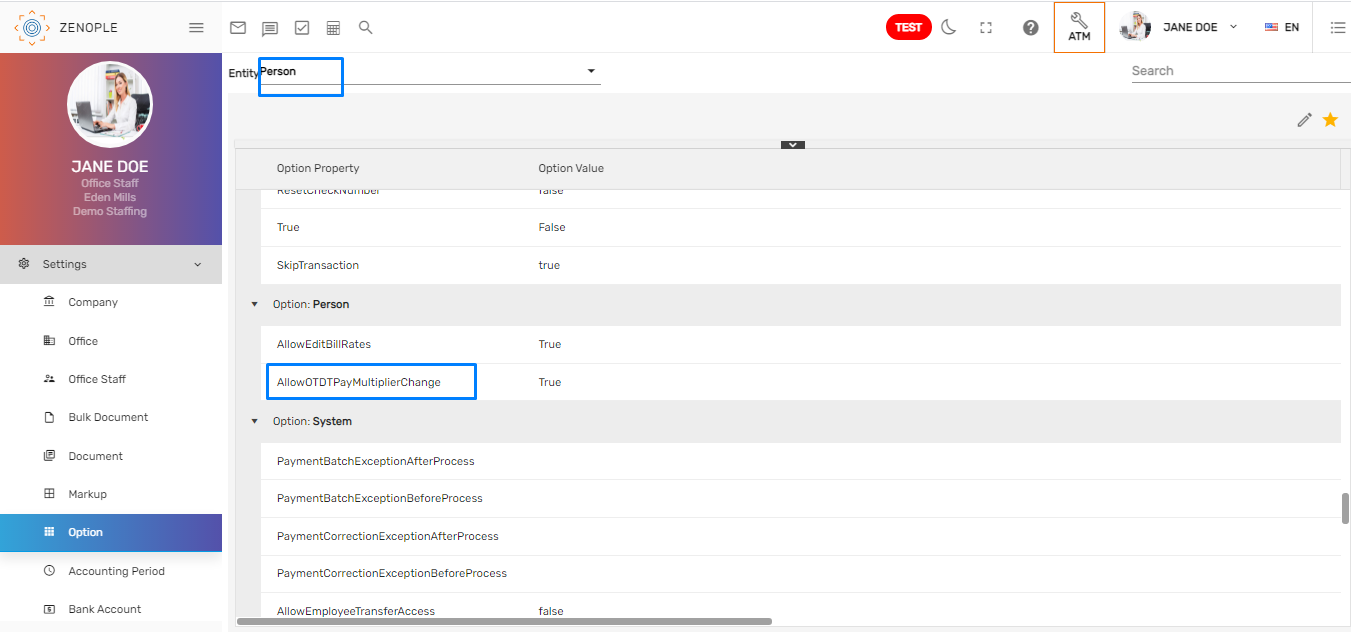
- While editing the option property, setting the default value 'True' will allow users to edit the OT/DT multiplier. Users can set the value to multiple users as well.
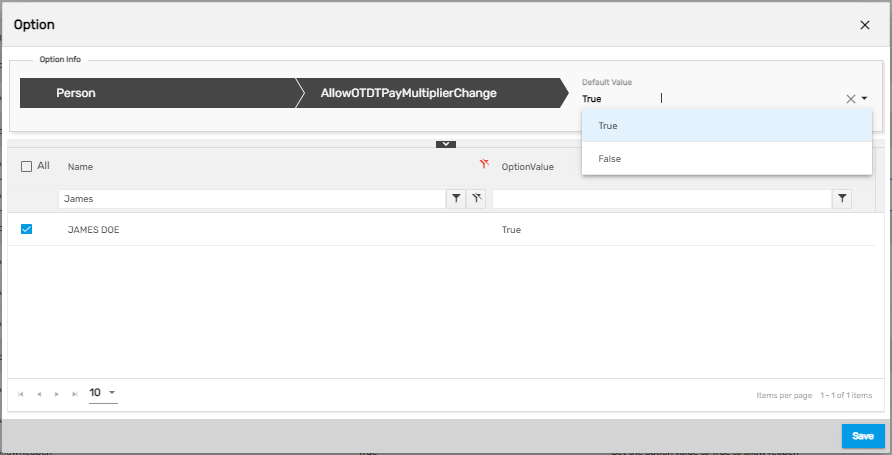
- Users will be able to edit OT/ DT Multiplier while editing the Markup
3. Shift
Shift refers to the duty hours that an employee follows. It allows you to add and edit multiple shifts. It is important for an organization as well as for employees to organize time schedules. Multiple shifts can be added.
4. Job Position
It allows users to add and edit various job positions with rates for the customer. Users can choose various 'Markups', 'WC code', and 'Shift' for the job from this side navigation. The markups, WC code, and shifts added from “WC code”, “Markup” and “Shift” side navigations are populated in the dropdown while adding a job position. The various types of rates available in the dropdown are:
- Markup Rate
- Static Rate
- Shift Markup
- Shift Rate
1. Markup Rate
All the markup rates added from the “Markup” navigation are displayed as dropdown options.
2. Static rate
It allows users to add specific 'Regular Time Pay Rate', 'Regular Time Bill Rate. Over-Time Pay Pate', and 'Over Time Bill Rate'.
3. Shift Markup
All the shifts added from the “Shift “navigation are displayed as dropdown options. It allows users to select the shifts and set up markups for that specific shift.
4. Shift Rate
Such as static rate, it allows users to add specific 'Regular Time Pay Rate', 'Regular Time Bill Rate. Over-Time Pay Pate', and 'Over Time Bill Rate' for the selected shift.
5. Discount
It allows users to add and edit multiple discounts for the customer with details such as 'Discount Value', 'Tier Based On', 'Discount' calculated on 'Percentage'or 'Amount'. This information is reflected while invoicing.' Active/All' toggle button allows user to view either active or all the discounts as required. By default, Active discounts are displayed.
6. Charge
It allows the user to add and edit multiple charges for the customer with details such as 'Charge Value', 'Tier Based On', 'Charge' calculated on 'Percentage'or 'Amount'. . This information is reflected while invoicing. 'Active/All' toggle button allows user to view either active or all the charges as required. By default, Active charges are displayed.
People
It has three side navigations. They are :
- Contact
- Contact Role
- User Role
1. Contact
It allows users to add and edit multiple contacts related to the new customer. The contact you entered while adding up a new customer is automatically displayed in this navigation. It allows you to add the Full 'Name' of the contact person, 'Job Title', 'Contact Role', 'Email address', 'Contact number', 'Address' details, etc. 'Active/All' toggle button allows users to view either active or all the contacts as required. By default, Active contacts are displayed.
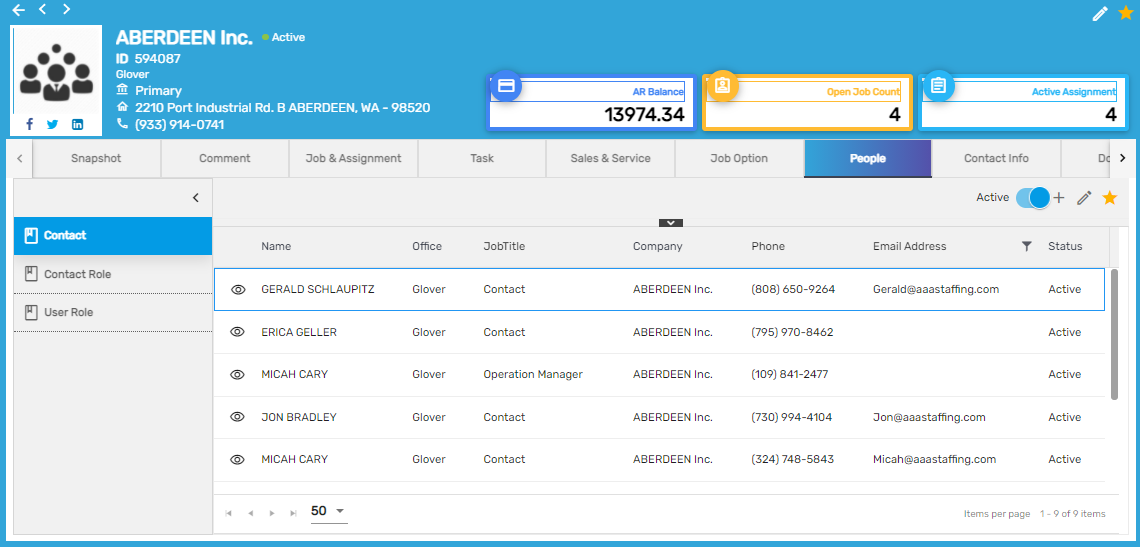
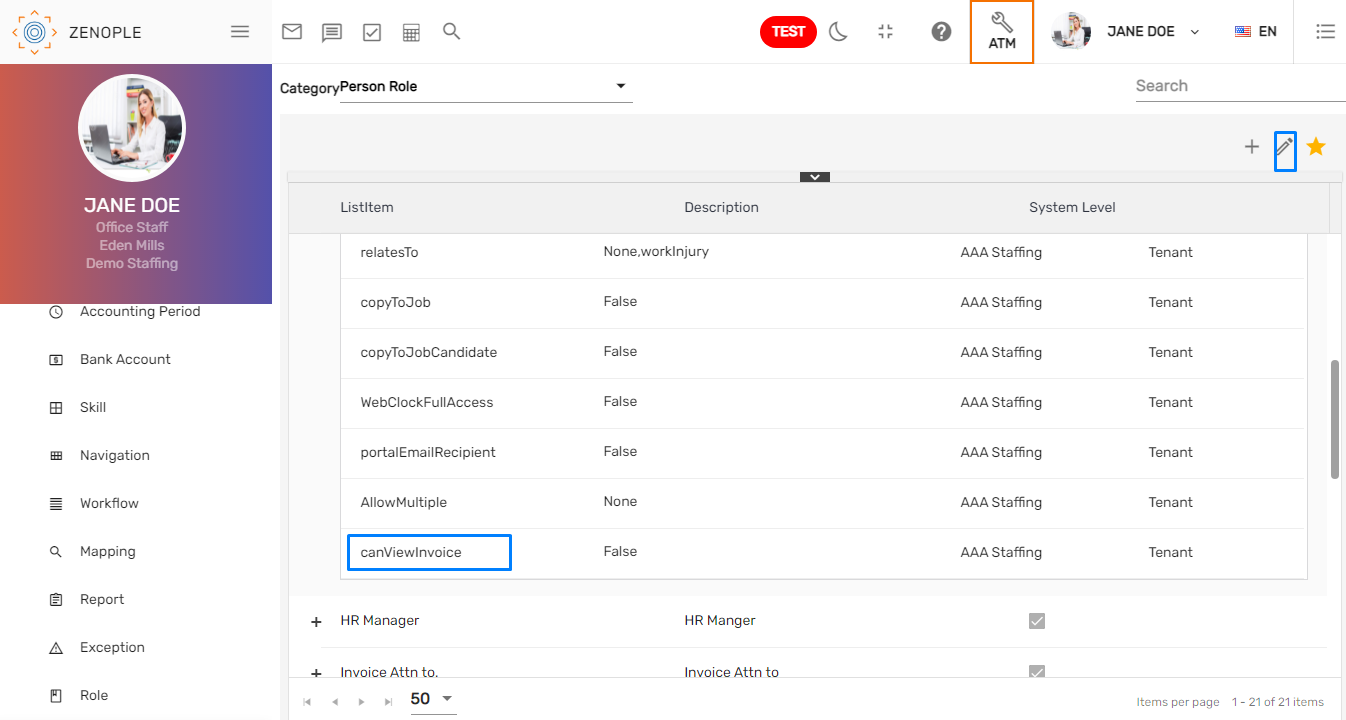
Users can view multiple invoices of other organizations/ offices as well. For this feature, user must set up the option value 'True' for the option property 'CanViewInvoice' of contact list item 'under category PersonRole. Users must have access to set up this list item and this access is handled from the option property of ATM.
- The screenshot below shows one of the contacts under the 'Contact' role of an organization.
.png)
- User has to go to 'List Item' navigation and choose 'Person Role' from the category dropdown
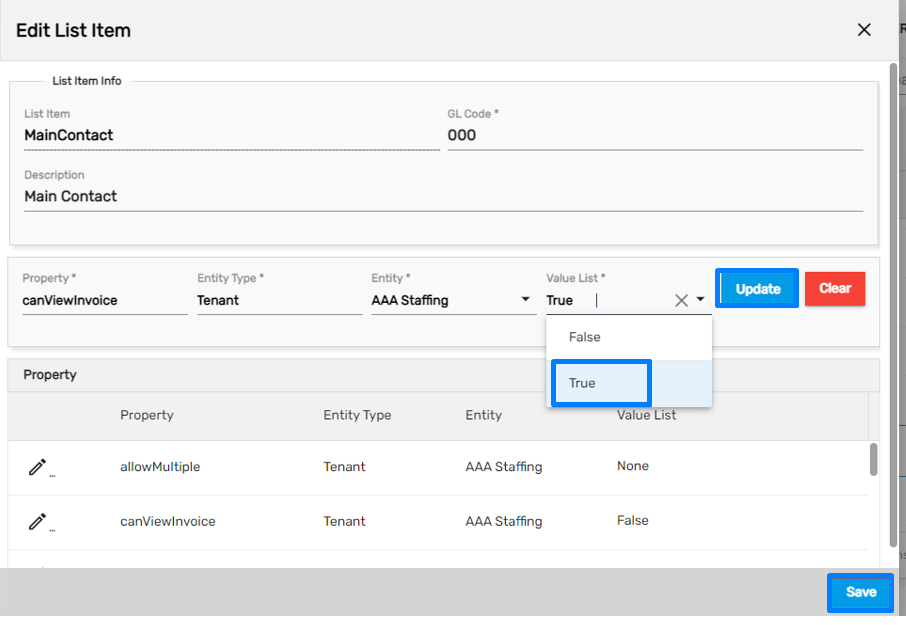
- As the changes are to be done for the 'Contact' role, the user needs to select the list item as 'Contact' and click on the Edit icon to set the option value
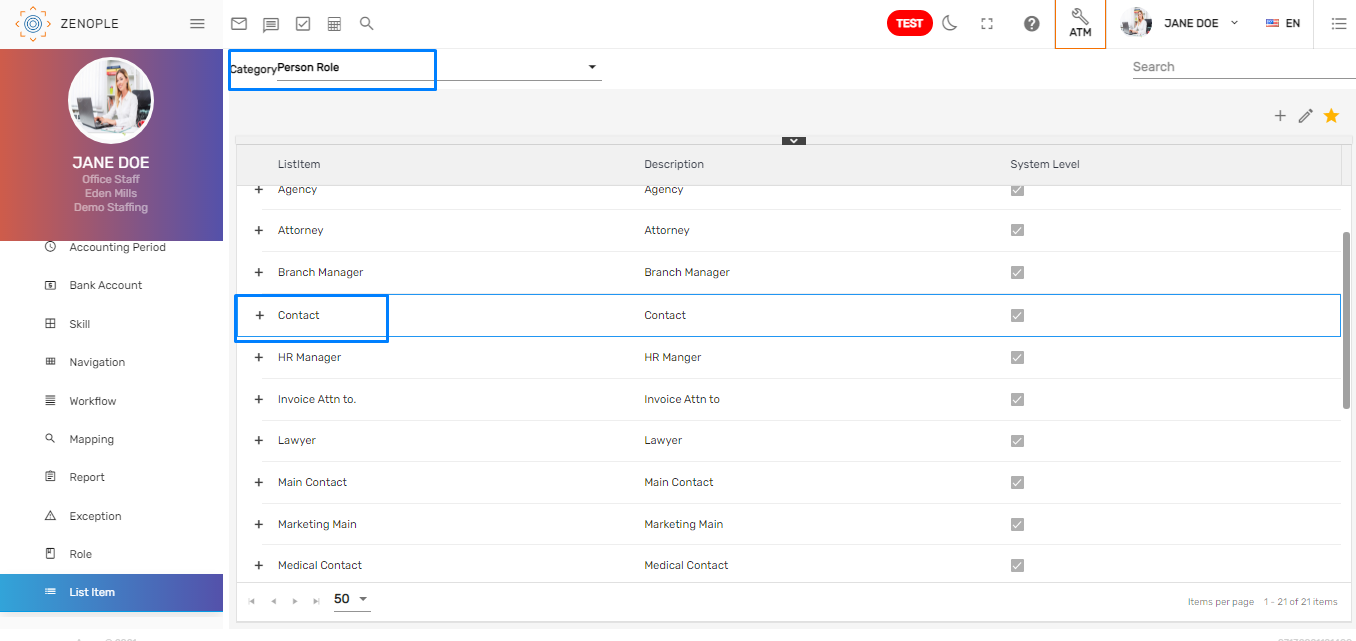
- Selecting the property 'Canviewinvoice' and setting the value to 'True' will allow the user to view the invoice
- Now the contact under the contact role will be able to view multiple invoices of other organizations as well.
- The screenshot below is a portal of a user in the contact role who has access to view invoices of other organizations as well.
.png)
How to Provide Access for Editing the List Item?
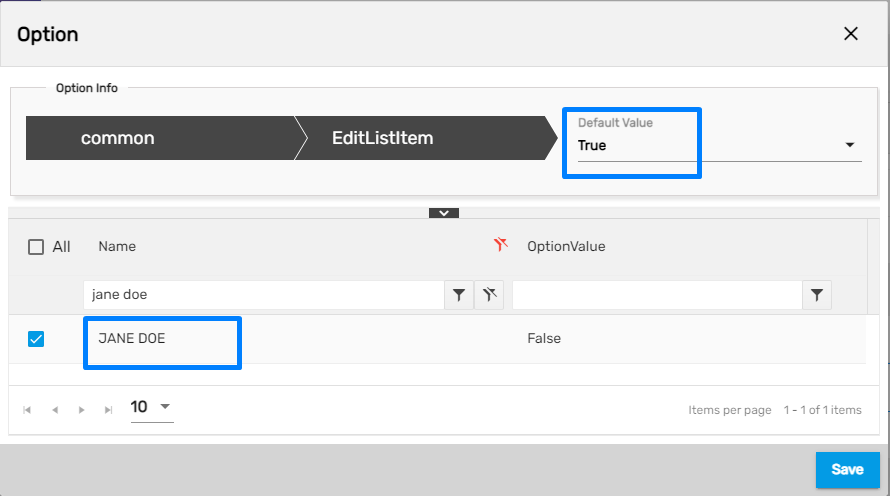
- User has to go to the ATM application and Option main navigation, then has to select the entity as 'Person'. Under the option 'Common', clicking on the 'EditListItem' property allows users to edit the option value and set it true.
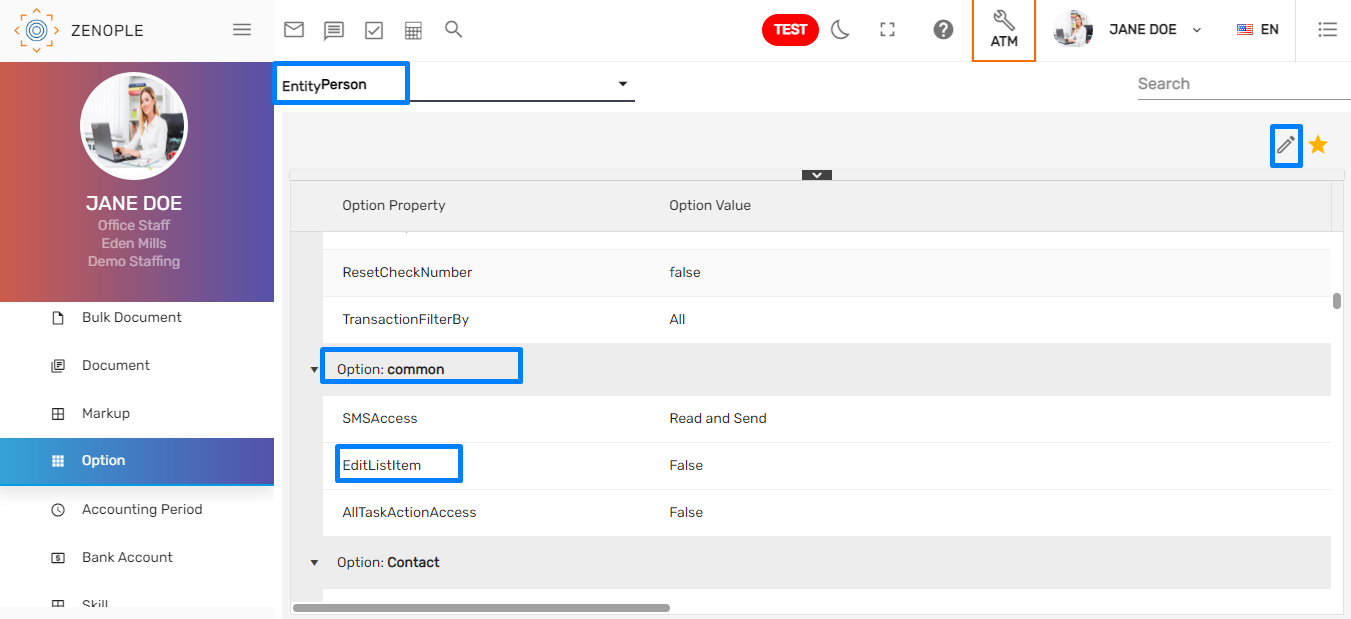
- Users can provide the access to edit the list item to multiple users as well.
Toggle Button Improvised on Job Side Navigation
The toggle button displays current jobs or all jobs when enabled/disabled as required. If the users set the toggle 'Of' i.e. 'Current,' it shows filled and active job status, whereas if they set the toggle 'On' i.e 'ALL', it shows active, filled, and completed job status.
2. Contact Role
It allows users to add and edit multiple contact roles for the same contact. The contact person added from the “contact” navigation is displayed in the dropdown for assigning various contact roles to this specific contact person. 'Active/All' toggle button allows the user to view either active or all the contact roles as required. By default, Active contact roles are displayed.
3. User Role
It allows users to add and edit multiple user roles for the customer with the user’s name with office details. You can add multiple user roles for the same user.
Contact Info
'Contact Info' has three side navigations. They are :
- Contact Information
- Address
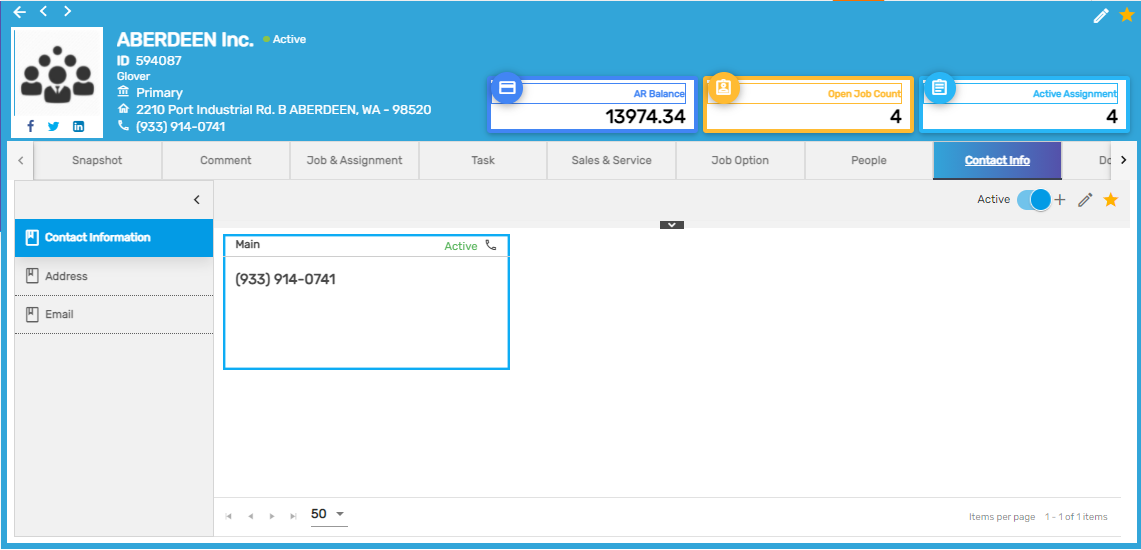
1. Contact Information
It allows users to add and edit multiple types of contact information such as phone numbers, fax numbers, email iD, website information, Twitter, Linked In, etc.' Active/All' toggle button allows user to view either active or all the contact information as required. By default, Active contact information is displayed.
2. Address
It allows users to add and edit multiple addresses such as billing, mailing, job site, and main address. Users can also add sales tax and pay rate for that address. Multiple addresses of the same type cannot be added. 'Active/All' toggle button allows user to view either active or all the addresses as required. By default, Active addresses are displayed.
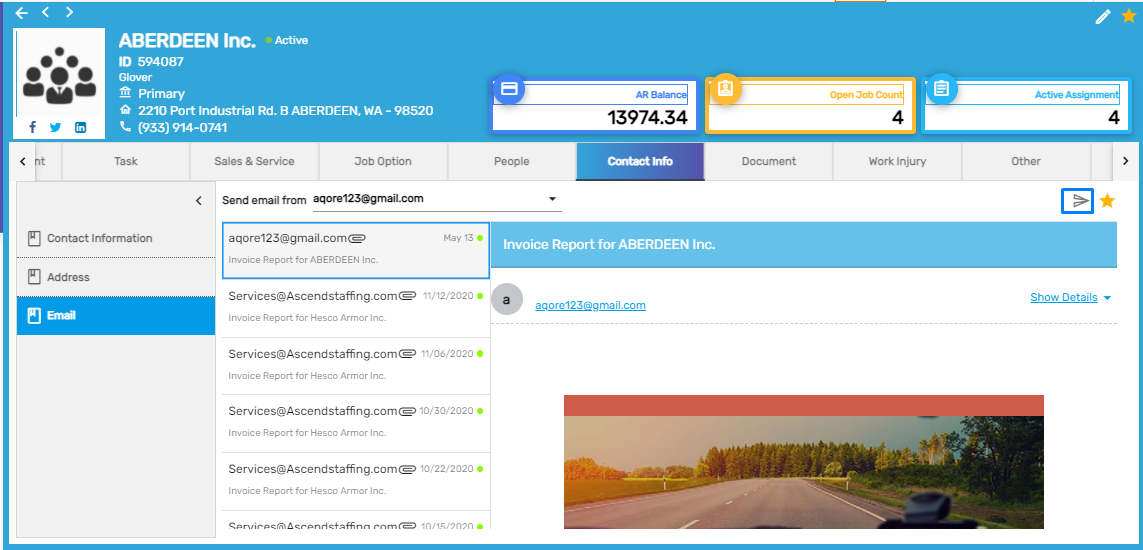
3. Email
It consists of the history of emails sent to this customer from the company's official email id setup from the application itself. Users can also send emails with attachments to a specific customer.
Document
It allows you to upload the related documents of the customer, add and edit the document details which will be displayed in the customer’s profile. The document may be an image, word, excel, pdf, etc. We can keep documents for future reference as well.
Work injury
It allows users to add and edit multiple work injury details such as claim number, an employee with 'Work Injury', 'Assignment', 'Type of Injury', 'Incident Date and time', specific body parts injured, and so on. When a certain employee is added for the work injury, the employee’s profile will also have these details. Open/All' toggle button allows user to view either open or all the work injury claims as required. By default, an open work injury claim is displayed.
Other
It has two side navigations. They are :
- Custom
- Date Type
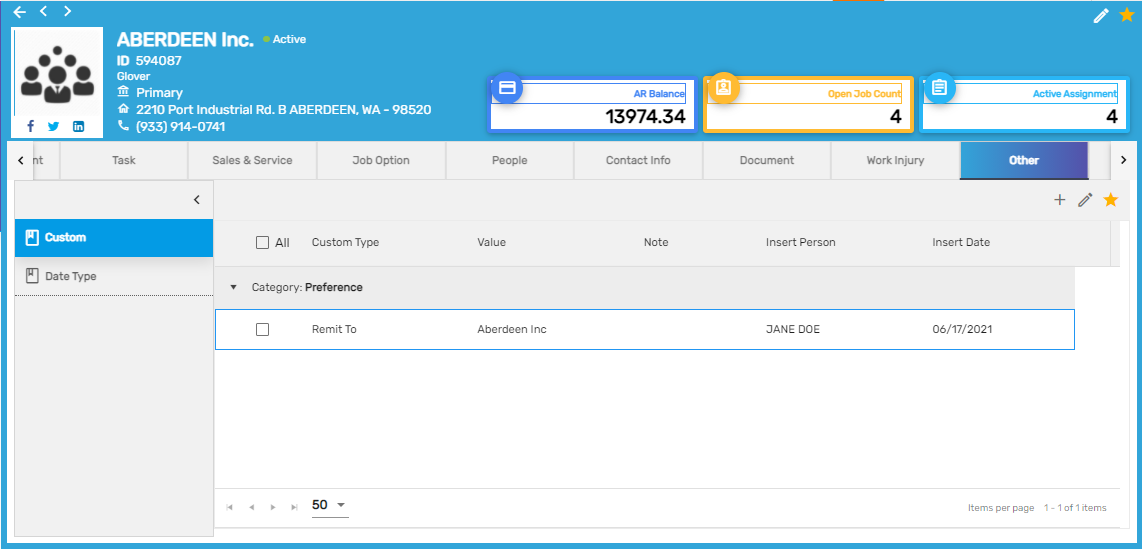
1. Custom
It allows users to add and edit various customized details related to the customer such as 'Show Remit to Name', 'Attn', 'Source'. It is mostly the client’s specific request to handle. These details will reflect in reporting.
2. Date Type
It allows users to add and edit various date type details related to the customer such as 'contract date' and 'entered date'. It is also customizable as per Company's requirements.
History
It has two side navigations. They are :
- Invoice History
- Transaction History
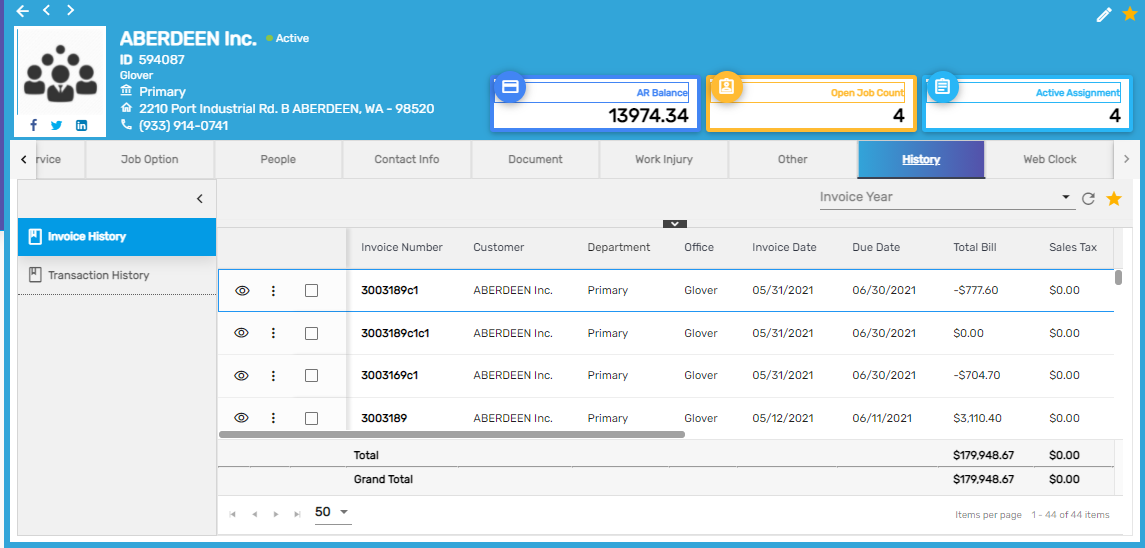
1. Invoice History
It contains all the previous records of the customer’s invoices. It has all the invoice history of the customer. Users can view all the invoice details with the 'Invoice Number,' 'Date,' 'Total Bill Amount,' 'Office,' 'Sales Tax,' 'Discount,' 'Charge,' 'Invoice Amount,' 'Payment Amount,' 'Adjusted Amount,' 'Last Payment Date,' and so on. Users can also download the invoices from their favorite icon.
2. Transaction History
It contains all the previous records of the customer’s transactions. It has all the transaction history of the customer. Users can view all the transaction details with the "Invoice Number', 'Accounting period', 'PPE', 'Job Position', 'Employee Name', 'RT/DT/OT Bill hours', 'RT/DT/OT Bill Check Number', 'WC Cost', 'Payroll Cost', 'Employer Tax' ,and so on. Users can also download the transactions from the favorite icon.
Note: Users can view the invoices and transactions in detail from the eye view icon.
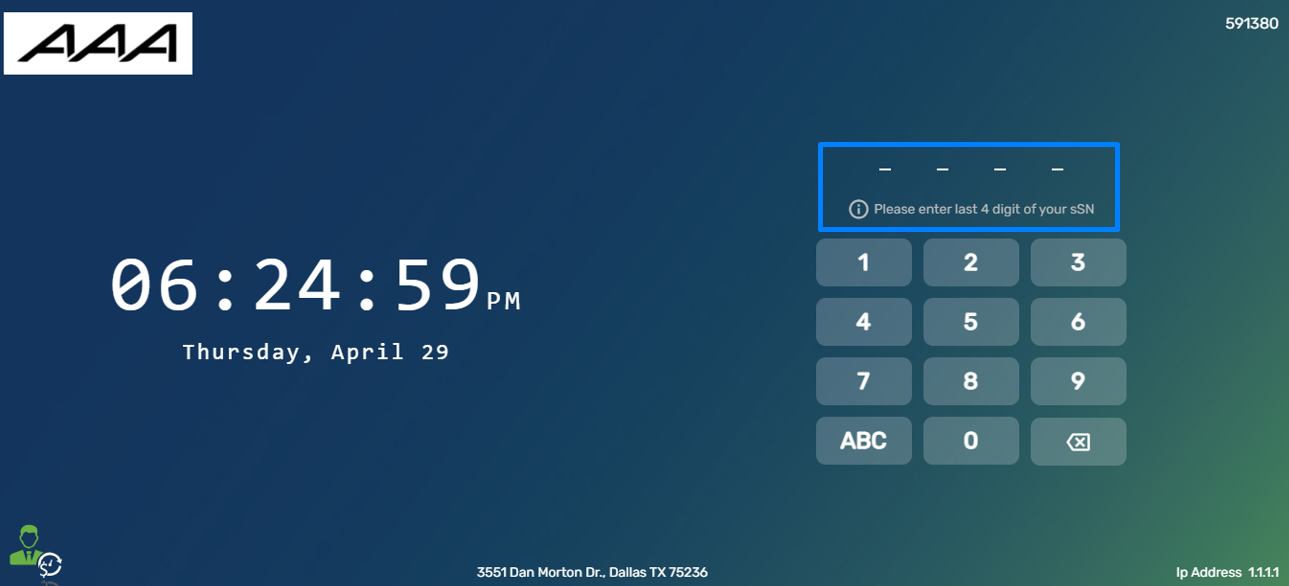
Web Clock
Web Clock is an online medium time entry system by which the employees complete their time entry for their assignment. A Company may have multiple web clock profiles. Web Clock allows users to set up and edit these details such as 'Users,' 'Company's Address,' 'Status,' 'IP Address,' and other various properties. The features of Web Clock are:
- IP Adress
- Time Clock Punch Sequence
- Timeclock Users
- Employee Pin Option
- Rest in Seconds
- Camera
- Day Start Time
- Day End Time
- Validate IP Address
- Auto Lunch Deduction Thresh
- Amount Break Deduction
- Play Audio
- Permitted Location
- Permitted Location Radius
1. IP Address
It defines the IP address which will have access to this web clock. Trying to log in to the web clock with another IP address will not be accessible.
2. Time Clock Punch Sequence
This property is handled for the clock in and clock out. Users must select 2 entries or 4 entries as per requirement while adding the service profile and that will be reflected here in the punch sequence. Ex: 2 entries define clock in and clock out whereas 4 entries define clock in, clock out, break-in, and break out.
3. Timeclock Users
The only user under supervisor roles will be displayed here in the dropdown.
4. Employee Pin Option
This is a type of pin option for time punch for the employee. They may be 'Last 6 digit SSN', 'Full SSN', 'First name Initial', and so on.
5. Reset in Seconds
Time interval to stay in punch screen.
6. Camera
Open camera for employees' snap while time punch.
7. Day Start Time
Timeclock start time for a new workday.
8. Day End Time
The timeclock end time for the current workday.
9. Validate IP Address
Validate login if network IP matches.
10. Auto Lunch Deduction Thresh
The minimum amount of workhour for auto lunchbreak.
11. Amount Break Deduction
Break minute after auto lunch deduction threshes hour.
12. Play Audio
This is to handle punch success audio.
13. Permitted Location
The employees can clock in/out from certain GPS zone. Other locations except the permitted location will not be accessible.
14. Permitted Location Radius
The employees can clock in/out inside a certain radius of the GPS zone. Radius outside of the permitted radius of the location will not be accessible.
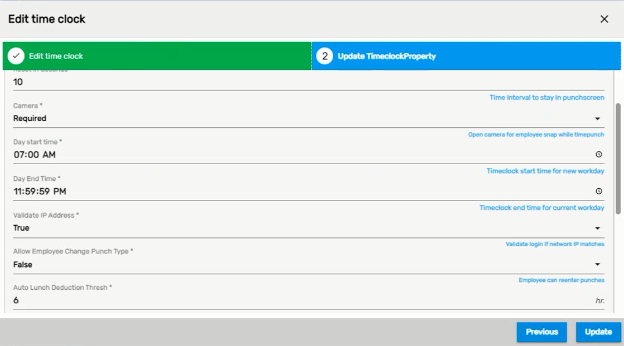
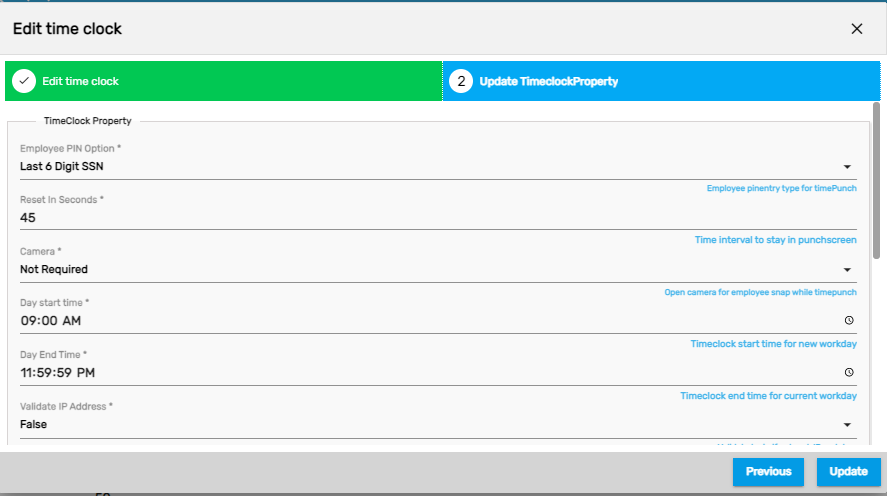
Edit Web Clock
Users can edit the web clock records and update them as per requirement. The web clock properties updated on the 'Update Timeclock Property' tab will get reflected on the 'Time Clock' screen.
- Navigate to CMS application
- Navigate to main navigation 'Customer'
- Click on 'Web Clock' top navigation
- Click on the 'Edit' action
- Update the Time Clock properties
The time clock properties that were updated while editing will get reflected on the 'Timeclock' screen in real-time.
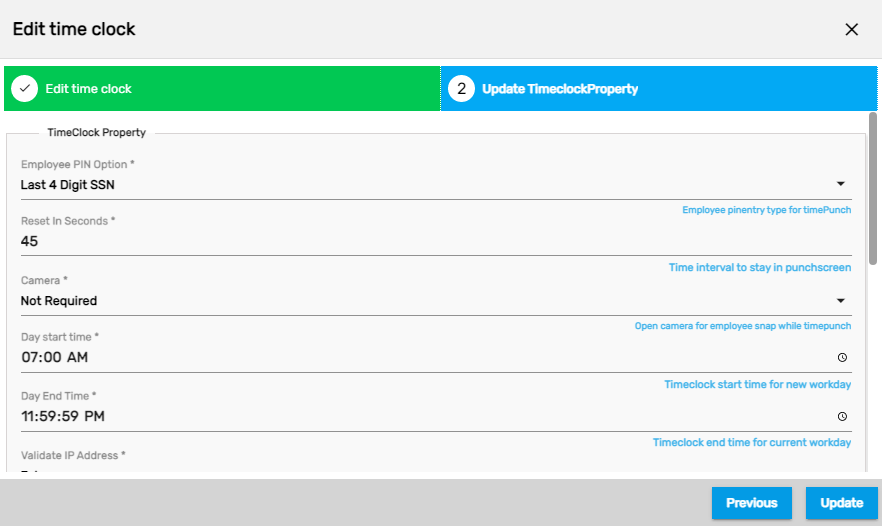
Timeclock Overnight Case on Web Clock
In the case of overnight work under a customer, the employee will be able to clock in for the next day. Its default value will be 12 AM as it is the starting time of a day and by default, the time will be set as 11:59:59 PM.
In a day, if the start time for an assignment is 7:00 AM and the end time is 1:00 AM, in this case, the start time for the next day will be 1:00 AM rather than 12:00 AM.
If the employee has clocked in on 8/18/2021 at 8:00 PM but has not clocked out for the assignment, then the employee will be able to clock out for the same day (8/18/2021) till 8/19/2021 7:00 AM.